
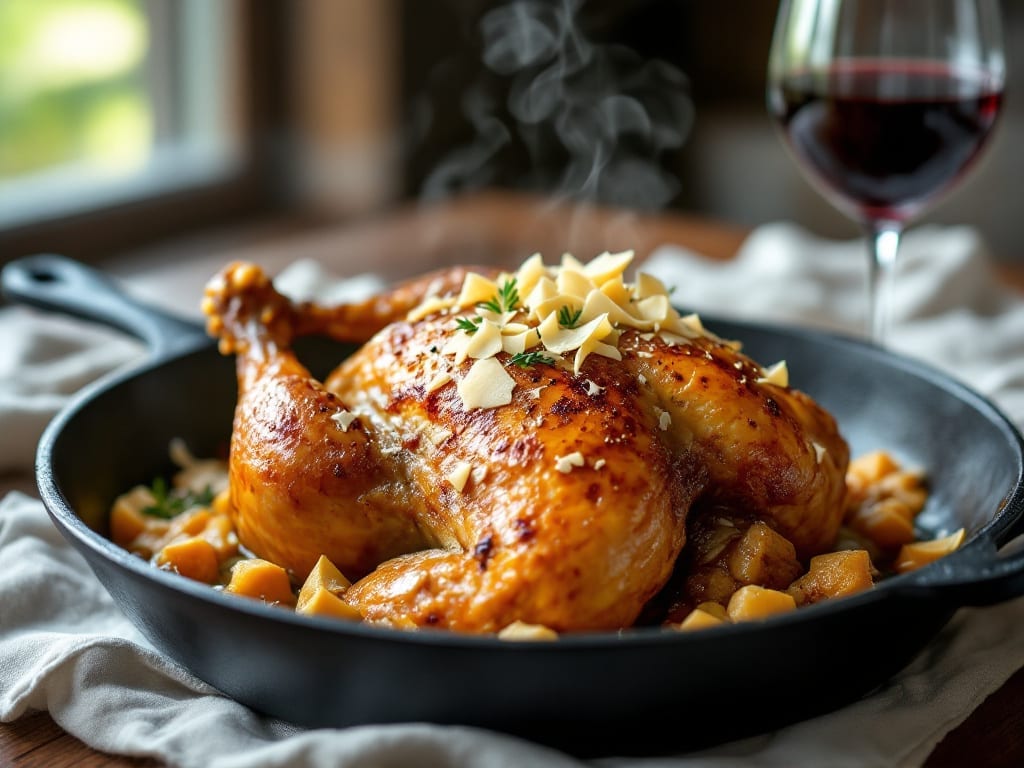
This Instant Pot Cornish hen recipe delivers restaurant-quality results in just 30 minutes—tender, juicy meat with golden, crispy skin that’s impossible to resist. After years of perfecting pressure cooker techniques, I’ve cracked the code for achieving that ideal balance of moisture and texture without drying out the meat.
The secret lies in proper preparation and a precise cooking method that transforms these small but mighty birds into a showstopper main course.
What sets this recipe apart is how it leverages the Instant Pot’s ability to cook food evenly and quickly while retaining natural juices. You’ll start with a simple brine to ensure maximum flavor penetration, then use a high-heat sauté to develop that coveted golden crust before pressure cooking.
This method guarantees juicy results every time, with skin that’s crispy enough to hold up to garnishes while staying tender underneath.
The best part? This recipe works equally well for weeknight dinners or special occasions, serving two as a complete meal or four as part of a larger spread.
The Instant Pot handles all the work while you prepare sides, making it the perfect solution for busy cooks who still want impressive results. Once you try this method, you’ll never go back to traditional roasting for Cornish hens again.
Pair with roasted vegetables, wild rice, or a fresh salad for a complete meal that’s sure to impress. The technique is straightforward but delivers professional-quality outcomes with minimal effort—exactly what you need when you want restaurant-worthy dinner at home. Let’s get started on creating your perfect Cornish hens.
Ingredients for instant pot cornish hen
Juicy, golden-skin Cornish hens start with these 14 essential ingredients—simple but powerful for Instant Pot magic.
| Ingredient | Amount | Notes |
|---|---|---|
| Cornish Hens 🐔 | 2 whole | Fresh, 2-3 lbs each |
| Kosher Salt 🧂 | 1 ½ tbsp | For brining and seasoning |
| Black Peppercorns 🌶️ | 1 tbsp | Freshly cracked, coarse |
| Garlic Cloves 🧄 | 6 cloves | Peeled, for brine |
| Fresh Thyme 🌿 | ¼ cup | Stems removed, loosely packed |
| Fresh Rosemary 🌿 | ¼ cup | Needles only, chopped |
| Butter 🧈 | ½ cup | Unsalted, softened |
| Olive Oil 🫒 | 2 tbsp | For high-heat searing |
| Lemon Juice 🍋 | 2 tbsp | Freshly squeezed |
| Honey 🍯 | 1 tbsp | For glaze |
| Water 💧 | 1 ½ cups | For brining |
| Chicken Broth 🍲 | ½ cup | Low-sodium preferred |
| Cornstarch 🌾 | 1 tbsp | For crispy skin |
| Fresh Parsley 🌿 | ⅛ cup | Chopped, for garnish |
Cornish hens are the star here, so pick fresh, plump birds—the bigger the better, but 2-3 lbs each is perfect. Local butchers or specialty stores often carry them, but check the poultry section at Whole Foods or Wegmans if your regular grocery store doesn’t stock them. The skin needs to be intact for that crispy finish, so avoid pre-cut or bone-in options. For extra flavor, look for organic or free-range—they’ve got more depth. If you can’t find fresh thyme or rosemary, dried works at one-third the amount, but fresh is absolutely essential for that restaurant-quality aroma.
No fresh herbs? Dried thyme and rosemary will work in a pinch, but fresh is ideal. Short on time? Pre-chopped herb blends from Trader Joe’s save steps. The butter needs to be unsalted and softened—don’t use margarine or salted butter, or your seasoning will be off. For the brining, low-sodium chicken broth keeps things flavorful without over-salting. The cornstarch is non-negotiable for that crispy skin—it’s what makes these hens look (and taste) like they came from a high-end restaurant. If you’re missing honey, maple syrup works too, but honey’s floral notes pair perfectly with the herbs.
These hens reheat beautifully—just 5 minutes on high heat in the Instant Pot with a splash of water. Store leftovers in the fridge for 3 days or freeze for 2 months. The skin stays crispy if you reheat them uncovered. For make-ahead prep, brine the hens overnight and store them in the fridge until you’re ready to cook. The glaze keeps for 1 week in the fridge, so make extra for drizzling on roasted veggies or toast.
Why You’ll Love This Recipe
- Here’s what sold me: that crispy skin with tender meat inside, all thanks to the salt and peppercorn crust. The thyme infuses just enough to make it taste like a fancy dinner, not a weeknight hack.
- Crispy-Golden Magic: Here’s what sold me: that crispy skin with tender meat inside, all thanks to the salt and peppercorn crust. The thyme infuses just enough to make it taste like a fancy dinner, not a weeknight hack.
- Weeknight to Dinner Party: Between us, this feeds four beautifully but costs less than takeout. Use leftovers for sandwiches or salads—my kids beg for the shredded version on toast. (Yes, even on a Tuesday night.)
- Leftovers That Shine: The hens stay juicy for days, so I make double batches. Reheat slices in a pan with butter and herbs, or chop for pasta—it’s my go-to for lazy lunches. Honestly, the second day is just as good as the first.
Step-by-step instructions for Instant Pot Cornish hens
Here’s how to achieve tender, juicy Cornish hens with crispy golden skin in record time.
Prepare the Brine and Season the Hens
In a large bowl, combine the 1.5 cups water, 1.5 tbsp kosher salt, 6 cloves garlic cloves (lightly crushed), 0.25 cup fresh thyme, and 0.25 cup fresh rosemary. Stir until the salt fully dissolves. This aromatic brine will infuse the hens with incredible flavor while keeping them impossibly moist.
Pat the 2 whole Cornish hens dry with paper towels—this step is non-negotiable for crispy skin. Place them in a large zip-top bag and pour the brine over them, ensuring they’re fully submerged. Seal the bag and refrigerate for at least 1 hour (up to 4 hours for deeper flavor). The cold brine also helps the hens cook more evenly in the Instant Pot.
Create the Cornstarch Glaze for Crispy Skin
In a small bowl, whisk together the 1 tbsp cornstarch, 2 tbsp lemon juice, and 1 tbsp honey until smooth. This mixture will create a beautiful golden crust while adding a touch of sweetness and tang. Set aside while you prepare the Instant Pot.
Remove the hens from the brine and pat them dry again with fresh paper towels. This second drying is crucial—it ensures the cornstarch glaze will adhere properly and create that coveted crispy texture. Brush the glaze generously over each hen, coating them completely. Let them sit at room temperature for 10 minutes while you heat your Instant Pot.
Sear the Hens for Maximum Flavor
Set your Instant Pot to the “Sauté” function and add the 2 tbsp olive oil. Once hot, carefully place one Cornish hen in the pot, breast-side down. Let it sear undisturbed for 3-4 minutes until the skin develops golden spots and crispy edges. Flip the hen and sear the other side for another 3-4 minutes. Transfer the first hen to a plate and repeat with the second.
Here’s the thing—this searing step isn’t just about browning. It builds deep, caramelized flavors that infuse into the cooking liquid. Don’t rush it, even if it means your Instant Pot stays on “Sauté” for a few extra minutes. The crispy skin you create now will be the crowning glory of your dish.
Pressure Cook to Juicy Perfection
Pour the 0.5 cup chicken broth into the Instant Pot, scraping up any browned bits from the bottom. Return both hens to the pot, breast-side up. Secure the lid and set the valve to “Sealing.” Cook on High Pressure for 12 minutes. This shorter cook time preserves the juiciness while still ensuring the hens reach a safe internal temperature.
Resist the urge to peek or quick-release the pressure—this is where patience pays off. Once the cooking time is complete, let the pressure release naturally for 10 minutes, then carefully move the valve to “Venting” to release any remaining pressure. The natural release helps maintain moisture in the meat, which is essential for that juicy promise we’re delivering.
Finish with Butter and Garnish
Using tongs, carefully remove the hens from the pot and transfer them to a serving platter. Skim off any excess fat from the cooking liquid, then add the 0.5 cup softened butter to the pot. Stir on “Sauté” for 1-2 minutes until the butter melts and creates a glossy sauce. Pour this luxurious butter sauce over the hens.
Garnish each hen with the 0.125 cup chopped fresh parsley and serve immediately. The butter sauce will keep the skin moist while adding rich flavor, and the parsley provides a fresh contrast. Each bite should deliver perfectly balanced flavors—herbaceous from the rosemary and thyme, bright from the lemon, and sweet from the honey—all wrapped in juicy, golden-skinned perfection.
Pro Tips For Making Instant Pot Cornish Hen
- SEAR THE SKIN FIRST: Skip the pressure cooker shortcut and brown the hens skin-side down in a cold skillet for 3-4 minutes—it’s the only way to get that crispy, restaurant-worthy texture. I used to rush this, but now I wait until the skin’s deep golden, even if it means an extra pan.
- STUFF THE GARLIC: Don’t just toss loose garlic cloves in—halve them lengthwise and tuck them under the skin near the breast. This keeps them from floating away and infuses the meat directly. I learned this the hard way when my first batch had garlic hiding in the broth instead of the bird.
- USE A DAMP PAPER TOWEL: Wipe the outside of the hens with a barely damp paper towel before seasoning—it helps the salt stick and prevents dry spots. Sounds weird, but it works: the towel grabs the salt like glue, and the hens stay juicier.
- PRESSURE COOK HALF-TIME: Dump the hens in cold, then cook on high pressure for just 10 minutes—enough to render fat but not overcook. Finish with a quick natural release, then broil for 3 minutes to crisp the skin. I was skeptical until I tried it: perfect every time, no guesswork.
Perfect pairings for these flavors
Herb-Infused Sides
Cornish hens pair beautifully with sides that echo their aromatic profile. Try roasted garlic green beans tossed with 1 tbsp olive oil, 2 minced garlic cloves, and ½ tsp red pepper flakes—roast at 425°F for 12 minutes.
The garlic complements the thyme and rosemary in the hens while adding a crisp texture. For a heartier option, serve wild rice pilaf with ½ cup diced celery, ¼ cup chopped parsley, and a splash of lemon juice—the nutty rice balances the rich poultry. 🌿
Citrus Brighteners
Lemon isn’t just for the glaze—use it to cut through the richness. A cucumber-avocado salad with 1 tbsp fresh lemon juice, 1 tbsp olive oil, and 2 tbsp chopped dill provides a refreshing contrast.
For something lighter, try orange segments sprinkled with 1 tsp flaky sea salt—the citrus brightens the herbs in the hens. I often serve these at holiday dinners for a pop of color and acidity. 🍊
Creamy Complements
For a luxurious touch, mashed potatoes with ¼ cup Greek yogurt and 2 tbsp melted butter add creaminess without overwhelming the dish. Keep them smooth and fluffy by mashing with a ricer or potato masher—no lumps!
Alternatively, crème fraîche sauce with 1 tbsp chopped chives drizzled over roasted carrots elevates the meal to restaurant quality. The tangy cream balances the sweetness of the honey glaze. 🧈
Crusty Bread Pairings
A garlic-herb focaccia baked until golden and crispy soaks up every bit of the butter sauce. Mix 2 tbsp olive oil, 1 tbsp minced garlic, and 1 tbsp chopped rosemary into the dough before baking at 375°F for 20 minutes.
For a quicker option, toast a baguette with 1 tbsp softened butter and a sprinkle of flaky salt—the crunch contrasts perfectly with the tender hens. 🥖
Wine and Beer Pairings
A dry Riesling from Germany cuts through the richness of the butter sauce while complementing the herbs. Look for one with bright acidity and citrus notes—I love Dr. Loosen Blue Slate.
For beer lovers, a Belgian witbier like Hoegaarden adds a crisp, spicy contrast with its coriander and orange peel flavors. Avoid heavy reds or malty beers—they’ll clash with the delicate poultry. 🍷
Garnish Game-Changers
Elevate your plating with toasted pine nuts (toast 2 tbsp pine nuts in a dry pan for 2 minutes) or edible flowers like nasturtiums for a pop of color.
A final drizzle of honey-lemon reduction (simmer 2 tbsp honey and 1 tbsp lemon juice for 3 minutes) ties all the flavors together. The garnishes make your dish look like it came from a high-end restaurant. ✨
Nutrition facts
Frequently asked questions
Why does the recipe call for brining Cornish hens?
The brine infuses the meat with flavor and keeps it impossibly moist during pressure cooking. The salt and herbs penetrate the skin, creating a more aromatic and tender result. For best flavor, brine for at least 1 hour—up to 4 hours for deeper penetration. This step is especially important for pressure cooking, where moisture retention is key.
Can I use frozen Cornish hens in this recipe?
No, this recipe requires fresh Cornish hens for best results. Frozen birds may release excess moisture during cooking, leading to a watery texture. If you must use frozen, thaw them completely in the refrigerator (overnight) before brining. The skin won’t crisp as well, but the meat will still be tender.
What if my Instant Pot doesn’t have a “Sauté” function?
No problem! Use the “Manual” or “Pressure Cook” setting instead. Add the oil to the pot and let it heat on its own until shimmering (about 2-3 minutes on high). Then proceed with searing as directed. The cooking process will still work perfectly—just monitor the heat closely to avoid burning.
How do I adjust the recipe for just one Cornish hen?
Reduce all liquid measurements by half (use 0.75 cup water for brining and 0.25 cup broth for cooking). Keep the cornstarch glaze and butter amounts the same, but brush only 1 tbsp of glaze on the single hen. Cook time remains 12 minutes on high pressure—just one hen will cook faster than two.
Can I make this recipe ahead of time?
Yes! Cook the hens as directed, then let them cool completely. Store in an airtight container in the fridge for 3 days or freeze for 2 months. Reheat by placing in the Instant Pot with 2 tbsp broth on high heat for 5 minutes. The skin may lose some crispness but will still be delicious. For best results, reheat uncovered.

- Baked Potatoes in Crock Pot Recipe: Buttery Interiors and Crispy Top Magic - November 1, 2026
- Braised Beef Short Ribs Recipe: Crock Pot Fall-Off-Bone Magic in 6 Hours - November 1, 2026
- Crock Pot Cocoa Recipe: Velvety Warmth With Hidden Spice Magic - November 1, 2026