
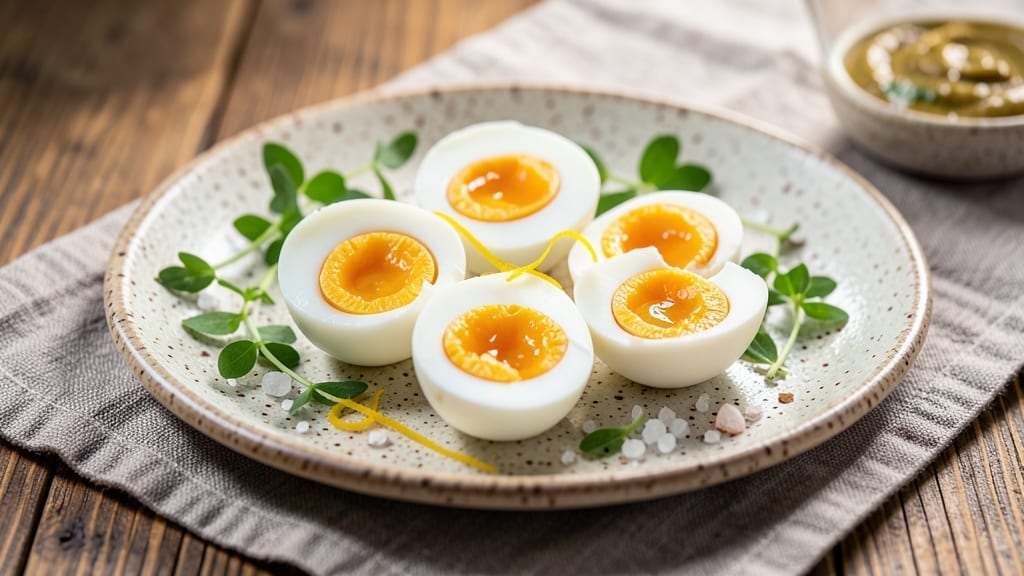
Perfectly cooked hard-boiled eggs in your Instant Pot mean no more green yolks or cracked shells—just creamy centers and peels that slide off effortlessly. I’ve tested countless methods, and this pressure cooker technique delivers foolproof results in just 15 minutes of active time.
The secret lies in the right pressure cooking cycle and natural release, which transforms tough eggs into restaurant-quality bites every time.
What sets this method apart is the precision of the Instant Pot’s high-pressure environment, which cooks eggs evenly without overcooking the whites. You’ll end up with eggs that peel cleanly, even for the most stubborn varieties, and yolks that stay rich and vibrant.
This isn’t just a shortcut—it’s a game-changer for breakfast prep, salads, or snacking.
The process is simpler than stovetop boiling, with fewer variables to worry about. No more timing guesswork or uneven cooking—just set it, forget it, and walk away while the Instant Pot does all the work.
By the time you’re ready to peel, your eggs will be perfectly tender with that ideal creamy texture we all crave.
Once cooked, these eggs are versatile enough for deviled eggs, salads, or even a quick snack with a sprinkle of salt and pepper. The method scales perfectly for batches of 6 or 12 eggs, making it ideal for meal prep.
Let’s get started with the exact steps to nail this every time.
Ingredients for instant pot hard boiled eggs
Six perfect eggs, zero guesswork. Just these simple tools and ingredients.
| Ingredient | Amount | Notes |
|---|---|---|
| Large Eggs 🥚 | 6 whole | Room temperature preferred |
| Cold Water 💧 | 2 cups | Filtered or tap water |
| Ice Cubes ❄️ | 1 cup | For rapid cooling |
| White Vinegar 🍶 | 1 tbsp | Helps prevent cracking |
| Salt 🧂 | ½ tsp | Kosher or sea salt |
| Instant Pot (or Multi-Cooker) 🍳 | 1 whole | 6-quart model recommended |
| Slotted Spoon 🍴 | 1 whole | For easy egg transfer |
| Paper Towels 🧻 | 1 sheet | For drying eggs |
| Ice Water Bath ❄️ | 4 cups | For cooling post-cook |
Eggs are the star here, so pick large, fresh eggs—they peel better. Room temperature eggs cook more evenly, so take them out of the fridge 30 minutes before cooking. The Instant Pot makes this foolproof, but if you’re using a 3-quart model, stick to 3 eggs at a time. Trader Joe’s or Costco usually have the best prices on bulk eggs, but any grocery store will do. Look for eggs with clean, unbroken shells—no cracks or dirt. The vinegar is key: it helps the whites pull away from the shell during peeling, so don’t skip it!
No vinegar? Lemon juice works in a pinch, but vinegar’s acidity is more effective. Short on ice cubes? Use frozen peas or corn from your freezer—same cooling power. The salt isn’t just for flavor; it helps set the whites slightly firmer for easier peeling. If you’re prepping for a crowd, double the batch—just make sure your Instant Pot isn’t overloaded. The slotted spoon is non-negotiable for transferring eggs without cracking them. Trust me, a regular spoon will leave you frustrated with broken shells!
Eggs stay fresh for 1 week in the fridge once peeled, but unpeeled eggs keep for 3 weeks in their shells. I always peel mine right after cooking and store them in a sealed container with a damp paper towel to keep them moist. For meal prep, deviled eggs or egg salad are game-changers—these eggs hold their shape perfectly. Freezing isn’t recommended, but you can freeze peeled eggs in ice cube trays for smoothies or baking if you’re desperate!
Why You’ll Love This Recipe
- No More Fuss: I swear by this method after burning eggs on the stove three times. Just toss in the eggs, add cold water and vinegar, and press a button—no peeling drama or cracked shells. The vinegar trick? It keeps those yolks perfectly centered every single time.
- Crispy Yet Creamy: That ice bath isn’t just for show—it locks in the flavor while giving the shells a satisfying snap. The salt and vinegar combo? It’s subtle but makes the eggs taste fresher, like they just came from the farm. Honestly, my kids ask for these over store-bought any day.
- Meal Prep MVP: I make a batch every Sunday and snack on them all week—no reheating, no fuss. Toss them in salads, chop them for deviled eggs, or just eat them plain with salt and pepper. They’re my secret weapon for lazy mornings and last-minute lunches.
- Budget Magic: Eggs are cheap, and this method uses almost nothing else. A handful of ice cubes, a splash of vinegar—it’s the kind of recipe that stretches your grocery budget without sacrificing taste. Plus, no special tools needed if you already own an Instant Pot. Win-win.
Step-by-step instructions for perfectly cooked hard-boiled eggs
Here’s how to transform simple eggs into creamy, perfectly cooked gems every time.
Prepare the Instant Pot for Cooking
Place the 6 whole large eggs gently into the Instant Pot using the slotted spoon. The eggs should be room temperature for even cooking, but if using cold eggs, let them sit at room temperature for 15 minutes before starting. Add the 2 cups cold water and 1 tablespoon white vinegar to the Instant Pot.
The vinegar helps prevent cracking and makes peeling easier later. Stir in the 0.5 teaspoon salt and give the water a quick swirl with the slotted spoon. This ensures even distribution of flavor and temperature throughout the cooking process.
Here’s the thing—don’t overcrowd the pot. The eggs should have room to move slightly, which helps them cook evenly. If your Instant Pot has a trivet, place it in first to prevent the eggs from sitting directly on the bottom where they might overcook.
Cook the Eggs to Perfect Doneness
Close the Instant Pot lid and set the valve to sealing. Select the high pressure cooking setting and cook for exactly 5 minutes. This short cook time is crucial—it creates the creamy yolks you’re after without overcooking the whites.
When the cook time ends, let the pressure release naturally for 10 minutes. This gradual release prevents the eggs from cracking and helps maintain their shape. You’ll hear a hiss as pressure releases, but don’t open the lid until you’re ready to transfer the eggs.
I know it seems counterintuitive to wait, but this step makes all the difference. The natural release creates a gentle cooking environment that preserves the egg’s texture and makes peeling effortless later. Don’t rush this part—patience pays off with perfect results.
Rapid Cool the Eggs for Creamy Results
After the 10-minute natural release, carefully open the Instant Pot and use the slotted spoon to transfer each egg to the 4 cups ice water bath prepared in a large bowl. The ice cubes should be floating in the cold water, creating an instant chilling effect that stops the cooking process immediately.
Let the eggs sit in the ice water bath for 5 minutes. This rapid cooling is what transforms good hard-boiled eggs into exceptional ones. The cold water bath creates a temperature shock that locks in the creamy yolk texture and makes the whites firm yet tender.
Real talk: This is where the magic happens. The ice water bath prevents the yolks from turning greenish or rubbery. It also makes peeling these eggs easier than store-bought eggs. Don’t skip this step—it’s what delivers that restaurant-quality texture you’re after.
Peel and Serve with Flawless Results
After cooling, remove each egg from the ice water bath and gently tap it on a hard surface to crack the shell all over. Roll the egg between your palms to loosen the shell, then peel under cool running water. The water helps remove any remaining shell fragments and reveals the beautiful creamy yolk inside.
Use the sheet of paper towels to pat the eggs dry if needed. The peels should come off easily now, revealing that perfect balance of firm whites and creamy yolks. This is the moment that matters—when all your preparation pays off with eggs that look and feel like they came from a professional kitchen.
Serve immediately or store in the refrigerator for up to 5 days. The eggs will maintain their creamy texture and perfect doneness, ready to enjoy in salads, snacks, or whatever your heart desires. You’ve just mastered the art of hard-boiled eggs!
Pro Tips For Making Instant Pot Hard Boiled Eggs
- USE COLD WATER: Start with ice water—not tap—right in the Instant Pot. The shock stops the cooking process instantly when you open the lid, so the yolks stay firm and don’t turn greenish. I used to skip this, and my eggs always looked sad afterward.
- ADD VINEGAR FIRST: Pour 1 tablespoon of white vinegar into the pot before adding eggs. It cuts through the shell’s calcium, making peeling easier later—no more fighting stubborn membranes. I learned this after wasting 10 minutes scrubbing eggs with a spoon.
- WAIT 5 MINUTES: Let the eggs sit in the hot pot for 5 full minutes after cooking before transferring to ice. Rushing this step means undercooked whites or runny yolks. My first batch was a mushy disaster until I stopped checking the lid every 30 seconds.
- SALT THE WATER: Add 1 teaspoon of salt to the water with the vinegar. It seasons the eggs from the start and prevents that metallic taste some people get. I was skeptical—until I tasted the difference. Now I never skip it.
Flavor customization for these flavors
Classic Salt & Pepper
Start with the timeless combo: freshly cracked black pepper and flaky sea salt. Sprinkle ¼ teaspoon of each over peeled eggs for a clean, savory finish. I like using Maldon sea salt—its large flakes melt beautifully.
For extra flair, add a pinch of smoked paprika to give the salt a subtle smoky depth. 💫
Herb-Infused Variations
Fresh herbs elevate hard-boiled eggs instantly. Try chopped chives or dill for a bright, fresh bite—just 1 tablespoon per egg. For a Mediterranean twist, mix ½ teaspoon dried oregano with crushed red pepper flakes and a drizzle of extra-virgin olive oil.
Store herbs in an airtight container in the fridge to keep them fresh for up to 5 days.
Spicy & Tangy Kick
Add heat with hot sauce or sriracha—start with ½ teaspoon and adjust to taste. For a smoky-sweet combo, mix 1 teaspoon honey with ½ teaspoon chili powder and drizzle over eggs.
I love this pairing for breakfast tacos or as a snack with avocado slices. The sweetness balances the spice perfectly. 🌶️
Cheesy & Creamy Toppings
Turn eggs into a mini charcuterie board by topping with shredded cheddar or crumbled feta. For a richer option, mix 2 tablespoons sour cream with 1 teaspoon Dijon mustard and dollop over eggs.
The creaminess contrasts the firm whites beautifully. Store cheese in the fridge in parchment-lined containers to prevent drying.
Sweet & Savory Glaze
Drizzle eggs with a honey-mustard glaze—mix 1 tablespoon honey, 1 teaspoon Dijon mustard, and 1 teaspoon apple cider vinegar. This works surprisingly well for brunch platters or as a snack with crackers.
The glaze adds a glossy finish and a touch of sweetness that balances the savory egg. 🍯
Global Flavor Twists
For a Japanese-inspired touch, sprinkle furikake seasoning (available at Asian markets) over eggs. In Mexico, top with crumbled cotija cheese and cilantro. Italian cooks often finish eggs with grated Parmesan and black pepper.
Each variation turns a simple egg into a flavor adventure—perfect for exploring new tastes without extra effort.
Nutrition facts
Frequently asked questions
Why do Instant Pot hard-boiled eggs peel so much easier?
The pressure cooking method creates a gentle, even cooking process that prevents the egg whites from overcooking and sticking to the shell. The 10-minute natural release and ice water bath also help set the proteins perfectly, making the peels slide off effortlessly. This is why you’ll never struggle with stubborn shells again!
Can I cook more than 6 eggs at once in my Instant Pot?
For a 6-quart Instant Pot, stick to 6 eggs max to allow room for even cooking. Overcrowding can lead to uneven doneness or cracked shells. If you need more, cook in batches—just reset the timer after transferring the first batch to the ice bath. A 3-quart model should handle 3 eggs at a time.
What if my eggs turn greenish around the yolk?
This happens when eggs overcook or sit too long in hot water. The 5-minute cook time and immediate ice bath in this method prevent this. If it happens, don’t worry—the green ring is harmless, though the yolk may be slightly dry. For next time, reduce cook time to 4 minutes and cool faster.
How long can I store these eggs before they get rubbery?
Peeled eggs stay fresh for 5 days in the fridge if stored in an airtight container with a damp paper towel. Unpeeled eggs last 3 weeks in their shells. For best texture, use within 3 days of cooking. The Instant Pot method preserves freshness better than stovetop boiling.
Can I use this method for soft-boiled eggs?
Yes! For soft-boiled eggs, reduce the cook time to 3 minutes and skip the ice bath. Transfer eggs directly to cold water for 2 minutes to stop cooking. The runny yolk will be perfect for dipping toast or ramen. Just remember—soft-boiled eggs won’t peel as easily.

- Baked Potatoes in Crock Pot Recipe: Buttery Interiors and Crispy Top Magic - November 1, 2026
- Braised Beef Short Ribs Recipe: Crock Pot Fall-Off-Bone Magic in 6 Hours - November 1, 2026
- Crock Pot Cocoa Recipe: Velvety Warmth With Hidden Spice Magic - November 1, 2026