
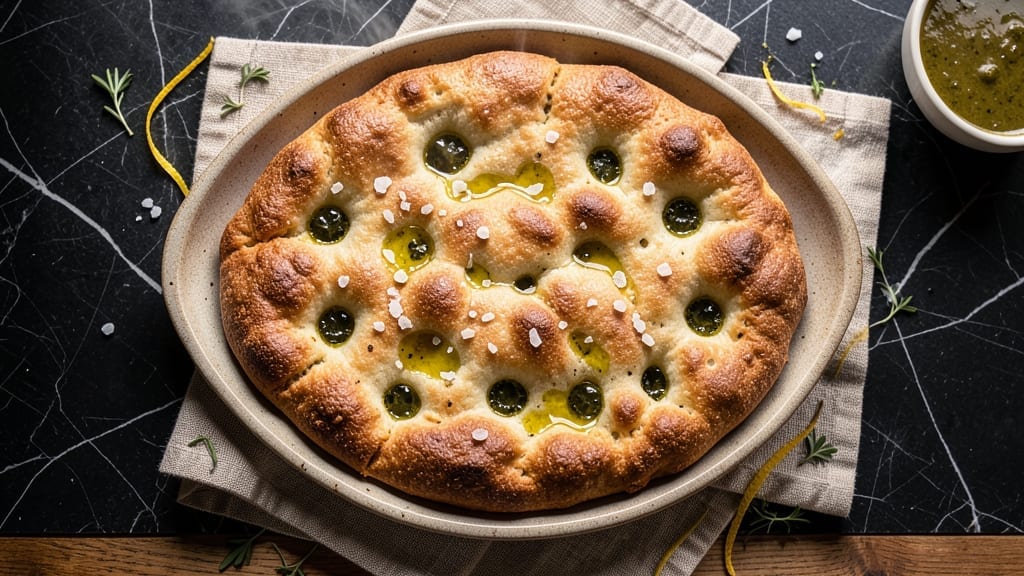
This 1 day focaccia bread recipe turns a weekend project into a satisfying reality—no overnight fermentation required. This recipe delivers that iconic olive oil pool and airy crumb by focusing on a simple dough formula and strategic shaping techniques.
The key lies in proper dimpling and baking at high heat, which creates the signature crispy crust while keeping the interior tender.
What sets this focaccia apart is its balance of simplicity and professional results. With just five basic ingredients—flour, yeast, olive oil, water, and salt—you’ll create a dough that develops flavor quickly.
The secret to that coveted golden crust? A hot oven and proper steam control during baking. This method ensures you get restaurant-quality focaccia without the wait.
By the time you pull it from the oven, you’ll have a loaf with a shimmering olive oil pool at its center and a crisp exterior that crumbles perfectly. The interior remains soft and fluffy, with just enough chew to satisfy.
Serve it warm with extra virgin olive oil, flaky sea salt, and fresh rosemary for a taste of Italy that’s impossible to resist.
Perfect for brunch, as a side for pasta, or with charcuterie boards, this focaccia proves you don’t need days to achieve bakery-quality results. The recipe scales easily, so you can make a small batch for two or a large one for a crowd. Let’s get started!
Ingredients for 1 day focaccia bread
Five simple ingredients transform into restaurant-quality focaccia with crispy crust and fluffy crumb.
| Ingredient | Amount | Notes |
|---|---|---|
| All-Purpose Flour 🌾 | 4 cups | Spooned and leveled measurement |
| Active Dry Yeast 🍞 | ¼ oz | 1 packet or 2 1/4 tsp |
| Extra-Virgin Olive Oil 🫒 | ¾ cup | High-quality, fruity variety |
| Warm Water 💧 | 1 ¼ cups | 105-110°F for yeast activation |
| Diamond Crystal Kosher Salt 🧂 | 1 ½ tsp | Adjust to taste |
| Flaky Sea Salt 🧂 | 2 tsp | For topping |
| Fresh Rosemary 🌿 | ¼ cup | Chopped, stems removed |
Flour is the foundation—King Arthur or Bob’s Red Mill work best for that tender crumb. Grab the yeast from the refrigerated section—it’s fresher than the shelf-packaged stuff. Olive oil matters here: California Avocado Ranch or Colavita give that rich, fruity flavor. If your water’s not warm enough, microwave it for 20 seconds. The rosemary? Grab fresh sprigs from the grocery store—it’s cheaper than pre-chopped and tastes better. Look for bright green needles, not brown or wilted.
No yeast? Instant yeast works too—just skip the proofing step. Short on rosemary? Dried works at half the amount, but fresh is ideal. The olive oil can be regular or extra-virgin—both work, but extra-virgin gives that authentic Italian flavor. No flaky sea salt? Coarse kosher salt is a good swap. The flour can be bread flour if you want extra chew, but all-purpose is perfect for beginners. Need to make a smaller batch? Cut everything in half—just keep the yeast-to-flour ratio the same.
Dough keeps for 24 hours in the fridge, covered with plastic wrap. For longer storage, freeze shaped loaves for up to 3 months. Fresh focaccia reheats beautifully—wrap in foil and warm in a 350°F oven for 5-10 minutes. The rosemary sprigs? Tuck them into the dough before baking for easy removal. Leftovers? Toast them for croutons—game changer.
Why You’ll Love This Recipe
- No-Knead Nightmare Solved: I’ll admit, I used to dread focaccia—dough that needed hours to rise, hands that got tired, and that perfectly golden crust that always seemed just out of reach. This version? Just mix, let it rest, and bake. The yeast does all the work while you’re scrolling or watching a show. Honestly, it’s the kind of recipe that makes you feel like a baker without the fuss.
- Olive Oil Magic: That first dimpled dimple of olive oil pressed into the dough? It’s not just for looks—it’s the secret weapon. The crust gets shatteringly crisp, but the inside stays soft and pillowy, like a hug from your nonna. And since we’re using extra-virgin, every bite tastes like a mini vacation. (Yes, even on a Tuesday night.)
- Dinner Party Hero: Between us, this bread is my go-to for gatherings—no one notices (or cares) that it’s not homemade from scratch. Tear it for bruschetta, slice it for sandwiches, or just serve it warm with butter. It’s the kind of thing that disappears faster than my willpower when cookies are baking, but it’s way more impressive than store-bought.
- Pantry Goldmine: You already have the ingredients—flour, yeast, oil, salt, water. That’s it. No specialty flours, no obscure additives, just the basics that turn into something people will ask for. And because it keeps well for days, I often bake two loaves: one for toast tomorrow, one for tomorrow’s toast. Budget-friendly? Absolutely. Life-saver? Even more so.
Step-by-step instructions for focaccia bread
Here’s how to make restaurant-quality focaccia in just one day.
Activate the Yeast and Mix the Dough
In a large bowl, combine the 1.25 cups warm water (about 105-110°F) with the 4 cups all-purpose flour and 1.5 teaspoons Diamond Crystal kosher salt. Stir until just combined, then sprinkle the 0.25 oz active dry yeast on top. Let sit for 5-10 minutes until the mixture becomes bubbly and foamy—this confirms the yeast is active.
Once bubbly, add the 0.75 cup extra-virgin olive oil and the 0.25 cup chopped fresh rosemary. Using a wooden spoon or your hands, mix until a shaggy dough forms. The dough will be sticky, but that’s perfect for focaccia. Cover the bowl with a damp towel and let it rise at room temperature for 1-2 hours, or until doubled in size.
Shape and First Rise in the Pan
Generously oil a 9×13-inch baking pan with olive oil, then transfer the dough to the pan. Using oiled hands, press the dough evenly into the pan, stretching it to the edges. The dough should be about ½-inch thick—don’t worry if it’s not perfect, as focaccia has a rustic texture. Cover the pan with a damp towel and let it rise again for 30-45 minutes until puffy and just about to overflow the pan.
Here’s the thing—this second rise is where the magic happens. The dough should expand noticeably, and you’ll see small bubbles forming on the surface. If it rises too quickly, it might overflow, so keep an eye on it. Preheat your oven to 425°F while the dough rises.
Create the Olive Oil Pool and Bake
Once the dough has risen, use your fingers to dimple the surface all over, creating little pockets. Drizzle the 0.75 cup extra-virgin olive oil evenly over the top, letting it pool in the dimples. Sprinkle the 2 teaspoons flaky sea salt on top, pressing it gently into the dough. Bake for 20-25 minutes until the edges are golden brown and the top is crispy in spots.
I like to rotate the pan halfway through baking to ensure even browning. The focaccia is done when it sounds hollow when tapped on the bottom and has a deep, golden crust. Remove from the oven and let it cool for 10 minutes before slicing—this prevents the oil from making it too soft.
Rest and Serve
Transfer the focaccia to a wire rack and let it cool completely. The crust will firm up as it cools, making it easier to slice. For the best texture, serve it at room temperature. The inside should be soft and airy, while the outside is crispy and golden, with pockets of fragrant olive oil and rosemary.
Slice it thick and serve with olive oil for dipping, or use it as the base for bruschetta. This focaccia keeps well at room temperature for 2-3 days, wrapped in a clean kitchen towel to maintain its crispiness.
Pro Tips For Making 1 Day Focaccia Bread
- Measure Salt by Volume: DESCRIPTION:
- Oil the Pan First: DESCRIPTION:
- Let Dough Rise Twice: DESCRIPTION:
- Use a Baking Stone: DESCRIPTION:
Common mistakes when making this recipe
Over-Kneading the Dough
Focaccia dough is famously sticky and wet—this isn’t a mistake, it’s intentional! When you overwork it, you’ll develop the gluten too much, creating a tough, chewy texture instead of that signature tender crumb. I’ve ruined focaccia this way by trying to “fix” the stickiness with extra flour.
Instead, embrace the stickiness: wet your hands and use that to your advantage when shaping. The dough should feel like thick pudding, not bread dough. 💫
Skipping the Second Rise
The second rise in the pan is where focaccia gets its signature height and airy texture. If you skip it or rush the process, your bread will be dense and flat. I once baked focaccia straight from the first rise, thinking it would save time—big mistake!
The dough needs that final 30-45 minutes to expand properly. Set a timer and resist the urge to peek—temperature fluctuations can stop the rise.
Using Low-Quality Olive Oil
This is where many home bakers fall short. Focaccia’s signature flavor comes from that rich, fruity olive oil pool. Using regular vegetable oil or cheap olive oil will leave you with bland, greasy bread. I learned this the hard way when I grabbed the first bottle from the store.
Invest in a good extra-virgin olive oil like Colavita or California Avocado Ranch—your taste buds (and your focaccia) will thank you. The oil should smell vibrant and peppery, not dull.
Under-Dimpling the Dough
Those little dimples aren’t just for looks—they create pockets that trap steam and olive oil, giving focaccia its signature texture and flavor. If you skip this step or do it too lightly, you’ll end up with a flat, dense loaf.
Press your fingers firmly into the dough, creating dimples about ½-inch apart. Think of it like creating a dimpled golf ball surface. The more pockets, the better the final texture. I like to use my knuckles for even pressure.
Baking Without Steam
Steam is crucial for that crispy crust and oven spring. Without it, your focaccia will bake up flat and pale. I’ve made this mistake by baking without any steam generation.
Here’s my foolproof method: Place a metal baking tray on the lower oven rack and fill it with ½ cup hot water when you put the focaccia in. The steam will circulate and create that perfect crust. Alternatively, spray the oven walls with water before baking.
Over-Baking for Crispiness
Focaccia should be crispy on the outside but still tender inside. Many bakers over-bake to achieve extra crispiness, resulting in dry, tough bread. The moment the edges turn golden brown and the internal temperature reaches 190-200°F, it’s done.
Pull it out when it sounds hollow when tapped. Let it cool completely before slicing—this prevents the oil from making the bread gummy. I’ve learned to trust my ears more than my eyes when judging doneness.
Nutrition facts
Frequently asked questions
Can I make this focaccia without rosemary?
While rosemary adds amazing flavor, you can easily swap it for other herbs like thyme, oregano, or even dried herbs at half the amount. For a savory twist, try garlic powder or red pepper flakes. The key is to keep the herb amount at ¼ cup total to maintain the right balance of flavor in the dough.
How do I store leftover focaccia?
Wrap cooled focaccia tightly in a clean kitchen towel or beeswax wrap to maintain crispiness. Store at room temperature for 2-3 days in an airtight container. For longer storage, freeze slices wrapped in plastic for up to 3 months. To revive, warm in a 350°F oven for 5-10 minutes
Can I use this recipe for a gluten-free version?
This recipe relies on gluten for its signature texture, but you can adapt it using a 1:1 gluten-free flour blend. Replace the all-purpose flour with 4 cups gluten-free flour and add ½ teaspoon xanthan gum if your blend doesn’t contain it. Expect a denser texture—gluten-free focaccia won’t have the same airy crumb, but it will still be delicious.
Why did my focaccia turn out flat?
Flat focaccia usually means one of three things: skipping the second rise, using cold dough, or not creating enough dimples. The dough needs that final 30-45 minute rise in the pan to expand properly. Also, make sure your oven is fully preheated to 425°F—cold spots can prevent proper rising. Dimpling creates steam pockets that help the bread puff up.
What’s the best way to reheat focaccia?
The best method is to wrap slices in foil and warm in a 350°F oven for 5-10 minutes. For extra crispiness, broil for 1-2 minutes at the end. Avoid the microwave—it makes focaccia soggy. You can also toast slices in a dry skillet over medium heat until golden and crispy on both sides.

- 12 Bean Chili Recipe: Hearty Slow-Cooked Depth With 12 Legumes - October 17, 2026
- 5 Seed Bread Recipe: Nutty Crunch and Artisan Flavor in One Loaf - October 17, 2026
- 1 Lb Macaroni Salad Recipe: Bold, Crunchy, and Crowd-Pleasing - October 17, 2026