
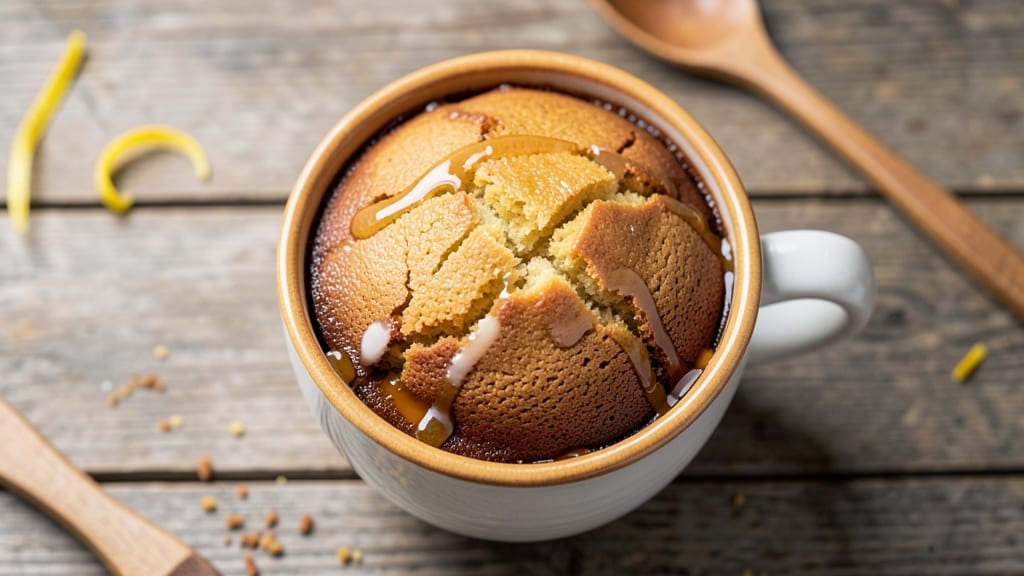
This 1 mug cake recipe delivers restaurant-quality dessert in just 5 minutes—ideal for satisfying cravings when you’re short on time. This foolproof recipe transforms simple pantry staples into a rich, moist cake that bakes directly in your microwave—no oven, no mess, no waiting.
The secret lies in precise measurements and the right mix of dry and wet ingredients to ensure a tender crumb every time.
What sets this recipe apart is its versatility—swap ingredients for chocolate, vanilla, or even caramel flavors without sacrificing texture. The key technique involves whisking ingredients just until combined, then baking at high heat for a crispy exterior and gooey center.
No fancy equipment needed, just a microwave and a mug. It’s the ideal solution for satisfying sweet tooths, testing new flavors, or feeding one without leftovers.
By the time you’re done, you’ll have a warm, golden cake with a crackly top and moist interior, ready to be topped with ice cream, whipped cream, or a sprinkle of powdered sugar.
The best part? Cleanup takes seconds—just rinse your mug. This recipe proves that indulgence doesn’t require effort, and every bite tastes like a treat you’d order out.
Whether you’re craving chocolate, vanilla, or something unexpected like lemon or matcha, this mug cake adapts effortlessly. The 5-minute prep and 1-minute bake make it perfect for last-minute guests, post-dinner cravings, or even a quick breakfast dessert. Let’s get baking—your microwave is about to become your best friend.
Ingredients for 1 mug cake
Pantry staples meet microwave magic—just 12 ingredients for two perfect mug cakes.
| Ingredient | Amount | Notes |
|---|---|---|
| All-Purpose Flour 🌾 | ½ cup | Sifted for light texture |
| Granulated Sugar 🍚 | ¼ cup | White or light brown |
| Unsalted Butter 🧈 | ¼ cup | Melted, no water |
| Vanilla Extract 🌿 | 1 tbsp | Pure, not imitation |
| Large Egg 🥚 | 1 whole | Room temperature |
| Milk 🥛 | ¼ cup | Whole for richness |
| Baking Powder 🍞 | ½ tsp | Aluminum-free preferred |
| Salt 🧂 | ¼ tsp | Fine sea salt |
| Cocoa Powder 🍫 | ¼ cup | Natural, unsweetened |
| Powdered Sugar 🍚 | 2 tbsp | For dusting, optional |
| Chocolate Chips 🍫 | ¼ cup | Semi-sweet, chopped |
| Whipped Cream 🥛 | ¼ cup | For topping, optional |
The cocoa powder and chocolate chips make this a chocolate lover’s dream, but swap them for vanilla extract and berries if you prefer. Trader Joe’s has the best cocoa powder—natural, not Dutch-processed—for that rich, deep flavor. For chocolate chips, Ghirardelli or Hershey’s Special Dark melt beautifully without burning. The butter needs to be fully melted but not greasy—microwave it for 40 seconds, then stir. If you’re using brown sugar, pack it tightly into the measuring cup for accurate measurements. The baking powder is non-negotiable here—it’s what gives your cake that perfect lift.
No cocoa powder? Instant espresso powder at half the amount adds depth without bitterness. Out of chocolate chips? Melted dark chocolate bars work just as well—just let them cool slightly before adding. The vanilla extract can be swapped for vanilla bean paste if you want extra flavor. For a lighter texture, replace half the milk with almond milk or coconut milk. If you’re making this for someone with dietary restrictions, flax eggs (1 tbsp ground flaxseed + 3 tbsp water) replace the regular egg perfectly. And if you’re feeling fancy, add a pinch of espresso powder to intensify the chocolate flavor.
Prep everything before you start—melted butter, whisked egg, measured dry ingredients. This cake bakes in 1 minute on high, so have your toppings ready. The mug should be microwave-safe and at least 12 oz—glass or ceramic works best. For a gooey center, underbake slightly by stopping when the edges are set but the middle still jiggles. Store leftovers in an airtight container for 2 days—though honestly, they rarely last that long. Freeze portions for up to 1 month by wrapping tightly in plastic wrap.
Why You’ll Love This Recipe
- No Dirty Dishes: I swear by this one—just a mug, a fork, and 60 seconds of stirring. The butter melts right into the flour, no extra bowls or mess. Honestly, I’ve made this in my hotel room, my car (yes, really), and my kitchen while pretending to supervise homework.
- Vanilla Butter Bliss: That single egg and vanilla extract? They turn this into something richer than it looks. The sugar caramelizes just enough to give it a subtle, buttery sweetness—like a mini cake that actually tastes like dessert, not sad, dense flour glue.
- Crowd-Pleaser Hack: Split the batter between two mugs, and suddenly you’ve got two perfect portions. Too tired to bake? Microwave for 60 seconds, and boom—warm, gooey cake ready for a last-minute snack or a “I’ll just have one” moment.
- Pantry Staple Magic: Between us, this recipe uses stuff you already own. No weird ingredients, no last-minute grocery runs—just flour, sugar, butter, and an egg. I’ve made it with expired spices, slightly melted butter, and still ended up with something delicious. Budget-friendly? More like budget proof.
Step-by-step instructions for single-serve mug cake
Here’s how to create a rich, fudgy chocolate mug cake in record time—no oven required!
Melt the Butter and Mix Wet Ingredients
In a microwave-safe mug, melt the 0.25 cup unsalted butter in 30-second bursts, stirring between each interval until completely liquid. This ensures even melting without burning. Let it cool for 1 minute—you don’t want to cook the egg immediately.
Next, whisk in the 0.25 cup granulated sugar and 1 tbsp vanilla extract until the sugar dissolves completely. Add the 1 whole large egg and mix vigorously for 10 seconds to combine. The mixture should look smooth and slightly thickened. This step creates the foundation for a tender, moist cake.
Combine Dry Ingredients for Lightness
In a small bowl, sift together the 0.5 cup all-purpose flour, 0.5 tsp baking powder, 0.25 tsp salt, and 0.25 cup cocoa powder. This sifting step prevents lumps and ensures a lighter texture. Gently fold the dry mixture into the wet ingredients using a fork, mixing just until no flour streaks remain.
Add the 0.25 cup milk and stir again until fully incorporated. The batter should be thick but pourable—like heavy pudding. Avoid overmixing, as this can make the cake dense. Fold in the 0.25 cup chocolate chips by hand, reserving a few for topping if desired.
Microwave Until Set
Pour the batter into a 12-ounce microwave-safe mug (preferably ceramic or glass). Microwave on high for 60 seconds, then let it rest for 15 seconds. Check the center—it should look slightly underdone but firm to the touch. If needed, microwave in 10-second increments until the edges pull away from the mug and the center is just set.
Here’s the thing—every microwave is different. You want the cake to be springy to the touch but still moist inside. Overcooking leads to a rubbery texture, so err on the side of slight underdoneness. The cake will continue cooking slightly as it cools.
Finish and Serve Warm
Let the cake cool for 1 minute—this prevents a runny top. Dust generously with 2 tbsp powdered sugar and top with the reserved 0.25 cup whipped cream. For extra indulgence, drizzle with melted chocolate or a sprinkle of sea salt to balance the sweetness.
Serve immediately while warm for the ultimate texture contrast: a gooey center, crisp edges, and a velvety chocolate finish. This mug cake is perfect for satisfying cravings in minutes—no cleanup, no fuss, just pure chocolate bliss.
Pro Tips For Making 1 Mug Cake
- MELT THE BUTTER FIRST: Skip the “room temperature” guesswork—melt the butter in the mug before adding dry ingredients. It mixes smoother and cuts down on lumps, especially when you’re stirring fast. (Yes, even if you’re impatient like me.)
- WEIGH THE FLOUR: Scooping flour from the bag packs it down, and packed flour = dense cake. Use a kitchen scale or spoon-and-level method for accuracy—this recipe lives or dies by the right ratio.
- STOP WHEN IT JIGGLES: Overbaking is the silent killer of mug cakes. Pull it out when the edges look set but the center still wobbles slightly—like a Jell-O shot. It’ll firm up while cooling.
- ADD VANILLA LAST: Mix the vanilla extract after the egg and melted butter, so it doesn’t evaporate in the heat. A quick swirl with a toothpick ensures it’s evenly distributed—no one wants a vanilla-free bite.
Serving suggestions for this dish
Classic Toppings
Start with the basics: a generous dusting of powdered sugar gives that bakery-fresh look and adds a delicate sweetness. I like to use Doms brand—it’s ultra-fine and dissolves beautifully.
For richness, top with whipped cream or heavy whipping cream sweetened with 1 tsp powdered sugar and a pinch of vanilla extract. A few chocolate chips or a drizzle of melted chocolate takes it to the next level. 🍫
Fruity Twists
Fresh berries add brightness to balance the richness. I love a handful of raspberries or blueberries warmed in 1 tbsp apricot jam for 30 seconds in the microwave—they soften slightly and release their juices.
For tropical vibes, try mango slices or pineapple tidbits sprinkled with toasted coconut flakes. A squeeze of lemon juice over the top adds a zesty kick.
Warm Sauces
Drizzle with warm caramel sauce or chocolate ganache for a decadent finish. For caramel, heat 2 tbsp heavy cream and 2 tbsp brown sugar in a saucepan until bubbly, then whisk in 1 tbsp butter.
For ganache, melt 0.25 cup chocolate chips with 2 tbsp heavy cream and let it cool slightly before drizzling. A pinch of flaky sea salt on top enhances all the flavors.
Creamy Additions
For a creamy texture, fold 2 tbsp Greek yogurt or mascarpone cheese into the whipped cream before topping. A dollop of Nutella or peanut butter adds a nutty contrast—just spread it on top or mix it into the whipped cream.
If you’re feeling fancy, a scoop of vanilla ice cream melts slightly into the warm cake for the ultimate dessert experience.
Unexpected Pairings
Think outside the box with toppings like crushed pretzels for a salty crunch or toasted nuts (pecans or almonds) for texture. For a spicy kick, sprinkle with cayenne pepper or a pinch of chili powder.
A sprinkle of cinnamon or cocoa powder adds warmth. These unexpected pairings elevate the mug cake from simple to extraordinary.
Nutrition facts
Frequently asked questions
Can I make this mug cake in a regular oven instead of the microwave?
Yes! Preheat your oven to 350°F and bake the mug cake for 12-15 minutes in a 12-ounce oven-safe mug. Use the same batter recipe, but reduce the milk by 1 tablespoon since oven-baked versions tend to dry out faster. Cover the mug loosely with foil if the top browns too quickly.
Why did my mug cake turn out dense instead of light and fluffy?
Overmixing the batter or using old baking powder are the most common culprits. Whisk just until combined, and make sure your baking powder is fresh (test by mixing with water—it should bubble vigorously). Also, don’t overfill the mug—¾ full is ideal for proper rising.
How can I make this recipe gluten-free or dairy-free?
For gluten-free, swap the all-purpose flour for a 1:1 gluten-free baking flour blend (like Bob’s Red Mill). For dairy-free, use melted coconut oil instead of butter, almond milk instead of dairy milk, and ensure your chocolate chips are dairy-free. The texture will be slightly denser but still delicious!
Can I make mug cakes ahead of time and reheat them?
For best results, bake mug cakes fresh—microwaving reheats them unevenly. However, you can prep the batter ahead and store it in the fridge for 24 hours, then bake as directed. If reheating, microwave for 10-15 seconds to warm through, but expect a slightly drier texture.
What are some flavor variations beyond chocolate?
Try vanilla by omitting the cocoa powder and adding 1 tsp vanilla bean paste and ½ tsp almond extract. For lemon, replace the vanilla with 1 tbsp lemon zest + 1 tsp lemon juice and reduce sugar by 1 tablespoon. Coffee lovers can add 1 tsp instant espresso powder to the dry ingredients for a mocha twist!

- 12 Bean Chili Recipe: Hearty Slow-Cooked Depth With 12 Legumes - October 17, 2026
- 5 Seed Bread Recipe: Nutty Crunch and Artisan Flavor in One Loaf - October 17, 2026
- 1 Lb Macaroni Salad Recipe: Bold, Crunchy, and Crowd-Pleasing - October 17, 2026