
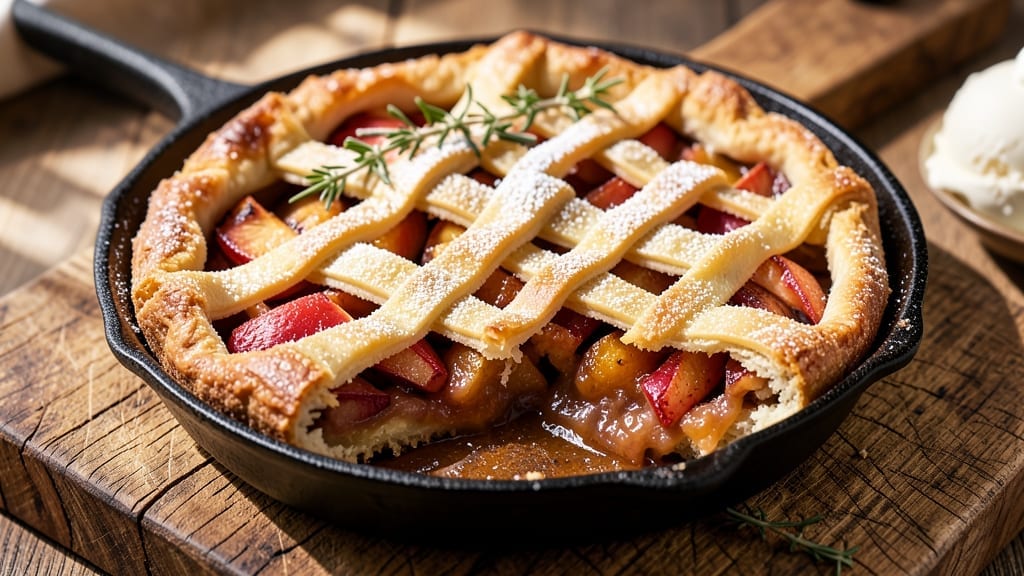
A 10-inch deep dish apple pie with a flaky lattice crust and spiced filling is the kind of dessert that transforms any gathering into a celebration. 🍏 The secret lies in the layers—crisp, golden crust that holds its shape while encasing a filling so fragrant it fills the kitchen before the oven even heats up.
This recipe balances tradition with practicality, whether you’re using a classic rolled crust or a shortcut pre-made option; the result is always that perfect balance of tender apples and buttery pastry.
The filling starts with a mix of sweet and tart apples, their juices caramelizing into a thick, aromatic center that’s just set enough to hold its shape when sliced.
A touch of cinnamon, nutmeg, and lemon zest brightens the flavors, while a cornstarch slurry ensures the filling stays firm without turning soggy. The lattice crust adds visual appeal while allowing steam to escape, creating those signature flaky layers that make every bite irresistible.
Baking at the right temperature—375°F—ensures a golden crust and tender filling, with about 50-60 minutes needed for perfection.
The aroma alone will have everyone gathering around the kitchen, and the first slice reveals the magic: crisp, buttery crust giving way to warm, spiced apples that practically melt in your mouth. This is the kind of pie that earns second helpings without apology.
Serve it warm with a scoop of vanilla ice cream or a drizzle of caramel for the ultimate dessert experience. The recipe scales perfectly for a single 10-inch pan, making it ideal for family dinners or holiday gatherings where a showstopper dessert is a must.
Let’s get baking—this pie is worth every minute of effort.
Ingredients for 10 inch deep dish apple pie
Gather these essential ingredients for that perfect deep-dish apple pie with lattice perfection.
| Ingredient | Amount | Notes |
|---|---|---|
| All-Purpose Flour 🌾 | 3 ½ cups | Sifted for flaky crust |
| Unsalted Butter 🧈 | 2 cups | Cold, cubed for lattice |
| Granulated Sugar 🍚 | 1 ½ cups | For crust and filling |
| Large Eggs 🥚 | 1 whole | Cold, for binding |
| Ice Water 💧 | ½ cup | For dough consistency |
| Salt 🧂 | 1 tsp | Kosher or sea salt |
| Ground Cinnamon 🌿 | 2 tbsp | For filling warmth |
| Ground Nutmeg 🌿 | ½ tsp | Freshly grated preferred |
| Lemon Zest 🍋 | 1 tbsp | Brightens filling |
| Cornstarch 🌾 | 2 tbsp | For thick filling |
| Mixed Apples 🍎 | 7 cups | Sweet/tart mix (Honeycrisp, Granny Smith) |
| Lemon Juice 🍋 | 2 tbsp | Prevents browning |
| Vanilla Ice Cream 🍦 | 2 cups | For serving suggestion |
| Caramel Sauce 🍯 | ½ cup | Optional drizzle |
The butter is non-negotiable here—use European-style unsalted butter for maximum flakiness, like Plugrá or Land O’Lakes. Most grocery stores stock it in the dairy section, but Whole Foods or specialty markets often carry higher-quality brands. Keep it cold until you’re ready to cut it into cubes for the lattice—room temperature butter will make your crust tough. The apples are your flavor foundation: Honeycrisp for sweetness, Granny Smith for tartness, and Pippin if you want that classic texture. Peel and slice them uniformly—about 1/4-inch thick—for even baking. If you’re short on time, pre-sliced apples at Trader Joe’s work in a pinch, just toss them with a little lemon juice first.
No cinnamon? Cassia cinnamon works fine, but it’s slightly stronger, so reduce to 1.5 tbsp. Nutmeg can be skipped, but if you’re feeling fancy, freshly grated nutmeg from a microplane adds depth. The cornstarch is key for that thick, jammy filling—don’t substitute flour. For the crust, if you’re using pre-made pie dough, Pillsbury Refrigerated or Whole Foods Store Brand are solid choices, but homemade always tastes better. The lemon zest and juice are brightening agents—if you’re out of lemons, bottled lemon juice works, but zest is harder to substitute. For the lattice, cut the dough strips into 1-inch widths for that classic look, but wider strips (1.5 inches) bake faster if you’re impatient.
The dough can be made a day ahead and stored in the fridge, wrapped tightly in plastic. The filling keeps its best flavor for 24 hours before baking, so prep it the night before. Once baked, the pie reheats beautifully—just cover it with foil and warm at 350°F for 15 minutes. Store leftovers in an airtight container for 4 days in the fridge or freeze for 3 months. For serving, let the pie cool slightly—warm slices with ice cream are the real magic. If you’re making this ahead for a party, assemble the pie the day before and bake it just before serving—everyone will notice the difference in freshness and aroma.
Why You’ll Love This Recipe
- No-Roll Pastry Shortcut: I swear by this cold butter dough—just mix the flour, sugar, and butter until it resembles wet sand, then add ice water. No chilling, no fuss, and the crust turns out flaky every single time.
- Spiced Apple Magic: The cinnamon-sugar blend caramelizes into a sticky, fragrant layer at the bottom while the apples stay tender. Honestly, the first bite makes me want to bake another one immediately.
- Weeknight Crowd-Pleaser: This 10-inch pie serves 6-8 but feels special enough for holidays or potlucks. I’ve made it for Thanksgiving leftovers, office parties, and even my kid’s soccer team fundraiser—no one ever guessed it was “easy.”
- Budget-Friendly Luxury: All those pantry staples—flour, butter, sugar—make this cost less than $10 for a whole pie. The leftovers? Even better cold, sliced thin with vanilla ice cream for a dessert that feels indulgent without breaking the bank.
Step-by-step instructions for deep dish apple pie
Here’s how to create a restaurant-quality deep dish pie with a lattice crust that’s crisp yet tender.
👨🍳 Step 1: Make the Crust Dough and Chill
In a large bowl, combine the 3.5 cups all-purpose flour and 1 tsp salt. Cut in the 2 cups cold unsalted butter using a pastry cutter or your fingers until the mixture resembles coarse crumbs with pea-sized butter pieces. Gradually add the 0.5 cup ice water, mixing just until the dough comes together.
Divide the dough into two equal discs, flatten into 6-inch circles, and wrap tightly in plastic. Chill for at least 2 hours (or up to 2 days). This resting time is crucial—it develops gluten for flakiness and prevents shrinking during baking. I like to press the dough into a 10-inch pie dish, letting it hang over the edges slightly for that classic deep dish look.
👨🍳 Step 2: Prepare the Apple Filling
Peel, core, and slice the 7 cups mixed apples into ¼-inch thick pieces. Toss immediately with 2 tbsp lemon juice and 1 tbsp lemon zest to prevent browning. In a separate bowl, whisk together 1.5 cups granulated sugar, 2 tbsp cornstarch, 2 tbsp ground cinnamon, and 0.5 tsp ground nutmeg. Add the apples and toss gently to coat evenly.
Let the filling sit for 15 minutes—this allows the cornstarch to begin thickening slightly, which prevents a watery pie. The apples should look glossy and evenly coated with the spice mixture. This step makes all the difference in texture when baked.
🥘 Step 3: Assemble the Deep Dish Pie
Roll out one chilled dough disc to fit a 10-inch pie dish, pressing gently to cover the bottom and sides completely. Trim excess dough, leaving about 1 inch overhang. Pour the prepared apple filling into the crust, mounding it slightly in the center. Roll out the second dough disc and cut into ½-inch wide strips for the lattice.
Arrange the strips in a crisscross pattern over the filling, starting with a full strip across the bottom. Weave the remaining strips over and under like a basketweave. Brush the lattice with a lightly beaten egg (use the 1 whole large egg) for golden color. Here’s the thing—don’t press down on the lattice or it’ll flatten and lose its beautiful pattern.
🔥 Step 4: Bake Until Golden and Bubbling
Preheat oven to 375°F. Place the pie on a parchment-lined baking sheet to catch any drips. Bake for 50-60 minutes until the crust is deep golden brown and the filling is bubbling vigorously at the edges. If the crust starts browning too quickly, tent loosely with foil.
I know it’s tempting to open the oven door, but resist! The pie needs that steady heat to develop proper texture. The filling should be thick and slightly sticky when done—it’ll set as it cools. When you tap the crust lightly, it should sound hollow, not dull.
⏰ Step 5: Cool and Serve with Classic Toppings
Transfer the pie to a wire rack and let it cool completely for at least 2 hours. This resting period allows the filling to set properly and prevents a soggy crust. The aroma alone will have your kitchen smelling like autumn.
Serve warm slices with 2 cups vanilla ice cream and a drizzle of 0.5 cup caramel sauce on the side. The contrast of warm pie, creamy ice cream, and rich caramel creates the perfect balance of textures and temperatures. Store leftovers covered at room temperature for up to 2 days or refrigerate for up to 5 days.
Pro Tips For Making 10 Inch Deep Dish Apple Pie
- CHILL THE DOUGH: I learned this the hard way—rolling out cold butter dough straight from the fridge leads to a greasy, uneven crust. Wrap the dough in plastic and refrigerate it for at least 30 minutes before rolling. The butter stays firm, the layers stay crisp, and you won’t end up with a soggy mess when it hits the oven.
- WEIGH THE BUTTER: Your future self will thank you if you measure the butter by weight instead of volume. Unsalted butter compacts differently in cups, and deep-dish crusts need that fat to hold its shape. Use a kitchen scale for 225g (1 cup) total—no guessing, no greasy surprises.
- DOCK THE CRUST: Skip the pre-baking step if you’re in a hurry, but always dock the bottom crust before filling. Use a fork to poke holes every ½ inch—this prevents air pockets and keeps the bottom from puffing up like a sad balloon when the apples steam. (Yes, even if you’re impatient like me.)
- BRUSH THE EDGES: After adding the top crust, don’t just crimp and call it done. Brush the exposed dough edges with cold water or egg wash—this creates a golden, caramelized seal that locks in moisture and looks way more professional. A pastry brush and a quick swipe make all the difference.
Health benefits of this dish
Fiber-Rich Filling
This deep dish apple pie packs a surprising amount of dietary fiber, thanks to the 7 cups of mixed apples in the filling. A single slice delivers about 5 grams of fiber, which supports digestive health and keeps you feeling full longer.
The combination of Honeycrisp (sweeter, softer) and Granny Smith (tart, crisp) apples provides both soluble and insoluble fiber, promoting gut health. 🍏
Natural Sweetness Boost
The recipe uses 1.5 cups granulated sugar, but the natural sweetness of the apples means you can reduce this by ¼ cup if you prefer a less sweet pie.
The lemon zest and lemon juice enhance the apples’ natural flavors, allowing you to rely more on their inherent sweetness while keeping the filling bright and tangy.
Antioxidant Benefits
Apples are packed with antioxidants like quercetin and catechin, which help combat oxidative stress in your body. The cinnamon and nutmeg in the filling also contribute to this benefit, with cinnamon being particularly effective at stabilizing blood sugar levels.
This makes the pie not just delicious, but also a healthier dessert choice. 💪
Healthy Fat from Butter
The 2 cups of cold unsalted butter in the crust provide saturated fats, which are essential for brain function and hormone production. While butter is often criticized, using it in moderation—like in this recipe—adds richness without overwhelming the dish.
Opt for European-style butter (like Plugrá) for a higher fat content that enhances flakiness without excess water.
Portion Control Made Easy
A single slice of this 10-inch deep dish apple pie serves as a reasonable dessert portion, providing about 250-300 calories depending on toppings. Serving it with vanilla ice cream adds creaminess but also increases the calorie count, so I recommend offering it as a side rather than a standard topping.
This makes it easier to enjoy without overindulging. ✨
Low-Sodium Option
If you’re watching your sodium intake, you can reduce the 1 tsp salt in the crust to ½ tsp without sacrificing flavor. The natural sweetness of the apples and the warmth of the spices will still shine through.
For extra flavor without added salt, consider adding a pinch of ground cardamom or orange zest to the filling.
Nutrition facts
Frequently asked questions
Can I use pre-made crust instead of homemade dough?
For a shortcut, use two 12-ounce packages of refrigerated pie crust (like Pillsbury). Roll one out for the bottom and the second for the lattice strips. Just be sure to pre-bake the bottom crust for 10 minutes at 375°F before adding filling to prevent a soggy bottom.
What if my lattice collapses during baking?
This happens when the dough strips are too wet or pressed down too firmly. Let your dough rest 2 hours before cutting strips, and handle it gently—no pressing! Also, brush with beaten egg before baking for extra stability. If it still collapses, try wider strips (1.5 inches) for better support.
How do I adjust the recipe for a 9-inch pie pan?
Reduce the crust dough to 2.5 cups flour (and 1.5 cups butter) and cut the filling to 5 cups apples and 1 cup sugar. The baking time stays the same (50-60 minutes), but check for doneness at 45 minutes since smaller pies bake faster. The lattice pattern works the same way!
Can I make this pie ahead of time?
Yes! Assemble the pie (unbaked) up to 24 hours ahead and refrigerate. Bake it just before serving—this keeps the crust crisp and filling fresh. For a fully baked pie, cool completely, wrap tightly, and store at room temp for 2 days or freeze for 3 months. Reheat covered at 350°F for 15 minutes to restore warmth.
What’s the best way to store leftover pie?
Let the pie cool completely, then store it in an airtight container at room temperature for up to 2 days. For longer storage, refrigerate for 5 days or freeze for 3 months. To reheat, cover with foil and warm at 350°F for 10-15 minutes. Never leave pie at room temperature longer than 2 hours for safety.

- Pea Soup Instant Pot Recipe: Velvety Green Smoothness in 20 Minutes - November 1, 2026
- Pork Loin Pulled Pork Crock Pot Recipe: Slow-Smoked Tenderness With Zero Dryness - November 1, 2026
- Baked Potatoes in Crock Pot Recipe: Buttery Interiors and Crispy Top Magic - November 1, 2026