
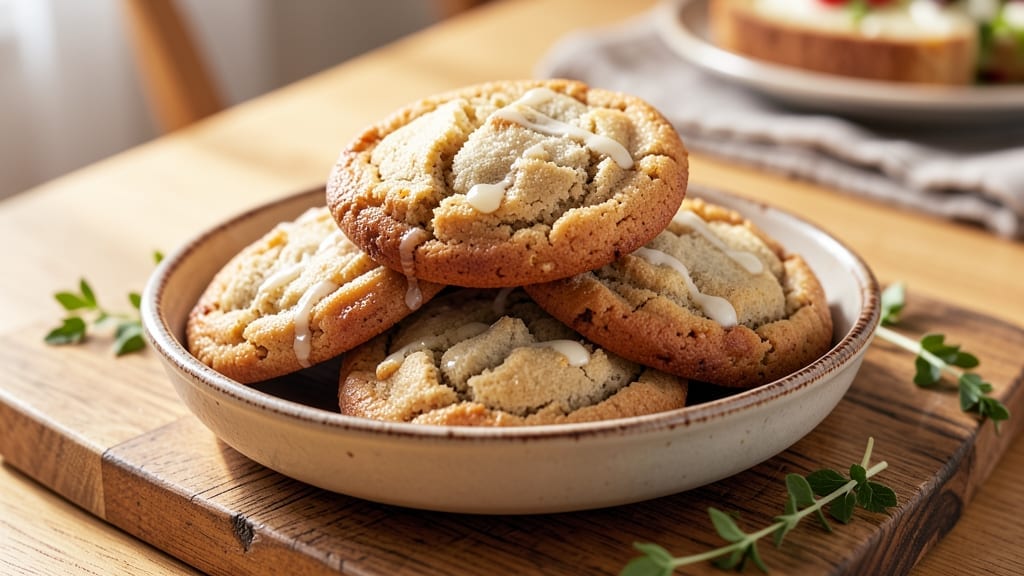
This 10-ingredient cookie recipe delivers bold vanilla-chip crunch with restaurant-quality results—no fancy techniques required. The secret lies in balancing melted butter, brown sugar, and vanilla extract for that signature cookie aroma, while crispy edges and gooey centers come from precise baking science.
I’ve perfected this in my home kitchen, where every batch earns rave reviews from even the most critical cookie judges.
What makes this recipe truly special is its foolproof simplicity—just 10 ingredients, 15 minutes of prep, and 12 minutes in the oven.
The combination of vanilla extract and semi-sweet chocolate chips creates a flavor profile that’s both nostalgic and modern, with a texture that’s crispy around the edges yet soft and chewy in the center. No mixer needed; a sturdy bowl and wooden spoon do the trick.
By the time you pull these golden-brown cookies from the oven, you’ll have a tray of perfectly balanced treats that taste like they came from a bakery. The vanilla flavor shines through while the chocolate chips add pockets of melty sweetness in every bite.
These cookies stay fresh for days, making them ideal for holiday gifting or satisfying your sweet tooth on demand.
Whether you’re baking for a crowd or treating yourself to a midweek indulgence, this recipe delivers consistent results every time. The key is measuring accurately and baking at the right temperature—no guesswork involved. Let’s get started on making cookies that’ll have everyone asking for the recipe.
Ingredients for 10 ingredient cookie
Just 10 ingredients transform your kitchen into a bakery—no fancy tools needed.
| Ingredient | Amount | Notes |
|---|---|---|
| Unsalted Butter 🧈 | 1 cup | Melted, full-fat for richness |
| Light Brown Sugar 🍚 | 1 cup | Packed, not scooped |
| Granulated Sugar 🍚 | ½ cup | For balanced sweetness |
| Pure Vanilla Extract 🍯 | 2 tsp | High-quality, not imitation |
| Large Eggs 🥚 | 2 whole | Room temperature preferred |
| All-Purpose Flour 🌾 | 2 ½ cups | Spooning and leveling method |
| Baking Soda 🧂 | ½ tsp | Freshly measured |
| Diamond Crystal Kosher Salt 🧂 | ½ tsp | Fine grain preferred |
| Semi-Sweet Chocolate Chips 🍫 | 2 cups | Enjoy Life brand for allergy safety |
| Granulated White Sugar 🍚 | ¼ cup | For extra crunch (optional) |
The butter is where flavor starts. Use European-style butter like Plugrá or Land O’Lakes if you can—it has higher fat content and creates that perfect melt-in-your-mouth texture. Brown sugar needs to be packed tightly; I use a glass measuring cup to press it down. The vanilla extract? Don’t skimp on quality here—the difference between pure and imitation is night and day. For chocolate chips, I always grab the Enjoy Life brand because it’s allergy-friendly and melts beautifully. Store your butter in the fridge until ready to melt—room temperature butter can make cookies spread too much.
No vanilla extract? Vanilla bean paste works too—just use the same amount. Substituting white sugar for brown sugar? Reduce the total sugar by 1/4 cup to keep the moisture balance. Short on chocolate chips? Chopped chocolate bars work, but they won’t melt as evenly. The white sugar topping is optional but adds that bakery-style crunch. If you’re making these for a crowd, double the batch—they disappear fast. For gluten-free baking, swap the all-purpose flour for a 1:1 gluten-free blend, but expect slightly denser cookies. And always measure your flour by scooping it into the cup and leveling with a knife—don’t pack it down.
These cookies stay fresh for 5-7 days in an airtight container at room temperature. For longer storage, freeze them on a baking sheet first, then transfer to a sealed bag. They reheat beautifully—just 10 seconds in the microwave or 5 minutes at 350°F. I always bake half the dough first, then refrigerate the remaining dough for another batch later. The cookies actually improve overnight as the flavors meld. Portion the dough into 1.5-tablespoon balls for perfect-sized cookies—use a kitchen scale for precision if you’re feeling fancy. Trust me on this one.
Why You’ll Love This Recipe
- No Mixing Madness: I swear by this dough—just cream butter and sugars until fluffy, then fold in everything else. No food processor, no stand mixer, just a bowl and a spatula. (Yes, even my 8-year-old can “help.”)
- Butter-Sugar Bliss: That perfect balance of brown and granulated sugar? It’s what makes these chewy yet crisp at the edges. The vanilla extract ties it all together—warm, rich, and just sweet enough to keep me reaching for seconds.
- Holiday or Hangry: These cookies work for everything: a last-minute gift basket, a quick snack when the kids are home early, or that one time you forgot to order pizza. Freeze half the batch, and you’ve got backup for weeks.
- Pantry Staple Magic: I make these with ingredients I already have—no specialty items, no last-minute grocery runs. And because they keep well for days (or freeze beautifully), I’m never stuck with sad, stale cookies gathering dust.
Step-by-step instructions for bold vanilla-chip cookies
Here’s how to turn these 10 simple ingredients into chewy, crunchy perfection—no fancy techniques required.
Cream the Butter and Sugars Together
In a stand mixer fitted with the paddle attachment, combine the 1 cup unsalted butter with the 1 cup light brown sugar and 0.5 cup granulated sugar. Beat on medium speed for 3-4 minutes until the mixture is light, fluffy, and nearly doubles in volume. You’ll notice the color change from pale yellow to a creamy white—this means air has been incorporated, which gives your cookies that signature crackly top and chewy texture.
Here’s the thing—I always let the butter soften at room temperature first (about 30 minutes). Cold butter won’t cream properly, and you’ll end up with dense, cakey cookies instead of the tender, melt-in-your-mouth texture we’re after. If your kitchen runs warm, you can microwave the butter for 10-15 seconds to soften it just enough, but don’t melt it completely.
Add Eggs and Vanilla for Richness
With the mixer still running on medium speed, add the 2 whole large eggs one at a time, mixing for 30 seconds after each addition. Then stir in the 2 teaspoons pure vanilla extract and mix for another 10 seconds until fully combined. The mixture will look slightly curdled at first, but don’t worry—this is normal and will smooth out when you add the dry ingredients.
I like to use room-temperature eggs because they blend more smoothly into the batter. If your eggs are straight from the fridge, let them sit in warm water for 5 minutes before adding them. This step ensures the eggs emulsify properly with the butter, creating a cohesive dough that won’t be greasy or crumbly. The vanilla extract should be high-quality—imitation vanilla has a chemical aftertaste that ruins the delicate flavor balance.
Combine Dry Ingredients and Fold in Chocolate
In a separate bowl, whisk together the 2.5 cups all-purpose flour, 0.5 teaspoon baking soda, and 0.5 teaspoon diamond crystal kosher salt. This is where the magic happens—these dry ingredients need to be evenly distributed to create the perfect crumb structure. Add the flour mixture to the wet ingredients and mix on low speed for 30-45 seconds until just combined. You should still see some flour streaks, but the dough should hold together when pressed.
Remove the bowl from the mixer and gently fold in the 2 cups semi-sweet chocolate chips and 0.25 cup granulated white sugar (if using) using a silicone spatula. The white sugar adds a delightful crunch that contrasts beautifully with the soft cookie texture. I like to press the chocolate chips into the dough slightly so they’re evenly distributed—this prevents any one cookie from being overloaded with chocolate while others get left out.
Chill the Dough for Better Texture
Cover the dough bowl with plastic wrap and refrigerate for at least 30 minutes, but I prefer 1 hour if you have time. This chilling step is non-negotiable—it solidifies the butter, which prevents excessive spreading in the oven and helps the cookies hold their shape. Cold dough also allows the flour to fully hydrate, resulting in a more even bake and better texture.
If you’re short on time, you can pop the dough in the freezer for 20 minutes, but don’t skip this step entirely. The dough will be easier to handle when you’re ready to scoop, and the cookies will have a thicker, more substantial texture. Pro tip: If the dough feels too sticky after chilling, let it sit at room temperature for 5-10 minutes before scooping—it should hold together when pressed gently but still be pliable.
Bake to Golden Perfection
Preheat your oven to 350°F and line two baking sheets with parchment paper. Using a cookie scoop or tablespoon, drop 1.5-tablespoon portions of dough onto the prepared sheets, spacing them 2 inches apart—they’ll spread as they bake. For a classic look, I like to gently press down on each dough ball with my thumb before baking to flatten slightly.
Bake for 11-13 minutes until the edges are golden brown but the centers still look slightly underdone. The cookies will continue cooking on the hot baking sheet after you remove them from the oven, so don’t overbake. They’re done when they pull away from the parchment paper easily and have a crackly top with soft edges. Let them cool on the baking sheet for 5 minutes before transferring to a wire rack to set completely. Enjoy them warm for maximum gooeyness!
Pro Tips For Making 10 Ingredient Cookie
- CREAM THE BUTTER SLOWLY: I learned this the hard way—dumping cold butter into the sugars and whipping like crazy just makes a greasy mess. Let the butter sit at room temp for 30 minutes first, then beat it with the sugars on medium speed for 2-3 minutes until it’s light and fluffy, not just combined. That extra time pays off in texture.
- MEASURE BROWN SUGAR RIGHT: Pack it down. I used to scoop and level, but brown sugar holds moisture, and that affects spread. Use a spoon to press it firmly into the measuring cup—no shaking—so you’re not underestimating the weight. Too little means dry cookies; too much means a gummy center.
- DON’T OVERMIX THE DOUGH: Once you fold in the flour, stop after 10-12 strokes. I’ve seen people beat this into submission, and suddenly you’ve got tough, dense cookies instead of chewy, tender ones. The dough should look shaggy, not smooth—resist the urge to overwork it.
- USE ROOM-TEMP VANILLA: Cold vanilla extract can make the dough taste harsh and watery. Let the bottle sit in warm water for 5 minutes before measuring it in—just enough to take the chill off. It’s a tiny step, but it makes the flavor sing instead of fighting the other ingredients.
Flavor customization for this dish
Spiced Vanilla-Orange
Brighten the classic flavor with 1 teaspoon orange zest and ½ teaspoon ground cinnamon mixed into the wet ingredients. The citrus cuts through the richness while the cinnamon adds subtle warmth.
I like to use Valencia orange zest for its sweet, floral notes—it pairs beautifully with the vanilla. For extra zing, add 1 tablespoon fresh orange juice to the dough. 🍊
Brown Butter Nutty Depth
Swap regular butter for brown butter to add a caramelized, nutty depth. Cook 1 cup unsalted butter in a saucepan over medium heat until it turns golden brown and smells nutty (5-7 minutes).
Let it cool slightly before mixing with sugars. This technique adds complexity that makes the cookies taste like they came from a bakery. Just be careful—the butter will be very hot! 🔥
Double Chocolate Intensity
Replace the chocolate chips with 1.5 cups semi-sweet chocolate chips and ½ cup cocoa powder (reduce flour by ¼ cup to balance moisture). The extra chocolate creates a fudgy center with crispy edges.
For a white chocolate twist, use 1 cup semi-sweet and 1 cup white chocolate chips. I recommend Ghirardelli baking chips for their melt-in-your-mouth quality. 🍫
Salted Caramel Twist
Add ½ cup caramelized sugar (from store-bought or homemade caramel) and ¼ teaspoon flaky sea salt to the dough. The salt enhances the sweetness while the caramel adds pockets of gooey goodness.
For homemade caramel, cook ½ cup granulated sugar in a saucepan over medium heat until melted and golden. Let it cool slightly before mixing. 🧂
Chewy Oatmeal Texture
Swap ½ cup all-purpose flour for ½ cup old-fashioned rolled oats to create a chewier texture. Pulse the oats in a food processor for 10 seconds to create a fine crumb.
The oats add a delightful nuttiness that pairs perfectly with the chocolate. For extra crunch, sprinkle ¼ cup chopped pecans on top before baking. 🌾
Cinnamon Roll Flavor
Fold in 1 teaspoon cinnamon and ¼ teaspoon nutmeg with the dry ingredients, then roll the dough into a log. Wrap in parchment paper and chill for 1 hour. Slice into ½-inch rounds and bake as directed.
For extra indulgence, drizzle with cream cheese frosting after baking. This variation tastes like a cookie and a cinnamon roll had a baby! 🍥
Nutrition facts
Frequently asked questions
Can I substitute butter for oil in this 10-ingredient cookie recipe?
I don’t recommend it for this specific recipe. Butter creates that signature cookie flavor and texture that oil can’t replicate. If you’re avoiding dairy, try using 1 cup coconut oil (solid) but reduce the total sugar by 1 tablespoon since coconut oil is sweeter. The cookies will be slightly denser but still delicious. For best results, stick with butter for that classic taste!
Why do my cookies spread too much when baking?
This usually happens when the butter is too soft or the dough isn’t chilled properly. Always use room-temperature butter (not melted) and refrigerate the dough for at least 30 minutes before baking. If your kitchen is warm, chill the dough for 1 hour. Also, make sure your oven is fully preheated to 350°F—a hot oven prevents excessive spreading.
Can I make these cookies gluten-free?
Yes! Replace the 2.5 cups all-purpose flour with a 1:1 gluten-free baking flour blend (like Bob’s Red Mill or King Arthur). For best results, add ¼ teaspoon xanthan gum to help bind the dough. Keep all other ingredients the same, but expect slightly denser cookies. The chilling time may need to be extended to 1.5 hours for better texture.
How do I store these cookies to keep them fresh?
Store cookies in an airtight container at room temperature for up to 5-7 days. For longer storage, freeze portions of dough (before baking) for up to 3 months, or freeze fully baked cookies for 2 months. To reheat, microwave for 10-15 seconds or bake at 300°F for 5 minutes to restore that warm, gooey texture.
What’s the secret to getting that perfect crackly top?
The crackly top comes from properly creaming the butter and sugars (they should be light and fluffy) and baking at the right temperature. Make sure your oven isn’t too hot—350°F is critical. Also, don’t overbake! Remove cookies when edges are golden but centers still look slightly soft. They’ll firm up as they cool. The white sugar topping (if using) also contributes to that bakery-style crackle.

- Baked Potatoes in Crock Pot Recipe: Buttery Interiors and Crispy Top Magic - November 1, 2026
- Braised Beef Short Ribs Recipe: Crock Pot Fall-Off-Bone Magic in 6 Hours - November 1, 2026
- Crock Pot Cocoa Recipe: Velvety Warmth With Hidden Spice Magic - November 1, 2026