
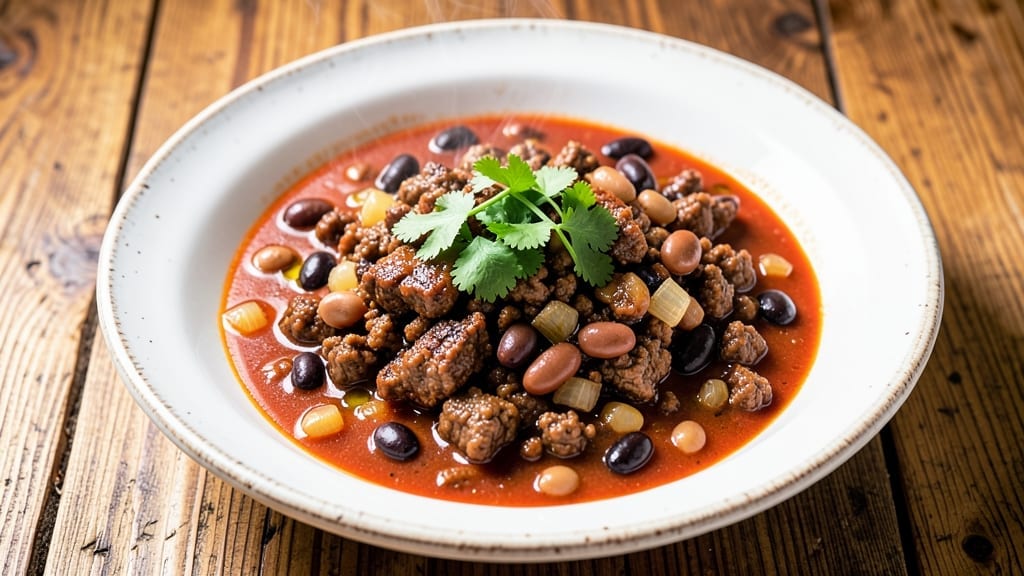
When you need 10-minute chili that delivers restaurant-quality heat and heartiness without the hours of simmering, this one-pan recipe is your answer. The secret lies in pre-cooked ingredients and a bold spice blend that builds flavor fast—no slow cooker or complicated steps required.
I developed this during a particularly busy week when takeout just wouldn’t cut it, and it’s been my go-to ever since for satisfying, spicy dinners in a fraction of the time.
This recipe transforms pantry staples into a hearty, spicy chili with minimal prep—just 10 minutes from start to finish. Ground beef or turkey (or plant-based crumbles) cooks quickly with pre-chopped onions, canned beans, and a packet of chili seasoning for instant depth.
The key is high heat and constant stirring to develop that deep, smoky flavor in minutes. It’s the kind of meal that feels indulgent but comes together faster than you can order delivery.
By the time you’re done, you’ll have a pot of rich, spicy chili with tender meat, soft beans, and a sauce that’s both bold and balanced. The texture is perfect—thick enough to coat a spoon but still saucy enough to ladle over rice or cornbread.
Top with your favorite garnishes like shredded cheese, sour cream, or fresh cilantro for extra freshness and crunch. This is comfort food at its fastest.
Perfect for weeknights, game days, or when you’re craving something warm and satisfying without the wait. The beauty of this recipe is its flexibility—scale it up for a crowd or halve it for leftovers. Let’s get cooking!
Ingredients for 10 minute chili
Pantry staples and a handful of fresh ingredients for restaurant-style chili in minutes.
| Ingredient | Amount | Notes |
|---|---|---|
| Ground Beef 🥩 | 1 lb | 80% lean preferred for texture |
| Onion 🧅 | 1 medium | Diced small (about 1 cup) |
| Canned Kidney Beans 🌿 | 1 can (15 oz) | Drained and rinsed |
| Canned Black Beans 🌿 | 1 can (15 oz) | Drained and rinsed |
| Chili Seasoning Packet 🌶️ | 1 package (1 oz) | Store-bought or homemade blend |
| Tomato Sauce 🍅 | 1 can (15 oz) | Crushed tomatoes preferred |
| Chicken Broth 💧 | 1 cup | Low-sodium preferred |
| Olive Oil 🫒 | 1 tbsp | For cooking |
| Garlic Cloves 🧄 | 2 cloves | Minced (about 1 tsp) |
| Salt 🧂 | ½ tsp | Adjust to taste |
| Black Pepper 🌶️ | ½ tsp | Freshly ground |
| Cayenne Pepper 🔥 | ¼ tsp | Adjust for heat |
| Shredded Cheddar Cheese 🧀 | ½ cup | For topping (optional) |
| Sour Cream 🥛 | ¼ cup | For topping (optional) |
| Fresh Cilantro 🌿 | ¼ cup | Chopped for garnish (optional) |
The ground beef is where the flavor starts—80% lean gives you that perfect mix of juiciness and texture. I always grab the store brand at Walmart or Kroger because it’s lean enough but still affordable. If you’re watching fat, lean ground turkey works just as well. The onions? Yellow or red both work, but yellow has a slightly sweeter kick. Dice them small so they cook down fast. For the beans, no-salt-added brands like Libby’s keep the sodium in check without sacrificing flavor.
No chili seasoning packet? Mix 1 tbsp chili powder, 1 tsp cumin, 1 tsp paprika, ½ tsp garlic powder, ½ tsp onion powder, ¼ tsp cayenne—that’s your DIY blend. The tomato sauce can be crushed tomatoes if you prefer chunkier texture. For extra depth, add 1 tbsp tomato paste with the sauce. The broth? Low-sodium is key here—you can always add more salt at the end. If you’re making this vegetarian, swap the beef for plant-based crumbles like Beyond Meat or lentils.
This chili tastes even better the next day, so double the batch if you’re feeding a crowd. Store leftovers in the fridge for 4-5 days or freeze for 3 months. I like to portion it into meal prep containers with a little cheese on top—ready to grab for lunch. The toppings? Keep them separate until serving. The cheese gets soggy fast, and the sour cream can turn grainy if mixed in too early.
Why You’ll Love This Recipe
- No Chopping Needed: I swear by this—just dice that onion while the beef browns, then dump everything in one pot. No knife skills required, just 10 minutes of hands-off cooking.
- Deep Flavor Fast: That chili packet packs a punch—smoky, spicy, and just sweet enough—but the beef and beans soak up the seasoning until it’s ridiculously rich. Honestly, it tastes like it simmered for hours.
- Game for Game Day: Toss it in a slow cooker for tailgates, or serve it straight from the pot with cornbread and chips. My friends always ask for the recipe after one bite—(yes, even on a Tuesday night).
- Budget-Friendly Powerhouse: Ground beef, canned beans, and a seasoning packet? This feeds four for under $5. The leftovers reheat like a dream, and I’ve got enough for lunches all week.
Step-by-step instructions for 10-Minute chili
Here’s how to make this hearty chili in record time without sacrificing flavor.
Brown the Ground Beef
Heat the 1 tablespoon olive oil in a large skillet over medium-high heat until shimmering. Add the 1 pound ground beef and break it apart with a wooden spoon, using your fingers to crumble it into small, even pieces. Cook for 4-5 minutes until the beef is no longer pink, stirring occasionally to ensure even browning.
Here’s the thing—don’t drain the fat. That rendered beef fat is pure flavor and helps create a rich chili base. Once the beef is fully browned, add the 2 cloves minced garlic and cook for 30 seconds until fragrant. This quick step builds the aromatic foundation for your chili. If it starts to brown too quickly, remove the pan from heat for a moment to prevent burning.
Sauté the Onion
Add the 1 medium diced onion to the skillet with the beef and garlic. Cook for 2-3 minutes until the onions soften and become translucent. You’ll know they’re ready when they lose their raw bite and start to caramelize slightly at the edges.
This step is where the sweetness of the onions really comes through. If you notice the onions sticking to the pan, add a splash of the 1 cup chicken broth to deglaze and keep everything moist. The goal is to develop that sweet, caramelized flavor that will make your chili taste homemade.
Combine All Ingredients
Pour in the 1 can (15 oz) tomato sauce, 1 cup chicken broth, 1 package (1 oz) chili seasoning packet, 0.5 teaspoon salt, 0.5 teaspoon black pepper, and 0.25 teaspoon cayenne pepper. Stir everything together well to combine all the flavors. Then add the 1 can (15 oz) drained and rinsed kidney beans and 1 can (15 oz) drained and rinsed black beans. Bring the mixture to a gentle boil over medium-high heat for 2-3 minutes.
This is where the magic happens. The chili seasoning packet contains all the spices you need for a balanced flavor—cumin, paprika, garlic powder, and more—but you can adjust the cayenne pepper to your preferred level of heat. If you like it spicier, add a bit more now. The beans will absorb all those delicious flavors as they simmer.
Simmer and Finish
Reduce the heat to medium-low and let the chili simmer for 2-3 minutes to allow all the flavors to meld together. Taste and adjust the seasoning if needed. You want a balance of spice, salt, and acidity from the tomato sauce. If it needs more salt, add it now—it’s easier to adjust than to fix an oversalted chili later.
While the chili simmers, you can prepare the toppings. Divide the chili among four bowls and top each serving with 0.125 cup shredded cheddar cheese and 0.0625 cup sour cream. Garnish with 0.0625 cup chopped fresh cilantro for a fresh, bright finish. Serve immediately while the chili is hot and the toppings are still creamy.
Serve and Enjoy
This chili is ready to eat in just 10 minutes—no waiting, no fuss. The beauty of this recipe is that it delivers all the rich, hearty flavors of traditional chili without the long cooking time. Each bite should be packed with tender beef, flavorful beans, and a perfect balance of spices.
I know it seems fast, but that’s the genius of this recipe. The chili seasoning packet does most of the work for you, and the canned beans save time without sacrificing texture. The key is to keep everything moving and not let the chili sit too long after cooking—serve it immediately for the best experience. Enjoy your quick, delicious chili!
Pro Tips For Making 10 Minute Chili
- CRANK THE HEAT FIRST: Brown that ground beef on high before adding onions—this isn’t a slow-cooker simmer. I used to rush it on medium and end up with gray, soggy meat that tasted like it was cooked in a swamp. Two minutes of aggressive searing makes all the difference for flavor and texture.
- DRAIN AND RINSE BEANS: Skip the salty, murky bean water—drain and rinse those kidney and black beans before tossing them in. The packet seasoning won’t cut through the canned brine like you’d hope, and you’ll end up with a dish that tastes more like a science experiment than chili.
- STIR IN SEASONING LAST: Wait until the very end to dump in that chili packet—mixing it in too early means you’re just steaming the spices instead of letting them bloom. Sprinkle it in after the beans go in, then stir like you’re trying to win a cooking contest.
- UPGRADE WITH GARLIC: Mince a clove or two and toss it in with the onions—it takes 30 seconds but transforms the whole dish. I was skeptical until I tried it; now I can’t imagine chili without it. (Yes, even if you’re impatient like me.)
Common mistakes when making this dish
Skipping the Sauté
One of the biggest mistakes I see is skipping the initial beef browning step. When you rush through this, your chili loses that deep, meaty flavor that comes from the Maillard reaction. I always take the extra 4-5 minutes to brown the beef thoroughly—it makes all the difference.
If you’re really pressed for time, at least sear the beef until it’s no longer pink inside, even if it’s not perfectly browned. 🔥
Ignoring the Chili Packet
Don’t just toss in the chili seasoning packet and hope for the best. Those little packets contain carefully balanced spices that work together to create authentic chili flavor.
If you’re using a homemade blend, make sure it includes cumin, paprika, garlic powder, and onion powder—these are the foundation of chili flavor. I’ve found that 1 packet is perfect for this recipe, but if you want to boost the flavor, add an extra ½ teaspoon cumin.
Underestimating the Heat
The cayenne pepper is where many people go wrong. A ¼ teaspoon might seem like nothing, but it adds up quickly. If you’re sensitive to spice, start with just ⅛ teaspoon and taste as you go.
I like to add it gradually—I’ll start with the full ¼ teaspoon and then adjust based on how spicy I want it. Remember, you can always add more heat, but you can’t take it out once it’s in there. 🌶️
Overcooking the Onions
Onions are sweetest when they’re just barely softened—about 2-3 minutes of cooking. If you let them cook too long, they’ll turn bitter and take over the flavor of your chili. Keep an eye on them and remove them from the pan as soon as they’re translucent.
If they start sticking, deglaze with a splash of the chicken broth to keep them moist and prevent burning.
Not Tasting as You Go
This is a big one. Many people pour everything into the pot and assume it’s going to taste good without tasting along the way. I can’t stress enough how important it is to taste your chili as you make it.
After adding the chili seasoning and beans, give it a taste and adjust the salt, pepper, or cayenne as needed. This is your chance to make sure everything is balanced before it’s too late.
Letting It Sit Too Long
This chili is designed to be served immediately, so don’t let it sit on the stove while you finish other tasks. The longer it sits, the more the flavors can separate, and the toppings like cheese and sour cream will get soggy.
Serve it straight from the heat while everything is still hot and vibrant. If you need to hold it for a few minutes, keep it on the lowest possible heat or transfer it to a preheated bowl. ⏰
Nutrition facts
Frequently asked questions
Can I make this chili vegetarian?
Swap the ground beef for 1 lb plant-based crumbles (like Beyond Meat or lentils) or use 1 can (15 oz) diced tomatoes instead of beef and extra beans for texture. Boost flavor with 1 tsp smoked paprika and ½ tsp liquid smoke to mimic the meaty depth. The chili seasoning packet still works perfectly—just adjust the cayenne to taste.
Why does my chili taste bland after 10 minutes?
Quick chili relies on high heat and proper technique. First, ensure you’re browning the beef until it’s no longer pink (4-5 minutes). Second, taste as you go—add ½ tsp more salt or ¼ tsp extra cayenne if needed. The chili seasoning packet is balanced, but homemade blends might need extra cumin or garlic powder for depth. Simmering 2-3 extra minutes on low heat can also help flavors meld.
Can I use frozen beans instead of canned?
Yes, but thaw and drain them first! Use 1.5 cups frozen beans (about 1 can’s worth) and add them to the pot with the broth. They’ll cook through during the 2-3 minute boil. For best texture, don’t skip draining—excess moisture makes the chili watery. If using, add beans 1 minute before serving to prevent mushiness.
How do I make this chili spicier?
Start with the full ¼ tsp cayenne, then add more in pinches while tasting. For extra heat, stir in ½ tsp chipotle powder or 1 tsp hot sauce at the end. If you love fire, try ½ tsp crushed red pepper flakes with the onions. Remember: you can always add heat, but you can’t remove it! For balanced spice, add 1 tsp honey or brown sugar to counteract.
What’s the best way to reheat leftovers?
Reheat gently to avoid breaking the beans. Use low heat on the stove with a splash of chicken broth (about 2 tbsp) for 3-4 minutes, stirring often. Microwave in 1-minute intervals on medium power, stirring between each. For extra richness, top with 1 tbsp sour cream or ¼ cup shredded cheese while reheating—it melts beautifully and adds creaminess.

- 12 Bean Chili Recipe: Hearty Slow-Cooked Depth With 12 Legumes - October 17, 2026
- 5 Seed Bread Recipe: Nutty Crunch and Artisan Flavor in One Loaf - October 17, 2026
- 1 Lb Macaroni Salad Recipe: Bold, Crunchy, and Crowd-Pleasing - October 17, 2026