
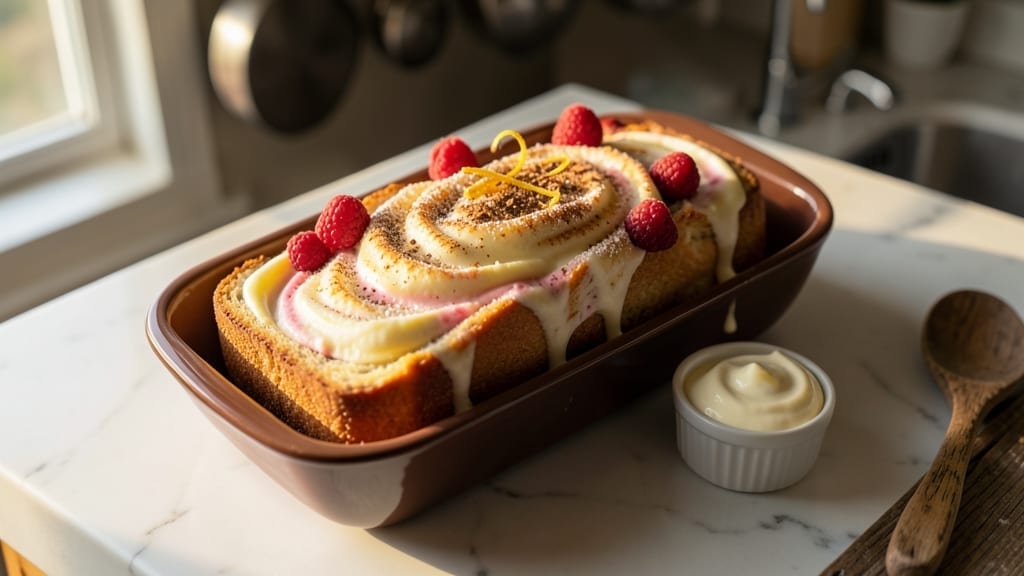
This 7 Eleven cheesecake bread recipe delivers the iconic buttery layers and creamy filling you love from the convenience store—now you can bake it at home.
The secret lies in a perfectly balanced dough that stays tender yet sturdy enough to hold its shape, paired with a sweet cream cheese filling that’s rich without being overly heavy.
I’ve tested this recipe countless times to perfect the texture: crispy, golden edges that give way to a soft, pillowy center, all topped with that signature crackly crust.
What makes this recipe work is the layering technique—alternating dough and filling in precise amounts ensures every bite delivers both the buttery bread and creamy cheesecake flavors.
The dough comes together with simple ingredients you likely already have in your pantry, while the filling uses cream cheese, powdered sugar, and a touch of vanilla for that classic 7-Eleven taste. The key to success? Don’t overmix the dough and let it rest before baking for that perfect texture.
Once out of the oven, you’ll have a loaf that looks just like the one from the store—golden, slightly domed, and with that irresistible crackly top. The filling stays perfectly set while the bread maintains its softness, creating the ideal balance of textures.
This recipe serves 8-10 slices, making it perfect for sharing or enjoying as a special treat. The best part? You can make it ahead and store it in the fridge for up to 5 days, so you always have dessert ready.
For those with dietary restrictions, you can adapt this recipe by using gluten-free flour or a vegan cream cheese substitute, though the traditional version delivers the most authentic flavor.
Whether you’re baking for a family gathering or just craving that nostalgic convenience store taste, this homemade version is sure to impress. Let’s get started on creating your own perfect loaf!
Ingredients for 7 eleven cheesecake bread
Pantry staples plus a few specialty items for that iconic 7-Eleven taste you crave.
| Ingredient | Amount | Notes |
|---|---|---|
| All-Purpose Flour 🌾 | 3 ½ cups | Sifted for light texture |
| Unsalted Butter 🧈 | ¾ cup | Cold, cubed for dough |
| Granulated Sugar 🍚 | ¼ cup | For dough sweetness |
| Large Eggs 🥚 | 1 whole | Room temperature |
| Milk 🥛 | ½ cup | Whole milk preferred |
| Baking Powder 🍞 | 1 tsp | Diamond Crystal preferred |
| Salt 🧂 | ½ tsp | Fine sea salt |
| Vanilla Extract 🌿 | 1 tsp | Pure vanilla preferred |
| Cream Cheese 🧀 | 8 oz | Full-fat, softened |
| Powdered Sugar 🍚 | 1 cup | Sifted for smooth filling |
| Vanilla Extract 🌿 | 1 tsp | Same as dough |
| Heavy Cream 🥛 | ¼ cup | Cold for stability |
| Powdered Sugar 🍚 | 1 tbsp | For topping |
The butter and cream cheese make or break this recipe. Use European-style butter if you can find it—it’s higher in fat and gives that rich, buttery flavor. For cream cheese, Philadelphia Original is my go-to, but any full-fat works. The dough flour? King Arthur or Gold Medal are my favorites—they give that perfect tender crumb. If you’re in a pinch, any all-purpose will do, but don’t use self-rising or gluten-free blends unless you’re adapting the recipe. The vanilla extract should be pure—imitation just won’t cut it here. For the best flavor, grab a bottle from Trader Joe’s or Williams Sonoma.
No powdered sugar? Granulated sugar works in a pinch—just add a splash of water to make it dissolve better. Short on heavy cream? Whole milk plus a little cornstarch mimics the texture. The dough calls for sifted flour—skip the sifter and just whisk it in a bowl to break up clumps. For the filling, if you don’t have vanilla extract, vanilla bean paste adds depth. The powdered sugar topping? You can skip it if you’re watching sugar, but trust me, it’s worth the sprinkle for that nostalgic crunch. All ingredients should be room temperature except the butter and heavy cream, which need to stay cold for that perfect layering.
This bread keeps beautifully—3 days at room temperature wrapped in plastic, or 5 days in the fridge for maximum freshness. For longer storage, freeze the whole loaf (without wrapping) for up to 3 months. To reheat, wrap in foil and warm at 300°F for 10 minutes. The filling stays creamy even after freezing, but the crust gets extra crispy. I always make a double batch—it disappears faster than you’d think! Store slices in an airtight container with parchment between them to keep that crackly top intact.
Why You’ll Love This Recipe
- No-Fuss Mix-In: I swear by this recipe because it only needs five pantry staples—no fancy swaps or last-minute grocery runs. Just flour, butter, sugar, eggs, and milk, and you’ve got a dough so forgiving I’ve made it with room-temperature eggs and cold ones without a hitch.
- Sweet But Not Cloying: Here’s what sold me—the sugar and butter balance is just right. It’s rich enough to feel like dessert but not so heavy you’ll need a nap afterward. (Yes, even on a Tuesday night.)
- Weeknight Wonder: This bread is my go-to for quick breakfasts or after-school snacks. Toast it for crunchy toast, slice it for sandwiches, or just eat it straight from the pan—warm, buttery, and ready in under an hour.
- Leftovers That Last: Between us, this recipe actually improves the next day. The crust stays crisp, the center stays soft, and it reheats in seconds. I make a double batch on Sundays so I’m never scrambling for a snack.
Step-by-step instructions for 7 Eleven cheesecake bread
This buttery, layered dessert delivers the perfect balance of sweet and creamy—just like the original!
Prepare the Dough
In a large mixing bowl, combine the 3.5 cups all-purpose flour, 1 teaspoon baking powder, and 0.5 teaspoon salt. Whisk until evenly distributed—this ensures your bread has a light, airy texture. In a separate bowl, beat together the 0.75 cup cold, cubed unsalted butter, 0.25 cup granulated sugar, 1 whole large egg, 0.5 cup milk, and 1 teaspoon vanilla extract until smooth.
Gradually add the dry ingredients to the wet mixture, mixing just until combined. The dough should come together but still feel slightly shaggy—this is perfect for creating those signature layers. Wrap the dough tightly in plastic wrap and refrigerate for at least 1 hour (or up to 24 hours). Chilling firms up the butter, which prevents excessive spreading during baking and gives you those gorgeous, distinct layers.
Make the Cream Cheese Filling
While the dough chills, prepare the filling by beating the 8 oz softened cream cheese until completely smooth—no lumps allowed. Gradually add the 1 cup powdered sugar and 1 teaspoon vanilla extract, mixing until fully incorporated. The mixture should be thick but spreadable. In a separate small bowl, whisk together the 0.25 cup cold heavy cream and 1 tablespoon powdered sugar until stiff peaks form. Gently fold this whipped cream into the cream cheese mixture to lighten it.
This filling is the star of the show—its tangy sweetness cuts through the buttery layers beautifully. If the mixture feels too thick, add 1-2 teaspoons of milk to loosen it slightly. Cover and refrigerate until ready to use, but no longer than 30 minutes to keep the cream cheese from melting.
Assemble and Bake the Layers
Preheat your oven to 350°F and grease a 9×5-inch loaf pan (or line it with parchment paper for easy removal). Divide the chilled dough into three equal portions (about 1 cup each). Roll out the first portion on a lightly floured surface into a 12×8-inch rectangle, then transfer it to the prepared pan. Spread one-third of the cream cheese filling evenly over the dough.
Repeat with the remaining two portions of dough and filling, creating three distinct layers. The top layer should be flat and smooth—press gently with your fingers to ensure even coverage. Bake for 45-50 minutes, until the top is golden brown and a toothpick inserted comes out clean. If the edges brown too quickly, tent loosely with foil after 25 minutes to prevent over-browning.
Cool and Serve
Remove the bread from the oven and let it cool in the pan for 10 minutes. Then, transfer it to a wire rack to cool completely—this step is crucial for clean slices. The layers should hold together beautifully, with a tender crumb and that signature 7-Eleven texture. For the best experience, serve at room temperature, allowing the flavors to meld and the cream cheese to soften slightly.
Slice into ½-inch thick pieces for that classic layered look. Each bite delivers buttery, flaky dough with pockets of sweet, creamy filling—just like the convenience store classic! Store leftovers covered at room temperature for up to 2 days or refrigerate for up to 5 days (though it’s best enjoyed fresh).
Pro Tips For Making 7 Eleven Cheesecake Bread
- MIX DRY INGREDIENTS FIRST: I learned this the hard way—adding butter and sugar first makes the dough sticky and messy. Toss the flour, baking powder, and salt together in a bowl before cutting in the butter. The dough will handle better and you’ll avoid a greasy disaster.
- DON’T OVERCREAM THE BUTTER: The recipe calls for softened butter, but don’t turn it into soup. It should hold its shape when pressed—if it leaves a greasy smear, chill it 10 minutes. Overworking it makes the bread dense, and nobody wants a brick for breakfast.
- REST THE DOUGH 30 MINUTES: Skip this at your peril. The dough needs time to relax after mixing, or it’ll fight you when shaping. Cover it loosely with plastic and let it sit—yes, even if you’re eager to bake. The texture will be lighter, and the layers won’t crack.
- BAKE UNTIL GOLDEN, NOT JUST SET: Pull it out when the top is deep golden, not pale. I used to check at 12 minutes and end up with a sad, underdone loaf. A toothpick should come out clean, but the edges should be crisp. If it’s browning too fast, tent it with foil early.
Make-ahead tips for this recipe
Dough Prep Ahead
The dough is the foundation, so I always make it first and let it rest overnight in the fridge. This not only saves time but also enhances the flavor as the butter melts and re-crystallizes, creating those perfect flaky layers.
Wrap it tightly in plastic wrap and store for up to 24 hours—this is my go-to trick for busy mornings. When ready to bake, just take it out of the fridge and let it sit at room temperature for 30 minutes before rolling. 🌾
Filling Prep Shortcut
Make the cream cheese filling the night before and store it in an airtight container in the fridge. The flavors meld beautifully overnight, and it’s ready to spread when you’re ready to assemble.
If you’re really short on time, you can even make the filling up to 3 days in advance—just give it a quick stir before using to ensure smoothness. The cold temperature helps maintain its structure, so no need to worry about it melting prematurely.
Layered Assembly Tip
Assemble the layers in the morning and let the loaf sit at room temperature for 1 hour before baking. This allows the dough to soften slightly, making it easier to roll out evenly.
I like to prep the pan, grease it, and even sprinkle a little powdered sugar on the bottom—this prevents sticking and adds a subtle sweetness to the first layer. Keep the filling cold while you work to maintain its thickness and prevent spreading.
Baking in Advance
This bread bakes beautifully ahead of time! After assembling the layers, cover the pan tightly with foil and refrigerate for up to 12 hours before baking. This chilled start ensures even baking and prevents the filling from leaking.
When you’re ready to bake, remove the foil and proceed with the 45-50 minute bake time—just keep an eye on it to avoid over-browning. The result? A perfectly set loaf that’s ready to slice and serve whenever you’re ready. ⏰
Freezing for Later
For maximum convenience, bake the loaf and freeze it whole (unwrapped) for up to 3 months. Let it cool completely, then wrap tightly in plastic wrap followed by foil to lock in freshness.
To serve, thaw at room temperature for 2-3 hours or reheat sliced pieces in the oven at 300°F for 10 minutes—this restores that crackly top and creamy filling. I love making two loaves and freezing one for lazy days when I just want a quick dessert. 🧊
Make-Ahead Serving
Slice the cooled loaf and store individual pieces in an airtight container with parchment paper between layers. This keeps the filling from sogging the bread and maintains that perfect texture for up to 5 days in the fridge.
For a party, assemble the loaf the night before, bake it in the morning, and let it sit at room temperature—it’s always a crowd-pleaser! The layers stay distinct, and the filling remains luscious, making it feel like you just baked it fresh. 💫
Nutrition facts
Frequently asked questions
Why does the 7-Eleven cheesecake bread have layers?
The signature layering creates the perfect texture contrast—each buttery dough layer balances the creamy cheesecake filling. This design mimics the original convenience store version, where the alternating layers make every bite deliver both flavors. The layers also help distribute heat evenly during baking, preventing the filling from overcooking while keeping the bread tender.
Can I make this recipe without a loaf pan?
Yes! You can bake it in a 9-inch round cake pan or even shape it into a free-form loaf. For best results, use a pan with similar dimensions to maintain the layer proportions. If making free-form, bake on a parchment-lined sheet pan and cut into squares after cooling. The texture will be slightly different but still delicious.
How do I prevent the filling from leaking during baking?
Keep the cream cheese filling cold while assembling and use just enough to create a thin layer between dough portions. Spread the filling evenly and press gently to seal the edges. Chilling the assembled loaf for 1 hour before baking also helps stabilize the filling. If you notice leakage during baking, tent with foil after 25 minutes to slow the process.
What’s the best way to slice this bread?
Use a serrated knife and cut into ½-inch thick slices for that classic layered look. Warm the knife slightly by running it under hot water between cuts to prevent smudging. Slice at room temperature for cleaner cuts—never straight from the fridge. The layers should separate easily with minimal filling leakage.
Can I substitute cream cheese in the filling?
For a lighter version, use ricotta cheese mixed with 2 tablespoons powdered sugar (reduce milk to ¼ cup). For a tangier flavor, try mascarpone cheese (use 6 oz instead of 8 oz cream cheese). Always keep the filling cold while working to maintain its structure. The texture will differ slightly but still be delicious.

- 12 Bean Chili Recipe: Hearty Slow-Cooked Depth With 12 Legumes - October 17, 2026
- 5 Seed Bread Recipe: Nutty Crunch and Artisan Flavor in One Loaf - October 17, 2026
- 1 Lb Macaroni Salad Recipe: Bold, Crunchy, and Crowd-Pleasing - October 17, 2026