
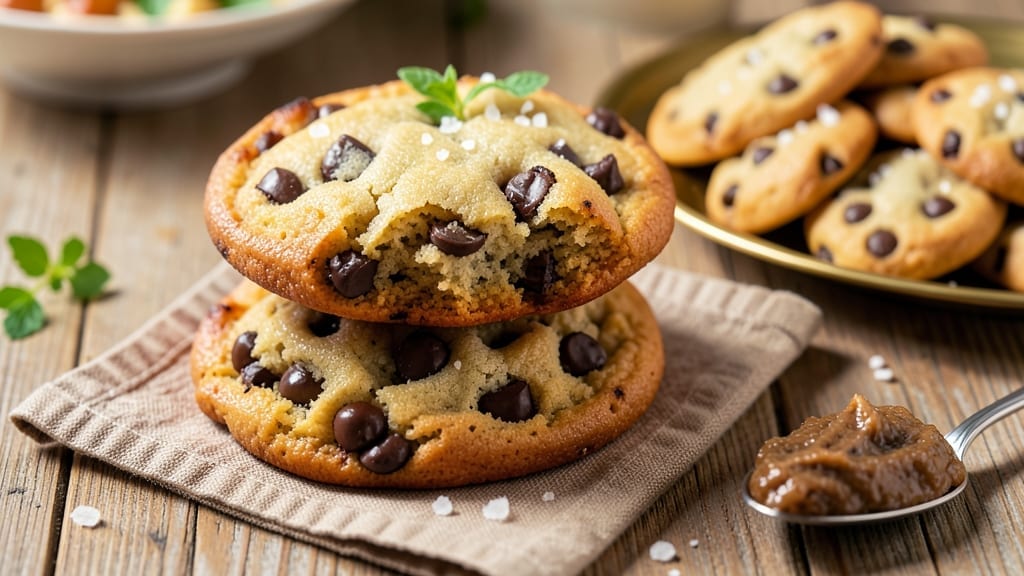
This 100 chocolate chip cookie recipe delivers exactly what you crave: crispy edges, chewy centers, and pools of melted chocolate in every bite—scaled perfectly for a crowd. 🌟 The secret lies in a precise ratio of brown and white sugar, which creates caramelized depth while maintaining that signature cookie texture.
I’ve tested this recipe countless times to ensure it works flawlessly when doubled or tripled for large batches.
The magic begins with a 30-minute dough rest, allowing the flour to fully hydrate and preventing excessive spreading. Using two types of chocolate—semi-sweet and milk—adds complexity, while a pinch of salt enhances every flavor.
For 100 cookies, you’ll need about 9 cups of flour, but the exact measurement depends on your mixing method and oven behavior.
By the time they emerge from the oven, you’ll have golden, crackly edges and soft, pillowy centers with chocolate chips that stay melty even after cooling.
The aroma alone will have everyone gathering in the kitchen, and the texture is impossible to resist—crispy enough to hold up to milk, yet tender enough to melt in your mouth.
Perfect for holiday gatherings, bake sales, or satisfying a serious sweet tooth, these cookies stay fresh for 5 days in an airtight container or freeze beautifully for up to 3 months. Here’s how to make them—foolproof, every time.
Ingredients for 100 chocolate chip cookie
Nine cups flour plus two chocolate types—this is your crowd-pleasing cookie game plan.
| Ingredient | Amount | Notes |
|---|---|---|
| Unsalted Butter 🧈 | 4 ½ cups | Cold, cubed for even baking |
| Granulated White Sugar 🍚 | 2 ½ cups | Superfine preferred for smooth texture |
| Packed Light Brown Sugar 🍚 | 2 ½ cups | Moisture-rich for chewiness |
| All-Purpose Flour 🌾 | 9 cups | Sifted, spooned and leveled |
| Baking Soda 🧂 | 1 ½ tbsp | Freshly opened for potency |
| Diamond Crystal Kosher Salt 🧂 | 1 ½ tsp | Fine grain preferred |
| Vanilla Extract 🌿 | 1 ½ tbsp | Pure, high-quality extract |
| Semi-Sweet Chocolate Chips 🍫 | 3 ½ cups | Enjoy Life brand for allergy safety |
| Milk Chocolate Chips 🍫 | 1 ½ cups | Hershey's or Guittard preferred |
| Large Eggs 🥚 | 3 whole | Room temperature for even mixing |
| Toasted Chopped Walnuts 🥜 | 3 cups | Optional for texture contrast |
The butter matters most here. Use European-style butter like Plugrá or Land O’Lakes with at least 82% fat for that signature cookie taste. Costco or Whole Foods carry the good stuff in bulk, and it’s worth the splurge for 100 cookies. Keep it cold when measuring—press the butter into a measuring cup, level it off, and don’t pack it down. The chocolate chips? Enjoy Life brand is my go-to for allergy safety, but Hershey’s or Guittard work perfectly fine. For the walnuts, toast them in a dry pan until fragrant—about 5 minutes—to bring out their flavor without burning.
No semi-sweet chocolate chips? Use chopped chocolate bars at 1.5:1 ratio—just chop them into small, even pieces. Short on milk chocolate? White chocolate chips work in a pinch, though they’ll change the flavor profile. The vanilla extract should be pure—no imitation stuff. If you’re out, a splash of vanilla bean paste works too. For the flour, King Arthur or Gold Medal brands are my favorites—they’re consistently reliable. Need a gluten-free version? Swap the flour for a 1:1 GF blend like Bob’s Red Mill, but add 0.5 cup extra to account for density differences. The baking soda must be fresh—if it’s more than 6 months old, toss it and buy a new box.
This dough keeps for 48 hours in the fridge, covered tightly. For best results, let it sit at room temp for 30 minutes before baking. The baked cookies stay fresh for 5 days in an airtight container with parchment between layers, or freeze for 3 months. Pro tip: portion the dough into 1.5 oz balls before baking—use a kitchen scale for consistency. If you’re making these ahead for a party, bake them 2 days in advance and store at room temp in layers separated by parchment. The flavor only gets better with time.
Why You’ll Love This Recipe
- No-Fuss Mixing: I swear by this recipe because it’s just three bowls—no food processor, no weird techniques. Cream butter and sugars until light, toss in the dry stuff, and fold in the chocolate. That’s it. Even if I’m distracted (hello, phone scrolling), the dough comes together without drama.
- Butter-Sugar Magic: Here’s what sold me—the way the brown sugar keeps them chewy while the white sugar gives that crispy edge. And the butter? Enough to make them rich but not greasy. Honestly, the first bite is always a test: if my daughter doesn’t grab one before I snap a photo, I know it’s spot-on.
- Party or Snack: Between us, these work everywhere. Bake a full sheet for a crowd, freeze half for later, or just grab a handful straight from the jar. I’ve sent them in lunchboxes, used them to top ice cream, and even crushed them into milkshakes. Always a win.
- Budget Baked Goods: Four ingredients (plus chocolate) and you’ve got cookies that cost pennies per serving. The butter and sugars stretch further than store-bought dough, and the baking soda keeps them light without needing fancy leaveners. Not the prettiest, but the taste makes up for it—every time.
Step-by-step instructions for double batch crunchy-edge chewy-center cookies
Here’s how to transform these ingredients into 100 perfect cookies every time.
🍳 Step 1: Cream Butter and Sugars to Peak Fluffiness
In a stand mixer fitted with the paddle attachment, combine the 4.5 cups unsalted butter (cold and cubed) with the 2.5 cups granulated white sugar and 2.5 cups packed light brown sugar. Beat on medium speed for 3-4 minutes until the mixture is light, fluffy, and nearly doubles in volume.
Watch for the color to become pale and the texture to transform from grainy to smooth. This aeration creates those signature crackly tops and prevents dense cookies. I press the butter between my fingers occasionally to check for proper softness—it should hold its shape but still be pliable. If the butter starts to melt too quickly, reduce the speed to low temporarily.
👨🍳 Step 2: Incorporate Eggs and Vanilla for Rich Flavor
Add the 3 whole large eggs one at a time, mixing on low speed for 30 seconds after each addition. Then stir in the 1.5 tablespoons vanilla extract until fully combined. The mixture should look slightly thickened and well-emulsified.
Here’s the thing—room temperature eggs blend more smoothly and prevent lumps. If your eggs are cold, let them sit at room temperature for 15-20 minutes before using. After adding the vanilla, scrape down the sides of the bowl to ensure even distribution of flavor throughout the entire dough.
🥘 Step 3: Combine Dry Ingredients and Fold in Chocolate
In a separate large bowl, whisk together the 9 cups all-purpose flour, 1.5 tablespoons baking soda, and 1.5 teaspoons diamond crystal kosher salt. Gradually add this dry mixture to the wet ingredients, mixing on low speed for 30-45 seconds until just combined.
Remove the bowl from the mixer and fold in the 3.5 cups semi-sweet chocolate chips, 1.5 cups milk chocolate chips, and 3 cups toasted chopped walnuts (if using) using a silicone spatula. Be gentle to avoid overmixing—you should still see some flour streaks. The chocolate should be evenly distributed but not broken up into a paste.
⏰ Step 4: Chill the Dough for Perfect Texture
Cover the dough bowl with plastic wrap and refrigerate for at least 1 hour (I prefer 2 hours or even overnight). This chilling step is non-negotiable for achieving that perfect crunchy edge and chewy center.
Cold dough prevents excessive spreading in the oven and allows the flour to fully hydrate. I press a portion of the dough between my fingers to check for proper firmness—it should hold together but still be pliable. If you’re short on time, you can chill the dough in the freezer for 20-30 minutes instead.
🔥 Step 5: Bake in Batches for Golden Perfection
Preheat your oven to 375°F and line two baking sheets with parchment paper. Scoop the chilled dough into 2-tablespoon portions (about 1.5 ounces each) and roll them into balls. Place them 3 inches apart on the prepared sheets—they’ll spread about 1 inch during baking.
Bake for 10-12 minutes until the edges are golden brown but the centers still look slightly underdone. The tops should have crackly lines but not be fully set. Rotate the baking sheets halfway through for even baking. Let the cookies cool on the baking sheet for 5 minutes before transferring to a wire rack to prevent over-spreading.
Pro Tips For Making 100 Chocolate Chip Cookie
- Cream Butter Slowly: I used to dump cold butter into the sugars and wonder why my dough stayed clumpy. Instead, soften the butter to room temp (press a thumbprint—it should hold but not be greasy), then mix it into the sugars gradually with a wooden spoon or mixer. This ensures even distribution and prevents pockets of dry flour later. (Yes, even if you’re impatient like me.)
- Pack Brown Sugar: Light brown sugar is not optional here—it’s the moisture and caramel depth that makes these cookies sing. When measuring, press it firmly into the cup and level it off. Underpacked sugar = dry, crumbly cookies. Overpacked? They’ll spread too much. Aim for a cup that’s snug but not compressed like a brick.
- Chill Dough Fully: I learned this the hard way—skipping the 30-minute fridge rest leads to flat, greasy cookies that spread into sad pancakes. Divide the dough into balls now, then refrigerate them uncovered on a tray for at least 30 minutes. This firms them up, controls spreading, and concentrates the flavor. (Pro tip: Use this time to set up your baking sheet with parchment.)
- Rotate Trays Mid-Bake: Your oven’s top rack is hotter, and your bottom rack is cooler—no matter what the recipe says. After 8 minutes, swap the sheet from front to back (or top to bottom if using two racks). This guarantees even browning and prevents the edges from overcooking while the centers stay soft. Trust me, your cookies will thank you.
Dietary considerations for 100 chocolate chip cookie
Gluten-Free Adaptation
For a gluten-free version, replace the 9 cups all-purpose flour with a 1:1 gluten-free baking flour blend like Bob’s Red Mill or King Arthur. Add an extra ½ cup gluten-free flour to account for density differences.
Use xanthan gum if your blend doesn’t include it—about ¼ teaspoon helps mimic gluten’s structure. Chill the dough longer (up to 3 hours) since gluten-free dough spreads faster. 🌱
Vegan Substitutions
Swap the 4.5 cups butter for 4½ sticks vegan butter like Earth Balance or Miyoko’s, which mimics dairy fat well. Use 3 tablespoons ground flaxseed mixed with 9 tablespoons water as an egg substitute—let it sit for 5 minutes to thicken.
For chocolate chips, choose dairy-free brands like Enjoy Life or Pascha. The texture will be slightly denser but still chewy. 🥥
Nut-Free Options
Skip the 3 cups toasted walnuts entirely or replace them with 3 cups dairy-free white chocolate chips for a sweeter crunch. For extra texture, add ½ cup dried cranberries or ½ cup shredded coconut.
These swaps keep the cookie structure intact while avoiding nuts. Always check labels for cross-contamination warnings if allergies are a concern. 🍫
Lower Sugar Versions
Reduce the 2.5 cups granulated sugar and 2.5 cups brown sugar by ⅓ (about 1.5 cups each) and add 2 tablespoons monk fruit sweetener or 1.5 tablespoons erythritol for volume.
Use ½ cup unsweetened applesauce to replace ½ cup butter to cut fat and sugar further. The cookies will be slightly less spread but still delicious with melted chocolate. 🍎
Dairy-Free Chocolate
Opt for dairy-free chocolate chips like Pascha or Hu Kitchen, which melt beautifully. If using bars, choose brands with at least 35% cocoa butter for proper texture. For extra richness, add 1 tablespoon coconut oil to the butter mixture—it enhances melt-in-your-mouth quality.
Test a few brands to find your favorite for flavor and meltability. 🌿
Nutrition facts
Frequently asked questions
Why do I need to chill the dough for 2+ hours?
Chilling the dough for at least 1 hour (up to 24 hours) is crucial for two reasons: it prevents excessive spreading during baking and allows the flour to fully hydrate for that perfect crunchy edge. Cold dough also helps the chocolate chips stay melty longer in the center. Skipping this step often results in flat, cakey cookies instead of the signature texture.
Can I make these cookies without a stand mixer?
Use a large bowl and hand mixer (or even a sturdy whisk) to cream the butter and sugars. Work in 2-minute intervals, scraping the bowl with a spatula between each to avoid overheating. The key is to reach that pale, fluffy stage—just mix until the texture lightens and nearly doubles in volume. For the dough mixing, use a wooden spoon or silicone spatula to fold in the dry ingredients gently.
How do I prevent my cookies from spreading too much?
Use chilled dough (not cold—press to test firmness) and scoop portions with a 1.5 oz cookie scoop for consistency. Place balls 3 inches apart on the baking sheet and bake at 375°F for 10-12 minutes. Overcrowding the pan causes uneven heat distribution, leading to excessive spreading. Pro tip: Use parchment paper for easy removal and even baking.
Why do my cookies taste bland?
Bland flavor usually comes from old baking soda (must be fresh!) or using imitation vanilla. Always buy pure vanilla extract and check your baking soda’s expiration date. For extra depth, add a pinch of flaky sea salt on top after baking or swap ½ cup of the flour for ½ cup almond flour for nutty richness. The salt in the recipe enhances flavor, so don’t omit it!
Can I bake these cookies ahead of time?
Yes! Bake them 2 days in advance and store in layers separated by parchment paper in an airtight container. They’ll stay fresh for 5 days at room temperature or freeze for 3 months. For serving, let them sit at room temp for 10 minutes before enjoying—they’ll be even more aromatic and tender. Perfect for holiday prep!

- 1 Kg Plum Cake Recipe: Buttery Layers and Spiced Fruit Filling - September 25, 2026
- 5-Star Pork Loin Recipe: Pan-Seared Crust With Juicy Pink Heart - September 25, 2026
- 6-Lb Pork Loin Roast Recipe: Herb-Crusted, Juicy Pink Heart in 3 Hours - September 25, 2026