
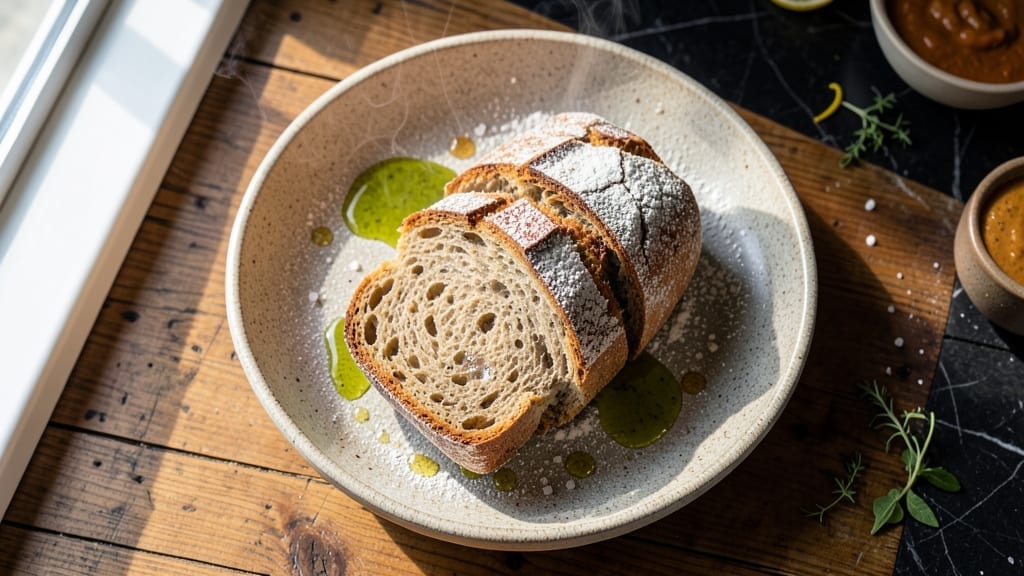
This 100 percent stone-ground whole wheat bread recipe delivers the nutty depth and chewy texture of artisanal loaves—without dairy or eggs. The key lies in stone-ground flour’s intact bran and germ, which create a richer flavor and denser crumb compared to refined wheat.
I’ve perfected this method using commercial yeast for predictable fermentation, ensuring a reliable crust and open crumb every time, even for beginners.
The dough develops its signature texture through a two-stage fermentation: an initial bulk rise at room temperature followed by a cold proof in the fridge. This slow process enhances gluten development and flavor complexity, while the Dutch oven baking method traps steam for that golden, oven-spring crust.
No special equipment is needed beyond a mixing bowl and a baking stone—or even a cast-iron skillet.
What sets this bread apart is its nutty, caramelized flavor and tender yet chewy bite, thanks to the stone-ground flour’s natural oils and fiber. It’s perfect for sandwiches, toast, or serving alongside soups—where its hearty texture holds up beautifully.
The recipe yields two 9-inch loaves, with precise shaping and scoring instructions to ensure professional results.
For those new to whole wheat baking, the longer fermentation is worth the wait—it’s what transforms basic ingredients into something extraordinary. Let’s bake bread that tastes like it belongs in a bakery, not just your kitchen.
Ingredients for 100 percent stone ground whole wheat bread
Nine essential ingredients transform into two artisanal loaves with nutty depth and chewy texture.
| Ingredient | Amount | Notes |
|---|---|---|
| Stone-Ground Whole Wheat Flour 🌾 | 4 cups | Unbleached, freshly milled preferred |
| Active Dry Yeast 🍞 | 2 ¼ tsp | Commercial yeast for reliability |
| Filtered Water 💧 | 1 ½ cups | Lukewarm (105-110°F) |
| Extra-Virgin Olive Oil 🫒 | ¼ cup | For dough elasticity |
| Raw Honey Substitute 🍯 | ¼ cup | Maple syrup or agave nectar |
| Kosher Salt 🧂 | 1 ½ tsp | Diamond Crystal preferred |
| Vegan Butter Substitute 🧈 | ⅛ cup | Melted, for dough enrichment |
| Flaxseed Meal 🌱 | 1 tbsp | For egg replacement |
| Cornmeal 🌽 | ¼ cup | For dusting and scoring |
| Coconut Oil 🥥 | 1 tbsp | For greasing Dutch oven |
Stone-ground flour is non-negotiable here—its intact bran and germ deliver that signature nutty flavor and dense crumb. King Arthur or Bob’s Red Mill are reliable brands, but check labels for 100% stone-ground specification. The yeast should be freshly purchased (test it in warm water to confirm activity) since old yeast weakens fermentation. For the honey substitute, Grade B maple syrup adds subtle caramel notes, while agave provides neutral sweetness. Flaxseed meal acts as a binder, mimicking eggs’ structural role without dairy or animal products.
No maple syrup? Date syrup or brown rice syrup work in a pinch, though flavor will differ slightly. The olive oil can be swapped for avocado oil if preferred, but stick with extra-virgin for optimal flavor. For vegan butter, Miyoko’s or Earth Balance brands melt cleanly without dairy traces. The cornmeal should be stone-ground if available—it enhances the bread’s rustic texture. If you lack a Dutch oven, a cast-iron skillet or baking stone works equally well, though steam retention will be slightly reduced.
Store flour in an airtight container in a cool, dark place for up to 6 months—stone-ground flour spoils faster than refined. Yeast keeps in the fridge for 4 months or freezes for 6 months. Once mixed, the dough can be refrigerated for 24 hours before shaping, though flavor peaks after the full two-stage fermentation. The baked loaves stay fresh for 4-5 days wrapped in a cotton towel, or freeze for 3 months for long-term storage.
Why You’ll Love This Recipe
- No-Knead Magic: I swear by this—just mix, let it rise, and bake. The stone-ground flour does all the heavy lifting; no stand mixer, no arm workout. Honestly, I’ve made it while scrolling through my phone.
- Nutty Depth: That raw honey and olive oil combo? It’s like a warm hug for your taste buds. The stone-ground flour adds a toasty, almost caramelized richness that store-bought bread can’t touch—especially when toasted.
- Meal Prep MVP: Slice it fresh, freeze half, and you’ve got breakfast, sandwiches, or toast for weeks. I keep a loaf in the fridge at all times—crusty outside, soft inside, always ready.
- Budget-Friendly Staple: Whole wheat flour is cheap, and this recipe stretches farther than any artisanal loaf. Between us, I’ve fed a houseful with one batch, and the leftovers? They disappear faster than I can say “second helping.”
Step-by-step instructions for 100 percent stone ground whole wheat bread
This method delivers an artisan-quality crust with nutty depth and chewy texture using only whole grains.
Create the Flaxseed Egg Substitute
Combine the 1 tablespoon flaxseed meal with 3 tablespoons filtered water in a small bowl. Let this mixture sit for 10 minutes until it thickens into a gel-like consistency resembling raw egg. This substitution binds the dough just as effectively while maintaining the bread’s moisture.
The flaxseed mixture should be thick but still pourable. If it’s too runny after 10 minutes, add another teaspoon of flaxseed meal. This step is crucial for replicating the structural integrity of traditional bread without animal products. Keep the mixture at room temperature until ready to use.
Activate the Yeast and Mix the Dough
In a stand mixer fitted with the dough hook attachment, combine the 4 cups stone-ground whole wheat flour, 1.5 teaspoons kosher salt, and the flaxseed gel. Mix on low speed for 2 minutes to distribute the ingredients evenly. In a separate bowl, whisk together the 1.5 cups lukewarm filtered water (105-110°F), 2.25 teaspoons active dry yeast, and 0.25 cup raw honey substitute. Let this mixture sit for 5 minutes until frothy.
With the mixer running on low speed, gradually pour in the yeast mixture while simultaneously drizzling in the 0.25 cup extra-virgin olive oil. Increase the speed to medium and mix for 5-7 minutes until the dough begins to pull away from the sides of the bowl and forms a shaggy mass. The olive oil adds elasticity to the dense whole wheat flour, preventing a tough crumb.
Knead and Develop Gluten
Continue kneading on medium speed for 8-10 minutes until the dough becomes smooth and elastic. The dough will be stickier than white flour dough due to the whole wheat content, but it should pass the windowpane test—when stretched gently, it should form a thin, translucent membrane without tearing. If the dough feels too dry, add 1 teaspoon water at a time until it reaches the proper consistency.
This kneading time is essential for developing gluten in whole wheat flour, which naturally contains less gluten than white flour. The result should be a dough that’s slightly tacky but holds its shape when pressed. If working by hand, knead for 12-15 minutes on a lightly floured surface until the dough reaches this same consistency.
First Rise and Shaping
Lightly grease a large mixing bowl with 1 tablespoon coconut oil, then transfer the dough to the bowl. Cover with a damp kitchen towel and let rise in a warm place (75-80°F) for 1.5-2 hours, or until the dough has doubled in size. The dough will rise more slowly than white flour dough due to the whole wheat content, so be patient during this stage.
After the dough has risen, turn it out onto a lightly floured surface and gently shape it into a round loaf. Dust your hands with 0.25 cup cornmeal to prevent sticking. The dough should be soft but hold its shape when pressed. Place the shaped dough seam-side down in a greased 9-inch loaf pan, then cover again and let rise for another 45-60 minutes until it’s just above the pan’s rim.
Bake to Perfection
Preheat your oven to 375°F with a Dutch oven inside for 30 minutes. This creates a steam environment that’s crucial for developing the bread’s crust and preventing a dense crumb. Carefully transfer the risen dough (still in its pan) to the hot Dutch oven. Bake for 45-50 minutes until the internal temperature reaches 205-210°F and the crust is deep golden brown.
For the final 10 minutes of baking, remove the lid and increase the oven temperature to 400°F to encourage browning. The bread is done when it sounds hollow when tapped on the bottom and the internal temperature reaches the target range. Let the bread cool in the pan for 10 minutes, then transfer to a wire rack to cool completely before slicing. The cooling period allows the crumb to set properly, preventing a gummy texture.
Pro Tips For Making 100 Percent Stone Ground Whole Wheat Bread
- Hydrate the Flour First: Stone-ground whole wheat flour is thirsty—mix it with water and honey before adding yeast. I learned this after watching my first batch turn gummy; letting the flour soak for 10 minutes loosens the bran and gluten, making the dough handleable. (Yes, it feels weird, but your kneading life will improve.)
- Proof at Warmth, Not Heat: Whole wheat dough rises slower—place your bowl in a slightly warm oven (75°F) with a cup of boiling water underneath. Too hot and the yeast burns out; too cool and it’ll take forever. I used to eyeball it and end up with dense loaves. A cheap oven thermometer fixes this.
- Skip the Over-Kneading: Whole wheat dough resists gluten formation. Knead just until the outside smooths (about 8–10 minutes by hand), then let the machine do the rest. Overwork it, and you’ll get a tough, dry crumb. My first loaf was brick-hard—I now stop when the dough clings but doesn’t stick aggressively.
- Oil the Pan Last: Brush the baking pan with olive oil right before sliding the dough in. The dough’s natural stickiness will pull oil into the crust, but if you do it too early, the oil soaks in and weakens the structure. I used to oil the pan hours ahead—now my crust stays crisp for days.
Serving suggestions for 100 percent stone ground whole wheat bread
Toasted Perfection
Slice your freshly baked loaf and toast it until golden brown for a crispy exterior that contrasts beautifully with the chewy interior. I love using a cast-iron skillet for even browning—just heat it over medium heat for 2-3 minutes per side.
Brush the toasted slices with melted vegan butter and sprinkle with flaky sea salt for a simple yet elegant presentation. 🔥
Sandwich Potential
This bread holds up exceptionally well for hearty sandwiches. Try it with hummus and roasted red peppers, or layer avocado, tomato, and sprouts for a vegan “BLT.” The dense crumb prevents sogginess, making it ideal for open-faced sandwiches too.
I often press the bread lightly with a rolling pin before assembling to create a sturdy base.
Soup Companion
Serve warm slices alongside soups like lentil or minestrone—the bread’s hearty texture soaks up flavors beautifully. For extra indulgence, drizzle with olive oil and balsamic glaze before serving. The stone-ground flour’s nutty notes complement earthy soups perfectly, while the crust adds satisfying crunch to every bite. ✨
Breakfast Boost
Transform slices into French toast using a vegan batter of 1 cup plant milk, 2 tbsp maple syrup, and 1 tbsp flaxseed meal. Cook in a buttered pan until golden and serve with fresh berries.
The bread’s density prevents it from falling apart, making it ideal for breakfast dishes that need structure.
Dessert Twist
Dip slices in melted dark chocolate and sprinkle with crushed nuts for a quick dessert. The bread’s nutty flavor pairs wonderfully with sweet fillings like almond butter and banana slices. For a showstopper, layer with vegan whipped cream and fresh fruit for a decadent yet healthy treat.
Storage and Reheating
Store slices in an airtight container with a slice of apple or lemon to prevent drying. Reheat in a 350°F oven for 5-7 minutes until warm and crispy.
For microwave reheating, wrap slices in a damp paper towel and heat at 50% power for 20-30 seconds to restore texture without drying.
Nutrition facts
Frequently asked questions
Why does stone-ground flour make this bread taste different?
The stone-ground process preserves the bran and germ, which contain natural oils and nutrients that create a richer, nuttier flavor compared to refined flour. This also gives the bread a denser, chewier texture with a more complex crumb structure. The intact grain components add depth that’s impossible with pre-milled flour.
Can I use this recipe without a Dutch oven?
Yes! Use a cast-iron skillet or place the dough on a baking sheet lined with parchment paper. For best results, create steam by placing a tray of boiling water in the oven during the first 20 minutes of baking. The crust will be slightly less crispy but still delicious.
What if my dough doesn’t rise properly?
Whole wheat dough rises slower than white flour dough. If your dough isn’t doubling after 2 hours, check these: 1) Yeast freshness (test in warm water first), 2) Water temperature (should be 105-110°F), and 3) Room temperature (ideal is 75-80°F). If needed, extend the rise time to 3 hours or use a proofing box.
How do I store leftovers to keep them fresh?
Wrap cooled loaves in a cotton towel (not plastic) and store at room temperature for 4-5 days. For longer storage, freeze slices in a bag for up to 3 months. To reheat, wrap slices in foil and warm at 350°F for 5 minutes or toast in a pan. The towel method prevents drying better than plastic.
Can I add seeds or nuts to this recipe?
Add 1/4 cup seeds (sunflower, pumpkin) or chopped nuts (walnuts, pecans) during the final kneading stage. Soak nuts/seeds in warm water for 10 minutes first to prevent drying the dough. For extra flavor, toast them before adding. The texture will be heartier but still maintain the bread’s signature chew.

- Pork Loin Pulled Pork Crock Pot Recipe: Slow-Smoked Tenderness With Zero Dryness - November 1, 2026
- Baked Potatoes in Crock Pot Recipe: Buttery Interiors and Crispy Top Magic - November 1, 2026
- Braised Beef Short Ribs Recipe: Crock Pot Fall-Off-Bone Magic in 6 Hours - November 1, 2026