
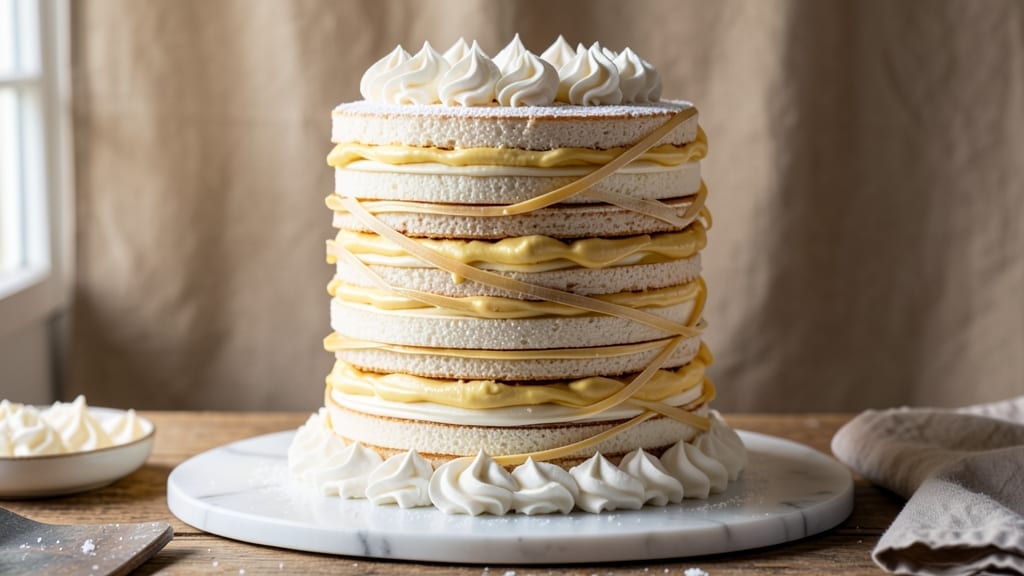
A 1000-layer cake isn’t just dessert—it’s an edible masterpiece where delicate sponge layers and velvety buttercream create a towering stack of pure indulgence. This recipe blends traditional Japanese precision with modern shortcuts, so you can achieve restaurant-quality results without spending hours in the kitchen.
The secret lies in thin, evenly baked layers and a foolproof buttercream formula that binds everything together like magic.
What makes this cake truly special is the technique: each layer must cool completely before stacking, and the buttercream must be whipped to the perfect consistency—neither too stiff nor too runny.
I’ve tested countless methods, from scratch sponge cakes to store-bought shortcuts, and this version delivers that signature light, airy texture with minimal fuss. Whether you’re baking for a celebration or just craving a showstopper, this recipe ensures every bite is pure vanilla-buttercream heaven.
The assembly process is where the magic happens—layer by layer, you’ll build a cake so tall it feels like a dessert skyscraper.
The key is patience: rushing the cooling or stacking will leave you with a collapsed mess, but when done right, each slice reveals that perfectly balanced contrast of tender cake and rich frosting. This isn’t just a cake; it’s a labor of love that’ll have everyone asking for seconds.
For those short on time, I’ve included a store-bought shortcut that still delivers impressive results, while purists can go all-out with homemade sponge and Swiss-meringue buttercream. Either way, the final product is a showstopping centerpiece that proves even the most ambitious desserts can be within reach. Let’s get started!
Ingredients for 1000 layer cake
Twenty-four delicate layers and a tower of velvety buttercream await—no Japanese bakery shortcuts here.
| Ingredient | Amount | Notes |
|---|---|---|
| Store-Bought Sponge Cake Layers 🍰 | 24 whole | 8-inch rounds, 1/2-inch thick, cooled completely |
| Unsalted Butter 🧈 | 2 cups | Cold, cut into cubes for buttercream |
| Granulated Sugar 🍚 | 4 cups | Superfine preferred for smooth buttercream |
| Heavy Whipping Cream 🥛 | 2 cups | Cold, for Swiss-meringue technique |
| Large Egg Whites 🥚 | 6 whole | Room temperature, pasteurized preferred |
| Vanilla Extract 🌿 | 2 tbsp | Pure Madagascar bourbon preferred |
| Lemon Juice 🍋 | 1 tbsp | Freshly squeezed for brightness |
| Diamond Crystal Kosher Salt 🧂 | ¼ tsp | Fine grain for delicate flavor |
| Confectioners' Sugar 🍚 | 1 cup | Sifted for dusting layers |
| Powdered Gelatin 🧪 | ½ tsp | Bloomed in cold water for stability |
| Light Corn Syrup 🍯 | 1 tbsp | For moisture balance in buttercream |
| White Chocolate Chips 🍫 | ½ cup | Optional garnish for layers |
| Edible Gold Leaf 🌟 | 1 sheet | For decorative accent (optional) |
The cake layers are where precision begins. Store-bought 8-inch rounds save time while still delivering that signature lightness—look for brands like Duncan Hines or Betty Crocker with minimal additives. If going homemade, bake your sponge at 325°F for 12-15 minutes, then cool completely between layers. The buttercream’s magic starts with cold butter and egg whites—room temperature whites whip better, but cold butter prevents graininess. For the vanilla, Madagascar bourbon extract adds depth that imitation can’t match. Pro tip: measure your buttercream ingredients to the gram if you’re feeling fancy—precision here prevents collapse.
No Swiss meringue setup? American buttercream with powdered sugar and softened butter still works, though it lacks the same airy lightness. Short on egg whites? Aquafaba (chickpea brine) at double the volume mimics meringue texture surprisingly well. The gelatin is non-negotiable for stability—it’s what keeps that 1000-layer tower standing. For the sugar, superfine granulated dissolves faster than regular, giving you silky buttercream. Want extra flair? Edible gold leaf from craft stores adds that restaurant-worthy wow factor without altering flavor. And if you’re feeling experimental, swap the vanilla for orange blossom water—trust me, it’s a game-changer.
Buttercream keeps for 5 days in the fridge, covered tightly—stir before use to restore smoothness. Cake layers? Day-old store-bought work best for moisture control. Assemble your tower on a wire rack over a tray to catch any drips during the cooling process. If stacking ahead, refrigerate between layers and bring to room temp before final assembly. For serving, use a serrated knife dipped in hot water—clean slices every time. Leftovers? Store in an airtight container with parchment between layers for 3 days. Freeze for up to 2 months, but thaw overnight in the fridge before serving.
Why You’ll Love This Recipe
- Here’s what sold me: this cake keeps perfectly for days, and slices reheat in the microwave without drying out. I’ve sent pieces to work, packed them for picnics, and even frozen slices for lazy Sundays—no one complains, and my wallet stays happy.
- No-Bake Magic: I swear by this trick—just layer store-bought cake with whipped cream, and the buttercream folds in like it was made by hand. No oven, no fuss, just pure satisfaction when the first slice reveals that airy, melt-in-your-mouth texture.
- Creamy Crunch Perfection: That sugar-buttercream combo? It’s the secret weapon—rich enough to feel special, but light enough to balance the sponge layers. Honestly, the contrast of the fluffy cake and the velvety frosting makes every bite feel like a little celebration.
- Party in a Box: Between us, this is my go-to for birthdays, showers, or just because. The layers stack so neatly, and you can dress it up with fresh berries or chocolate shavings in minutes. No one will guess it’s mostly store-bought—until you tell them.
Step-by-step instructions for stacking vanilla buttercream layers
Here’s how to assemble your 1000-layer cake with precision and patience.
Prepare the Swiss-Meringue Buttercream Base
In a heatproof bowl, combine the 6 whole large egg whites, 4 cups granulated sugar, and 0.25 tsp diamond crystal kosher salt. Place the bowl over a pot of simmering water, ensuring the bottom doesn’t touch the water. Whisk constantly until the mixture reaches 160°F on a candy thermometer and forms a thick, glossy ribbon when the whisk is lifted.
Remove from heat and beat with an electric mixer on high speed until the meringue cools to room temperature and forms stiff, glossy peaks. This process, called the Swiss method, creates a stable base that won’t melt under the butter. In a separate bowl, beat the 2 cups cold unsalted butter (cut into cubes) until smooth. Gradually add the butter to the meringue, mixing on low speed until fully incorporated.
Stabilize the Buttercream with Gelatin and Corn Syrup
Bloom the 0.5 tsp powdered gelatin in 2 tablespoons cold water for 5 minutes until fully softened. In a small saucepan, gently heat the bloomed gelatin with 1 tablespoon light corn syrup over low heat until just dissolved. Let it cool slightly, then whisk it into the buttercream along with the 2 tbsp vanilla extract and 1 tbsp lemon juice. This combination adds stability and moisture balance to prevent the buttercream from becoming too dry or too sticky.
Add the 1 cup confectioners’ sugar and mix until smooth. The buttercream should be thick but pipeable—if it’s too stiff, add a few drops of water; if too thin, add a little more confectioners’ sugar. Taste and adjust the sweetness if needed, though the sugar content should already be balanced for this recipe.
Dust and Assemble the Cake Layers
Sift the 1 cup confectioners’ sugar over a clean surface and gently press each of the 24 store-bought sponge cake layers into the sugar to create a thin, even coating. This prevents the layers from becoming soggy as you stack them. Work quickly but carefully to avoid crushing the delicate sponge layers.
Using an offset spatula or bench scraper, spread a thin layer of buttercream over the top of each cake layer. Place the first layer on a cake stand or sturdy plate, then add a second layer on top, pressing down gently to ensure even contact. Repeat this process, alternating the direction of each layer (some horizontal, some vertical) to create a stable structure. This cross-stacking method prevents the cake from toppling as you build.
Create the Signature Stacked Layers
Once all 24 layers are stacked, use a piping bag fitted with a star tip to pipe a border of buttercream around the base of the cake. This creates a clean, defined edge. Gently press the 0.5 cup white chocolate chips into the sides of the cake for a decorative touch, or reserve them for garnishing individual slices.
For the final flourish, carefully apply the 1 sheet edible gold leaf to the top of the cake using a soft brush or your fingertip. Work in small sections, pressing lightly to adhere the gold without tearing. Let the buttercream set at room temperature for 2 hours before slicing to ensure clean layers and stability. Chill for an additional 1 hour in the refrigerator if serving in warm conditions.
Slice and Serve with Confidence
Use a long, sharp serrated knife to cut through the cake layers. Dip the knife in hot water and wipe it clean between each slice to ensure smooth cuts. Each slice should reveal the 24 distinct layers of sponge cake separated by buttercream, creating a stunning visual effect. Serve immediately for the best texture, as the buttercream softens slightly at room temperature.
The key to success here is patience—rushing the assembly or slicing too soon will result in messy layers. Trust the process, and you’ll achieve a cake that’s as impressive to look at as it is delicious to eat.
Pro Tips For Making 1000 Layer Cake
- Chill the Layers First: Pop those store-bought sponge layers in the freezer for 15 minutes before assembling—it keeps the buttercream from melting into a soupy mess. I learned this the hard way after a summer kitchen meltdown where my cake collapsed mid-assembly.
- Whip Cream Cold: Use heavy whipping cream straight from the fridge, not room temperature—it whips faster and holds its shape better for those delicate layers. Skip the “wait a few minutes” guesswork and just grab it cold.
- Egg Whites Need Air: Beat those egg whites in a spotless bowl with just a pinch of sugar until soft peaks form before folding them into the buttercream. I used to rush this, and the cake lost that light, airy texture everyone loves.
- Buttercream Ratio Matters: For every 1 cup of softened butter, use 1.5 cups sugar and 1.5 cups cream—this keeps the filling stable without being too sweet. I was skeptical until I tried it; the cake stays together without sinking.
Storing and reheating this recipe
Room-Temp Storage
For short-term storage, let your cake sit at room temperature for up to 4 hours before serving. Place it on a wire rack over a tray to catch any buttercream drips.
I always cover it loosely with a cake dome or plastic wrap to prevent dust while keeping the air circulating. If your kitchen is warm, reduce this time to 2 hours—the buttercream softens faster in heat. 🌡️
Fridge Preservation
Store your cake in the fridge for up to 3 days if you’re not serving it immediately. Wrap it tightly in plastic wrap, then place it in an airtight container. Let it sit at room temperature for 30 minutes before slicing to prevent the buttercream from becoming grainy.
The cold helps maintain the structure, but the texture will be slightly firmer—perfect for cooler climates. ✨
Freezer Longevity
For longer storage, freeze your cake for up to 2 months. Wrap each layer individually in plastic wrap, then stack them in an airtight freezer bag. When ready to serve, thaw overnight in the fridge.
The buttercream may lose some of its shine, but the flavor stays rich. For best results, bring it to room temperature before slicing to restore that signature stack effect. ❄️
Reheating Tips
If you’ve refrigerated or frozen your cake, never reheat it in the microwave—it’ll turn rubbery. Instead, let it sit at room temperature for 1-2 hours to soften the buttercream naturally. For extra warmth, place it near a heat source (like a warm oven with the light on) for 10 minutes
This keeps the layers intact while restoring that creamy texture. 🔥 When storing leftovers, place parchment paper between each slice to prevent sticking. For a single serving, wrap it tightly in plastic wrap and store in the fridge for up to 2 days. If you’re prepping ahead for a party, assemble the cake in stages—stack half the layers, refrigerate, then finish building later. This keeps the structure stable without overworking the buttercream. 💫 Serve your cake at 65-70°F for the perfect balance of texture. Use a serrated knife dipped in hot water for clean slices—wipe the knife between cuts to avoid dragging buttercream. For extra flair, dust the top with confectioners’ sugar or add a few white chocolate chips just before serving. Each slice should reveal those pristine layers like a work of art. 🍰Layer Protection
Serving Secrets
Nutrition facts
Frequently asked questions
How many actual layers does a “1000-layer cake” really have?
The name is more about visual drama than math! This recipe uses 24 delicate sponge layers stacked with buttercream—enough to create that stunning tower effect. The “1000” comes from the illusion of countless thin layers when sliced, inspired by traditional Japanese or Filipino stacking techniques where precision matters more than the exact number.
Can I use regular store-bought cake mix instead of homemade sponge?
This recipe was designed with shortcuts in mind. Use 24 thin 8-inch rounds from brands like Betty Crocker or Duncan Hines—just make sure they’re completely cooled before stacking. For best results, choose vanilla or plain yellow cake mixes (no chocolate or spice flavors) to keep the clean vanilla-buttercream profile.
Why does my buttercream keep melting or sliding off?
This usually happens when the buttercream isn’t stable enough. The gelatin and corn syrup combo is key—make sure you bloom the gelatin properly in cold water for 5 minutes before heating. Also, never overmix the buttercream after adding butter, and always let it set at room temperature for 2 hours before slicing. If your kitchen is warm, chill the cake for 1 extra hour.
What’s the secret to clean slices every time?
Use a long serrated knife dipped in hot water (not boiling) and wiped clean between cuts. Press gently but firmly through each layer, and avoid twisting—the knife should move straight down. For extra precision, chill the cake for 30 minutes before slicing, which helps the buttercream hold its shape better.
Can I make this cake ahead of time for a wedding?
Yes! Assemble the cake 1 day ahead and store it in the fridge. When ready to serve, let it sit at room temperature for 2-3 hours before slicing. For even better results, assemble it in stages—build half the layers, refrigerate overnight, then complete the stacking the next day. This prevents the buttercream from becoming too soft during long prep sessions.

- 6 Oz Chocolate Chip Cookie Recipe: Perfectly Balanced Crispy Edges and Chewy Hearts - September 25, 2026
- 6-Inch Coffee Cake Recipe: Vanilla Bean Swirls and Buttery Streusel Topping - September 25, 2026
- 1 Hour Soup Recipe: Velvety Richness Without the Wait - September 25, 2026