
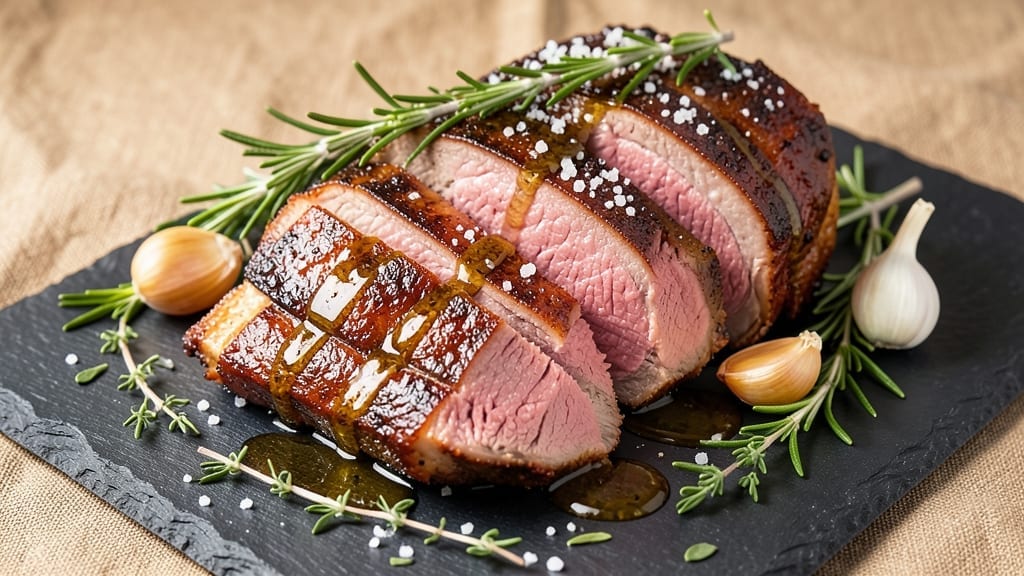
A juicy pink center and crispy herb crust are exactly what this 11 lb rib roast recipe delivers—perfect for feeding a crowd without sacrificing tenderness.
The secret lies in a precise balance of low-and-slow roasting and high-heat searing, ensuring every slice stays moist while the exterior develops that coveted caramelized crust.
I’ve perfected this method over years of holiday feasts, where the difference between a dry roast and one that melts in your mouth comes down to timing, temperature, and a few key techniques.
What sets this recipe apart is the herb crust, a flavorful barrier that locks in moisture while adding depth to every bite.
You’ll start with a dry brine (a game-changer for large roasts) and finish with a blend of fresh rosemary, thyme, and garlic that crisps beautifully under the broiler.
The roast cooks to 130–145°F internal temperature—your choice for medium-rare or medium—before resting to redistribute juices, guaranteeing a result that’s restaurant-quality at home.
By the time you carve into this roast, you’ll have a center that’s tender and pink, a crust that’s crispy and aromatic, and sides that complement perfectly—think roasted root vegetables, a red wine reduction, or crusty bread to soak up every last drop.
This isn’t just a recipe; it’s a centerpiece for gatherings, where the effort feels worth every bite. Let’s get started with the steps that make it foolproof.
The beauty of this method is its scalability—whether you’re feeding 10 or 20, the same principles apply. Optional techniques like a dry brine overnight or a brown butter glaze elevate it further, but the core process remains simple: patience, precision, and a little love. Your table will thank you.
Ingredients for 11 lb rib roast
Eleven pounds of prime rib transforms into a showstopper with these carefully chosen ingredients—where every element works to lock in juices and build that coveted crust.
| Ingredient | Amount | Notes |
|---|---|---|
| Prime Rib Roast (Ribeye) 🥩 | 11 lb | Bone-in, center-cut for even cooking |
| Kosher Salt 🧂 | 2 cups | Diamond Crystal preferred for dry brine |
| Fresh Rosemary 🌿 | ½ cup | Finely chopped, stems removed |
| Fresh Thyme 🌿 | ¼ cup | Leaves only, no stems |
| Garlic Cloves 🧄 | 12 cloves | Peeled, smashed for herb crust |
| Extra-Virgin Olive Oil 🫒 | ½ cup | High-quality, fruity variety |
| Unsalted Butter 🧈 | ½ cup | Cold, cubed for herb crust |
| Black Peppercorns 🌶️ | 2 tbsp | Freshly cracked, coarse grind |
| Red Wine 🍷 | 1 cup | Bold, dry (Cabernet Sauvignon recommended) |
| Beef Tallow or Duck Fat 🍴 | ¼ cup | For basting, optional but recommended |
| Fresh Parsley 🌿 | ¼ cup | Chopped, for garnish |
| Balsamic Vinegar 🍶 | 2 tbsp | For finishing drizzle |
| Dried Mustard Powder 🌶️ | 1 tsp | For herb crust depth |
The rib roast is non-negotiable here—bone-in, center-cut prime rib is your best bet for even cooking and maximum flavor. Costco or Whole Foods carry excellent cuts, but ask your butcher to trim excess fat if you’re buying from a specialty shop. The Diamond Crystal kosher salt is key for the dry brine (it dissolves better than table salt), and I always grab a fresh bunch of rosemary and thyme from the grocery store’s produce section—nothing beats the aroma of fresh herbs. For the garlic, peel and smash the cloves with the flat side of your knife before mixing into the crust; this releases more flavor. The olive oil should be fruity and extra-virgin—none of that cheap cooking oil stuff. And trust me on the butter: cold, cubed butter in the herb crust makes all the difference when it browns under the broiler.
No fresh rosemary? Dried at one-third the amount works in a pinch, but the texture won’t be the same. Short on time? Pre-chop your herbs and store them in the fridge for up to 3 days before using. The red wine can be swapped for beef broth with a splash of balsamic if you’re avoiding alcohol, but the acidity helps tenderize. For the fat, olive oil alone works if you’re skipping tallow—just use an extra tablespoon. The balsamic vinegar is optional but adds a touch of sweetness that balances the richness. And if you’re feeling fancy, truffle oil in the basting liquid takes this to the next level (just a teaspoon!).
The roast itself keeps beautifully in the fridge for 3-4 days if wrapped tightly in butcher paper, but it’s even better the next day as the flavors meld. For longer storage, vacuum-seal portions and freeze for up to 6 months—just thaw overnight in the fridge before reheating. The herb crust mix can be prepped a day ahead and stored in the fridge, saving you time on cook day. And here’s a pro tip: save the roasting juices—they make an incredible gravy when reduced with a little flour and stock. Leftovers? Repurpose them into sandwiches, tacos, or hash for easy meals later in the week.
Why You’ll Love This Recipe
- Minimal Prep, Maximum Impact: I swear by this—just a handful of ingredients, no fancy techniques. You’re rubbing salt, herbs, and garlic on a massive hunk of beef, then letting the oven do the work. That’s it. Even if you’re the kind of cook who burns toast, this won’t stress you out.
- Crispy-Creamy Magic: The rosemary and thyme cling to that prime rib like it’s their job, while the garlic infuses every bite. That crispy edge on the outside? Chef’s kiss. It’s the kind of flavor that makes people lean in closer, like they’re about to get a secret.
- Leftovers That Don’t Suck: Honestly, I make this because of the leftovers. The roast practically begs to be sliced thin for sandwiches or tossed into hash the next day. No sad, dry meat here—it’s still juicy, still rich, still worth eating.
- One Roast, Endless Uses: This isn’t just a Sunday dinner. Feed a crowd? Done. Meal prep for the week? Done. Hosting a game day? Done. I’ve repurposed slices into tacos, salads, and even a fancy charcuterie board—because why not? The versatility is ridiculous.
Step-by-step instructions for juicy pink rib roast with crispy herb crust
Here’s how to achieve that perfect balance of tender pink center and golden herb crust—every time.
Prepare the Prime Rib for Dry Brining
Remove the prime rib roast from its packaging and pat it completely dry with paper towels, including the cavity. I can’t stress this enough—moisture is the enemy of crispy crust. Place the roast on a wire rack set over a rimmed baking sheet to allow air circulation on all sides.
In a small bowl, combine the 2 cups kosher salt with the 1 tsp dried mustard powder. This dry brine mixture is crucial for both seasoning and tenderizing the meat. Generously coat the entire surface of the roast with this mixture, pressing it into the meat so it adheres evenly. Don’t forget the fat cap—this is where the crispy crust will form. Place the roast on a tray lined with parchment paper and refrigerate uncovered for 24 hours. This step is non-negotiable for achieving that perfect pink center and flavor penetration.
Create the Herb Butter Crust
After the dry brine, remove the roast from the refrigerator and let it sit at room temperature for 1 hour before cooking. While it comes to room temperature, prepare the herb butter crust. In a food processor, combine the 0.5 cup cold unsalted butter, 0.5 cup extra-virgin olive oil, 0.5 cup finely chopped fresh rosemary, 0.25 cup fresh thyme leaves, 12 smashed garlic cloves, and 2 tbsp cracked black peppercorns. Pulse until the mixture is finely chopped but still slightly textured—you want visible herb flecks for maximum flavor impact.
Spread this herb butter mixture evenly over the entire surface of the roast, including the fat cap. Press it firmly into the meat so it sticks. The butter will render during cooking, creating that coveted crispy crust while keeping the interior juicy. This is where the magic happens—don’t skip spreading it thinly over the entire surface.
Sear the Roast for Maximum Flavor
Preheat your oven to 450°F with a rack positioned in the lower third. Place the roast on the rack in the preheated oven and roast for 30 minutes. This initial high-heat sear creates a flavorful crust and helps render the fat. After 30 minutes, reduce the oven temperature to 325°F. Here’s the thing—this initial sear is critical for developing deep flavor before we switch to low-and-slow cooking.
While the roast is searing, prepare a basting mixture by combining 1 cup red wine and 0.25 cup beef tallow or duck fat in a small saucepan. Bring to a simmer over medium heat, then remove from heat. This mixture will help keep the roast moist during the long cook. After the initial 30 minutes, carefully brush this mixture over the roast and return it to the oven.
Cook to Perfect Doneness
Continue roasting at 325°F until the internal temperature reaches 115°F for medium-rare (about 2 to 2.5 hours total cooking time). This is where patience pays off—low and slow ensures that juicy pink center. Use a meat thermometer inserted into the thickest part of the roast (not touching bone) to monitor the temperature. The roast is ready when it reaches 115°F—this is the sweet spot for that perfect pink center.
During the last 30 minutes of cooking, tent the roast loosely with aluminum foil to prevent the crust from drying out. Remove the roast from the oven when it reaches 115°F and let it rest for 20 minutes before carving. This resting period is absolutely essential—it allows the juices to redistribute throughout the meat, ensuring every slice is moist and flavorful.
Finish and Serve with Flavorful Garnishes
After resting, carefully transfer the roast to a warm serving platter. Use a sharp carving knife to slice the roast into 1-inch thick slices against the grain. The slices should be beautifully pink in the center with a crispy, golden herb crust on the outside. Here’s a pro tip—I like to arrange the slices on a warm platter and drizzle with the remaining 2 tbsp balsamic vinegar mixed with a splash of the red wine reduction from earlier.
Garnish each slice with 0.25 cup chopped fresh parsley just before serving. The parsley adds a fresh contrast to the rich, herby crust. Serve immediately with roasted vegetables or a simple green salad. The combination of the crispy herb crust and juicy pink center makes every bite unforgettable—this is what we’re aiming for all along.
Pro Tips For Making 11 Lb Rib Roast
- CRANK THE OVEN HIGH: The first 20 minutes at 500°F (yes, that’s hot) sears the crust and locks in juices—don’t skimp. After that, drop to 325°F for the rest. I used to play it safe with lower heat, and the roast never got that caramelized bark I wanted.
- SLICE GARLIC THIN: Crush those cloves with the flat of your knife first, then slice them paper-thin—this way, they infuse flavor without turning to mush. Thick slices just sit there like flavorless pebbles. (And skip the pre-minced stuff; it’s sad.)
- SALT THE MEAT TWICE: Do it 24 hours ahead with a heavy hand, then again 2 hours before cooking. The first salt breaks down the surface proteins, and the second builds that crust. I learned this the hard way after a roast turned out bland—turns out, salt isn’t just for seasoning.
- REST IT UNDER FOIL: Let the roast sit for 30 minutes, wrapped in foil, before slicing. This keeps the juices from pooling on the cutting board. I know, I know—you’re eager to dig in—but trust me, the difference is night and day. (Your guests won’t even notice the wait.)
Flavor customization for 11 lb rib roast
Herb Variations
Swap out the rosemary and thyme for fresh sage and garlic—this Italian-inspired twist pairs beautifully with the butter crust. Use 0.5 cup chopped sage leaves and 8 smashed garlic cloves instead, adding 1 tbsp lemon zest for brightness.
The sage adds earthy depth while the lemon prevents the dish from feeling too heavy. 🌿
Spice Infusions
For a kick of heat, add 1 tbsp smoked paprika and 1 tsp cayenne pepper to the herb butter mixture. The smokiness complements the roast’s richness, while the cayenne adds subtle heat.
I like to balance it with 1 tbsp honey> mixed into the basting liquid for a sweet-spicy contrast. Adjust cayenne to taste—start with ½ tsp> if you’re sensitive to heat.
Cheese Crust Upgrade
Mix ½ cup finely grated Gruyère> or Parmigiano-Reggiano> into the herb butter crust for a nutty, umami-rich finish. The cheese melts into the butter, creating a golden, crispy layer that’s irresistible.
Use 2 tbsp fresh breadcrumbs> in the mixture to help bind the cheese and prevent it from sliding off during cooking. This works especially well with a white wine reduction> instead of red.
Citrus Zest Brightness
Add 1 tbsp orange zest> or lemon zest> to the herb butter for a refreshing twist. The citrus cuts through the richness of the roast, adding a bright, aromatic note. Pair it with a white wine and shallot reduction> for a lighter, more elegant presentation.
I often garnish with thin orange slices> on the platter for a pop of color and acidity.
Smoky Charcoal Touch
For a unique smoky flavor, lightly toast 1 tbsp crushed coriander seeds> and 1 tsp ground cumin> in a dry skillet until fragrant. Mix these into the herb butter crust along with the garlic and herbs.
The earthy, slightly sweet notes add complexity without overpowering. This works especially well if you’re serving the roast with charred corn or black beans> for a Mexican-inspired fusion.
Sweet Glaze Finish
Brush the roast with a honey-mustard glaze> during the last 15 minutes> of cooking. Mix 2 tbsp honey>, 1 tbsp Dijon mustard>, and 1 tsp soy sauce> for a sticky, caramelized finish.
The sweetness balances the herb crust’s richness, and the mustard adds a tangy depth. Drizzle lightly over the slices before serving for an elegant touch. ✨
Nutrition facts
Frequently asked questions
How do I adjust cooking time for a different weight roast?
For this recipe, calculate 15-18 minutes per pound at 325°F for medium-rare (115°F internal temp). So an 8 lb roast would cook for about 2-2.5 hours, while a 14 lb would need 3-3.5 hours. Always use a meat thermometer—the size matters less than hitting the right internal temperature. The initial 30-minute 450°F sear remains the same regardless of weight.
Can I cook this roast in a smoker instead of the oven?
Smoke the roast at 225-250°F until it reaches 115°F internal (about 4-5 hours for 11 lbs). Use a hickory or cherry wood blend for classic flavor. After reaching temp, finish with a 10-minute broil to crisp the herb crust. The low-and-slow method works perfectly with smoking—just monitor the temp closely as smokers can vary in heat distribution.
What if my roast doesn’t have a fat cap?
No fat cap? No problem! The herb butter crust will still create a beautiful crust. Simply spread the mixture evenly over all surfaces, including the edges. For extra richness, add 2 tbsp extra butter to the crust mixture. The key is pressing the herb butter firmly into the meat so it sticks during cooking—this ensures maximum flavor transfer and moisture retention.
How do I prevent the roast from drying out?
Three critical steps: 1) Dry brine overnight (non-negotiable), 2) Use a meat thermometer (never guess), and 3) Rest for 20 minutes before carving. The dry brine keeps it juicy, the thermometer prevents overcooking, and resting lets juices redistribute. For extra insurance, tent loosely with foil during the last 30 minutes of cooking to protect the crust while maintaining moisture.
Can I make this roast ahead of time?
Yes! Cook the roast to 110°F internal (about 10°F below target), then let it rest and refrigerate for up to 2 days. Reheat in a 275°F oven until it reaches 130°F (about 1.5 hours for an 11 lb roast). The flavors actually improve overnight as they meld. For serving, simply broil for 5-7 minutes to rec crisp the herb crust before carving.

- Baked Potatoes in Crock Pot Recipe: Buttery Interiors and Crispy Top Magic - November 1, 2026
- Braised Beef Short Ribs Recipe: Crock Pot Fall-Off-Bone Magic in 6 Hours - November 1, 2026
- Crock Pot Cocoa Recipe: Velvety Warmth With Hidden Spice Magic - November 1, 2026