
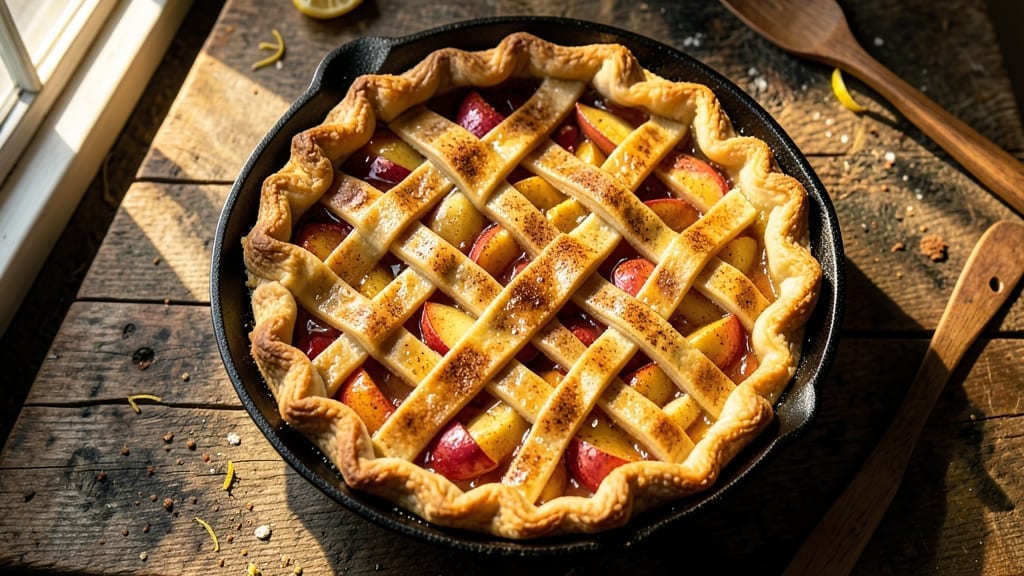
This 12-inch cast iron skillet apple pie delivers restaurant-quality dessert in a single pan—no fuss, no mess, just golden crust and spiced filling that tastes like autumn in every bite.
The secret lies in cast iron’s even heat distribution, which eliminates the risk of a soggy bottom while creating a crisp, caramelized crust that’s impossible to resist.
I perfected this recipe after years of trial and error, ensuring the filling stays tender while the edges achieve that perfect balance of flaky and slightly crisp.
What makes this recipe stand out is its simplicity: a homemade crust (or store-bought shortcut) meets a classic apple filling of cinnamon, nutmeg, and brown sugar, all baked in the same skillet.
The cast iron’s weight helps distribute heat evenly, preventing hot spots that can burn the crust or leave the filling undercooked. With just 45 minutes in the oven, you’ll have a pie that looks and tastes like it came from a bakery—no deep-dish pan or pie dish required.
The result is a pie with a deeply golden crust, fragrant with warm spices, and a filling that’s just soft enough to melt in your mouth. The cast iron’s natural nonstick properties mean less sticking, and the edges develop a beautiful caramelization that adds depth to every slice.
Serve it warm with a scoop of vanilla ice cream or whipped cream for the ultimate dessert experience.
Whether you’re feeding a crowd or treating yourself to a cozy weeknight dessert, this skillet pie delivers foolproof results every time. The recipe scales easily, and the cast iron skillet doubles as servingware—no extra dishes to wash. Here’s how to make it perfectly the first time.
Ingredients for 12 inch cast iron skillet apple pie
Six apples, a skillet, and these pantry staples—everything you need for foolproof golden pie.
| Ingredient | Amount | Notes |
|---|---|---|
| All-Purpose Flour 🌾 | 2 ½ cups | Sifted for light texture |
| Unsalted Butter 🧈 | 1 cup | Cold, cubed for crust |
| Granulated Sugar 🍚 | ¼ cup | Plus 0.5 cup for filling |
| Ice Water 💧 | ½ cup | Chilled for crust |
| Large Egg 🥚 | 1 whole | For egg wash |
| Ground Cinnamon 🌿 | 2 tbsp | Toasted for deeper flavor |
| Ground Nutmeg 🌶️ | ½ tsp | Freshly grated preferred |
| Light Brown Sugar 🍚 | ¾ cup | Packed, for filling |
| Lemon Juice 🍋 | 2 tbsp | Freshly squeezed |
| Salt 🧂 | 1 tsp | Kosher preferred |
| Medium Apples 🍎 | 6 whole | Honeycrisp or Granny Smith |
| Vanilla Extract 🌸 | 1 tsp | Pure vanilla preferred |
| Heavy Cream 🥛 | ¼ cup | Optional for topping |
The crust is the star here, so don’t cut corners. King Arthur flour or Bob’s Red Mill gives the best texture, but any all-purpose works. For butter, Plugrá or Land O’Lakes unsalted melt beautifully—never use salted. Chill your butter cubes and water for 30 minutes before mixing, or the crust will get gummy. If you’re short on time, Pillsbury pie crust works in a pinch (just skip the egg wash and brush with melted butter instead). The apples? Honeycrisp or Granny Smith hold up best—avoid mealy varieties like Gala.
No cinnamon? Cinnamon sticks ground in a spice grinder taste better than pre-ground. Nutmeg too expensive? Mace works at half the amount. Short on apples? Substitute pears or tart cherries, but reduce sugar by 0.25 cup. The lemon juice keeps the filling bright—bottled works, but fresh is worth it. For extra richness, add 0.25 cup of applesauce to the filling. And if you’re making this ahead, bake the crust first, then add filling the next day—prevents a soggy bottom.
This pie tastes even better the next day, so make it ahead if you can. Store leftovers at room temp for 2 days or refrigerate for 4 days. The crust stays crispy if you reheat slices in a 350°F oven for 5 minutes. Freeze the whole pie (unserved) for 3 months—thaw overnight in the fridge. Pro tip: Brush the crust with cream before baking for extra browning, and sprinkle with cinnamon sugar after it comes out of the oven.
Why You’ll Love This Recipe
- No-Roll Crust Magic: I swear by this butter-and-flour crust—just mix, chill, and fold. No rolling pin, no stress, and that flaky edge? It’s the kind of shortcut that makes you feel like a pro (even when you’re not).
- Skillet Perfection: That cast iron holds heat like a dream, so you get a caramelized bottom with a tender top—no soggy pie crust in sight. Plus, it’s one dish, one cleanup, and zero fuss.
- Weeknight Hero: I’ve served this to book club, potlucks, and even my skeptical brother-in-law. It’s simple enough for a Tuesday but fancy enough for company, and the leftovers reheat beautifully (yes, even the crust).
- Budget Sweet Spot: A single pie costs me pennies compared to store-bought, and the ingredients last forever. That egg? It’s the secret to a crust so sturdy, you won’t need extra dough. Smart, tasty, and guilt-free.
Step-by-step instructions for one-pan cast iron skillet apple pie
Here’s how to make a perfect golden crust with spiced apple filling—all in one pan.
Make the Pie Crust in the Skillet
Cut the 1 cup unsalted butter into ½-inch cubes and place them in your 12-inch cast iron skillet. Let it sit at room temperature for 10 minutes to soften slightly. In a large bowl, whisk together the 2.5 cups all-purpose flour, 1 teaspoon salt, and 0.25 cup granulated sugar. Add the cold butter cubes and use a pastry cutter or your fingers to work the butter into the flour until the mixture resembles coarse crumbs with some pea-sized butter pieces remaining.
Drizzle in the 0.5 cup ice water while stirring with a fork. Mix just until the dough comes together—don’t overwork it. Turn the dough out onto a lightly floured surface and gently press it into a ¼-inch thick round about 14 inches in diameter. Transfer the dough to the skillet and press it into the bottom and 3 inches up the sides. The dough will be uneven—that’s okay. Chill in the refrigerator for 30 minutes while you prep the filling.
Prepare the Spiced Apple Filling
Peel, core, and slice the 6 whole medium apples into ¼-inch thick slices. In a large bowl, toss the apples with 0.75 cup packed light brown sugar, 2 tablespoons ground cinnamon, 0.5 teaspoon ground nutmeg, 2 tablespoons lemon juice, and 1 teaspoon vanilla extract. Let the mixture sit for 10 minutes—this helps the apples soften and releases their juices. The filling should look glossy and fragrant.
Preheat your oven to 375°F. Remove the chilled crust from the refrigerator and brush the sides with the 1 whole large egg beaten with 1 tablespoon water for an egg wash. This will give your crust that beautiful golden color. Spread the apple mixture evenly over the crust, mounding it slightly in the center. The filling should come up to about ½ inch from the top of the crust.
Bake Until Golden and Bubbly
Bake the pie for 45 minutes. After 30 minutes, tent the skillet loosely with aluminum foil to prevent the top from browning too quickly. The filling should be bubbling and the crust should be deep golden brown with some spots of light brown. If the crust starts to darken too quickly, cover it completely with foil for the remaining baking time.
For the last 5 minutes, remove the foil and bake until the crust is deep golden brown and the filling is bubbling vigorously. The apples should be tender but not mushy. If you’re using the 0.25 cup heavy cream for a topping, drizzle it over the filling in the last 2 minutes of baking—it will create a beautiful caramelized crust.
Cool and Serve Warm
Let the pie cool for 15 minutes before serving. This resting time allows the filling to set slightly and makes it easier to slice. The crust should be crisp and flaky while the filling remains juicy and warm. Serve slices directly from the skillet—it’s perfect for sharing with family or guests. The cast iron retains heat beautifully, keeping your pie warm and delicious.
Pro Tips For Making 12 Inch Cast Iron Skillet Apple Pie
- Chill the Dough First: After rolling out your crust in the skillet, pop it in the fridge for 15–20 minutes before filling. I learned this the hard way—skipping it makes the butter leak like a sad, greasy mess when the apples bake. Cold dough = crispy crust, not a soggy bottom.
- Pre-Cook the Apples: Toss your sliced apples with sugar and spices, then let them sit uncovered for 10 minutes before baking. This draws out excess juice, so your pie doesn’t turn into a watery apple soup. (Yes, even if you’re impatient like me.)
- Use Cold Butter in Crust: Cut that unsalted butter into the flour using a pastry cutter or your fingers until it’s pea-sized, not paste. Cold butter = flaky layers, not a dense brick. If your dough feels too sticky, add ice water 1 tablespoon at a time—it’s easier to fix than dry dough.
- Bake Until Golden, Not Just Brown: Your pie’s done when the crust is deep golden, not just “light brown.” If it’s browning too fast, tent it with foil. I used to pull mine out too soon, and the crust stayed pale and sad—like it was holding back. A toothpick check is fine, but look at the color first.
Regional styles of this 12 inch cast iron skillet apple pie
New England Classic
In New England, apple pies are a symbol of autumn harvests and family gatherings. This version uses Granny Smith apples for tartness and often includes a touch of maple syrup in the filling—about 2 tablespoons—to honor the region’s maple tradition.
I like adding 1 teaspoon of ground cardamom alongside the cinnamon for a subtle Nordic twist that locals appreciate. Serve with vanilla ice cream made from local cream for the ultimate New England experience. 🍁
Southern Comfort Style
Southern cooks often sweeten their apple pies with cornmeal in the crust—about ¼ cup mixed into the flour—for extra crunch. The filling gets a boost of pecan pieces (about ½ cup) and a splash of bourbon (1 tablespoon) for depth.
I prefer Braeburn apples for their balance of sweetness and tartness. Top with a whipped cream dusted with powdered sugar and a pinch of salt for that classic Southern touch. 🥜
Midwest Homestyle
The Midwest loves its apple pies with a lattice crust—achieve this by rolling out half the dough, cutting it into strips, then weaving it over the filling. Use Honeycrisp apples and add 1 teaspoon of ground ginger to the filling for warmth.
A secret trick I learned from my grandmother is to sprinkle crushed graham crackers (about ¼ cup) over the filling before baking for added texture. Serve with apple cider on the side for dipping. 🍂
Pacific Northwest Twist
West Coast versions often incorporate blackberries or raspberries (about ½ cup) into the filling for a berry-apple fusion. Use Fuji apples for their crisp sweetness and add 1 teaspoon of orange zest to brighten the flavors.
A drizzle of honey (about 2 tablespoons) replaces some of the brown sugar. For the crust, I like adding 1 tablespoon of chia seeds to the dough for extra fiber and nuttiness. Pair with local blueberry ice cream for a Pacific Northwest-inspired dessert. 🌲
Texas-Style BBQ Apple Pie
This bold variation adds smoked paprika (½ teaspoon) and chopped pecans (½ cup) to the filling, then tops it with a sweet BBQ sauce (about ¼ cup) drizzled over the crust before baking. Use Pink Lady apples for their balance of sweetness and acidity.
The crust gets a brush of melted butter mixed with 1 teaspoon of smoked salt for a savory-sweet contrast. Serve with salted caramel ice cream for a Texas-sized dessert. 🔥
Modern Minimalist
For a sleek, contemporary take, skip the top crust entirely and focus on a single thick crust with a rustic edge. Use aromatic apples like Jazz and reduce the sugar to ½ cup to let the natural sweetness shine.
Add 1 teaspoon of thyme to the filling for an herbal note. After baking, brush the crust with apricot jam (about 2 tablespoons) for a glossy finish. Serve with coconut yogurt for a lighter, modern pairing. ✨
Nutrition facts
Frequently asked questions
Can I use a store-bought crust instead of homemade?
For convenience, use one 12-inch refrigerated pie crust (like Pillsbury). Press it directly into your cast iron skillet and chill for 20 minutes before adding filling. Skip the egg wash—just brush with melted butter for browning. The texture will be slightly different but still delicious!
How do I prevent a soggy bottom crust?
Prevent sogginess by baking the crust 5 minutes before adding filling (called “pre-baking”). For extra insurance, sprinkle ½ cup crushed cornflakes or oats on the crust before filling—it absorbs moisture beautifully. The cast iron’s even heat also helps maintain crust crispness.
What if my cast iron skillet is smaller than 12 inches?
Use a 10-inch skillet and reduce apples to 4 medium, filling ingredients by ⅔, and crust flour to 2 cups. Bake at 375°F for 35 minutes. A 14-inch skillet requires increasing everything by 1.5x and baking 50 minutes. Always adjust oven time based on your pan size.
Can I make this pie ahead of time?
Yes! Assemble the pie (unbaked) and refrigerate for up to 24 hours. For best results, bake the crust first, then add filling the next day. Store baked pie at room temperature for 2 days or refrigerate for 4 days. Reheat slices in a 350°F oven for 5 minutes to restore crispness.
Why did my crust turn dark too quickly?
Cast iron conducts heat intensely—cover the pie with foil after 25 minutes if browning too fast. For lighter color, reduce oven temp to 350°F**. Brush edges with extra egg wash to create a protective barrier. The filling should still bubble beautifully while the crust achieves perfect golden color.

- 12 Bean Chili Recipe: Hearty Slow-Cooked Depth With 12 Legumes - October 17, 2026
- 5 Seed Bread Recipe: Nutty Crunch and Artisan Flavor in One Loaf - October 17, 2026
- 1 Lb Macaroni Salad Recipe: Bold, Crunchy, and Crowd-Pleasing - October 17, 2026