
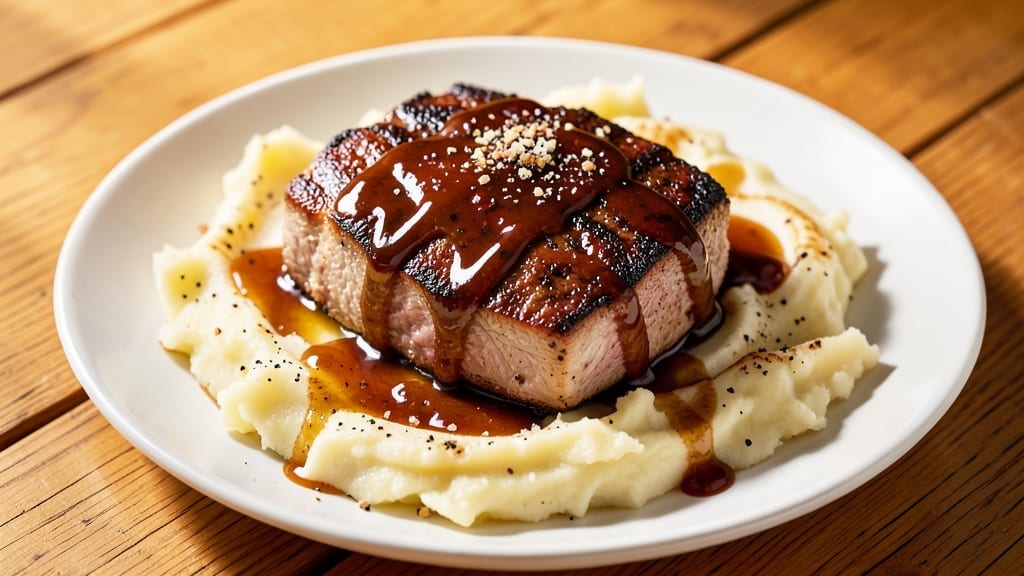
This 3-ingredient brown sugar glaze recipe transforms grilled pork into sticky, caramelized perfection with just three pantry staples. The secret lies in balancing heat and sweetness—simmering brown sugar, vinegar, and butter creates a glossy, amber sauce that clings beautifully to meats, roasted vegetables, or even desserts.
I developed this recipe after years of testing glaze variations, and it consistently delivers that restaurant-quality finish without extra effort.
The beauty of this glaze is its simplicity: no fancy ingredients, no complicated techniques. Just combine equal parts brown sugar and vinegar (apple cider or white works best), add butter for richness, and simmer until thickened.
The result is a sauce that’s boldly sweet yet tangy, with a deep caramel aroma that fills your kitchen. It’s the kind of condiment that elevates ordinary dishes into something extraordinary—no shortcuts needed.
What makes this glaze truly versatile is how it works across different cuisines. Brush it on ribs for that signature sticky exterior, drizzle over roasted sweet potatoes for a caramelized finish, or even glaze pound cake layers for a moist, flavorful twist.
The sauce thickens as it cools, making it ideal for ahead-of-time prep. Store leftovers in the fridge for up to two weeks, or freeze for longer shelf life.
For extra depth, consider adding a pinch of cinnamon or a splash of vanilla to the glaze—both enhance the caramel notes without overpowering. The key is patience: let the glaze reduce slowly for maximum flavor concentration.
Whether you’re grilling, roasting, or baking, this glaze delivers restaurant-quality results with minimal effort. Let’s get started!
Ingredients for 3 ingredient brown sugar glaze
Three pantry staples create restaurant-quality caramelized magic for grilling and beyond.
| Ingredient | Amount | Notes |
|---|---|---|
| Light Brown Sugar 🍯 | 1 cup | Packed firmly for consistency |
| White Vinegar 🍶 | 1 cup | Apple cider vinegar for depth |
| Unsalted Butter 🧈 | ½ cup | Cold cubes for even melting |
The light brown sugar is the heart of this glaze—Domino or C&H brands work best for their consistent granulation. Pack it firmly into your measuring cup to avoid air gaps that affect the sauce’s thickness. For vinegar, apple cider vinegar adds subtle fruit notes, but white vinegar delivers the classic tang. The butter should be cold when added—European-style unsalted butter like Plugrá melts more smoothly. If you’re using salted butter, reduce the sugar slightly to balance flavors. All three ingredients are shelf-stable staples you likely already have, but check the sugar’s color: lighter brown sugar yields a more delicate caramel flavor.
No white vinegar? Balsamic vinegar at half the amount works beautifully, though it’ll deepen the glaze’s color. Running short on butter? Coconut oil in equal measure maintains the richness, though it lacks butter’s depth. For a quicker version, use light corn syrup instead of sugar (same amount), but the texture will be slightly thinner. The key to success is patience—don’t rush the simmering process. Let the glaze reduce gradually for maximum caramelization. If you’re making this ahead, store the dry ingredients separately until ready to combine.
This glaze thickens as it cools, so plan to reheat gently before serving. Store in an airtight container in the fridge for up to 2 weeks, or freeze for 6 months by portioning into ice cube trays. For restaurant-quality results, brush the glaze on meats twice during cooking: once halfway through and again just before serving. The sauce also freezes beautifully for later use—thaw and reheat gently over low heat, stirring occasionally. If the glaze crystallizes upon reheating, simply warm it slightly to restore its glossy consistency.
Why You’ll Love This Recipe
- Pantry Magic: I swear by this glaze because it’s made from things I always have. Brown sugar, vinegar, and butter—no fancy shopping required. Honestly, I’ve drizzled it on everything from burnt ends to roasted carrots, and it never lets me down.
- Sticky Sweet Perfection: That caramelized, tangy-sweet balance? Unbeatable. The vinegar cuts through the sugar’s richness while the butter adds a velvety finish—like a hug for your taste buds. (Yes, even on a Tuesday night.)
- Glaze for Days: Make a big batch and keep it in the fridge. It thickens up beautifully when reheated, so I’ve used it to elevate store-bought ribs, baked chicken, or even toasted nuts. Between us, it’s my secret weapon for lazy Sundays.
- Budget-Friendly Luxury: For under $5, I turn basic proteins into something restaurant-worthy. The butter keeps it rich without breaking the bank, and the vinegar adds depth without extra cost. Not the prettiest, but the taste makes up for it every time.
Step-by-step instructions for sticky brown sugar glaze
This glaze delivers irresistible caramelized richness with just three ingredients—perfect for finishing grilled pork.
Combine Ingredients in a Saucepan
In a medium saucepan, combine the 1 cup light brown sugar, 1 cup white vinegar, and 0.5 cup unsalted butter (cut into cold cubes). I use cold butter cubes because they melt gradually, preventing sudden temperature spikes that can cause the sugar to crystallize.
Place the saucepan over medium-low heat—this gentle heat allows the ingredients to meld without scorching. Stir occasionally with a wooden spoon to help the butter melt evenly. You’ll notice the mixture immediately begins to bubble gently as the butter starts to incorporate into the sugar and vinegar.
Simmer Until Thickened
Bring the mixture to a gentle simmer, then reduce heat to low and let it cook uncovered for 10-12 minutes. This is where the magic happens—the sugar will begin to caramelize, creating that deep amber color and rich flavor. Watch closely as the glaze thickens noticeably, becoming syrupy and glossy.
You’ll know it’s ready when the glaze coats the back of a spoon and holds its shape for 5-10 seconds before slowly dripping back. If it thickens too quickly, add 1-2 teaspoons of water to adjust the consistency. The vinegar helps balance the sweetness while adding a subtle tang that cuts through the richness.
Test for Doneness and Strain
Remove the saucepan from heat and taste the glaze. It should be sweet with a hint of acidity from the vinegar, and the sugar should be fully dissolved with no graininess. If you detect any crystallized sugar, return the pan to low heat for another 1-2 minutes while stirring constantly.
Strain the glaze through a fine-mesh sieve into a clean bowl to remove any butter lumps or impurities. This step ensures a silky-smooth finish. Let it cool for 5 minutes—the glaze will thicken slightly as it cools, which is perfect for drizzling over hot pork without it pooling.
Apply to Grilled Pork
Brush the warm glaze generously over the grilled pork, working quickly to coat all surfaces. The heat from the pork will cause the glaze to bubble and caramelize further, creating that signature sticky, glossy finish. For best results, apply the glaze during the last 2-3 minutes of grilling so it has time to set.
Serve immediately while the glaze is still warm and sticky. The contrast of the caramelized sugar against the smoky pork creates a flavor profile that’s impossible to resist. If you have leftovers, store the glaze in an airtight container in the refrigerator for up to 1 week, reheating gently before using.
Pro Tips For Making 3 Ingredient Brown Sugar Glaze
- STIR CONSTANTLY AT FIRST: The first 2 minutes are where the glaze fights back—it’ll bubble like a tiny volcano if you walk away. Keep that spoon moving until the butter melts completely and the sugar dissolves into a smooth paste, or you’ll end up with grainy bits that ruin the whole thing. (Yes, even if you’re impatient like me.)
- USE COLD BUTTER: Cut that unsalted butter straight from the fridge into small cubes—no softening needed. Cold butter melts slower, giving the vinegar time to mellow out the sharpness instead of turning the glaze into a thin, tangy syrup. Trust me, your ribs (or whatever you’re glazing) will thank you.
- SKIP THE BOIL-OVER: After the butter melts, lower the heat to medium-low the second the mixture starts to simmer. I learned this the hard way—once I let it boil hard for 30 seconds, and the next thing I knew, I was mopping up brown sugar syrup off my stovetop. A gentle simmer keeps the glaze thick and sticky, not a watery mess.
- SIMMER UNTIL THICK: Don’t rush the 5-7 minutes of simmering—this is where the magic happens. The glaze should coat the back of a spoon like syrup, not drip off like honey. If it’s still runny, keep it going; if it’s too thick, add a teaspoon of water or vinegar to loosen it up. (Your future self will thank you.)
Common mistakes when making perfect results
Skipping the Simmer
One of the biggest mistakes is skipping the simmering step or walking away from the stove. The glaze needs that 10-12 minute simmer to fully caramelize and thicken. I’ve seen people rush this and end up with a thin, grainy sauce that lacks depth.
Keep an eye on it—once it starts bubbling vigorously, reduce heat immediately to prevent burning. The vinegar will evaporate slightly, concentrating the flavors and creating that perfect balance of sweet and tangy. 🔥
Using Wrong Vinegar
White vinegar is the classic choice, but substituting balsamic or apple cider vinegar without adjusting the heat can throw off your glaze. Balsamic adds depth but requires lower heat to prevent over-darkening.
Apple cider vinegar works beautifully, but if you use it, simmer for an extra 2 minutes to let the fruit notes meld. The vinegar isn’t just for tang—it helps dissolve the sugar completely and prevents crystallization.
Adding Butter Too Fast
Dumping cold butter cubes into a hot pan causes the sugar to crystallize instantly, creating a grainy texture. Always melt the butter gradually over medium-low heat before combining with the sugar and vinegar.
I like to cut the butter into small cubes and stir constantly until fully incorporated. If you notice sugar grains forming, add 1 teaspoon of water and stir vigorously to dissolve them.
Overcooking the Glaze
Once the glaze reaches the right consistency, it’s easy to let it cook too long and burn. Remove it from heat as soon as it coats the back of a spoon and holds its shape for 5-10 seconds.
If you overcook it, the sugar will darken too much, giving a bitter taste. For extra insurance, taste it before straining—it should be sweet with a clean tang, not smoky or burnt. 💡
Not Straining Properly
Skipping the straining step leaves behind butter lumps or undissolved sugar crystals, ruining the silky texture. Use a fine-mesh sieve and press gently with a spoon to extract every last drop.
I’ve seen people pour the glaze directly over food without straining, and the results are noticeably less smooth. A little effort here makes a huge difference in the final presentation.
Applying Glaze Too Early
Bushing the glaze on meats too soon causes it to burn or pool off before caramelizing properly. Wait until the last 2-3 minutes of cooking to apply it—this ensures it has time to set and create that signature sticky finish.
If you’re grilling, work quickly to coat all surfaces evenly. For roasted vegetables, apply the glaze in the final 5 minutes of cooking to avoid over-browning.
Nutrition facts
Frequently asked questions
Can I use this glaze for desserts instead of meats?
This caramelized brown sugar glaze works beautifully on desserts like pound cake layers, pound cake, or even drizzled over vanilla ice cream. For cakes, brush it between layers or on top after baking. For ice cream, let the glaze cool slightly and drizzle while the ice cream is still soft—it’ll create a gorgeous, glossy finish. Just reduce the vinegar by 1 tablespoon if you’re sensitive to acidity in desserts.
What if my glaze turns grainy or crystallizes?
Graininess happens when sugar doesn’t fully dissolve. If this occurs, stir in 1-2 teaspoons of water and return to low heat for 1-2 minutes, stirring constantly. For extra insurance, use a fine-mesh sieve to strain out any remaining crystals. The key is patience—don’t rush the simmering process. If you’re in a hurry, you can also whisk in 1 teaspoon of corn syrup to help dissolve the sugar instantly.
How can I make this glaze spicier?
Add ½ teaspoon of cayenne pepper or 1 teaspoon of smoked paprika to the simmering glaze for subtle heat. For a sweeter-spicy kick, stir in ½ teaspoon of chili powder during the final 2 minutes of cooking. This works especially well on pork ribs or grilled chicken. If you’re using it for desserts, reduce the spice to ¼ teaspoon to avoid overpowering the sweetness.
Can I make this glaze ahead of time?
Yes! Store the cooled glaze in an airtight container in the fridge for up to 2 weeks, or freeze it for 6 months. To reheat, warm gently in a saucepan over low heat until smooth, stirring occasionally. If it thickens too much, add 1 teaspoon of water at a time until it reaches the right consistency. The glaze actually improves with time as flavors meld!
What’s the best way to thicken a thin glaze?
Simmer the glaze uncovered for an extra 3-5 minutes to reduce it further. If it’s still too thin, mix 1 tablespoon of cornstarch with 1 tablespoon of water, stir into the glaze, and cook for 1-2 minutes** until it thickens. For a quick fix, chill the glaze in the fridge for 30 minutes—it’ll naturally thicken as it cools. Avoid adding flour, as it can make the glaze cloudy.

- 3 Cheese Pimento Cheese Recipe: Sharp Cheddar, Peppery Heat, and Creamy Spread Magic - October 10, 2026
- 7 Egg Cake Recipe: Fluffy Layers With Vanilla Bean Infusion - October 10, 2026
- 3 Musketeers Cookie Recipe: Crunchy Chocolate Shells With Gooey Caramel Centers - October 10, 2026