
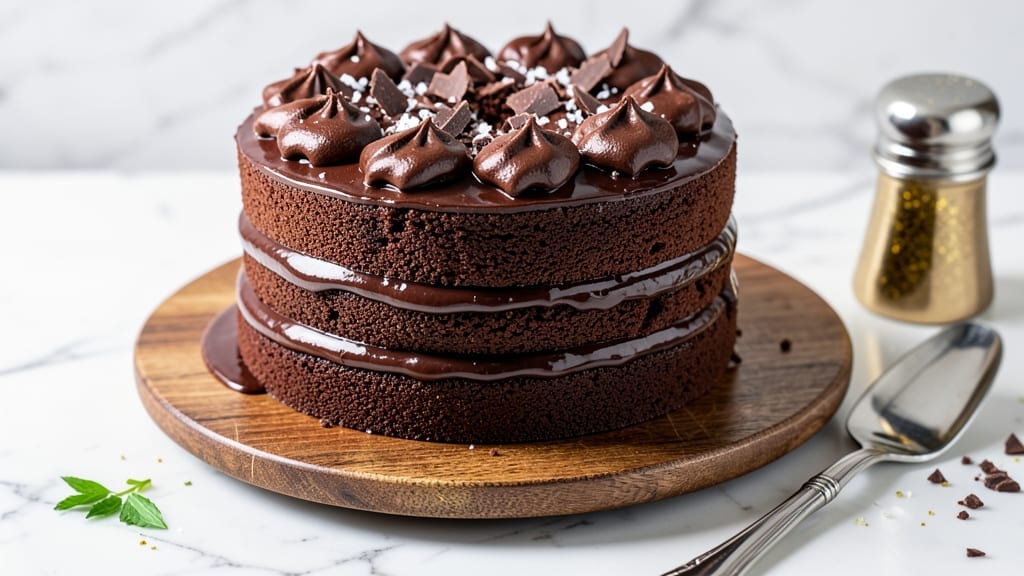
A 12-inch chocolate cake with triple layers and a rich ganache drizzle is the showstopper dessert every celebration deserves. This recipe delivers moist, fudgy layers with a perfectly balanced sweetness and deep cocoa flavor that satisfies even the most discerning chocolate lovers.
The secret lies in precise mixing techniques and proper layering to ensure structural integrity without compromising that signature tender crumb.
What sets this recipe apart is the professional-level finish—each layer is baked to an ideal doneness, cooled properly, and assembled with a velvety ganache that cascades beautifully.
The cake’s height comes from careful measurement and layering, while the ganache adds that luxurious restaurant-quality touch that makes it worth the effort. No special equipment is needed, just patience and attention to detail.
The result is a decadent centerpiece that commands attention at any gathering. The ganache drizzle not only enhances the visual appeal but also adds a glossy, semi-solid chocolate layer that contrasts perfectly with the cake’s texture.
Every slice reveals a moist interior with just the right balance of sweetness and chocolate intensity, making it a recipe you’ll want to perfect.
Whether you’re baking for a birthday, anniversary, or simply treating yourself, this 12-inch chocolate cake delivers restaurant-quality results at home. The technique is straightforward once mastered, and the reward is a dessert that will impress even the most critical of palates. Let’s get started on creating your masterpiece.
Ingredients for 12 inch chocolate cake
Precision-measured ingredients create a triple-layered chocolate masterpiece with restaurant-quality ganache drizzle.
| Ingredient | Amount | Notes |
|---|---|---|
| Unsalted Butter 🧈 | 1 ½ cups | Cold, cubed for creaming |
| Granulated Sugar 🍚 | 2 ½ cups | Superfine preferred for smoothness |
| Dark Chocolate Chips 🍫 | 12 oz | 70% cocoa or higher |
| Large Eggs 🥚 | 6 whole | Room temperature |
| All-Purpose Flour 🌾 | 3 cups | Sifted, spooned lightly |
| Cocoa Powder 🍫 | ¾ cup | Dutch-processed, unsweetened |
| Baking Powder 🧂 | 1 tbsp | Aluminum-free preferred |
| Salt 🧂 | ½ tsp | Fine sea salt |
| Vanilla Extract 🌿 | 2 tsp | Pure Madagascar preferred |
| Heavy Cream 🥛 | 1 ½ cups | Cold for ganache |
| Semisweet Chocolate Bars 🍫 | 12 oz | High-quality, chopped |
| Butter (for ganache) 🧈 | ½ cup | Unsalted, cubed |
| Powdered Sugar 🍚 | 1 cup | Sifted for smooth drizzle |
The chocolate quality makes or breaks this cake. Valrhona or Ghirardelli chocolate chips deliver that deep cocoa intensity without bitterness, while Dutch-processed cocoa powder from Penzeys ensures smooth layers. Butter matters too—use European-style unsalted butter like Plugrá for superior flavor and texture. Eggs should be room temperature to emulsify properly, and vanilla extract must be pure (the imitation kind ruins everything). For the ganache, high-quality chocolate bars like Lindt or Guittard create a velvety finish. Every ingredient here supports that signature tender crumb and glossy ganache.
No superfine sugar? Pulse granulated sugar in a food processor for 30 seconds—it dissolves better. Dutch-processed cocoa unavailable? Natural cocoa powder works at the same amount, but the cake will be slightly tangier. Short on eggs? Flax eggs (1 tbsp ground flax + 3 tbsp water per egg) work in a pinch, though texture may vary. For the ganache, substitute coconut cream for a dairy-free version, though it won’t set as firmly. The chocolate bars must be high-quality—avoid store-brand chocolate that melts unevenly. Pre-sift your dry ingredients to prevent dense layers, and measure flour by weight if possible for perfect accuracy.
Butter and eggs can sit at room temperature for 2 hours before baking, while chocolate bars should be chopped and ready to melt. The cake layers keep 3 days in an airtight container at room temperature, but ganache must be refrigerated for up to 1 week—reheat gently before drizzling. For make-ahead convenience, bake and freeze layers separately for 3 months, then assemble when ready. The ganache can be made 2 days ahead and reheated until smooth. Always bring ganache to 90°F before drizzling for that perfect semi-solid consistency.
Why You’ll Love This Recipe
- No Mixer Needed: I swear by this—just cream the butter and sugar with a wooden spoon until it’s light and fluffy. The eggs fold in smoother than you’d think, and the chocolate chips melt into those pockets of gooey perfection without a single extra bowl.
- Rich Without Overpowering: That dark chocolate isn’t just in the cake—it’s the star. But here’s the magic: the butter and sugar balance it so well, it’s never bitter, just deep. One bite and you’ll understand why I keep a pan in the freezer for emergencies.
- Pantry Staples Only: Honestly, if you’ve got butter, sugar, eggs, and flour, you’re already halfway there. No specialty ingredients, no last-minute grocery runs. It’s the kind of cake that proves you don’t need fancy tools or a bakery budget to make something worth celebrating.
Step-by-step instructions for triple-layered chocolate cake
Here’s the precise method for baking a towering 12-inch cake with perfectly moist layers and glossy ganache.
Cream Butter and Sugars to Light Ribbons
In a stand mixer fitted with the paddle attachment, beat the 1.5 cups unsalted butter on medium speed until smooth and creamy, about 2 minutes. Gradually add the 2.5 cups granulated sugar, mixing on medium-high speed for 4-5 minutes until the mixture is light, fluffy, and nearly doubles in volume. You’ll see ribbons form when you lift the paddle—this is your signal the butter and sugar are properly emulsified.
Scrape down the sides of the bowl to ensure even mixing. The reason we wait until the mixture reaches this stage is that proper aeration creates a tender crumb. If you rush this step, the cake will be dense rather than light and airy. I like to press my finger through the mixture at this point—it should leave a slight indent that slowly fills back in.
Incorporate Eggs and Chocolate
Add the 6 whole large eggs, one at a time, mixing well after each addition until fully incorporated. The mixture will look slightly curdled at first, but don’t worry—this will resolve as we add the dry ingredients. Next, add the 2 tsp vanilla extract and mix for 10 seconds to distribute the flavor evenly.
In a separate bowl, whisk together the 3 cups all-purpose flour, 0.75 cup cocoa powder, 1 tbsp baking powder, and 0.5 tsp salt. With the mixer on low speed, gradually add the dry ingredients to the wet mixture, mixing just until combined. Be careful not to overmix—you should still see some flour streaks. Fold in the 12 oz dark chocolate chips by hand using a silicone spatula to ensure even distribution throughout the batter.
Bake Three Perfect Layers
Preheat your oven to 350°F. Grease and flour three 8-inch round cake pans (or use parchment-lined pans for easier removal). Divide the batter evenly among the pans, smoothing the tops with a spatula. Bake for 25-30 minutes, or until a toothpick inserted into the center comes out clean and the edges pull away slightly from the pan.
I recommend checking the cakes at the 20-minute mark—your oven might run hot, so start testing early. Let the cakes cool in their pans for 10 minutes, then transfer to a wire rack to cool completely. This gradual cooling prevents cracking and ensures even layers when assembling. The cakes should be moist but not sticky to the touch when fully cooled.
Prepare the Ganache
While the cakes cool, prepare the ganache by combining the 12 oz chopped semisweet chocolate bars and 0.5 cup butter (for ganache) in a heatproof bowl. Place this bowl over a pot of simmering water, ensuring the bottom of the bowl doesn’t touch the water. Stir occasionally until the chocolate and butter melt completely, then remove from heat.
Stir in the 1.5 cups heavy cream until smooth and glossy. Let the ganache cool slightly—it should thicken enough to coat the back of a spoon but still be pourable. This consistency is crucial for creating that professional-looking drizzle. If it thickens too much, gently warm it over low heat with a splash of cream.
Assemble and Drizzle
Place the first cake layer on a serving plate. Spread a thin layer of the cooled ganache over the top, then place the second layer on top. Repeat with the third layer. Once all layers are stacked, pour the remaining ganache over the top and let it drip down the sides for a dramatic effect. Sift the 1 cup powdered sugar over the cake just before serving for a snowy finish.
The cake should be served at room temperature, allowing the ganache to set slightly for easier slicing. Each slice should reveal a rich, fudgy texture with a glossy chocolate exterior. For best results, assemble the cake no more than 2 hours before serving—this prevents the ganache from becoming too firm.
Pro Tips For Making 12 Inch Chocolate Cake
- Melt Butter Slowly: Turn the heat to medium-low when melting butter for the batter—high heat burns it before the sugar dissolves. I learned this the hard way when my first batch smelled like toasted butter instead of chocolate. A gentle melt keeps the flavor pure and the texture smooth.
- Sift the Flour: Skip the clumps by sifting the flour before mixing—especially if you’re using a 12-inch pan where even distribution matters. I used to just dump it in, and the cake always had dense pockets near the edges.
- Check Doneness Early: Pull the cake out when the center is just set—no jiggle, but the toothpick shouldn’t be bone-dry. Overbaking turns rich chocolate cake into dry sponge. If you’re nervous, give it 2-3 minutes less than the recipe says.
- Chill the Batter: Let the batter sit for 10 minutes after mixing—this helps the flour absorb fully and prevents a dense crumb. I was skeptical until I tried it, and now I never skip it. (Yes, even if you’re impatient like me.)
Wine and beer pairings for these flavors
Rich Red Wine Pairings
For this decadent chocolate cake, a bold red wine with deep fruit notes complements the ganache’s richness beautifully. I recommend a Cabernet Sauvignon from Napa Valley—its dark cherry and blackberry flavors mirror the cake’s chocolate intensity while the tannins cut through the fat.
A Malbec from Argentina offers similar depth with softer tannins, perfect for those who prefer smoother sips. 🍷
For a lighter option, try a Pinot Noir from Oregon—its bright acidity and red fruit flavors provide contrast without overwhelming the dessert. Avoid heavy, oaked wines like Bordeaux, as they can clash with the ganache’s sweetness.
Serve the wine slightly chilled (around 55°F) to enhance its fruitiness and balance the cake’s richness.
Chocolate-Inspired Liqueurs
A small glass of chocolate liqueur alongside your cake creates a luxurious pairing. I love Godiva Chocolate Liqueur—its velvety cocoa and vanilla notes echo the cake’s flavors while adding a boozy depth.
For a lighter option, Creme de Cacao (either white or dark) mixed with a splash of cream makes a delightful accompaniment. 🥃
For a non-alcoholic twist, serve hot chocolate made with Valrhona cocoa powder and heavy cream—the warmth enhances the cake’s chocolatey richness. A sprinkle of sea salt on the hot chocolate (like in a salted caramel) adds a sophisticated contrast to the sweet dessert.
Beer Pairings for Balance
A dark Belgian ale like Rodenbach or Chimay Blue pairs surprisingly well with this cake. The beer’s caramel and coffee notes complement the chocolate, while its slight tartness cuts through the sweetness. For a lighter option, try a stout like Guinness—the roasted malt flavors enhance the cake’s depth. 🍺
Avoid overly sweet beers or IPAs, as their hop bitterness or fruity notes can compete with the chocolate. Instead, opt for beers with caramel, coffee, or dark fruit profiles that harmonize with the cake’s flavor. Serve the beer slightly cooler than room temperature (50-55°F) to highlight its maltiness.
Coffee Contrast
A strong espresso or dark roast coffee provides the perfect bitter contrast to this rich cake. I recommend a single-origin Ethiopian Yirgacheffe—its floral and citrus notes brighten the chocolate flavors.
For an iced option, try a cold brew with a splash of heavy cream and cocoa powder for a dessert-like drink. ☕
If you prefer a sweeter coffee pairing, a mocha latte made with dark chocolate syrup and whipped cream mirrors the cake’s flavors while adding a creamy texture. The caffeine in coffee also helps balance the dessert’s indulgence, making it a great choice for post-meal enjoyment.
Nutrition facts
Frequently asked questions
Can I use this recipe for a smaller or larger cake?
Yes! This recipe makes three 8-inch layers that stack to create a 12-inch cake. For a single 8-inch layer, use 1/3 of the batter in one pan. For a 16-inch cake, divide the batter into four 8-inch pans and bake for 30-35 minutes. Adjust baking time based on your oven—always check with a toothpick at the 20-minute mark.
How do I prevent my cake layers from cracking?
Cracking happens when layers cool too quickly or aren’t properly supported. Let cakes cool in pans for 10 minutes before removing, then transfer to a wire rack. When assembling, use thin layers of ganache or frosting between layers to act as a “glue.” Chill the assembled cake in the fridge for 30 minutes before serving to help it hold its shape better.
Why did my ganache turn grainy?
Grainy ganache usually means the chocolate wasn’t melted smoothly or the cream was too hot. Always melt chocolate gently over simmering water (never boiling) and stir until completely smooth. Let the ganache cool to 90°F before drizzling—it should coat the back of a spoon but still be pourable. If it’s too thick, warm it gently with a splash of cream. High-quality chocolate with 70% cocoa or higher helps prevent graininess.
Can I substitute butter in the cake batter?
For best results, stick with unsalted butter—it has the right fat content for a tender crumb. If you must substitute, use vegetable shortening (same amount) for a lighter texture, but expect slightly less flavor. For dairy-free, replace butter with coconut oil (cooled to room temperature) and reduce the heavy cream in the ganache by 0.25 cup to maintain proper consistency. The cake will still be delicious but may have a slightly different texture.
How far ahead can I make this cake?
Bake the layers up to 3 days ahead and store them in an airtight container at room temperature. The ganache can be made 2 days ahead and refrigerated—reheat gently until smooth before using. Assemble the cake 4-6 hours before serving to allow the ganache to set slightly for easier slicing. If storing longer than 24 hours, wrap the assembled cake tightly in plastic wrap and refrigerate.

- Pea Soup Instant Pot Recipe: Velvety Green Smoothness in 20 Minutes - November 1, 2026
- Pork Loin Pulled Pork Crock Pot Recipe: Slow-Smoked Tenderness With Zero Dryness - November 1, 2026
- Baked Potatoes in Crock Pot Recipe: Buttery Interiors and Crispy Top Magic - November 1, 2026