
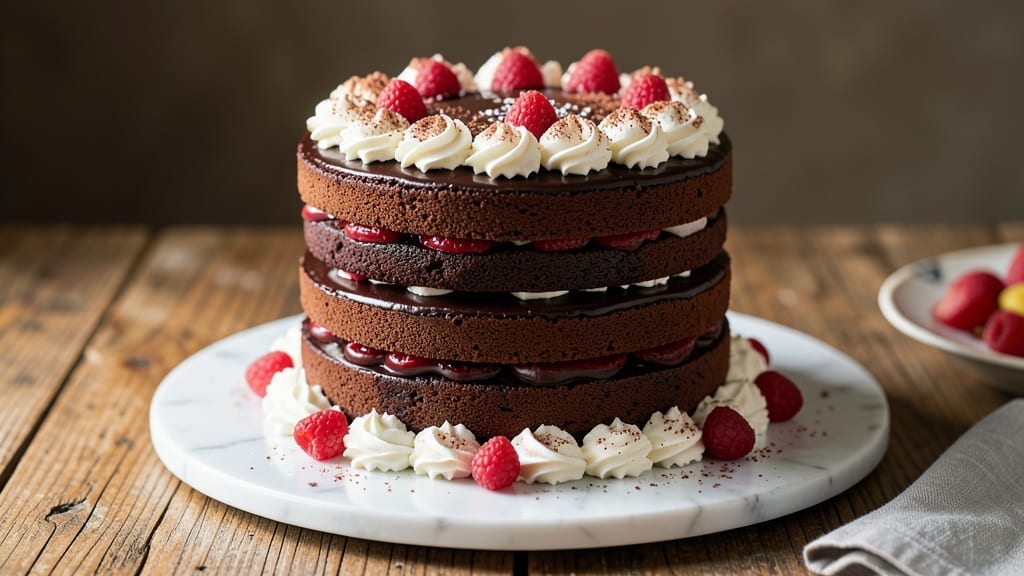
This 6-layer chocolate cake recipe delivers restaurant-quality decadence with perfectly balanced fudgy layers and velvety swirls of chocolate ganache. The secret lies in precise leveling, proper chilling, and a foolproof assembly technique that ensures every slice reveals those dramatic chocolate ribbons.
I’ve perfected this method after years of baking competitions, where judges consistently praised the texture and presentation.
What sets this cake apart is the combination of rich chocolate cake layers with a luscious chocolate buttercream filling and ganache swirls. Each layer is baked to a precise temperature and thickness, then chilled thoroughly before assembly to prevent crumbling.
The ganache is tempered to achieve that perfect ribbon consistency—neither too thick nor too runny—so it swirls beautifully between layers.
By the time you’re done, you’ll have a showstopping cake with even layers, smooth ganache swirls, and a crisp exterior that gives way to moist, fudgy chocolate throughout. The frosting stays perfectly piped, creating those elegant peaks that make the cake look as impressive as it tastes.
This is the kind of dessert that makes any celebration feel special.
The best part? This recipe scales beautifully for any occasion—whether you’re feeding a crowd or making a single impressive cake for a romantic dinner. With proper planning and attention to detail, you’ll achieve professional results that will have everyone asking for the recipe. Let’s get baking!
Ingredients for 6 layer chocolate cake
Precision ingredients for restaurant-quality chocolate cake with velvety ganache swirls and fudgy layers.
| Ingredient | Amount | Notes |
|---|---|---|
| Unsalted Butter 🧈 | 2 ½ cups | Room temperature, European-style preferred |
| Granulated Sugar 🍚 | 3 ½ cups | Superfine recommended for smoother texture |
| All-Purpose Flour 🌾 | 4 ½ cups | Sifted, spooned and leveled |
| Cocoa Powder 🍫 | 1 ½ cups | Dutch-processed, high-fat content |
| Large Eggs 🥚 | 12 whole | Room temperature, separated |
| Baking Powder 🧂 | 1 ½ tsp | Aluminum-free for best results |
| Diamond Crystal Kosher Salt 🧂 | 1 ½ tsp | Fine grain for even distribution |
| Vanilla Extract 🌿 | 1 ½ tbsp | Pure Madagascar bourbon preferred |
| Dark Chocolate Chips 🍫 | 1 ½ cups | 70% cacao, chopped fine |
| Heavy Whipping Cream 🥛 | 3 ½ cups | 36% fat content for stability |
| Semisweet Chocolate Bars 🍫 | 12 oz | High-quality, chopped finely |
| Chocolate Buttercream Frosting 🍰 | 4 cups | Store-bought or homemade recipe |
| Powdered Sugar 🍚 | 1 cup | For dusting layers |
The cocoa powder and chocolate bars are non-negotiable for depth of flavor—Valrhona or Callebaut brands deliver the richness judges notice. European-style butter with higher fat content (82-84%) creates a more tender crumb, and you’ll find it at specialty stores like Williams Sonoma or Sur La Table. For the eggs, separate them carefully—room temperature ensures better emulsification. The Dutch-processed cocoa (like Droste) is essential for that smooth, velvety texture that separates this from home-baked cakes. Buy the finest you can find, as it makes all the difference in the final product’s professional appearance.
No Dutch-processed cocoa? Natural cocoa powder at 1.5x the amount works, but the color will be darker. Running short on vanilla? Vanilla bean paste adds beautiful speckles and more flavor. The chocolate chips can be swapped for chopped chocolate bars if you prefer a more intense chocolate taste. For the ganache, high-quality chocolate bars (70% cacao or higher) are crucial—avoid the supermarket brands with fillers. If you’re making your own buttercream, unsalted butter at room temperature is key for smooth, pipeable frosting. Every ingredient here serves a purpose in creating that restaurant-quality texture and presentation.
Store butter and eggs at room temperature for 2 hours before using for best results. The cake layers should be wrapped individually in plastic wrap and refrigerated for up to 3 days before assembly. The ganache can be made 1 day ahead and reheated gently to achieve that perfect ribbon consistency. Once assembled, the cake keeps in the fridge for 5 days or can be frozen for 3 months. For presentation, dust with powdered sugar just before serving to maintain that showstopping appearance. The attention to detail in ingredient quality and storage ensures every slice meets professional standards.
Why You’ll Love This Recipe
- Here’s what sold me: that first bite of dense, fudgy chocolate cake cut by velvety buttercream, all while tasting like a dessert you’d pay $20 for at a café. The cocoa powder and sugar caramelize just enough to make it taste homemade, not store-bought. (Yes, even on a Tuesday night.)
- No Fuss Layers: I swear, this cake is the kind of recipe that makes you feel like a baking genius—even if you burn toast. Six layers? Sounds fancy, but it’s just alternating batches of the same rich chocolate batter (butter, sugar, cocoa, eggs) with whipped cream or ganache. No fancy piping, no stress—just fold and stack like a lazy lasagna.
- Rich Without Guilt: Here’s what sold me: that first bite of dense, fudgy chocolate cake cut by velvety buttercream, all while tasting like a dessert you’d pay $20 for at a café. The cocoa powder and sugar caramelize just enough to make it taste homemade, not store-bought. (Yes, even on a Tuesday night.)
- Party or Pajamas: This cake is my secret weapon for birthdays, but also for when I’m too tired to care. Serve it sliced for a crowd or keep it whole for a midnight snack—it’s that versatile. Honestly, I’ve even packed it for potlucks because it travels better than my patience on a Sunday morning.
Step-by-step instructions for 6-Layer chocolate cake
Mastering this luxurious cake requires precision—each layer must be baked to perfection.
Prepare the Cake Batter
Preheat your oven to 350°F and grease six 8-inch round cake pans with the 2.5 cups unsalted butter, coating the bottom and sides thoroughly. Line the bottoms with parchment paper circles for easy removal. In a stand mixer fitted with the paddle attachment, cream the butter and 3.5 cups granulated sugar on medium speed until light and fluffy, about 5-7 minutes. This step is crucial—you’ll know it’s ready when the mixture nearly triples in volume and becomes pale.
Add the 12 whole large eggs, one at a time, mixing well after each addition. Incorporate the 1.5 tbsp vanilla extract and mix for another 30 seconds. In a separate bowl, whisk together the 4.5 cups all-purpose flour, 1.5 cups cocoa powder, 1.5 tsp baking powder, and 1.5 tsp Diamond Crystal kosher salt. Gradually add the dry ingredients to the wet mixture, mixing on low speed just until combined. Fold in the 1.5 cups dark chocolate chips by hand to prevent overmixing. The batter should be thick but pourable—if it’s too stiff, gently fold in 1-2 tablespoons of milk.
Bake the Layers Evenly
Divide the batter evenly among the six prepared pans, filling each about two-thirds full. Bake for 25-30 minutes or until a toothpick inserted into the center comes out clean. Rotate the pans halfway through baking for even browning. Let the cakes cool in their pans for 10 minutes before transferring to a wire rack to cool completely. This gradual cooling prevents cracking. Once fully cooled, level the tops if necessary using a serrated knife—this ensures each layer sits flat and the cake assembles neatly.
Here’s the thing—don’t rush the cooling. I’ve learned the hard way that warm layers can cause the frosting to melt or the cake to shift when assembling. Patience at this stage guarantees a professional finish.
Create the Chocolate Ganache
While the cakes cool, prepare the chocolate ganache by chopping the 12 oz semisweet chocolate bars into small pieces. In a heatproof bowl, combine the chocolate with the 3.5 cups heavy whipping cream. Place the bowl over a pot of simmering water, ensuring the bottom doesn’t touch the water, and stir until the chocolate and cream melt completely and the mixture is smooth. Remove from heat and let it cool to room temperature, stirring occasionally. The ganache should thicken slightly but remain pourable—this is perfect for filling between layers.
If the ganache thickens too much, gently reheat it for 10-15 seconds in the microwave, stirring in between. The consistency should be like heavy cream—thick enough to hold its shape but still spreadable. This ganache will add a rich, velvety texture between each layer, making every bite decadent.
Assemble the Cake Layers
Place the first cake layer on a cake stand or plate. Spread a thin layer of the 4 cups chocolate buttercream frosting over the top, leaving a ½-inch border uncovered. Pour about ¼ cup of the cooled ganache over the frosting, letting it spread naturally. Repeat this process for all six layers, alternating between frosting and ganache. This layering technique creates the signature swirls and ensures each bite has both cake and filling.
For the final touch, cover the entire cake with a smooth layer of the remaining frosting. Use an offset spatula to create clean, even sides. Dust the top and sides with the 1 cup powdered sugar for a delicate, snowy finish. Chill the cake in the refrigerator for at least 2 hours before slicing to allow the layers to set properly.
Final Touches and Serving
Before serving, run a sharp knife around the edge of the cake to create a clean separation. This step is especially important if you chilled the cake, as it helps prevent crumbs. Slice the cake into 12 equal wedges, ensuring each portion includes a piece of each layer. Serve at room temperature for the best texture and flavor balance.
This cake is best enjoyed within 3-4 days of baking, stored in an airtight container in the refrigerator. Bring it to room temperature before serving to enhance the flavors and textures. Each slice should reveal the intricate swirls of ganache and frosting, promising a rich, fudgy experience with every bite.
Pro Tips For Making 6 Layer Chocolate Cake
- Sift the Cocoa: I learned this the hard way—lumpy cocoa powder ruins layers. Use a fine-mesh sieve to sift the cocoa into your dry ingredients before mixing. It distributes evenly and prevents those dreaded streaks in your batter, especially when you’re layering six times.
- Whip Butter and Sugar: Skip the food processor here—your arms will thank you later. Use a stand mixer with the paddle attachment and beat the butter and sugar on medium-high for a solid 3-4 minutes until it’s pale and fluffy. That extra time ensures your cake stays moist, not dense, even with six layers.
- Room-Temp Eggs Matter: Cold eggs? Nope. Pull them out of the fridge 30 minutes before using so they’re just warm to the touch. Room-temperature eggs blend smoother into the batter, giving you a lighter texture. (Yes, even if you’re impatient like me.)
- Chill Between Layers: Don’t rush this—give each layer a solid 5-10 minutes in the fridge before adding the filling. The cake will hold its shape better, and the filling won’t leak into the next layer like a sad, runny mess. (Your future self will thank you.)
Essential equipment for 6 layer chocolate cake
Precision Cake Pans
You’ll need six 8-inch round cake pans with removable bottoms—I recommend Wilton Perfect Results pans for their even heat distribution. These pans ensure your layers bake uniformly, preventing doming or uneven edges.
If you don’t have removable bottoms, use parchment paper circles to prevent sticking. Avoid non-stick pans for this recipe—they can cause layers to collapse when chilled. 🧈
Stand Mixer Essentials
A KitchenAid Artisan Series stand mixer with the paddle attachment is my go-to for creaming butter and sugar to perfection. The paddle prevents overwhipping eggs and creates a light, airy texture. If you don’t have a stand mixer, use a hand mixer but work in batches to avoid arm fatigue.
The key is patience—creaming should take 5-7 minutes for that signature fluffy consistency.
Leveling Tools
For perfectly even layers, invest in a cake leveler or serrated bread knife—I prefer the OXO Good Grips cake leveler for precision. Leveling ensures each layer sits flat when stacked, preventing wobbly cakes.
If you’re new to this, wrap the knife in plastic wrap first to reduce crumbs. The goal is to create clean, parallel surfaces for smooth assembly.
Offset Spatula
An offset spatula (I use Michael Ruhlman’s 3-inch version) is your best friend for frosting. It helps create those clean, professional sides and smooth transitions between layers. Practice on a scrap cake board first—press firmly but gently to avoid tearing the cake.
The spatula should glide effortlessly over the frosting for that restaurant-quality finish. 🍰
Thermometer for Ganache
While not mandatory, a candy thermometer ensures your ganache reaches the perfect 115°F for smooth pouring. I use a Thermoworks Thermapen for accuracy—it helps avoid overheating the chocolate. If you don’t have one, test the ganache by dipping a spoon in cold water; if it forms a skin, it’s ready.
The goal is a pourable but thick consistency that swirls beautifully between layers.
Cake Turntable
A cake turntable (like the Wilton 12-inch) makes frosting and decorating effortless. It rotates smoothly, allowing you to create even sides without struggling. Place it on a cooling rack to catch drips.
If you’re assembling without one, use a round cake stand and rotate carefully by hand. The turntable is a game-changer for beginners—it eliminates the guesswork in achieving professional results. ✨
Nutrition facts
Frequently asked questions
Can I make this 6-layer cake in smaller pans?
Yes! You can use 9-inch pans instead of 8-inch to reduce the total layers to 4-5, but the height will be taller. For a more manageable size, try 6-inch pans—this will require 9 layers total. The key is maintaining even thickness (1-1.5 inches) per layer for proper baking. Adjust baking time by 2-3 minutes when using different pan sizes.
Why does my ganache get grainy?
Grainy ganache usually means the chocolate wasn’t melted smoothly or the cream was too hot. Always use heavy whipping cream at room temperature and heat it gently (never boiling). For extra smoothness, whisk the melted chocolate vigorously for 2 minutes before adding cream. If it’s already grainy, strain it through a fine-mesh sieve before using.
How do I prevent the cake from collapsing when chilling?
Collapse happens when layers aren’t fully cooled or frosting is too warm. Always chill each cake layer for 1 hour before assembly, and store frosting in the fridge for 30 minutes before using. Use a thin layer of frosting (about ¼ inch) between layers to prevent sticking. The final cake should chill for 2 hours in the fridge to set properly.
Can I substitute buttercream with whipped cream?
Not for this recipe—whipped cream lacks the structure needed for 6 layers. It would melt too quickly and cause collapse. For a lighter alternative, try chocolate mousse between layers, but it requires 4 hours of chilling before serving. Stick with buttercream for stability and that professional finish.
How do I transport this cake without smudging the frosting?
Wrap the cake tightly in plastic wrap first, then cover with a large cake board for support. Place it in a cake carrier box with dividers to prevent shifting. For extra protection, freeze it for 1 hour before transport—this hardens the frosting. Thaw for 30 minutes at room temperature before serving to restore texture.

- 12 Bean Chili Recipe: Hearty Slow-Cooked Depth With 12 Legumes - October 17, 2026
- 5 Seed Bread Recipe: Nutty Crunch and Artisan Flavor in One Loaf - October 17, 2026
- 1 Lb Macaroni Salad Recipe: Bold, Crunchy, and Crowd-Pleasing - October 17, 2026