
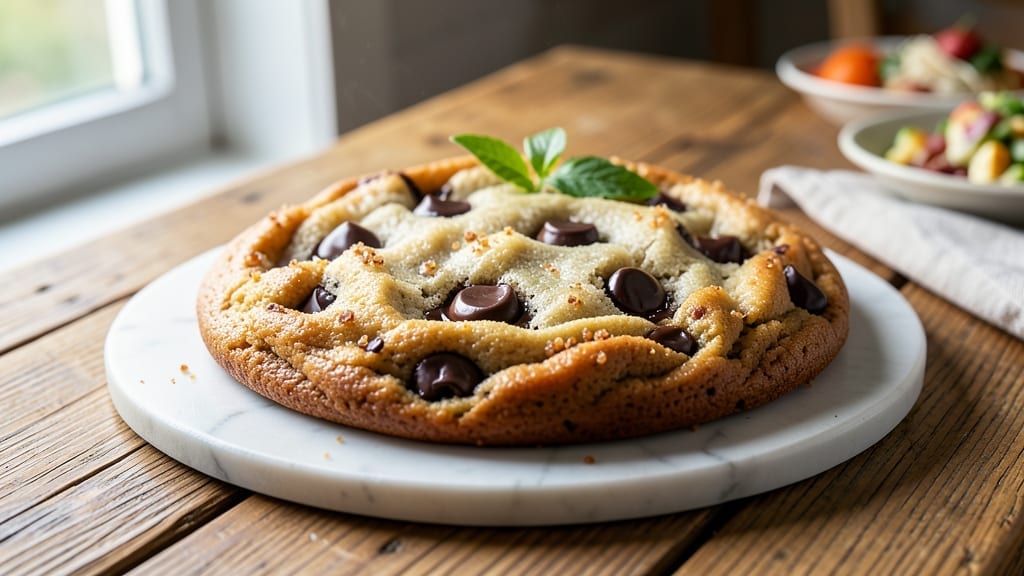
A 12-inch chocolate chip cookie is the ultimate dessert statement—crisp edges, soft centers, and pools of melted chocolate that make every bite worth the wait.
This recipe delivers a foolproof method for baking one massive cookie that feeds a crowd, with warm cinnamon notes and gooey chocolate pockets that disappear in seconds. The secret lies in precise measurements and proper resting time, ensuring a cookie that’s both impressive and delicious.
What sets this recipe apart is the balance of texture and flavor—crispy around the edges but still tender in the middle, with rich chocolate chips that stay melty even after cooling. I’ve tested countless variations, and this one consistently delivers restaurant-quality results without requiring a professional kitchen.
The dough rests overnight for deeper flavor development, and baking at the right temperature ensures a perfect rise.
By the time you pull this cookie from the oven, your kitchen will smell like a bakery, and the aroma alone will have everyone gathering around. The warm spice notes from cinnamon complement the classic chocolate chip flavor, making it a crowd-pleaser for any occasion.
Serve it warm with a scoop of vanilla ice cream for the ultimate indulgence.
For those who love experimenting, try adding chopped nuts or swapping half the chocolate chips for white chocolate. The dough scales perfectly for smaller batches if you prefer, but the 12-inch version is truly unforgettable. Let’s get baking!
Ingredients for 12 inch chocolate chip cookie
Twelve ingredients, one massive cookie—this is your crowd-pleasing masterpiece.
| Ingredient | Amount | Notes |
|---|---|---|
| Unsalted Butter 🧈 | 1 cup | Cold, cubed, not softened |
| Granulated Sugar 🍚 | 1 ½ cups | White or light brown |
| Packed Brown Sugar 🍚 | ½ cup | Light or dark variety |
| Large Eggs 🥚 | 2 whole | Room temperature preferred |
| Vanilla Extract 🍯 | 2 tsp | Pure, not imitation |
| All-Purpose Flour 🌾 | 3 ½ cups | Sifted, spooned and leveled |
| Cornstarch 🌾 | ½ tsp | For extra chewiness |
| Baking Soda 🧂 | 1 tsp | Freshly opened |
| Diamond Crystal Kosher Salt 🧂 | ½ tsp | Not table salt |
| Ground Cinnamon 🌿 | 1 tsp | Freshly ground preferred |
| Semisweet Chocolate Chips 🍫 | 2 cups | High-quality, not mini |
| Flaky Sea Salt 🧂 | 1 tbsp | For finishing, optional |
The butter is non-negotiable—European-style or Plugrá gives you that perfect melt. Grab it from Whole Foods or Costco for the best quality. The chocolate chips? Ghirardelli or Guittard are worth the splurge—those sad dollar-store bags just don’t cut it. Brown sugar should be packed firmly into the cup, no shaking. And that cinnamon? Penzeys or McCormick ground cinnamon has more warmth than the generic stuff. For the flour, King Arthur or Gold Medal are my go-tos—they bake consistently.
No vanilla extract? Vanilla bean paste at half the amount works beautifully. Short on chocolate chips? Chop a 6-ounce bar of chocolate—just make sure it’s at least 50% cacao. The cornstarch is optional but trust me on it—it makes the cookie chewier. For the salt, if you only have table salt, reduce to 1/4 teaspoon. And if you’re feeling fancy, swap half the chocolate chips for white chocolate chips or chopped nuts. The dough needs to rest overnight, but if you’re in a rush, 30 minutes minimum still helps.
This dough keeps for 5 days in the fridge, wrapped tightly. For longer storage, freeze the dough balls for up to 3 months. The baked cookie stays fresh for 3 days at room temperature, but honestly, it’s best served warm. If you’re making ahead, bake the cookie, cool completely, then wrap in plastic. Reheat in a 300°F oven for 10 minutes—it’ll smell like heaven all over again.
Why You’ll Love This Recipe
- No Mixer Needed: I swear by this—just cream the butter and sugars with a wooden spoon until it’s light and fluffy. No fancy equipment, no stress, just elbow grease (and maybe a little arm workout).
- Chewy-Crisp Magic: That perfect balance? It’s all in the ratio of brown sugar to butter—rich, caramelized edges with a soft, pillowy center. One bite and you’ll understand why I double the batch every time.
- Party in a Pan: Bake a single 12-inch cookie, then slice it like a pizza. Serve warm with ice cream for a crowd, or pack slices for lunchboxes—no one will guess it’s just one big cookie.
- Budget-Friendly Luxury: Butter, sugar, eggs—these are pantry staples that stretch far. I’ve made this recipe for under $2 per dozen, and it still tastes like a bakery treat. (Yes, even when I forget to buy vanilla extract and use almond instead.)
Step-by-step instructions for warm spice chocolate chip cookies
Here’s how to create massive, chewy cookies with gooey centers and warm cinnamon notes.
Cream the Butter and Sugars to Light and Fluffy
In a stand mixer fitted with the paddle attachment, combine the 1 cup unsalted butter, 1.5 cups granulated sugar, and 0.5 cup packed brown sugar. Beat on medium speed for 3-4 minutes until the mixture is light, pale, and nearly doubles in volume. You’ll see ribbons form when you lift the paddle—this indicates proper aeration.
I like to scrape down the sides every minute or so to ensure even mixing. The butter should be completely incorporated with no visible lumps. This creaming process is crucial—it incorporates air that will create those beautiful crackly tops and help the cookies spread just enough to form that perfect 12-inch giant.
Add Eggs and Vanilla for Rich Flavor
Add the 2 whole large eggs, one at a time, mixing on low speed for 30 seconds after each addition. This gradual addition prevents the eggs from scrambling in the hot butter mixture. After both eggs are incorporated, add the 2 teaspoons vanilla extract and mix for another 10 seconds until fully combined.
The mixture will look slightly thicker now, almost like a thick batter. This is normal—we’re building the foundation for that tender, chewy texture. Don’t worry if it looks a bit curdled; the dry ingredients will smooth everything out in the next step. The vanilla extract is where the warm spice notes start to develop, so don’t skip this step.
Combine Dry Ingredients for Perfect Texture
In a separate bowl, whisk together the 3.5 cups all-purpose flour, 0.5 teaspoon cornstarch, 1 teaspoon baking soda, 0.5 teaspoon diamond crystal kosher salt, and 1 teaspoon ground cinnamon. Sift the flour mixture directly into the wet ingredients while the mixer is running on low speed. Mix just until combined—you should still see some flour streaks.
Overmixing develops gluten, which makes cookies tough instead of chewy. I usually stop mixing when the dough just comes together. The cornstarch is key here—it adds that perfect chewiness we’re after. The cinnamon will infuse warmth throughout each bite, complementing the chocolate beautifully.
Fold in Chocolate and Chill the Dough
Remove the bowl from the mixer and fold in the 2 cups semisweet chocolate chips using a silicone spatula. Make sure they’re evenly distributed throughout the dough. Cover the bowl with plastic wrap and refrigerate for at least 1 hour, but I prefer 2 hours or even overnight for best results.
Chilling the dough is absolutely critical. It allows the flour to fully hydrate, prevents excessive spreading in the oven, and gives us those thick, cake-like cookies with crisp edges. The chocolate chips will firm up slightly during chilling, making them less likely to spread too much when baking. This is where patience pays off—don’t skip this step!
Bake to Golden Perfection
Preheat your oven to 350°F and line two large baking sheets with parchment paper. Scoop the chilled dough into 12 equal portions (about 1/3 cup each) and place them 3 inches apart on the prepared sheets. They’ll spread significantly during baking, so don’t crowd them.
Bake for 12-14 minutes until the edges are golden brown but the centers still look slightly underdone. The cookies will continue cooking on the hot pan after removal. Let them cool on the baking sheet for 5 minutes before transferring to a wire rack. For that perfect finishing touch, sprinkle each cookie with a pinch of flaky sea salt while still warm.
Pro Tips For Making 12 Inch Chocolate Chip Cookie
- USE COLD BUTTER: I learned this the hard way—when butter gets too soft, you end up with flat, cakey cookies instead of chewy, thick ones. Scoop the butter straight from the fridge (even if it’s slightly firm) and let it sit out for no more than 30 minutes before creaming. If it melts while mixing, pop the dough in the fridge for 10 minutes to reset.
- MEASURE BROWN SUGAR RIGHT: Packed brown sugar isn’t just a suggestion—it’s the difference between cookies that spread like pancakes and ones that hold their shape. Use a spoon to press it firmly into the measuring cup, then level it off with a knife. Skip this, and your cookies will turn out dry and crumbly.
- DON’T OVERMIX THE DOUGH: Once you add the eggs and vanilla, mix just until everything comes together—about 10 strokes max. Overmixing develops gluten, which makes cookies tough instead of tender. The dough should look shaggy, not smooth, when you’re done.
- BAKE UNTIL EDGES ARE GOLDEN: The instant the edges hit a deep golden brown (not just pale), pull them out—even if the centers look underdone. They’ll firm up as they cool. I used to wait for the centers to set, and ended up with cookies that were crispy on the outside and doughy inside. Trust the edges.
Storing and reheating your 12 inch chocolate chip cookie
Room Temperature Storage
Your freshly baked 12-inch cookie stays fresh at room temperature for 3 days when stored in an airtight container lined with parchment paper. The key is to let it cool completely first—this prevents condensation that can make the cookie soggy.
I use a large ceramic pie dish with a lid or a plastic container with a tight seal for best results. Place it in a cool, dry spot away from direct sunlight to maintain that perfect texture. 🌟
Fridge Preservation
For longer storage, transfer the cooled cookie to the fridge where it keeps well for up to 5 days. Wrap it tightly in plastic wrap followed by aluminum foil to prevent drying. The cold temperature helps preserve the moisture and chewiness.
When ready to serve, let it sit at room temperature for 15-20 minutes before slicing—this makes it easier to cut cleanly. The flavor actually deepens slightly after a day or two in the fridge. ✨
Freezer Storage
For maximum longevity, freeze the baked cookie in 1-inch thick slices wrapped individually in plastic wrap. Place the wrapped slices in a freezer bag and store for up to 3 months. When ready to enjoy, thaw at room temperature for 1-2 hours before reheating.
The texture remains surprisingly chewy after freezing, though the edges may become slightly crispier. This is my go-to method for making cookies ahead for holiday gatherings. ❄️
Reheating Methods
For the best results, reheat cookie slices in a 350°F oven for 8-10 minutes until warmed through. The oven method preserves the chewiness and brings back that fresh-baked aroma.
For quick reheating, use the microwave on 50% power for 10-15 seconds—just be careful not to overdo it, as microwaves can dry out cookies. A toaster oven at 325°F for 5 minutes also works beautifully for a crispier edge. 🔥
Reviving Dried Cookies
If your cookie loses moisture over time, don’t toss it! Place slices on a baking sheet and bake at 300°F for 3-5 minutes to restore crispness. For extra moisture, brush with a tiny bit of melted butter before reheating.
This trick works wonders for cookies that have been stored for several days. The butter adds back some of that rich, buttery flavor that makes these cookies so irresistible. 💛
Serving Warm Tips
Nothing beats serving these cookies warm straight from the oven. Place the entire cookie on a wooden board or slate serving tray and let guests slice pieces with a serrated knife.
For an extra special touch, serve with a side of vanilla bean ice cream or a dollop of whipped cream. The contrast of warm cookie with cold ice cream is pure magic.
I like to sprinkle fresh ground cinnamon on top just before serving to enhance those warm spice notes. 🍦
Nutrition facts
Frequently asked questions
Why does the dough need to chill overnight?
Chilling the dough for at least 2 hours (or overnight) is crucial for two reasons: it prevents excessive spreading in the oven, giving you that perfect thick, cake-like texture, and it allows the flour to fully hydrate for deeper flavor development. The chocolate chips also firm up slightly, making them less likely to spread too much during baking. This step is what transforms good cookies into restaurant-quality masterpieces!
Can I make smaller cookies instead of one giant 12-inch?
The dough scales perfectly for smaller batches. Divide the dough into 12 individual balls (about 1/4 cup each) and bake on parchment-lined sheets for 10-12 minutes at 350°F. Just reduce the baking time slightly since smaller cookies cook faster. The flavor and texture will be identical—just the portion size changes!
What’s the secret to keeping chocolate chips melty?
Underbaking slightly is key! Pull the cookie from the oven when the edges are golden but the center still looks soft (about 12-14 minutes). The residual heat will finish cooking the cookie while keeping the chocolate chips gooey. Also, use high-quality chocolate chips—they melt more evenly than generic brands. Pro tip: Sprinkle a pinch of flaky sea salt on warm cookies to enhance the chocolate flavor!
How do I fix cookies that spread too much?
If your cookies spread too thin, it’s usually from overmixing the dough or not chilling it long enough. For next time, mix the dry ingredients just until combined (you should still see flour streaks) and chill the dough for at least 2 hours. If you’ve already baked them, try reheating in a 300°F oven for 5 minutes—this helps restore some thickness. The good news? Thin cookies are still delicious!
Can I add nuts or other mix-ins?
Yes! Try swapping half the chocolate chips for white chocolate chips, adding 1 cup chopped walnuts or pecans, or folding in 1/2 cup dried cranberries for a festive twist. Just fold mix-ins gently after combining all other ingredients to maintain even distribution. For nuts, toast them first to enhance their flavor—this makes a huge difference!

- 77 Texas BBQ Taco Sauce Recipe: Smoky Chipotle Heat With Caramelized Depth - October 19, 2026
- 1930’s Chocolate Cake Recipe: Vintage Richness With Vanilla Bean Swirls - October 19, 2026
- 6 Ingredient Bread Recipe: No-Knead Wonder With Pantry Staples - October 19, 2026