
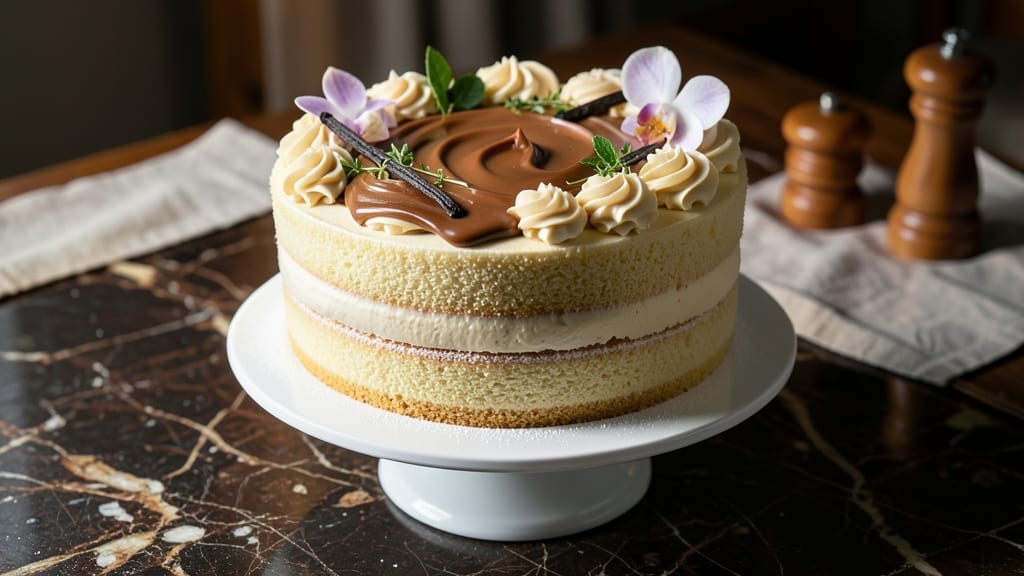
A 12-inch vanilla cake with vanilla bean infusion delivers restaurant-quality layers of tender crumb and fragrant vanilla flavor that’ll impress even the most discerning dessert lovers. This recipe balances precision with approachability—perfect for special occasions or weekend baking projects.
The secret lies in proper mixing techniques and gentle layering to ensure moist, even layers that hold up beautifully when sliced.
What sets this recipe apart is the vanilla bean infusion, which transforms ordinary vanilla extract into a rich, aromatic experience. We’ll use a combination of vanilla bean paste and pure extract for depth of flavor, while precise measurements and a two-stage baking process prevent cracking or sinking.
The result? A cake with golden domes, fine crumbs, and a vanilla aroma that fills your kitchen the moment it emerges from the oven.
Once baked, we’ll demonstrate how to level and layer the cake with confidence, using a simple buttercream or ganache to create clean, professional-looking tiers. The frosting not only adds visual appeal but also reinforces the vanilla flavor, ensuring every bite delivers that signature aromatic sweetness.
This cake isn’t just for show—it’s designed to be sliced, served, and savored.
Whether you’re baking for a celebration or simply treating yourself, this foolproof 12-inch vanilla cake delivers restaurant-quality results without the fuss. The techniques here are adaptable for dietary preferences, and we’ll share tips for customizing the flavor or presentation. Let’s get started—your guests won’t believe it’s homemade.
Ingredients for 12 inch vanilla cake
Twelve essential ingredients transform into a showstopping vanilla cake with layers of flavor and height.
| Ingredient | Amount | Notes |
|---|---|---|
| All-Purpose Flour 🌾 | 3 ½ cups | Sifted for light texture |
| Granulated Sugar 🍚 | 2 ½ cups | Superfine preferred for smoothness |
| Unsalted Butter 🧈 | 1 ½ cups | Cold, cubed for creaming |
| Large Eggs 🥚 | 4 whole | Room temperature for even mixing |
| Pure Vanilla Extract 🌿 | 2 tbsp | High-quality, Madagascar bourbon |
| Vanilla Bean Paste 🍬 | 2 tsp | Seeds scraped for aromatic depth |
| Whole Milk 🥛 | 1 cup | Room temperature for smooth batter |
| Baking Powder 🧂 | 2 tsp | Aluminum-free for tender crumb |
| Salt 🧂 | ½ tsp | Fine sea salt for balance |
| Vanilla Bean Pods 🌿 | 2 whole | Infused in milk for richness (optional) |
| Powdered Sugar 🍚 | 4 cups | For buttercream (sifted) |
| Heavy Whipping Cream 🥛 | 1 ½ cups | Cold for stiff buttercream |
| Unflavored Gelatin 🍬 | 1 tsp | Bloomed in 2 tbsp cold water |
The vanilla bean pods are non-negotiable here—Madagascar bourbon beans from Penzeys or a specialty shop deliver that signature aromatic punch. If you can’t find pods, high-quality Madagascar vanilla extract (like Madagascar Bourbon from Williams Sonoma) works in a pinch, but the paste adds depth you can’t replicate. The butter? European-style unsalted (like Plugrá) melts beautifully for that tender crumb. For the flour, King Arthur or Gold Medal brands are my go-tos—they’re sifted and consistent. Pro tip: measure your dry ingredients by weight if you have a kitchen scale—1 cup flour varies by brand.
No vanilla bean paste? Double the vanilla extract and add 1/4 tsp ground vanilla bean seeds (if you’ve got a pod). The buttercream can be made with vegan butter if needed—just use Miyoko’s or Earth Balance for best results. Substituting milk? Oat milk works best for baking, but avoid almond milk—it’s too thin. For the gelatin, unflavored powder is key; flavored versions add unwanted sweetness. If you’re avoiding gelatin, agar-agar at 1.5x the amount gives similar stability. The vanilla bean pods can be reused once—they’ll still infuse flavor in your next batch of milk or cream.
Store your vanilla extract in a cool, dark place—it lasts years. The buttercream keeps 3 days in the fridge, but the cake itself? 5 days wrapped tightly. For longer storage, freeze the unfrosted layers—3 months works perfectly. The vanilla bean pods? Clean and dry them, then store in an airtight container with a bit of sugar for 6-12 months. Pro move: make extra buttercream and freeze it in 1/2 cup portions—thaw and whip right back to perfection.
Why You’ll Love This Recipe
- No Mixer Needed: I swear by this one—just cream the butter and sugar by hand (or with a fork if you’re in a rush). The eggs blend right in without a trace, and the vanilla? That extract gets worked into the batter, so every slice tastes like you slaved over it.
- Butter-Sugar Magic: That rich, creamed butter-sugar combo? It’s the secret weapon. The cake turns out tender yet sturdy, with a crumb so fine it melts in your mouth. Honestly, the first time I tried it, I nearly ate the bowl.
- Birthday or Backup: Serve it for a party or pull it out when you forgot to order dessert—it’s that reliable. Slice it warm with vanilla ice cream or save slices for days. My kids don’t care if it’s a celebration; they’ll devour it either way.
- Pantry Staples Only: Five ingredients, zero weird substitutions. The flour and sugar are cheap, the butter’s already in your fridge, and the eggs? You’ll use them before they go bad. Leftovers? Wrap them up—they’re just as good the next day.
Step-by-step instructions for layered vanilla cake with vanilla bean infusion
Here’s how to bake a towering, moist vanilla cake with professional layers and velvety buttercream.
Prepare the Vanilla Bean Milk and Cream the Butter
Split the 2 whole vanilla bean pods lengthwise and scrape out the seeds into the 1 cup whole milk. Heat the milk gently in a small saucepan over medium-low heat until it reaches 160°F—just below a simmer. Remove from heat, cover, and let steep for 15 minutes to infuse the milk with deep vanilla flavor. While the milk steeps, place the 1.5 cups unsalted butter in a stand mixer fitted with the paddle attachment.
Beat the cold butter on medium speed until it becomes pale and fluffy—about 3-4 minutes. This creaming process incorporates air, which creates a light, tender crumb. The butter should nearly double in volume and look like whipped cream. Here’s the thing—if you rush this step, your cake will be dense instead of airy. Patience pays off with a perfect texture.
Gradually Add Sugar and Eggs for a Silky Batter
With the mixer running on medium speed, gradually add the 2.5 cups granulated sugar and mix until fully combined—about 2 minutes. The mixture should look smooth and ribbon-like when you lift the paddle. Add the 4 whole large eggs, 1 at a time, mixing well after each addition until fully incorporated. Scrape down the sides of the bowl as needed to ensure even mixing.
Now, add the 2 tablespoons pure vanilla extract and 2 teaspoons vanilla bean paste, mixing on low speed for 30 seconds until just combined. The paste adds an extra layer of vanilla complexity that extract alone can’t match. In a separate bowl, whisk together the 3.5 cups all-purpose flour, 2 teaspoons baking powder, and 0.5 teaspoon salt. With the mixer on low speed, gradually add the dry ingredients to the wet mixture, mixing just until combined—about 20 seconds. Overmixing develops gluten, which can make your cake tough. Stop mixing as soon as the flour disappears.
Infuse the Batter with Vanilla Milk and Bake the Layers
Remove the vanilla-infused milk from the heat and let it cool slightly. With the mixer on low speed, slowly pour the milk into the batter, mixing just until combined. The batter should be smooth and slightly thick, like pancake batter. Divide the batter evenly among 3 greased and parchment-lined 8-inch round cake pans. Tap the pans gently on the counter to release any air bubbles.
Preheat your oven to 350°F. Bake the cakes for 25-30 minutes, or until a toothpick inserted into the center comes out clean. Rotate the pans halfway through baking for even browning. Let the cakes cool in their pans for 10 minutes, then transfer to a wire rack to cool completely. This cooling step is crucial—it prevents the buttercream from melting when you assemble the cake. If you’re impatient, the layers might shift or the frosting could slide.
Make the Stabilized Vanilla Buttercream
In a small bowl, sprinkle the 1 teaspoon unflavored gelatin over 2 tablespoons cold water and let it bloom for 5 minutes. Place the 1.5 cups heavy whipping cream in the chilled bowl of a stand mixer and whip on high speed until soft peaks form. In a separate bowl, beat the 4 cups powdered sugar on medium speed until smooth. Add the bloomed gelatin and mix until fully dissolved.
With the mixer running on low speed, gradually add the powdered sugar mixture to the whipped cream. Increase the speed to medium-high and whip for 2-3 minutes until the buttercream is thick, smooth, and holds its shape. This stabilized buttercream won’t melt or slide, even in warm rooms. Taste and adjust the sweetness if needed—you can add a splash of the vanilla-infused milk if it’s too sweet.
Assemble and Frost the Cake for Perfect Layers
Place the first cake layer on a cake stand or plate. Spread a thin layer of buttercream—about ¼ inch thick—on top to create a “crust.” This prevents the layers from shifting when you add the filling. Add a second layer of buttercream, then place the second cake layer on top, pressing down gently. Repeat the process with the third layer. The key here is to keep the layers level—use a long ruler or cake leveler to check.
Once all layers are stacked, spread the remaining buttercream evenly over the top and sides of the cake, creating a smooth, domed shape. Use an offset spatula to achieve a professional finish. Chill the cake in the refrigerator for 30 minutes before slicing to allow the buttercream to set. This step ensures clean slices and prevents the cake from collapsing. Serve at room temperature for the best texture and flavor.
Pro Tips For Making 12 Inch Vanilla Cake
- Measure Butter Cold: Take that butter straight from the fridge—yes, even if you’re impatient like me—and cut it into cubes before creaming. I used to melt it for convenience, and the cake turned out dense and greasy. Cold butter creates air pockets that make the texture light as a cloud.
- Room Eggs First: Let those eggs sit out for 30 minutes before cracking them into the batter. Cold eggs can curdle the butter mixture, and nobody wants a lumpy vanilla cake. Pro tip: Test one egg first—if it’s still slightly chilly, give it another 10 minutes.
- Don’t Overmix Batter: Stop folding in the flour the second it’s just combined—no streaks, no dry spots. I’ve seen people beat this like a smoothie, and that’s how you end up with a tough, chewy cake instead of tender layers. Think “barely there” when it comes to mixing.
- Test Doneness Early: Pull the cake out of the oven when the center looks almost set—like a wobbly Jell-O. If you wait for the toothpick to come out completely clean, you’ll end up with a dry cake. Let it rest 5 minutes first, then check: if it’s still slightly springy, it’s perfect.
Regional styles of this 12 inch vanilla cake
French Classic
In France, the 12-inch vanilla cake is known as gâteau vanille, often baked in a single layer but with the same rich vanilla infusion. The French version uses vanilla bean paste exclusively and incorporates rum or Grand Marnier for depth—about 1 tablespoon of either.
The buttercream is often replaced with a crème pâtissière (pastry cream) for a lighter texture. I’ve made this version with Lorraine pastry cream from a Le Creuset ramekin, and it adds a silky contrast to the cake’s tender crumb. 🌟
Southern U.S. Style
Southern bakers elevate vanilla cake with a lemon zest twist—about 1 teaspoon—and a buttermilk batter for extra moisture. The frosting? A vanilla bean buttercream piped into roses or swirls for a whimsical touch. I’ve seen Southern versions topped with peach glaze or fresh berries for a seasonal nod.
The key here is high heat (375°F) for a domed top, a hallmark of Southern baking. Trust me, the aroma alone will have your kitchen smelling like a bakery. 💛
Japanese Layered Vanilla
Japanese bakers take precision to another level with their 12-inch vanilla cake, often incorporating matcha powder (½ teaspoon) for a subtle earthy note. The layers are thinly sliced (about ½-inch thick) and stacked with white chocolate ganache for a sleek, modern look.
I’ve tried this version with Hershey’s White Chocolate Bars melted into ganache, and it adds a creamy contrast. The cake itself is baked at 325°F for a longer rise, resulting in a fine, even crumb. 🌸
German Buttercream Style
German Butterkuchen (butter cake) replaces buttercream with a thick, spiced buttercream—often infused with cardamom (¼ teaspoon) or cinnamon (½ teaspoon). The cake itself is baked in three 8-inch layers but assembled into a towering dome with a smooth, sloped top.
I’ve used Wilton 12-inch round pans for this, and the result is a cake that looks like it belongs in a patisserie. The secret? Chilling the layers for 1 hour before frosting to prevent sliding. 🍰
Mexican Vanilla Cake
Mexican pastel de vainilla often includes orange blossom water (½ teaspoon) for floral notes and piloncillo syrup (2 tablespoons) for a caramelized depth. The frosting? A crema (Mexican whipped cream) sweetened with piloncillo and topped with chopped pecans or candied fruit.
I’ve made this version with MexGro brand piloncillo, and it adds a unique, smoky-sweet flavor. The cake is baked at 350°F but brushed with orange juice after baking for extra moisture. 🌶️
Nutrition facts
Frequently asked questions
Can I make this vanilla cake in a 9-inch pan instead of 8-inch?
Yes, but you’ll need to adjust the baking time and layer count. For a 9-inch pan, bake at 350°F for 35-40 minutes per layer. Use 2 layers instead of 3 to maintain the same height. Reduce the batter by 1/3 (about 1.5 cups) and increase the buttercream proportionally to fill the larger surface area. The key is to keep the cake’s height proportional to its diameter for stability.
Why does my vanilla cake sink in the middle?
This usually happens from overmixing the batter or opening the oven door too early. The gluten develops when you mix too long, making the cake dense. Also, check your oven temperature—if it’s too hot (375°F+), the cake rises too fast and collapses. Always preheat for 20 minutes and avoid opening the oven during the first 20 minutes of baking. A toothpick test (clean when inserted) is more reliable than visual cues.
How do I store a vanilla cake with buttercream?
For short-term storage (3 days), wrap the cake tightly in plastic wrap and store at room temperature. For longer storage (up to 5 days), refrigerate the cake (covered) and bring to room temperature before serving. The buttercream may weep slightly if refrigerated—just re-pipe any separated cream back on top. Freeze unfrosted layers for 3 months by wrapping each layer individually in plastic and aluminum foil. Thaw overnight in the fridge before assembling.
Can I substitute vanilla extract for vanilla bean paste?
Yes, but you’ll lose some depth of flavor. Use double the amount of high-quality vanilla extract (about 4 tablespoons) and add 1/4 teaspoon ground vanilla bean seeds (scraped from a pod) for complexity. For best results, use Madagascar bourbon vanilla extract—it has more natural vanillin content. The paste contains real vanilla solids that extract can’t fully replicate, but this combo works in a pinch. The cake will still taste delicious, just slightly less aromatic.
What’s the best way to level a cake for even layers?
Use a serrated bread knife or a cake leveler for clean cuts. First, let the cake cool completely on a wire rack. Place the cake on a cutting board and use a pencil to mark a 1/2-inch line around the top edge. Press down firmly with the knife at a 45-degree angle and slide it across the cake in one smooth motion. Wipe the knife between cuts to prevent crumbs. For extra precision, use a laser level or a straightedge to guide your cuts.

- Baked Potatoes in Crock Pot Recipe: Buttery Interiors and Crispy Top Magic - November 1, 2026
- Braised Beef Short Ribs Recipe: Crock Pot Fall-Off-Bone Magic in 6 Hours - November 1, 2026
- Crock Pot Cocoa Recipe: Velvety Warmth With Hidden Spice Magic - November 1, 2026