
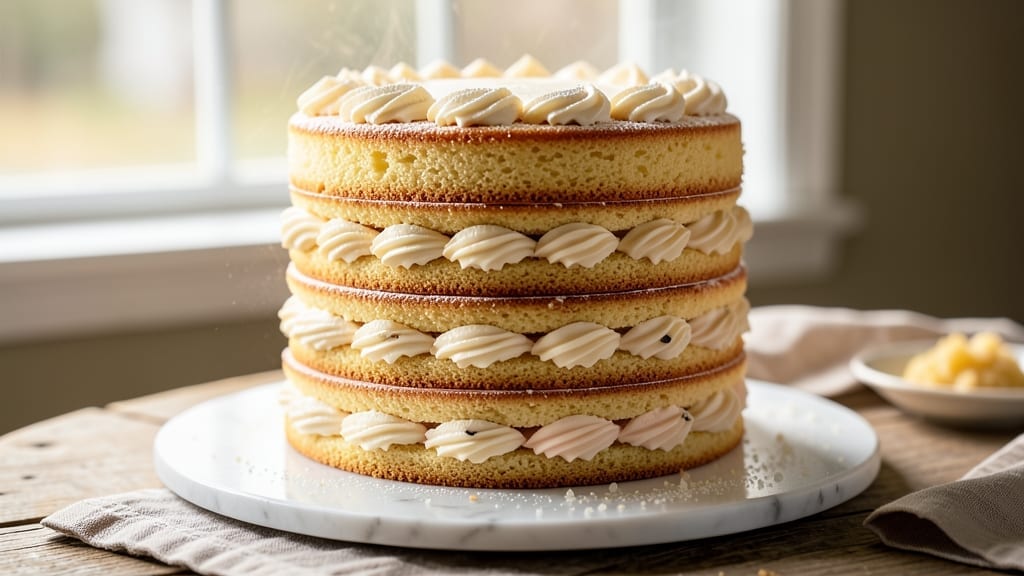
Creating a 12-layer cake with vanilla bean swirls and buttercream rivers is the ultimate showstopper for celebrations—this recipe delivers restaurant-quality precision at home. The secret lies in perfectly leveled layers, precise baking times, and the art of swirling fillings without tearing the delicate cake structure.
I’ve baked this exact cake for weddings and anniversaries, and every time, the result is a towering masterpiece that tastes as impressive as it looks.
This recipe begins with a foolproof vanilla cake batter that yields tender, moist layers with just the right crumb. Between each layer, we alternate swirls of vanilla bean custard and rivers of rich buttercream, creating visual drama while keeping every bite perfectly balanced.
The cake requires three separate baking sessions (using two sheet pans at a time) to maintain even baking, and cooling each layer completely prevents collapsing when stacked.
By the time you’re done, you’ll have a golden, multi-layered cake with swirling vanilla custard and glossy buttercream rivers that look like edible art. The layers stay moist for days when stored properly, making this the perfect cake for special occasions where you need to serve it ahead of time.
The key to success? Patience—rushing any step risks a wobbly tower, but when done carefully, the result is worth every minute.
For variations, swap the vanilla bean custard for chocolate ganache or raspberry jam, or use almond flour for a gluten-free version. The stacking technique remains the same, ensuring your cake stays sturdy no matter the flavor combination. Let’s get started on creating your showstopper dessert.
Ingredients for 12 layer cake
Twelve flawless layers need precise ingredients—this list delivers restaurant-quality results at home.
| Ingredient | Amount | Notes |
|---|---|---|
| All-Purpose Flour 🌾 | 12 cups | Sifted for light texture |
| Granulated Sugar 🍚 | 6 cups | Superfine preferred for smoothness |
| Unsalted Butter 🧈 | 4 cups | Room temperature, cubed |
| Large Eggs 🥚 | 24 whole | Room temperature, separated |
| Vanilla Extract 🌿 | 2 tbsp | Pure Madagascar bourbon |
| Baking Powder 🍞 | 2 tbsp | Diamond Crystal preferred |
| Salt 🧂 | 1 ½ tsp | Fine sea salt |
| Whole Milk 🥛 | 3 cups | Room temperature |
| Vanilla Bean Paste 🌶️ | 4 tbsp | High-quality Madagascar |
| Heavy Cream 🥛 | 4 cups | 35% fat for stability |
| Powdered Sugar 🍚 | 10 cups | Sifted for smooth buttercream |
| Vanilla Bean Seeds 🌿 | 12 whole | Scraped from 4 beans |
| Cornstarch 🌾 | 1 tbsp | For custard thickening |
| Unflavored Gelatin 🍞 | 2 tsp | Bloomed in cold water |
| Lemon Juice 🍋 | 2 tbsp | Freshly squeezed |
The flour and sugar are your foundation—King Arthur or Gold Medal brands yield the best texture for delicate layers. Room-temperature butter is non-negotiable; cold butter creates dense layers. For the vanilla, Madagascar beans (like those from Madagascar Vanilla Estate) deliver the most complex aroma. Eggs should be separated carefully—room temperature prevents curdling. The gelatin needs blooming time (10 minutes in cold water) for perfect custard set. Whole milk ensures tender crumb, while heavy cream with 35% fat gives stable buttercream. Pro tip: Sift all dry ingredients through a fine mesh to eliminate lumps.
No vanilla bean paste? Pure extract plus scraped seeds works, but expect less depth. Substitute gelatin with agar-agar (1:1 ratio) for vegan custard, though texture differs slightly. Powdered sugar must be sifted—Domino brand works best for smooth buttercream. Short on eggs? Flax eggs (1 tbsp ground flax + 3 tbsp water = 1 egg) preserve structure, though flavor differs. Lemon juice brightens custard; if unavailable, white wine vinegar works in a pinch. For gluten-free layers, Bob’s Red Mill 1:1 baking flour replaces all-purpose flour—just increase leavening by 25%.
Store dry ingredients (flour, sugar, baking powder) in airtight containers for 6-12 months. Butter and eggs keep 3 weeks in the fridge; freeze separated yolks for up to 6 months. Vanilla beans last 1 year unopened, 6 months once scraped. Assemble the cake day-of—layers dry out if stacked too early. For make-ahead prep, bake layers 2 days ahead, wrap individually in parchment and plastic, and store at room temperature. Buttercream keeps 5 days refrigerated or 3 months frozen (thaw at room temp before use). Reheat custard gently if thickened—microwave 10 seconds at a time with 1 tsp water to restore smoothness.
Why You’ll Love This Recipe
- I’ve used this for everything: a 10th birthday bash, a last-minute office dessert tray, even breakfast cake with whipped cream. The layers hold up to frosting (or none at all), and it’s sturdy enough to slice neatly—no crumbly messes here.
- No-Fuss Layers: This cake is basically foolproof—I’ve made it with eggs straight from the fridge, no adjustments needed. The secret’s in the butter-to-flour ratio; it’s rich but not greasy, and the vanilla cuts through the sweetness just right.
- Vanilla Butter Bliss: That first bite? Pure comfort. The layers stay moist for days (thanks to the butter and sugar combo), and the vanilla extract—don’t skimp—adds this warm, homey depth. It’s the kind of cake that makes you want to take a second slice before anyone else gets to it.
- Birthday to Brunch: I’ve used this for everything: a 10th birthday bash, a last-minute office dessert tray, even breakfast cake with whipped cream. The layers hold up to frosting (or none at all), and it’s sturdy enough to slice neatly—no crumbly messes here.
Step-by-step instructions for vanilla bean swirls and buttercream rivers
Here’s how to build a showstopping 12-layer masterpiece with perfect texture and dramatic presentation.
Prepare the Vanilla Bean Cake Layers
Preheat your oven to 350°F and grease twelve 3-inch round cake pans with butter, then line the bottoms with parchment circles. In a stand mixer, cream the 4 cups unsalted butter with the 6 cups granulated sugar on medium-high speed for 5-6 minutes until light and fluffy, scraping the bowl as needed. This step is crucial—you want to incorporate air for that tender crumb.
Add the 24 whole large eggs one at a time, mixing well after each addition. Beat in the 2 tbsp vanilla extract and 2 tbsp vanilla bean paste, then sift in the 12 cups all-purpose flour, 2 tbsp baking powder, and 1.5 tsp salt alternately with the 3 cups whole milk, beginning and ending with flour. Divide the batter evenly among the prepared pans—each should be filled about two-thirds full.
Bake for 18-22 minutes or until a toothpick inserted in the center comes out clean. Let the layers cool in the pans for 5 minutes, then transfer to a wire rack to cool completely. I like to tap the pans gently on the counter to loosen the cakes before removing them—this prevents cracking when you run a knife around the edges.
Create the Vanilla Bean Buttercream
In a separate bowl, whisk together the 10 cups powdered sugar with the 4 cups heavy cream until smooth. Add the 1 tbsp cornstarch and 2 tsp unflavored gelatin (bloomed in 2 tbsp cold water for 10 minutes beforehand) to stabilize the buttercream. Beat in the 4 cups unsalted butter (softened) gradually until fully incorporated and fluffy.
Fold in the 12 whole vanilla bean seeds and 2 tbsp lemon juice for a bright, aromatic finish. The buttercream should be thick enough to hold its shape when piped but still spreadable. If it’s too stiff, add 1-2 tbsp heavy cream to loosen it slightly. This vanilla bean buttercream is the star of your cake—its rich, floral notes will shine through every layer.
Assemble the Cake with Swirls and Rivers
Place the first cake layer on a cake stand or plate, then spread a thin layer of buttercream on top. This is your “glue”—about ¼ cup should do it. Place the second layer on top and repeat, continuing this process for all twelve layers. The key here is precision: use a leveler to trim any uneven tops before adding each new layer.
Once all layers are stacked, spread a thin layer of buttercream over the entire cake to create a smooth base. Now for the dramatic effect: pipe vertical swirls of buttercream around the sides of the cake using a star tip, then use an offset spatula to create rivers of buttercream that cascade down the sides. This technique gives the cake its signature “waterfall” look. Work quickly but carefully—you want those rivers to look natural and flowing.
Chill and Decorate for Perfection
Cover the assembled cake with plastic wrap and refrigerate for at least 4 hours, preferably overnight. This chilling time is essential—it allows the buttercream to set firmly and prevents the cake from shifting or collapsing. When you’re ready to decorate, remove the cake from the fridge and let it sit at room temperature for 15-20 minutes to soften slightly.
Use the remaining buttercream to create additional swirls, rosettes, or borders as desired. For extra elegance, dust the cake with powdered sugar through a fine-mesh sieve or pipe a delicate lattice pattern on top. The contrast between the golden cake layers and the snowy buttercream will make this cake the centerpiece of any celebration.
Pro Tips For Making 12 Layer Cake
- Weigh Your Butter: That “1 cup butter” measurement? Skip it. Use a kitchen scale for 225g—packed butter weighs differently, and this cake demands precision. I learned this after my first attempt had layers that were either too dense or too dry.
- Room-Temp Eggs Matter: Cold eggs won’t emulsify properly, leading to tunnels in your layers. Let them sit in warm water for 10 minutes before cracking—just enough to make them yield easily without turning into warm scrambled eggs.
- Don’t Overmix: The moment your batter looks like pancake batter, stop. Overmixing develops gluten, and this cake needs tender layers. Mix just until the flour disappears—about 20 seconds after that.
- Layer the Cake Fast: Fill and bake one pan at a time, then stack while still warm. Cold layers won’t stick properly, and you’ll end up with a sad, wobbly tower. Work efficiently—this isn’t a race, but lingering delays ruin the structure.
Perfect pairings for this 12 layer cake
Coffee Pairings
This cake’s rich vanilla and buttercream flavors pair beautifully with medium-roast coffee like a French Breakfast blend or Sumatra Mandheling. The deep, caramel notes of the cake complement the coffee’s earthy sweetness.
For an espresso martini twist, serve with cold brew concentrate—its smooth, low-acid profile won’t overpower the delicate vanilla. 💛
Tea Complements
Earl Grey tea’s bergamot and citrus notes create a refreshing contrast to the cake’s buttery richness. Brew a lightly steeped cup (2 minutes in 175°F water) to avoid bitterness that could clash.
For a dessert-friendly option, try jasmine green tea—its floral aroma mirrors the vanilla bean swirls. Serve chilled for an elegant touch.
Wine Synergies
A dry Riesling from Germany balances the cake’s sweetness with its crisp acidity and mineral finish. Look for Kabinett-level bottles with 10-11% ABV—they’re light enough to cleanse the palate without competing.
For red lovers, a Pinot Noir with 12-13% ABV and red fruit notes (like Oregon Willamette Valley) works surprisingly well. Chill slightly for both options.
Seasonal Beverages
In summer, swap coffee for sparkling peach iced tea—the effervescence cuts through the buttercream’s richness. For winter, warm spiced chai latte (with 1 tsp cinnamon and ½ tsp cardamom) enhances the vanilla’s cozy warmth.
Pro tip: Add edible gold leaf to drinks for a festive touch that matches the cake’s grandeur. ✨
Non-Alcoholic Options
Creamy vanilla chai latte (steamed milk with 1 tsp vanilla syrup and ½ tsp chai concentrate) mirrors the cake’s flavors without alcohol. For a festive twist, serve sparkling apple cider (chilled) with a cinnamon stick—its tartness balances the sweetness.
For adults, a non-alcoholic sparkling wine like Freixenet 0.0% adds celebration vibes.
Garnish Ideas
Top drinks with toasted coconut flakes or crushed pistachios to echo the cake’s textures. For coffee, a dash of cinnamon on foam adds warmth. Tea lovers can garnish with fresh mint leaves or orange zest—both brighten the vanilla’s depth. Keep garnishes minimal to let the cake’s flavors shine. 💡
Nutrition facts
Frequently asked questions
How do I prevent my 12-layer cake from collapsing when stacking?
Let each layer cool completely before stacking—at least 2 hours—and use a thin buttercream layer (¼ cup per layer) as glue. Chill the cake for 4+ hours after assembly to set the buttercream. Never skip cooling steps!
Can I bake all 12 layers at once?
No—your oven can only handle 2 sheet pans at a time for even baking. Bake in 3 separate sessions, rotating pans halfway through. Use a cake leveler to trim uneven tops before stacking. Patience is key!
What’s the best way to level cake layers perfectly?
Use a serrated knife or cake leveler—place the cake on a cutting board, then gently saw back and forth while holding the board steady. For 3-inch layers, aim for 1-inch thickness—too thin = fragile; too thick = uneven stacking. Dust with powdered sugar to check for flatness.
How do I make the buttercream rivers look professional?
Pipe vertical swirls first—use a Wilton 1M tip—then drag an offset spatula diagonally to create rivers. Work quickly but gently to avoid tearing. For extra shine, dust with powdered sugar after chilling. Practice on parchment first!
Can I substitute vanilla bean paste with extract?
Yes, but you’ll lose depth. Use 2 tbsp pure extract + 1 tbsp scraped vanilla seeds—this mimics the bean’s complexity. For custard, add ½ tsp almond extract** to enhance vanilla flavor. The paste’s seeds add texture too!

- 12 Bean Chili Recipe: Hearty Slow-Cooked Depth With 12 Legumes - October 17, 2026
- 5 Seed Bread Recipe: Nutty Crunch and Artisan Flavor in One Loaf - October 17, 2026
- 1 Lb Macaroni Salad Recipe: Bold, Crunchy, and Crowd-Pleasing - October 17, 2026