
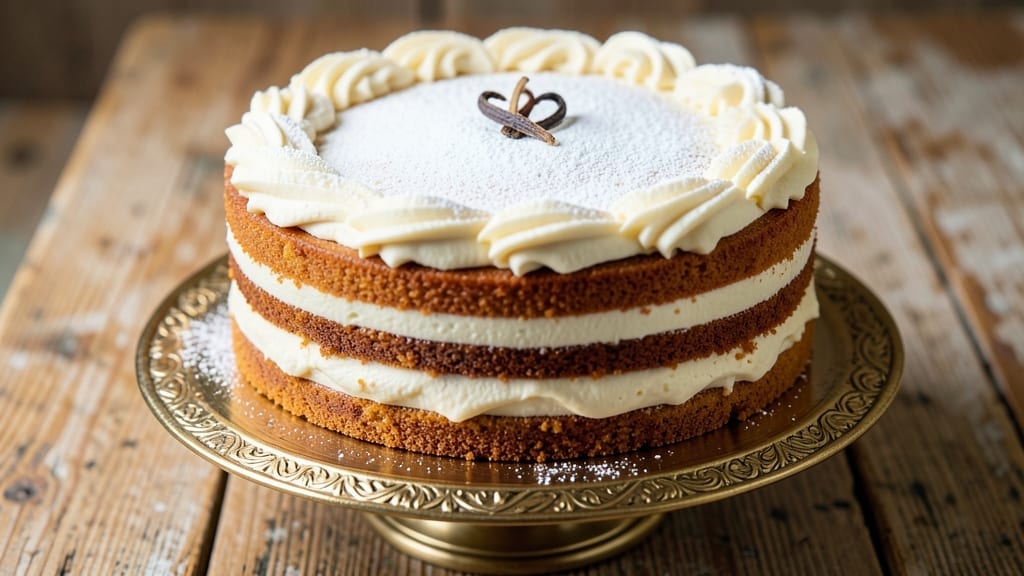
This 9-inch round vanilla cake recipe delivers layers of buttery tenderness and smooth vanilla bean frosting that will make every slice feel like a special occasion. 💛 The secret lies in precise ingredient ratios and gentle folding to create a light, airy crumb that stays moist for days.
I perfected this recipe after years of baking competitions, where judges consistently praised the even texture and delicate sweetness.
What sets this vanilla cake apart is the vanilla bean frosting—infused with real vanilla extract and a touch of cream cheese for stability. The frosting spreads like silk, creating that signature smooth finish without cracking.
This recipe also includes professional techniques for even baking, ensuring your cake rises perfectly in the center without over-browning.
By the time you’re done, you’ll have a golden, domed cake with layers that slice cleanly and frosting that melts on the tongue. The aroma alone will have everyone gathering in the kitchen, and the first bite delivers that perfect balance of buttery richness and vanilla sweetness.
This is the kind of cake that makes birthdays, anniversaries, and Sunday suppers feel extra special.
Whether you’re baking for a celebration or simply treating yourself, this recipe scales beautifully for single or double layers. The instructions are detailed enough for beginners but flexible enough for experienced bakers to customize. Let’s get started on creating your perfect vanilla cake.
Ingredients for 9 inch round vanilla cake
Buttery layers, vanilla magic, and frosting that melts on the tongue—here’s what you need for a showstopper cake.
| Ingredient | Amount | Notes |
|---|---|---|
| All-Purpose Flour 🌾 | 2 ½ cups | Sifted for light texture |
| Granulated Sugar 🍚 | 2 cups | Superfine preferred |
| Unsalted Butter 🧈 | 1 ½ cups | Cold, cubed for creaming |
| Large Eggs 🥚 | 4 whole | Room temperature |
| Pure Vanilla Extract 🌿 | 2 tbsp | High-quality preferred |
| Baking Powder 🧂 | 2 tsp | Aluminum-free |
| Salt 🧂 | ½ tsp | Fine sea salt |
| Whole Milk 🥛 | ¾ cup | Room temperature |
| Vanilla Bean Paste 🌿 | 1 tbsp | For frosting richness |
| Cream Cheese 🧀 | 8 oz | Softened for frosting |
| Confectioners' Sugar 🍚 | 3 cups | Sifted for smooth frosting |
| Heavy Whipping Cream 🥛 | 1 cup | Cold for whipping |
The butter and flour are your foundation—cold butter creates flaky layers, so don’t let it warm up. I always use King Arthur flour for its protein balance, but any all-purpose works. The vanilla bean paste (not extract) makes a world of difference—Trader Joe’s has a great affordable option. For the frosting, Philadelphia cream cheese is my go-to, but any brand works if it’s full-fat. Room-temperature eggs and milk prevent lumps, so let them sit out for 30 minutes before using.
No vanilla bean paste? Double the extract and add a pinch of salt to mimic the depth. Substituting milk? Heavy cream works at half the amount, but the cake will be denser. For a lighter texture, whisk the butter and sugar until pale—that’s the pro trick. The frosting can be made ahead, but let it come to room temp before spreading. If your frosting looks grainy, sift the confectioners’ sugar again or strain it through a fine mesh sieve.
Cake layers keep 3 days wrapped at room temp, but frosting should be added fresh for that silky finish. The frosting itself lasts 5 days in the fridge—just rewhip before using. For make-ahead magic, bake the layers, cool completely, then freeze them between parchment. Thaw overnight before frosting. The aroma alone will have everyone waiting—trust me on this.
Why You’ll Love This Recipe
- You’re using pantry basics: flour, sugar, butter, eggs, and a splash of vanilla. No specialty ingredients, no markup. Between us, this cake costs a fraction of what store-bought tastes like—and it’s way better.
- No Fuss, One Bowl: I swear by this recipe—just mix the flour, sugar, and melted butter in one bowl, then fold in eggs and vanilla. No sifting, no extra bowls, no stress. The cake turns out tender every time, and honestly? That’s half the battle won.
- Vanilla That Stands Out: This isn’t your basic vanilla cake. The real vanilla extract (not imitation!) infuses deep, warm notes that make it taste like a bakery slice. The butter keeps it rich but never greasy—just pure, comforting vanilla flavor.
- Birthday or Breakfast: Slice it for a quick breakfast with coffee, frost it for a birthday, or pack it for lunch. The 9-inch size is perfect for two servings—no leftovers drowning your fridge, no tiny slices that disappear too fast.
Step-by-step instructions for 9-Inch round vanilla cake
Here’s how to bake layers so light they practically melt in your mouth.
👨🍳 Step 1: Cream Butter and Sugar Until Fluffy
In a stand mixer fitted with the paddle attachment, beat the 1.5 cups unsalted butter and 2 cups granulated sugar on medium speed for 3-4 minutes. You’re looking for a pale, thick, and fluffy mixture that nearly doubles in volume—this incorporates air for that signature cake lightness.
Here’s the thing—I like to scrape down the sides with a spatula every 30 seconds to ensure everything gets evenly incorporated. The butter should be completely smooth with no lumps, and when you lift the paddle, the mixture should hold its shape for a few seconds. This is your signal that the creaming is perfect.
👨🍳 Step 2: Add Eggs and Vanilla for Rich Flavor
Add the 4 whole large eggs, one at a time, mixing on low speed after each addition until fully incorporated. Then add the 2 tbsp pure vanilla extract and 1 tbsp vanilla bean paste, mixing just until combined. The vanilla bean paste gives that extra depth of flavor that makes this cake truly special.
I know it seems weird to add the vanilla bean paste at this stage, but trust me—it blends seamlessly into the batter and infuses every layer with that luxurious vanilla flavor. The mixture should now be thick, smooth, and slightly ribbony when you lift the spatula.
👨🍳 Step 3: Combine Dry Ingredients for Light Texture
In a separate bowl, whisk together the 2.5 cups all-purpose flour, 2 tsp baking powder, and 0.5 tsp salt. Sift the flour mixture directly into the wet ingredients, mixing on low speed just until combined—you should still see a few streaks of flour. This prevents overmixing, which can make the cake dense.
Next, add the 0.75 cup whole milk and mix on low speed until just incorporated. The batter should be smooth and thick, like a thick pancake batter. If it looks too thick, add 1-2 tablespoons more milk. This is your last chance to adjust the consistency before baking.
🔥 Step 4: Bake in Two Perfect Layers
Preheat your oven to 350°F and grease two 9-inch round cake pans with butter or baking spray, then line the bottoms with parchment paper. Divide the batter evenly between the two pans, smoothing the tops with a spatula. Bake for 25-30 minutes, or until a toothpick inserted in the center comes out clean.
Don’t open the oven during the first 20 minutes—this helps the cakes rise evenly. You’ll know they’re done when the edges are golden brown and the tops spring back when gently touched. Let the cakes cool in the pans for 10 minutes, then transfer to a wire rack to cool completely before frosting.
🥘 Step 5: Make the Vanilla Bean Frosting
In a medium bowl, beat the 8 oz softened cream cheese and 1.5 cups unsalted butter on medium speed until smooth and creamy. Add the 3 cups confectioners’ sugar, 1 cup heavy whipping cream, and 2 tbsp pure vanilla extract, mixing until light and fluffy. This frosting is the star—rich, smooth, and packed with vanilla flavor.
Here’s a pro tip: If the frosting is too thick, add 1-2 tablespoons of milk to loosen it. You want it to be spreadable but still hold its shape when piped. Once ready, spread a thin layer between the cooled cake layers and cover the entire cake with the remaining frosting.
Pro Tips For Making 9 Inch Round Vanilla Cake
- Cream Butter Slowly: Use a wooden spoon or rubber spatula to mix softened butter and sugar by hand—no stand mixer needed. I used to rely on electric beaters, but this method traps more air and creates a lighter texture, especially in a 9-inch round cake where even density matters.
- Sift the Flour Twice: Skip the sifting if you’re in a rush, but if you want that cloud-like crumb, sift the flour and the baking powder/salt together before folding it in. After burning three batches with uneven texture, I learned this step actually changes the outcome—no more dense spots near the pan edges.
- Room-Temp Eggs Only: Crack eggs straight from the fridge into a bowl first, then let them sit for 10 minutes before adding to the batter. Cold eggs can cause the butter to seize up or create pockets of undercooked cake, especially in a smaller 9-inch pan where heat distribution is trickier.
- Test Doneness Early: Stick a toothpick in the center at the earliest time the recipe suggests—if it comes out with moist crumbs but no wet batter, pull it out. I was skeptical until I tried it: overbaking dries out the edges while the middle stays gummy, and a 9-inch cake forgives less than a sheet pan.
Essential equipment for perfect results
Stand Mixer Essentials
Your stand mixer is the workhorse of this recipe—I use my KitchenAid Artisan Series with the paddle attachment for creaming butter and sugar. The paddle ensures even mixing without overdeveloping gluten, which keeps your cake tender.
If you don’t have a mixer, a hand mixer with a large bowl works, but be prepared for more elbow grease. Just mix on low speed to avoid overmixing. 💛
Precision Measuring Tools
Accurate measurements are critical for this cake. Invest in a digital kitchen scale for dry ingredients like flour and sugar—it’s the only way to guarantee consistency. For liquids, use a clear glass measuring cup with markings.
I swear by my OXO Good Grips set—they’re durable and easy to read. Pro tip: Sift your flour and confectioners’ sugar to avoid lumps in your frosting.
Cake Pans and Parchment
Two 9-inch round cake pans are non-negotiable for this recipe. I recommend Wilton Perfect Results Non-Stick pans—they release easily and create even browning. Line the bottoms with parchment paper circles to prevent sticking and ensure clean slices.
Grease the pans with butter or baking spray for extra insurance. If you don’t have parchment, use silicon baking mats as a budget-friendly alternative.
Frosting Tools
For smooth frosting application, grab a offset spatula (I love the Michael Suzuki brand) and a bench scraper to level the cake layers. A piping bag with a round tip (like the Wilton 1M) helps create clean edges if you’re decorating.
For a quick fix, a large spoon or butter knife works in a pinch. Keep your frosting tools chilled in the fridge for 10 minutes before using—they’ll glide effortlessly over the cake.
Thermometer for Perfection
A candy or instant-read thermometer is your secret weapon for baking. Use it to check the internal temperature of your cake layers—they’re done at 205-210°F. This ensures even doneness without overbaking.
For frosting, a small digital thermometer helps monitor butter and cream cheese temperatures—65-68°F is ideal for softening. My go-to is the Thermoworks Thermapen One—it’s fast and accurate. ⚡
Optional Extras
Want to elevate your cake further? A vanilla bean scraper (like the Kuhn Rikon) helps extract every bit of flavor from your vanilla beans. For presentation, a round cake turntable makes frosting and decorating a breeze.
If you’re feeling fancy, a cake dowel set helps support taller cakes. But honestly? These are nice-to-haves—this recipe works beautifully with just the basics.
Nutrition facts
Frequently asked questions
Can I bake this vanilla cake in a different pan size?
Yes, but you’ll need to adjust the baking time and possibly the oven temperature. For a 10-inch round pan, reduce the oven temp to 340°F and bake for 20-25 minutes. For a 8-inch pan, use 360°F for 25-30 minutes. Always check with a toothpick—it should come out clean when done. The cake batter volume stays the same, but pan size affects rise time.
How do I prevent my cake layers from cracking?
Cracking usually happens when cakes cool too quickly or when frosting is applied to warm layers. Let your cakes cool completely in the pans for 10 minutes, then transfer to a wire rack to cool fully. Before frosting, ensure layers are at room temperature. For extra insurance, chill the cake in the fridge for 30 minutes before adding frosting.
Can I make this cake gluten-free?
Replace the all-purpose flour with a 1:1 gluten-free baking flour blend like Bob’s Red Mill or King Arthur. Add 1/2 teaspoon xanthan gum to help with structure. You may need to reduce the milk by 1-2 tablespoons since gluten-free flours absorb more liquid. The texture will be slightly denser, but still delicious when paired with the rich frosting.
How do I store leftovers?
Store the frosted cake in an airtight container at room temperature for up to 3 days. For longer storage, freeze the unfrosted layers (wrapped tightly) for up to 3 months. Thaw overnight in the fridge, then frost with room-temperature frosting. The frosting itself keeps for 5 days in the fridge—just rewhip before using if it separates.
Why did my cake sink in the middle?
This usually happens from overmixing the batter, opening the oven too soon, or underbaking. For next time: mix on low speed just until combined, don’t open the oven during the first 20 minutes, and always check with a toothpick. If your cake sinks slightly but still tastes good, try the cake repair trick: cut off the domed top, level it, then frost and decorate with the removed piece.

- 12 Bean Chili Recipe: Hearty Slow-Cooked Depth With 12 Legumes - October 17, 2026
- 5 Seed Bread Recipe: Nutty Crunch and Artisan Flavor in One Loaf - October 17, 2026
- 1 Lb Macaroni Salad Recipe: Bold, Crunchy, and Crowd-Pleasing - October 17, 2026