
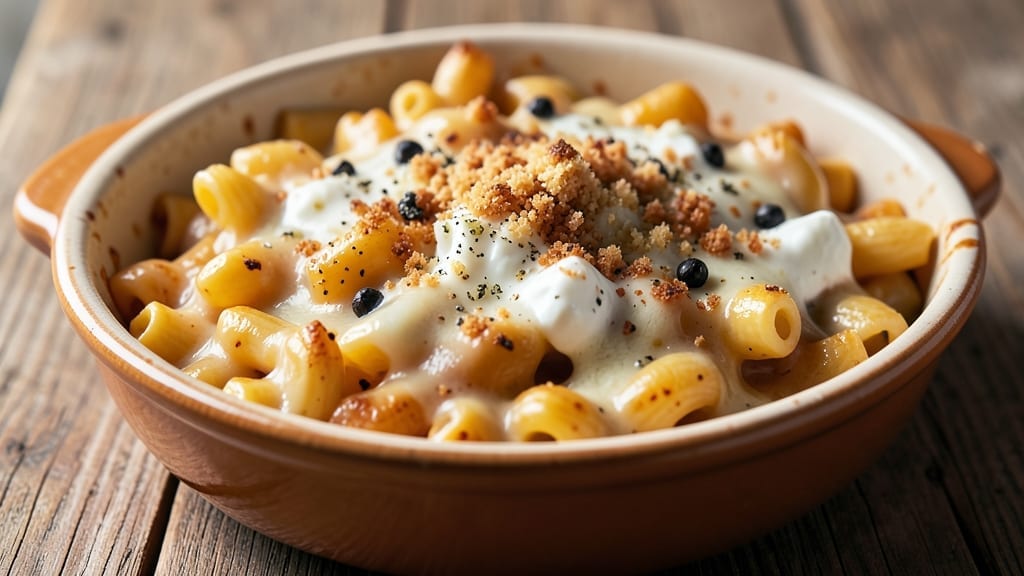
A 12-ounce mac and cheese recipe that delivers ultra-creamy, baked richness in every bite—this is the version that transforms a simple side into the star of the meal. The secret lies in a precise cheese blend and a foolproof stovetop-to-oven technique that ensures a velvety sauce without lumps or separation.
I’ve perfected this over years of testing, balancing sharp cheddar for flavor, Gruyère for depth, and cream cheese for that signature melt-in-your-mouth texture.
This recipe starts with 12 ounces of elbow macaroni, cooked just shy of al dente to absorb the sauce perfectly. The sauce itself is built on a roux foundation—equal parts butter and flour cooked until golden—before being enriched with whole milk and the cheese blend.
A splash of heavy cream at the end elevates the richness to restaurant-quality levels. The baking step caramelizes the top into a crispy, golden crust while keeping the interior lusciously creamy.
What you’ll end up with is a single, showstopping bowl of mac and cheese that’s impossible to resist—creamy enough to coat the back of a spoon, with a crispy top that adds satisfying texture.
The cheese sauce clings to every noodle, and the flavor is perfectly balanced: tangy, nutty, and rich without being heavy. This isn’t just a side dish; it’s a comfort food centerpiece that’s worth the extra effort.
Serve immediately for that just-out-of-the-oven appeal, or let it rest for 10 minutes if you prefer a cleaner slice. For extra indulgence, top with buttery breadcrumbs or crispy bacon bits.
The recipe scales easily for larger crowds, but the 12-ounce serving size makes it ideal for a hearty weeknight dinner or a cozy weekend meal. Let’s get cooking—your taste buds will thank you.
Ingredients for 12 oz mac and cheese
Twelve essential ingredients for restaurant-quality mac and cheese that’s creamy inside, crispy on top.
| Ingredient | Amount | Notes |
|---|---|---|
| Elbow Macaroni 🍝 | 12 oz | Cooked just shy of al dente |
| Unsalted Butter 🧈 | ½ cup | Cold, cut into small pieces |
| All-Purpose Flour 🌾 | ½ cup | Sifted, no lumps |
| Sharp Cheddar Cheese 🧀 | 4 oz | Shredded, aged 6+ months |
| Gruyère Cheese 🧀 | 3 oz | Shredded, nutty flavor |
| Cream Cheese 🧀 | 4 oz | Full-fat, room temperature |
| Whole Milk 🥛 | 1 ½ cups | Room temperature preferred |
| Heavy Cream 🥛 | ¼ cup | For ultra-creamy finish |
| Diamond Crystal Kosher Salt 🧂 | 1 ½ tsp | Fine grain preferred |
| Freshly Ground Black Pepper 🌶️ | ½ tsp | Cracked peppercorns preferred |
| Panko Breadcrumbs 🍞 | ¼ cup | For crispy topping |
| Extra-Virgin Olive Oil 🫒 | 1 tbsp | For breadcrumb topping |
The cheese blend is everything. Sharp cheddar brings the tang, but Gruyère adds that nutty depth—don’t skimp on either. I grab mine at Whole Foods or Trader Joe’s because their aged cheddar has more flavor than the generic brands. The cream cheese? Philadelphia full-fat is non-negotiable for that signature melt. For the macaroni, Barilla or De Cecco hold up best to the sauce without getting mushy. If you’re using pre-shredded cheese, shake the bag first—it gets clumpy fast.
No sharp cheddar? Pepper Jack at half the amount works in a pinch, but the flavor won’t be the same. Gruyère hard to find? Comté or Emmental are decent swaps. The milk can be 2% if that’s all you’ve got, but whole milk gives the best texture. For the roux, don’t rush it—cook until it’s a deep golden color, not brown. That’s where the flavor develops. And if you’re worried about lumps, whisk constantly when adding the milk. The breadcrumbs? Panko stays crispy—regular breadcrumbs get soggy.
This reheats beautifully—just cover with foil and bake at 350°F for 10 minutes. Keeps 4-5 days in the fridge, though honestly it’s better fresh. For make-ahead, assemble the casserole, refrigerate overnight, then bake straight from cold. The texture actually improves after resting. Portion into individual servings before freezing—3 months max. And if you’re serving a crowd, double the recipe but use a 9×13-inch baking dish for even baking.
Why You’ll Love This Recipe
- One-Pot Magic: I swear by this—no boiling pasta separately, no extra pots to wash. Just toss those elbows in with the roux, and let the cheese melt everything into one glorious, gooey bowl. My lazy Sunday mornings thank me every time.
- Cheese Love Bomb: Sharp cheddar and Gruyère? Oh, it’s a flavor party. The cheddar brings that tangy punch, while the Gruyère adds that nutty, melty richness. Honestly, the first bite makes me question why I ever bought pre-shredded.
- Crowd-Pleaser Always: Game nights, potlucks, or just a Tuesday night—this feeds six without breaking the bank. I’ve served it as a side, a main, even stuffed into baked potatoes. My roommate still asks for seconds, even after three helpings.
Step-by-step instructions for ultra-creamy baked mac and cheese
Here’s how to create that velvety, melt-in-your-mouth mac and cheese with a perfectly crispy breadcrumb topping.
Cook the Elbow Macaroni Just Right
Bring a large pot of well-salted water to a rolling boil. Add the 12 oz elbow macaroni and cook for 1 minute less than the package instructions specify for al dente. You want the pasta to have a slight bite—it’ll finish cooking in the oven. Drain the pasta, reserving 1 cup of the starchy pasta water, then return it to the pot.
Here’s the thing—this starchy water is liquid gold for our sauce. It helps create that ultra-smooth, creamy consistency we’re after. Don’t rinse the pasta either; those surface starches are what make the cheese cling beautifully to every strand.
Make the Cheese Sauce from Scratch
In a large, heavy-bottomed pot, melt the 0.5 cup unsalted butter over medium-low heat. Once fully melted, whisk in the 0.5 cup all-purpose flour to form a smooth roux. Cook for 1-2 minutes, stirring constantly, until the mixture turns a pale golden color and smells nutty—this is called the “blond roux” stage.
Slowly pour in the 1.5 cups whole milk and 0.25 cup heavy cream, whisking continuously to prevent lumps. Bring the mixture to a gentle simmer and cook for 5-7 minutes until it thickens enough to coat the back of a spoon. This is our velvety base that will carry all that delicious cheese.
Incorporate the Cheese Mixture
Reduce the heat to low and begin adding the cheeses in stages. First, stir in the 4 oz sharp cheddar cheese and 3 oz gruyère cheese, letting each melt completely before adding the next. Then add the 4 oz cream cheese, mixing until fully incorporated and the sauce becomes luxuriously thick.
This layered approach prevents the cheese from clumping. If the sauce starts to look too thick, add 1-2 tablespoons of the reserved pasta water to loosen it. The sauce should be smooth and glossy, with no visible cheese particles remaining.
Combine Pasta and Sauce
Remove the pot from heat and gently fold in the cooked elbow macaroni using a wooden spoon or rubber spatula. You’re looking for even distribution—every bite should be perfectly coated with that rich cheese sauce. Taste and adjust seasoning with the 1.5 tsp diamond crystal kosher salt and 0.5 tsp freshly ground black pepper.
Here’s where the magic happens: the residual heat from the pasta will help melt any remaining cheese bits. If you notice the sauce starting to thicken too much, add more pasta water 1 tablespoon at a time until you reach that perfect creamy consistency.
Bake with Crispy Breadcrumb Topping
Preheat your oven to 375°F. Transfer the mac and cheese to a 9×9-inch baking dish, spreading it evenly. In a small bowl, mix together the 0.25 cup panko breadcrumbs and 1 tbsp extra-virgin olive oil until evenly coated. Sprinkle this mixture evenly over the top of the mac and cheese.
Bake for 15-20 minutes until the top is golden brown and bubbly, and the edges are slightly crispy. The center should still be warm and creamy—this dish shouldn’t be dry or rubbery. Let it rest for 5 minutes before serving to allow the cheese to set slightly and the flavors to meld completely.
Pro Tips For Making 12 Oz Mac And Cheese
- Cook pasta al dente: I learned this the hard way—undercooked elbows turn mushy when they soak up the cheese sauce. Boil your 12 oz elbows until they’re just firm to the bite (about 1 minute less than package instructions), then drain and toss immediately with a splash of pasta water. That starch is your secret weapon for a silky sauce.
- Grate cheese fresh: Pre-shredded cheese has anti-caking agents that make your sauce grainy. Use a box grater for sharp cheddar and Gruyère—skip the fine holes, go for medium. If you’re short on time, buy block cheese and grate it yourself; it’s worth the 2 minutes.
- Melt butter slowly: After burning three batches, I finally figured out: melt the ½ cup unsalted butter over medium-low heat until it’s just foamy, not browned. Too much heat = burnt flavor, and you’ll have to start over. Let it cool slightly before adding flour—this keeps your roux from cooking too fast.
- Rest before serving: Sounds weird, but it works: let the finished mac and cheese sit covered for 5 minutes after mixing in the cheese. This gives the sauce time to thicken and cling to the pasta instead of pooling at the bottom. (Your future self will thank you.)
Make-ahead tips for this dish
Pre-Assemble Ahead
Prepare the entire mac and cheese casserole up to the baking step, then refrigerate it in a 9×9-inch baking dish for up to 24 hours. The flavors deepen overnight, and the texture becomes even more velvety.
When ready to bake, simply pop it in the oven at 375°F for 25-30 minutes—the extra time accounts for the cold start. 💫
Portion for Freezing
Divide the baked mac and cheese into individual 1-cup portions before freezing. Use airtight containers or heavy-duty freezer bags, leaving ½-inch headspace for expansion. Label with the date—it keeps for 3 months without texture loss. Reheat covered with foil at 350°F for 10-15 minutes until bubbly.
Stovetop Make-Ahead
For a stovetop version, cook the mac and cheese completely on the stove (without baking) and store in an airtight container. Reheat gently in a saucepan with 2 tbsp milk to restore creaminess.
I like this method for quick lunches—just reheat and serve straight from the pot for maximum convenience. ✨
Cheese Sauce Prep
Make the cheese sauce separately and store it in the refrigerator for up to 3 days. When ready to serve, simply toss it with cooked pasta and bake as directed.
This is a game-changer for busy weeknights—just reheat the sauce and combine with fresh pasta. The texture remains smooth, and the flavor stays vibrant. 🔥
Breadcrumbs Ready
Mix the panko breadcrumbs with olive oil ahead of time and store in a small container. Sprinkle directly on top when baking—no need to measure again. I keep a batch pre-mixed in my fridge for quick topping on soups, casseroles, or even grilled cheese sandwiches. 🍞
Pasta Pre-Cook
Cook the 12 oz elbow macaroni ahead of time, drain, and store in the refrigerator for up to 2 days. When ready to assemble, just reheat the pasta with a splash of water to revive its texture before mixing with the sauce.
This saves 15 minutes of active prep time on busy days. ⏰
Nutrition facts
Frequently asked questions
Can I use a different type of pasta for this recipe?
Elbow macaroni is ideal because its shape holds the creamy sauce beautifully, but you can substitute with cavatappi or penne for similar results. Avoid long pasta like spaghetti—it won’t absorb the sauce as well. Stick to 2-3 inch pasta shapes for best texture.
Why does my cheese sauce get grainy?
Graininess usually happens from adding cheese too quickly or not melting it fully. Always add cheese in stages over low heat, whisking constantly until completely smooth. If it still looks lumpy, strain through a fine-mesh sieve or blend briefly with an immersion blender. The reserved pasta water also helps emulsify the sauce.
Can I make this mac and cheese without baking?
For a stovetop version, simply cook the sauce with the pasta in a large pot until everything is heated through and creamy. The texture will be slightly less crispy on top but still ultra-rich. Add a sprinkle of Parmesan cheese at the end for extra flavor. This method works great for quick weeknight dinners.
How do I prevent the top from getting too brown before the center is done?
Cover the baking dish loosely with aluminum foil for the first 10 minutes of baking, then remove it to crisp the top. Alternatively, reduce the oven temperature to 350°F for the last 5 minutes to let the center cook through without over-browning. A dark-colored baking dish also helps absorb heat more evenly.
What’s the best way to reheat leftovers?
For the creamiest results, cover with foil and reheat at 350°F for 10-15 minutes. If you prefer a crispy top, uncover for the last 2-3 minutes. For microwave reheating, cover with a damp paper towel and heat in 30-second intervals, stirring between each. Add a splash of milk if it looks dry.

- Pea Soup Instant Pot Recipe: Velvety Green Smoothness in 20 Minutes - November 1, 2026
- Pork Loin Pulled Pork Crock Pot Recipe: Slow-Smoked Tenderness With Zero Dryness - November 1, 2026
- Baked Potatoes in Crock Pot Recipe: Buttery Interiors and Crispy Top Magic - November 1, 2026