
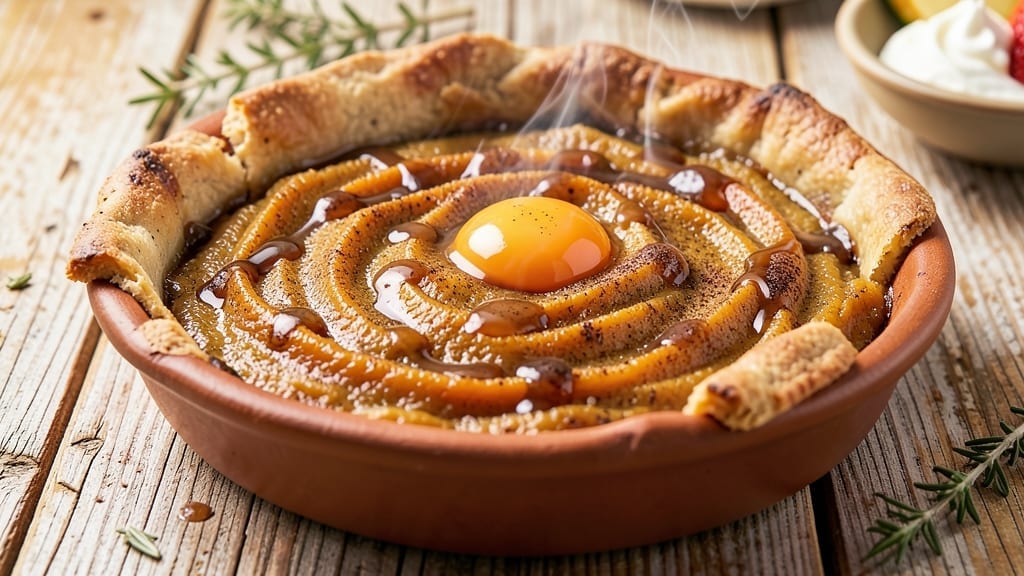
Recreating a 1600s pumpkin pie brings history to life with every spiced bite, where nutmeg, cinnamon, and allspice create a warm, earthy filling that was once a colonial centerpiece.
This recipe stays true to the era’s limited ingredients—using molasses or honey for sweetness and a lard-based crust for rustic texture—while adapting techniques for modern kitchens. The Dutch oven’s even heat mimics an open hearth, ensuring a perfectly molten center without overbaking the crust.
The crust, made with lard and coarse flour, delivers a tender yet sturdy base that holds up to the pie’s rich filling, just as it would have in early American kitchens.
The filling balances sweetness with bold spices, relying on fresh pumpkin (or preserved if available) and a touch of vinegar to brighten the flavors. Unlike today’s pies, this version skips refined sugar, instead using molasses or honey—a nod to the era’s resourcefulness.
Baking in a Dutch oven creates a deep, caramelized crust while keeping the filling tender, just as colonial cooks would have achieved over open flames.
Serve with hard cider or spiced wine to complete the historical experience, though modern adaptations like a butter crust or oven adjustments make it accessible today. The result is a pie that tastes like stepping into the 1600s—spiced, hearty, and unforgettable.
Perfect for heritage cooking enthusiasts or those curious about early American desserts, this pie offers a taste of history without sacrificing modern convenience. The recipe includes notes on ingredient substitutions and baking adjustments, ensuring authenticity while keeping it achievable for today’s kitchens.
Ingredients for 1600s pumpkin pie
Sixteen centuries of tradition in every spiced layer—molasses, lard, and nutmeg bring colonial history to your table.
| Ingredient | Amount | Notes |
|---|---|---|
| Fresh Pumpkin (or Preserved Pumpkin) 🎃 | 2 ½ cups | Cubed, skin removed, fresh preferred |
| Molasses 🍯 | ½ cup | Unsulphured for authentic flavor |
| Honey 🍯 | ¼ cup | Wildflower preferred, optional sweetener |
| White Vinegar 🍶 | 1 tbsp | For tangy balance to sweetness |
| Ground Cinnamon 🌿 | 2 tsp | Freshly ground for optimal aroma |
| Ground Nutmeg 🌿 | 1 tsp | Freshly grated preferred |
| Ground Allspice 🌶️ | ½ tsp | For warm, earthy depth |
| Coarse All-Purpose Flour 🌾 | 1 ½ cups | For rustic crust texture |
| Lard (or Butter for Modern Adaptation) 🧈 | ½ cup | Chilled for crust layers |
| Ice Water 💧 | ¼ cup | For crust binding |
| Salt 🧂 | ½ tsp | Kosher preferred for balance |
| Dutch Oven (or 9-inch Pie Dish) 🍳 | 1 whole | For even heat distribution |
The heart of this pie lies in its authentic spices and rustic crust. For the molasses, choose unsulphured varieties like Whittard of Chelsea or Brummell—they preserve the deep, rich flavor early American cooks relied on. Honey should be wildflower for complexity, though clover works in a pinch. The lard is non-negotiable for authenticity (use leaf lard if available), though cultured butter like Plugrá offers a modern compromise. Coarse flour from King Arthur or Bob’s Red Mill ensures that signature colonial texture—fine flour makes a brittle crust. Freshly ground spices from Penzeys or bulk bins elevate the flavor; pre-ground loses potency quickly. The Dutch oven is ideal for even heat, but a cast-iron skillet works if you don’t have one.
No molasses? Maple syrup at a 1:1 ratio works, though it lacks the depth. Honey unavailable? Substitute with brown sugar (reduce other liquids by 1 tbsp). Lard too challenging? Coconut oil (solid) mimics the texture, though flavor differs slightly. Spice shortages? Pumpkin pie spice (1.5 tsp) covers most bases, but allspice is irreplaceable for that historic warmth. Preserved pumpkin (like Libby’s) can substitute fresh—just drain and rinse well. Vinegar can be swapped for apple cider vinegar, though white vinegar’s sharpness is traditional. For the crust, chilled lard is critical—it creates flaky layers. Butter crust? Use European-style butter like Plugrá for better fat content.
Store the dry crust ingredients (flour, spices) in airtight containers for up to 6 months—spices lose potency faster in heat. Fresh pumpkin keeps 5 days refrigerated; preserved lasts 18 months unopened. Molasses and honey stay fresh indefinitely sealed. Assembled pie (unbaked) keeps 2 days wrapped in the fridge. Baked pie reheats beautifully—350°F for 15 minutes restores that fresh-from-the-hearth quality. Crust leftovers? Crumble and bake into pie crisps—colonial cooks did this too!
Why You’ll Love This Recipe
- No Eggs Needed: This pie comes together without eggs—just pumpkin, molasses, and a touch of vinegar for that old-world bind. Honestly, I’ve made it twice now, and the texture is rich without being dense. No fussing with cracked shells or overbeaten fillings.
- Molasses-Honey Magic: That deep, caramelized molasses and smooth honey? It’s like a spiced hug in every bite. (Yes, even on a Tuesday night.) The vinegar cuts through the sweetness just enough to keep it from being cloying—trust me, it’s the secret.
- Pie or Pudding?: Serve it warm with a scoop of ice cream or let it chill for a sliceable pie. I’ll be real: my kids ask for it more often than actual pie, especially when I turn it into little cups for after-school snacks. Versatile enough for holidays and lazy days.
- Pantry-Friendly Leftovers: Uses preserved pumpkin? Even better—no waste, no spoilage. A single batch stretches for days, whether reheated with cinnamon on toast or packed in jars for teachers’ gifts. Budget win, and my wallet thanks me every time.
Step-by-step instructions for 1600s pumpkin pie
Here’s how to recreate this historic recipe with its signature spiced crust and rich molasses-sweetened filling.
Prepare the Pumpkin Filling
In a medium saucepan, combine the 2.5 cups fresh pumpkin (or preserved pumpkin) with the 0.5 cup molasses, 0.25 cup honey, and 1 tablespoon white vinegar. Bring to a gentle simmer over medium heat, stirring occasionally to prevent scorching. You’ll notice the mixture thicken slightly as it cooks—this creates the perfect balance of sweetness and tang that defines 17th-century pies.
Add the 2 teaspoons ground cinnamon, 1 teaspoon ground nutmeg, and 0.5 teaspoon ground allspice, stirring until the spices are fully incorporated and the mixture is fragrant. Simmer for 8-10 minutes until the pumpkin softens and the filling reaches a thick, pudding-like consistency. The aroma should be warm and inviting, with notes of molasses and spice that transport you back to colonial kitchens.
Make the Spiced Crust
In a large mixing bowl, combine the 1.5 cups coarse all-purpose flour with the 0.5 teaspoon salt. Cut in the 0.5 cup lard (or butter for modern adaptation) using a pastry cutter or your fingers until the mixture resembles coarse crumbs with pea-sized fat pieces throughout. The texture should be dry and crumbly—this ensures a rustic, flaky crust rather than a dense one.
Gradually add the 0.25 cup ice water, 1 tablespoon at a time, mixing gently with a fork until the dough just comes together. Avoid overmixing—the dough should hold its shape when pressed but still feel slightly crumbly. Divide the dough into two equal portions and flatten each into a 10-inch round. Chill in the refrigerator for 30 minutes while you prepare the filling.
Assemble the Pie
Preheat your oven to 375°F. Remove one of the chilled dough rounds and fit it into the Dutch oven (or 9-inch pie dish), pressing gently to conform to the shape. Trim any excess dough hanging over the edge, leaving a clean border. Pour the prepared pumpkin filling into the crust, spreading it evenly to within 1/2 inch of the edge.
Roll out the second dough round and place it over the filling. Trim any excess dough, then crimp the edges together to seal completely. Cut 4-5 small slits in the top crust to allow steam to escape during baking. The pie should look rustic and inviting, with its spiced crust promising a flavor experience straight from history.
Bake to Golden Perfection
Place the assembled pie on a baking sheet to catch any potential drips, then bake in the preheated oven for 45-50 minutes. The pie is done when the crust is deep golden brown and the filling is bubbling through the slits in the top crust. You’ll know it’s properly baked when the filling jiggles slightly in the center but doesn’t feel liquid when touched.
Remove the pie from the oven and let it cool completely on a wire rack for at least 2 hours before slicing. This resting period allows the filling to set properly and the flavors to meld together. The contrast between the spiced crust and the molasses-sweetened filling will be even more pronounced after cooling, delivering that authentic 17th-century pumpkin pie experience.
Pro Tips For Making 1600s Pumpkin Pie
- Roast the Pumpkin: If using fresh, roast the pumpkin cubes until they’re tender but not mushy—about 25 minutes at 375°F (190°C) with a splash of water in the pan. I learned this the hard way: overcooking turns the filling into a sad, watery mess, while undercooked chunks make every bite feel like chewing on a rock.
- Bloom the Spices: Toast the cinnamon in a dry pan for 30 seconds until fragrant—this deepens its flavor without burning. Skip this, and your pie will taste like it’s missing something, even if the recipe says to add it straight from the jar.
- Balance the Molasses: The molasses and honey will fight for dominance—taste the mixture before baking. If it’s too sharp, add a pinch of salt; if too sweet, a splash of vinegar cuts through it. I used to eyeball it, but now I adjust like a mixologist.
- Bake Slow and Low: 325°F (160°C) is the magic number for this pie—it cooks evenly without burning the top before the center sets. I was impatient once and cranked it to 375°F; the edges were dark, the middle raw, and the whole thing smelled like regret.
Creative variations of this recipe
Colonial Spice Variations
In the 1600s, spices like nutmeg and allspice were prized commodities, often ground fresh at home. For extra warmth, add ½ teaspoon ground cloves to the filling—colonial cooks used them sparingly but boldly.
If you want a ginger kick, substitute ½ teaspoon fresh grated ginger for ¼ teaspoon of the allspice. The vinegar in the filling wasn’t just for tang—it also preserved the pie longer, a practical necessity in early American kitchens. 🌶️
Crust Adaptations
The original crust relied on lard for its flaky texture, but if you prefer a modern touch, use cultured butter like Plugrá—it has higher fat content for better layers.
For a nutty twist, replace ¼ cup of the flour with finely ground walnuts or pecans, just as some colonial cooks did with limited pantry staples. If you’re baking in a cast-iron skillet instead of a Dutch oven, reduce the oven temperature to 350°F to prevent over-browning.
The crust should still turn golden but stay tender.
Sweetener Swaps
Molasses was the go-to sweetener, but if you’re out, maple syrup works in a pinch—use the same amount, but expect a slightly lighter flavor. For a honey-only version, increase to ½ cup and reduce the vinegar to ½ tablespoon to balance the sweetness.
Some early recipes called for treacle, an early form of molasses, which adds a deeper caramel note. If you’re feeling adventurous, try date syrup for a Middle Eastern-inspired twist, though the texture will be slightly thicker. 🍯
Regional Twists
In New England, cooks often added cornmeal to the crust for a coarser texture, mimicking the grain-based diets of the time.
For a Southern variation, fold ½ cup chopped pecans into the filling before baking—this was common in later colonial periods as trade with the Caribbean introduced new ingredients.
In Pennsylvania Dutch communities, blackstrap molasses was preferred for its intense flavor, so if you can find it, use ⅓ cup instead of the standard ½ cup. The result is a molasses-forward pie with a deeper, almost bittersweet profile.
Modern Shortcuts
Short on time? Use pre-made pie dough (just skip the lard and use all butter for a flakier texture). For the filling, canned pumpkin puree works—just reduce the liquid by 2 tablespoons to account for the extra moisture.
If you’re baking in a conventional oven without a Dutch oven, place the pie on a baking sheet lined with parchment paper to catch drips.
For a no-chill crust, press the dough into the pie dish, freeze for 15 minutes, then proceed with the filling—this mimics the quick prep methods of colonial cooks who didn’t always have time for long chilling. ✨
Serving Traditions
In the 1600s, pie was often served at harvest festivals or holiday gatherings, paired with hard cider or spiced wine. For a modern touch, serve with apple cider or mulled wine—both complement the pie’s warm spices.
If you’re hosting a historical reenactment, garnish with toasted pumpkin seeds or candied ginger to mimic the rustic presentations of the era. For a dessert course, offer whipped cream sweetened with honey instead of sugar, just as colonial cooks might have done. 🍷
Nutrition facts
Frequently asked questions
Why does this 1600s recipe use molasses instead of sugar?
Molasses was the primary sweetener in colonial America because refined sugar was rare and expensive. It provided deep caramel notes and helped preserve the pie longer—a practical necessity for early settlers. The recipe balances its intensity with vinegar and honey for complexity.
Can I make this pie without lard for the crust?
Yes! For authenticity, use cultured butter like Plugrá (high-fat content) or coconut oil chilled solid. If avoiding dairy, leaf lard is the traditional choice, though modern substitutes work well with slightly different textures.
How do I know when the pie is fully baked?
The pie is done when the crust is deep golden brown and the filling bubbles through the slits in the top crust. Insert a knife near the center—if it comes out clean (or with just a few moist crumbs), it’s perfect. Let it cool 2 hours before slicing for ideal texture.
What’s the best way to store leftover pie?
Wrap tightly in plastic wrap and store in the fridge for up to 4 days. For longer storage, freeze slices in an airtight container for 3 months. Reheat frozen slices at 350°F for 15 minutes to restore that fresh-from-the-oven warmth.
Can I substitute fresh pumpkin with canned?
Yes! Use 2.5 cups canned pumpkin puree (not pumpkin pie filling) and reduce the vinegar by 1 tablespoon to account for extra moisture. Drain well if using chunky canned pumpkin, as it contains more liquid than fresh.

- Pea Soup Instant Pot Recipe: Velvety Green Smoothness in 20 Minutes - November 1, 2026
- Pork Loin Pulled Pork Crock Pot Recipe: Slow-Smoked Tenderness With Zero Dryness - November 1, 2026
- Baked Potatoes in Crock Pot Recipe: Buttery Interiors and Crispy Top Magic - November 1, 2026