
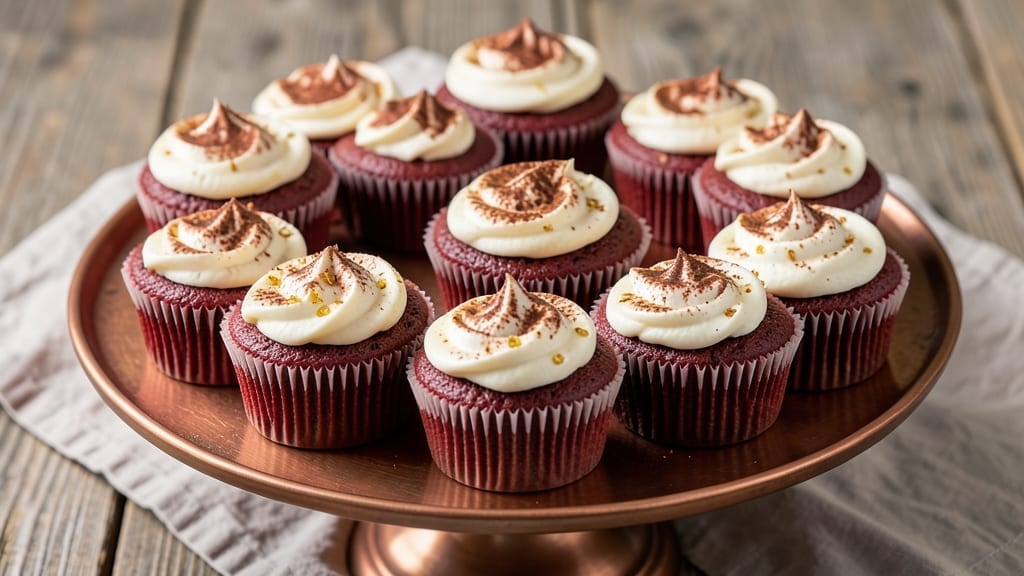
The 12 red velvet cupcakes recipe delivers that iconic chocolatey swirl and velvety texture we all crave, with a cream cheese frosting that’s dangerously addictive. 💛 I’ve perfected this technique over years of baking—balancing cocoa powder for depth, buttermilk for moisture, and a precise chocolate batter swirl that never overpowers.
The result? Cupcakes with a tender crumb, subtle cocoa richness, and a frosting so smooth it disappears between bites.
What sets these apart is the foolproof method for achieving those signature swirls without overmixing the batter. We’ll use a simple piping technique to create elegant chocolate patterns that stay distinct through baking.
The cream cheese frosting gets its signature tang from real cream cheese, not powdered versions—this is the difference between good and restaurant-quality dessert.
By the time you’re done, you’ll have 12 perfectly portioned cupcakes with golden domes, a moist interior, and frosting that holds its shape without cracking. The cocoa flavor shines through without being overpowering, while the cream cheese frosting adds a perfect balance of sweetness and tang.
Each bite delivers that classic red velvet experience—just like your favorite bakery, but made at home.
These cupcakes are ideal for celebrations, gift-giving, or satisfying that afternoon sweet tooth. The recipe scales easily if you need more, and leftovers stay fresh for days when stored properly. Let’s get baking—your taste buds will thank you.
Ingredients for 12 red velvet cupcake
Twelve ingredients, twelve perfect cupcakes—this is the red velvet magic you’ve been waiting for.
| Ingredient | Amount | Notes |
|---|---|---|
| All-Purpose Flour 🌾 | 2 ½ cups | Sifted, for tender crumb |
| Unsalted Butter 🧈 | 1 cup | Cold, cubed for cutting |
| Granulated Sugar 🍚 | 1 ½ cups | White sugar preferred |
| Cocoa Powder 🍫 | ½ cup | Natural, unsweetened |
| Buttermilk 🥛 | 1 cup | Room temperature |
| Large Eggs 🥚 | 2 whole | Room temperature |
| Vanilla Extract 🌸 | 2 tsp | Pure, high-quality |
| Baking Soda 🧂 | 1 tsp | Pure, not baking powder |
| Salt 🧂 | ½ tsp | Fine sea salt |
| Red Food Coloring 🎨 | ¼ tsp | Gel-based for precision |
| Chocolate Ganache 🍫 | 1 cup | Cooled, for swirls |
| Cream Cheese 🧀 | 8 oz | Room temperature, full-fat |
| Powdered Sugar 🍚 | 3 cups | Sifted, for frosting |
| Heavy Whipping Cream 🥛 | ½ cup | Cold, for frosting |
| Vanilla Extract 🌸 | 1 tsp | For frosting flavor |
The cocoa powder and buttermilk are the secret weapons here. Dutch-processed cocoa (like Hershey’s Special Dark) gives that signature depth without bitterness, while buttermilk keeps the crumb tender. Grab the full-fat cream cheese at Trader Joe’s—it whips up smoother than the lighter versions. For the red food coloring, Wilton gel-based is my go-to; it won’t bleed like liquid dyes. And that chocolate ganache? Use high-quality dark chocolate (70% or higher) for the swirls—it melts beautifully and adds richness without overpowering the red velvet flavor.
No buttermilk? Mix 1 tbsp vinegar or lemon juice with 1 cup milk and let it sit for 5 minutes. Swapping cocoa powder? Natural cocoa works too, but Dutch-processed gives that classic red velvet taste. For the frosting, if you’re short on cream cheese, substitute with 4 oz mascarpone mixed with 4 oz softened butter—it’s just as luscious. The ganache can be made ahead (it actually improves overnight), and if you’re in a pinch, melted chocolate chips work in a bind. Just make sure they’re cooled before swirling into the batter—warm chocolate will melt the butter and ruin your pretty patterns.
Store leftover cupcakes in an airtight container at room temperature for up to 2 days, or freeze for 1 month. The frosting? Keep it refrigerated in a sealed container for 3 days, but bring it to room temperature before re-whipping. I like to wrap individual cupcakes in parchment paper before storing—they stay fresh longer and look pretty when you’re ready to serve. The ganache and frosting can be made a day ahead, which is a total game-changer for busy mornings.
Why You’ll Love This Recipe
- No Fuss Mixing: I swear by the creamy butter-buttermilk combo—just cream the butter and sugar, toss in the flour and cocoa, then fold in that tangy buttermilk. No sifting, no overmixing, and the batter’s so smooth it practically slides into the cupcake liners.
- Velvet Magic: That cocoa powder isn’t just for color—it’s the secret to the deep, slightly bitter-sweet flavor that makes these cupcakes addictive. The buttermilk keeps them moist, and the sugar balances the richness like a perfect hug.
- Party in a Box: Twelve cupcakes mean zero stress for gatherings. Bake a batch, frost them with cream cheese glaze, and boom—birthday spread, brunch treat, or office dessert table covered. (Pro tip: The leftovers freeze like a dream.)
- Budget-Friendly Luxury: Flour, butter, sugar—these are pantry staples that won’t break the bank. A dozen cupcakes costs less than takeout but feels like a bakery splurge. Plus, the buttermilk makes it taste indulgent without the price tag.
Step-by-step instructions for 12 red velvet cupcakes
Here’s how to craft cupcakes with that signature red hue and decadent chocolate swirls.
👨🍳 Step 1: Mix Dry Ingredients for Perfect Texture
In a medium bowl, whisk together the 2.5 cups All-Purpose Flour, 0.5 cup Cocoa Powder, 1 tsp Baking Soda, and 0.5 tsp Salt. Sift the mixture through a fine-mesh sieve directly into a large mixing bowl to aerate the flour and prevent dense cupcakes. This step ensures your cupcakes will have that signature tender crumb.
Make a well in the center of the dry ingredients and set aside. I like to use a rubber spatula to press the mixture gently against the sides of the bowl—this helps break up any flour clumps that might have formed during sifting. The cocoa powder will give your cupcakes that rich chocolate flavor without overpowering the red velvet taste.
👨🍳 Step 2: Cream Butter and Sugar Until Light
In the bowl of a stand mixer fitted with the paddle attachment, beat the 1 cup Unsalted Butter and 1.5 cups Granulated Sugar on medium speed for 3-4 minutes. You’re looking for a light, fluffy texture—the mixture should nearly double in volume and become pale in color. This creaming process incorporates air, which creates those beautiful crackly tops and helps the cupcakes rise properly.
Scrape down the sides of the bowl with a spatula to ensure even mixing, then add the 2 whole Large Eggs, one at a time, mixing on low speed for 30 seconds after each addition. The eggs help bind the ingredients and add moisture to the batter. After the eggs are fully incorporated, add the 2 tsp Vanilla Extract and mix for another 10 seconds. This step is crucial for developing the rich flavor profile of your red velvet cupcakes.
🥘 Step 3: Combine Wet Ingredients and Add Color
Gradually add the 1 cup Buttermilk to the butter mixture while mixing on low speed until just combined. The buttermilk adds acidity that balances the sweetness and helps create that tender crumb. In a separate small bowl, mix the 0.25 tsp Red Food Coloring with 1 tablespoon of the buttermilk to ensure even distribution of color.
Add the colored buttermilk mixture to the batter and mix on low speed for 30 seconds until fully incorporated. You’ll notice the batter takes on that signature red velvet hue. Be careful not to overmix—the batter should be smooth but still slightly thick. This is the moment that matters: the color should be vibrant but not overwhelming, and the texture should be just right for piping perfect cupcakes.
🍳 Step 4: Fold in Dry Ingredients and Pipe Cupcakes
With the mixer on low speed, gradually add the dry ingredients to the wet mixture, mixing just until combined. You should still see a few flour streaks—overmixing develops gluten and makes cupcakes tough. Remove the bowl from the mixer and gently fold in the 1 cup Chocolate Ganache using a silicone spatula. The ganache will create those beautiful swirls in your cupcakes.
Divide the batter evenly among 12 lined cupcake liners, filling each about ⅔ full. For the classic red velvet look, use a toothpick to swirl the batter in each cupcake liner before baking. This creates the signature marbled effect. Bake in a preheated 350°F oven for 18-20 minutes, or until a toothpick inserted into the center comes out clean. The tops should be slightly domed and golden brown, but not overbaked.
🍽️ Step 5: Frost and Serve with Cream Cheese Delight
While the cupcakes cool, prepare the frosting by beating the 8 oz Cream Cheese and 3 cups Powdered Sugar in a stand mixer fitted with the paddle attachment until smooth and creamy. Add the 0.5 cup Heavy Whipping Cream and 1 tsp Vanilla Extract, then beat on high speed for 2-3 minutes until light and fluffy. This frosting is the star of your cupcakes, providing a tangy contrast to the rich red velvet flavor.
Once the cupcakes have cooled completely, pipe or spread the frosting onto each cupcake. For a professional finish, use a piping bag fitted with a star tip to create decorative swirls. Serve immediately and watch as everyone is wowed by your bold chocolate swirls and creamy frosting. These cupcakes are perfect for special occasions or just treating yourself to a little indulgence.
Pro Tips For Making 12 Red Velvet Cupcake
- Sift the Cocoa: I learned this the hard way—lumpy cocoa powder ruins the texture. Use a fine-mesh sieve to sift it directly into the dry ingredients before mixing. This keeps the batter smooth and ensures even distribution, so every cupcake has that signature velvety depth.
- Measure Butter Cold: Unsalted butter straight from the fridge is your friend here. Scoop it straight into the bowl without softening—it creates pockets of air in the batter that make the cupcakes light. If it’s too soft, chill the dough for 10 minutes before baking.
- Don’t Overmix the Batter: The moment the flour disappears is the moment to stop. Overmixing develops gluten, and your cupcakes will turn dense instead of tender. Stir just until combined—about 15 seconds after the dry ingredients are incorporated.
- Rotate the Pan Halfway: Red velvet cupcakes bake unevenly, especially if your oven runs hot on one side. After 15 minutes, swap the pan from top to bottom rack. This guarantees even rise and prevents a batch of domed cupcakes and a batch of flat ones.
Pro cooking tips for great 12 red velvet cupcake
Swirl Perfection
For those signature chocolate swirls, I recommend using a piping bag fitted with a large star tip (like Wilton’s 1M tip) to pipe the ganache into the batter.
Pipe a zigzag pattern down the center of each cupcake liner before adding the red velvet batter—this creates clean, defined swirls that stay beautiful through baking. 🌟
Pro tip: Chill the ganache for 10 minutes before piping to thicken it slightly, which helps it hold its shape better in the batter.
If your ganache is too runny, pop it in the fridge for 5-10 minutes—just don’t let it get too firm or it’ll be tough to pipe.
Batter Consistency
The ideal red velvet batter should be thick but pourable, like heavy pudding. If your batter is too thin after mixing, add 1-2 tablespoons more flour at a time until it reaches the right consistency.
Too thick? Add 1 teaspoon of buttermilk to loosen it. Remember: the batter should coat the back of a spoon but still flow smoothly when piped. 🥄
I’ve found that using room-temperature ingredients (especially eggs and butter) makes a huge difference in batter consistency. Cold butter creates lumps, while cold eggs can cause the batter to curdle. Let everything sit out for 30 minutes before mixing if your kitchen is chilly.
Baking Time
Your oven might run hot or cold, so always test one cupcake first at 18 minutes if you’re unsure. The cupcakes are done when a toothpick inserted into the center comes out with a few moist crumbs—not wet batter.
Overbaking dries out the crumb and makes the frosting slide off. 🕒
For even baking, rotate your cupcake pan halfway through the baking time. I also like to place a small baking sheet on the lower rack during baking to prevent the bottoms from browning too quickly. This helps maintain that tender crumb we’re after.
Frosting Secrets
For the ultra-smooth cream cheese frosting, beat the cream cheese until completely smooth before adding any other ingredients. Lumps in the frosting can make it grainy. I use a hand mixer for this step to avoid overmixing, then finish with the stand mixer for that light, airy texture. 🧀
If your frosting isn’t coming together, it might be too warm. Chill the bowl in the freezer for 5 minutes before beating again. For extra stability, add 1 teaspoon of lemon juice to the frosting—it helps strengthen the structure without adding flavor.
Make-Ahead Tips
Baked cupcakes can be stored at room temperature for up to 2 days in an airtight container with parchment paper between layers. For longer storage, freeze them unfrosted for up to 1 month. Thaw at room temperature before frosting. 🧊
The frosting can be made 1 day ahead and stored in the fridge. Before using, let it sit at room temperature for 30 minutes and re-whip briefly to restore its fluffiness.
I like to wrap individual cupcakes in plastic wrap before freezing—they stay fresh longer and look beautiful when you’re ready to serve.
Nutrition facts
Frequently asked questions
Why does red velvet cake need cocoa powder when it’s not chocolate?
The cocoa powder gives red velvet its signature depth and subtle chocolate flavor without making it taste like chocolate cake. Just ½ cup creates that perfect balance—it’s what makes the flavor unique! The buttermilk and eggs complement it beautifully, creating that tender crumb we all love.
Can I make these cupcakes without buttermilk?
Mix 1 tablespoon vinegar or lemon juice with 1 cup milk and let it sit for 5 minutes to make a substitute. The acidity is key for that tender crumb and balanced flavor. For even better results, use whole milk instead of skim to match the richness of buttermilk.
How do I get the perfect chocolate swirls?
Use a piping bag with a star tip to pipe the ganache in a zigzag pattern down the center of each cupcake liner before adding batter. Chill the ganache for 10 minutes first to thicken it slightly—this helps the swirls stay defined during baking. Pipe the red velvet batter over the ganache and swirl gently with a toothpick.
Can I make the frosting ahead of time?
Yes! Prepare the frosting 1 day ahead and store it in the fridge in an airtight container. Before using, let it sit at room temperature for 30 minutes and re-whip briefly to restore its fluffiness. The cupcakes themselves can be stored at room temperature for 2 days or frozen for 1 month (unfrosted).
What if my cupcakes are too dense?
Overmixing or using cold ingredients usually causes dense cupcakes. Make sure to mix the batter just until combined (a few flour streaks are fine), and use room-temperature butter and eggs. Also, don’t overfill the cupcake liners—fill them about ⅔ full for even baking. A 350°F oven should give you perfectly tender cupcakes!

- 12 Bean Chili Recipe: Hearty Slow-Cooked Depth With 12 Legumes - October 17, 2026
- 5 Seed Bread Recipe: Nutty Crunch and Artisan Flavor in One Loaf - October 17, 2026
- 1 Lb Macaroni Salad Recipe: Bold, Crunchy, and Crowd-Pleasing - October 17, 2026