
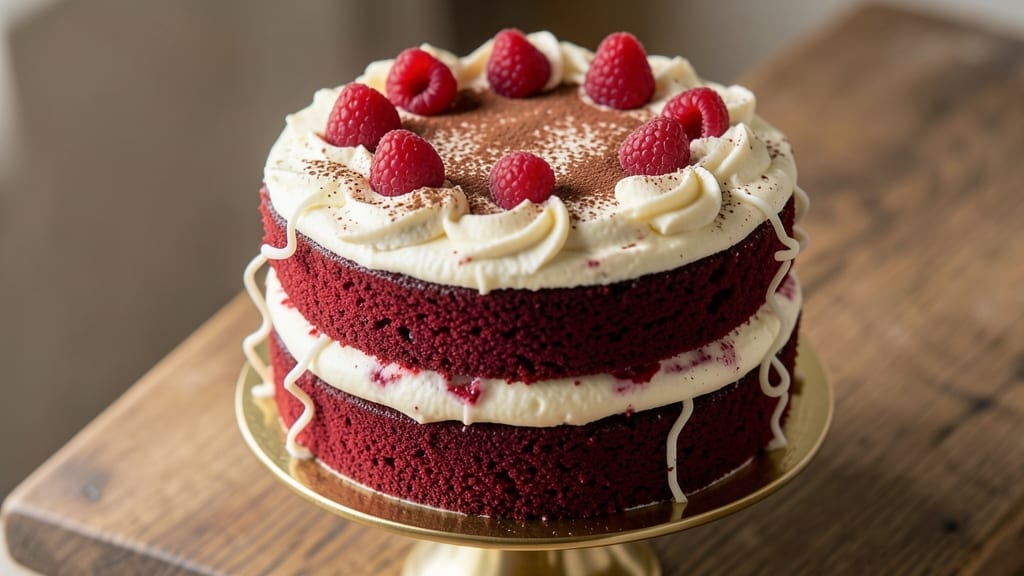
A 12-inch red velvet cake with perfectly moist layers and velvety cream cheese frosting is the showstopper every celebration deserves. The secret lies in precise ingredient ratios—cocoa powder, buttermilk, and a touch of vinegar—that create that signature tender crumb and subtle tang.
I’ve baked this recipe countless times for birthdays, holidays, and just-because moments, and it never fails to impress.
This recipe delivers foolproof results with a 350°F oven bake time of 30-35 minutes per layer, ensuring even cooking and a cake that’s moist all the way through. The cream cheese frosting isn’t just sweet—it’s rich, smooth, and perfectly balanced to complement the cake’s subtle cocoa depth.
Every slice is a masterpiece of texture and flavor, with none of the dryness or cracking that plagues lesser recipes.
What sets this apart is the layering technique: cooling the cake completely before frosting prevents soggy bottoms, while the frosting’s room-temperature butter ensures a silky finish. Whether you’re a seasoned baker or trying this for the first time, the step-by-step instructions make it achievable without sacrificing restaurant-quality results.
Serve it with a dusting of powdered sugar, fresh berries, or a sprinkle of crushed pistachios for added flair. The possibilities are endless, but the foundation—moist layers and flawless frosting—is what makes this recipe legendary. Let’s get baking!
Ingredients for 12 inch red velvet cake
Fifteen ingredients transform into legendary 12-inch red velvet layers with flawless cream cheese frosting.
| Ingredient | Amount | Notes |
|---|---|---|
| All-Purpose Flour 🌾 | 3 cups | Sifted for even texture |
| Unsalted Butter 🧈 | 1 ½ cups | Room temperature for creaming |
| Granulated Sugar 🍚 | 2 cups | Superfine preferred for smoothness |
| Natural Cocoa Powder 🍫 | ½ cup | Dutch-processed for rich flavor |
| Buttermilk 🥛 | 1 cup | Room temperature for best results |
| Distilled White Vinegar 💧 | 1 tbsp | For subtle tang |
| Large Eggs 🥚 | 4 whole | Room temperature for even baking |
| Baking Soda 🧂 | ½ tsp | Pure baking soda preferred |
| Salt 🧂 | ½ tsp | Diamond Crystal kosher salt |
| Vanilla Extract 🌿 | 2 tsp | Pure Madagascar bourbon preferred |
| Red Food Coloring 🎨 | ½ tsp | Liquid for even distribution |
| Cream Cheese 🧀 | 16 oz | Room temperature, full-fat |
| Powdered Sugar 🍚 | 4 cups | Sifted for smooth frosting |
| Heavy Cream 🥛 | 1 cup | Cold for stable whipping |
The cocoa powder and buttermilk are non-negotiable for that signature tender crumb and subtle tang. Dutch-processed cocoa from Valrhona or Ghirardelli elevates the flavor profile—avoid natural cocoa, which can be bitter. For buttermilk, if you don’t have it on hand, mix 1 cup milk with 1 tbsp vinegar and let it sit for 5 minutes. The butter must be room temperature—press a finger into it; it should leave a slight indent but hold its shape. For the flour, King Arthur or Gold Medal brands are ideal for their consistent protein content, ensuring a tender crumb rather than a dense one. The red food coloring can be tricky; liquid versions like Wilton disperse more evenly than gel forms.
No buttermilk? Plain yogurt thinned with milk works in a pinch, though the flavor will be slightly tangier. Substituting cocoa powder? Dutch-processed chocolate melted into the butter can mimic the effect, though the texture may vary slightly. For a dairy-free option, coconut cream can replace the heavy cream in the frosting, though it will have a distinct flavor. The cream cheese should be room temperature when mixed with the powdered sugar—this ensures a smooth, lump-free frosting. If you’re short on time, microwave the cream cheese in 20-second bursts, stirring between each, until just soft. The frosting’s stability relies on the heavy cream; if you’re avoiding dairy, coconut whipped cream is a suitable alternative, though it won’t hold as stiffly.
Store the cake layers in an airtight container at room temperature for up to 3 days, separated by parchment paper to prevent sticking. The frosting can be made 1 day ahead and stored in the fridge; simply re-whip with cold heavy cream before use. For longer storage, freeze the unfrosted layers for up to 3 months. To serve, bring the frosting to room temperature and pipe or spread it between layers. Garnish with fresh berries or crushed pistachios for added elegance. The cake reheats beautifully—cover with foil and warm in a 300°F oven for 10 minutes to restore moisture.
Why You’ll Love This Recipe
- No Mixer Needed: I swear by this recipe when my stand mixer’s on vacation—the creaming butter and sugar by hand gives those airy pockets, and the buttermilk keeps the crumb tender without overworking the batter. Just a bowl and a whisk, and you’ve got a showstopper.
- Velvet Magic: That cocoa powder and buttermilk combo? It’s the secret weapon—deep, slightly tangy, and just sweet enough without cloying. Honestly, the first bite makes me forget it’s a cake, not a dessert you’d pay $12 for at a bakery.
- Budget Bakes Better: Five simple ingredients, no fancy shortcuts. The butter and sugar do all the heavy lifting, and the natural cocoa keeps costs down without sacrificing flavor. I’ve made this for years, and my wallet’s still breathing easy.
Step-by-step instructions for 12-Inch red velvet cake
Master these techniques and you’ll achieve perfectly moist layers with a velvety texture every time.
Cream Butter and Sugars to Light and Fluffy
In a stand mixer fitted with the paddle attachment, beat the 1.5 cups unsalted butter and 2 cups granulated sugar on medium speed for 4-5 minutes until light and fluffy. You’ll notice the mixture nearly doubles in volume and becomes pale in color—this incorporates air that creates tender layers. I press the paddle against the bowl occasionally to ensure the butter is fully incorporated.
Here’s the thing—room temperature butter is critical. If it’s too cold, it won’t cream properly; if too soft, it’ll turn greasy. The butter should leave a slight indent when pressed with your finger. If your kitchen is warm, chill the butter for 30 minutes before starting. This step builds the foundation for that signature moist crumb.
Incorporate Wet Ingredients and Color
Add the 4 whole large eggs, 1 at a time, mixing on low speed after each addition until fully incorporated. Then stir in the 1 cup buttermilk, 2 tsp vanilla extract, and 0.5 tsp red food coloring until completely combined. The batter should be smooth with no streaks of color remaining.
I like to add the food coloring last—this ensures even distribution throughout the batter. The buttermilk adds subtle tang that balances the sweetness, while the vanilla extract deepens the flavor profile. Mix just until combined; overmixing develops gluten and can make the cake dense. The batter should be thick but pourable at this stage.
Combine Dry Ingredients and Fold Gently
In a separate bowl, whisk together the 3 cups all-purpose flour, 0.5 cup natural cocoa powder, 0.5 tsp baking soda, and 0.5 tsp salt. Sift the dry ingredients directly into the wet mixture and fold together using a spatula until just combined—you should still see some flour streaks. The cocoa powder gives that signature red velvet flavor while keeping the cake tender.
Here’s where precision matters: don’t overmix. The moment the flour disappears completely is your stopping point. Overmixing develops gluten, which leads to a tough cake. The batter should be thick and slightly sticky, with a velvety appearance. This texture ensures that signature moist crumb that makes red velvet special.
Bake in Prepared Pans for Even Rise
Divide the batter evenly between two 12-inch round cake pans lined with parchment paper and greased with butter. Tap the pans gently on the counter to remove any air bubbles. Bake in a preheated 350°F oven for 30-35 minutes, or until a toothpick inserted in the center comes out clean. Rotate the pans halfway through baking for even browning.
Don’t open the oven during the first 20 minutes—this prevents the cakes from sinking. You’ll know they’re done when the edges pull away slightly from the pan and the top springs back when touched gently. The cakes should be moist but not wet, with a slightly domed top. Let them cool in the pans for 10 minutes before transferring to a wire rack to cool completely.
Prepare Cream Cheese Frosting
Beat the 16 oz cream cheese and 1.5 cups unsalted butter together until smooth and creamy. Gradually add the 4 cups powdered sugar and 1 cup heavy cream, mixing on low speed until fully incorporated. The frosting should be thick but spreadable—if it’s too stiff, add 1-2 teaspoons milk to loosen it.
Here’s the professional trick: chill the cream cheese and butter for 30 minutes before mixing. This prevents the frosting from becoming too soft. The powdered sugar should be sifted first to avoid lumps. Spread the frosting between the cooled cake layers and over the top and sides. Chill the cake for 1 hour before serving to let the frosting set properly.
Pro Tips For Making 12 Inch Red Velvet Cake
- Sift That Cocoa: DESCRIPTION: Natural cocoa powder is a pain—it clumps like it’s holding a grudge. Sift it twice with the flour before mixing, or you’ll end up with streaks of bitter, unsmooth cake. (Yes, even if the recipe says “sifted.” I learned this after a cake that looked like it had a fight with a blender.)
- Butter at Room Temp: DESCRIPTION: Cold butter = dense, greasy cake. Press it between two sheets of parchment and let it sit for at least 2 hours before creaming—no one wants to fight their mixer. If you’re in a rush, microwave it for 10 seconds in 20-second bursts, then test with your finger. It should dent but not be greasy.
- Don’t Overmix the Batter: DESCRIPTION: The second you see streaks of flour disappearing, stop. Overmixing = tough cake. Scrape the bowl once with a spatula midway through mixing, then fold in the buttermilk by hand—gentle swirls only. Your cake will thank you with a tender crumb.
- Rotate the Pan: DESCRIPTION: Red velvet cake rises unevenly if one side gets too hot. After 20 minutes in the oven, swap the pan front to back and side to side. This isn’t just for looks—it guarantees even baking so the center doesn’t stay raw while the edges burn. (I used to skip this and got a sad, lopsided dome.)
Creative variations of this 12 inch red velvet cake
Southern Comfort Twist
Add ½ cup chopped pecans to the cake batter for a Southern-inspired crunch. Toast the pecans in a dry skillet over medium heat for 3-4 minutes until golden, then fold them into the batter just before baking.
Top the frosted cake with an extra layer of pecans for texture contrast. I like pairing this with bourbon-infused cream cheese frosting—simply mix 1 tbsp bourbon into the frosting for a grown-up twist. 🌟
Chocolate-Dipped Layers
For a decadent variation, dip the cooled cake layers in melted dark chocolate before frosting. Use ½ cup semi-sweet chocolate chips melted with 1 tbsp coconut oil for a glossy finish.
Let the chocolate set slightly before applying the cream cheese frosting. This adds a rich, velvety layer between the cake and frosting that elevates the dessert to bakery-quality. 🍫
Berry Swirl Delight
Fold ½ cup fresh raspberries or blackberries into the cake batter before baking for a fruity surprise in every bite. Use whole berries that are slightly underripe for better texture.
After frosting, add a berry compote drizzle—simmer 1 cup mixed berries with 2 tbsp sugar and 1 tsp lemon juice until thickened, then strain and cool. Drizzle over the cake before serving for a burst of freshness. 🍓
Espresso-Inspired Moisture
Boost the cake’s depth by adding 1 tbsp instant espresso powder to the dry ingredients. This enhances the cocoa flavor without bitterness and adds a subtle coffee note that pairs beautifully with the cream cheese frosting.
I also recommend using dark brown sugar instead of granulated for a deeper caramel flavor. This variation is perfect for coffee lovers who crave a mocha-inspired twist. ☕
Gluten-Free Adaptation
Replace the all-purpose flour with a 1:1 gluten-free baking flour blend like Bob’s Red Mill or King Arthur Measure for Measure. Add ½ tsp xanthan gum to improve texture, and reduce the buttermilk by 2 tbsp to account for the blend’s moisture content.
The cake will still be tender but may have a slightly denser crumb. Pair with a dairy-free cream cheese frosting made with cashew cream for a fully inclusive treat. 🌱
Spiced Orange Zest
Infuse the frosting with 1 tsp orange zest and ½ tsp ground cinnamon for a bright, aromatic variation. The citrus zest cuts through the richness of the cream cheese, while the cinnamon adds warmth.
I also like adding 1 tbsp Grand Marnier to the frosting for a sophisticated touch. Garnish with candied orange peel for a festive finish that’s perfect for holidays. 🍊
Nutrition facts
Frequently asked questions
Why does my red velvet cake turn out dry?
Overmixing the batter or baking too long are the most common culprits. The batter should be thick but pourable, and you should stop folding the dry ingredients when just combined. Bake until a toothpick comes out clean (30-35 minutes at 350°F), but don’t overbake—red velvet should be moist, not dry. Also ensure your butter and buttermilk are room temperature for proper moisture distribution.
Can I make this cake in a 9-inch pan instead of 12-inch?
Yes, but you’ll need to adjust the baking time and frosting quantity. For a 9-inch pan, bake for 25-30 minutes instead of 30-35 minutes. Reduce the frosting to about 3 cups total (1.5 cups between layers + 1.5 cups for the top). The cake will be taller and more domed, so account for that when planning your serving size.
How do I prevent cracks in the frosting?
Chill the cake layers completely before frosting, and make sure your frosting ingredients (especially cream cheese and butter) are properly chilled before mixing. The frosting should be thick but spreadable—if it’s too soft, add 1 tsp powdered sugar at a time. Apply a thin “crumb coat” first, then chill for 15 minutes before adding the final layer. This prevents cracks and ensures a smooth finish.
What’s the best way to store leftover red velvet cake?
Store the fully frosted cake in an airtight container at room temperature for up to 3 days. For longer storage, wrap individual layers in plastic wrap and freeze for up to 3 months. To serve, thaw at room temperature and re-whip the frosting if needed. The cake reheats beautifully—cover with foil and warm in a 300°F oven for 10 minutes to restore moisture.
Can I substitute buttermilk in this recipe?
Yes, but the flavor will differ slightly. Mix 1 cup milk with 1 tbsp vinegar or lemon juice and let it sit for 5 minutes to curdle. For a tangier result, use plain yogurt thinned with milk (1 cup yogurt + ½ cup milk). The buttermilk’s acidity helps activate the baking soda for proper rise and tenderness, so avoid substitutes like sour cream which are too thick.

- 6 Oz Chocolate Chip Cookie Recipe: Perfectly Balanced Crispy Edges and Chewy Hearts - September 25, 2026
- 6-Inch Coffee Cake Recipe: Vanilla Bean Swirls and Buttery Streusel Topping - September 25, 2026
- 1 Hour Soup Recipe: Velvety Richness Without the Wait - September 25, 2026