
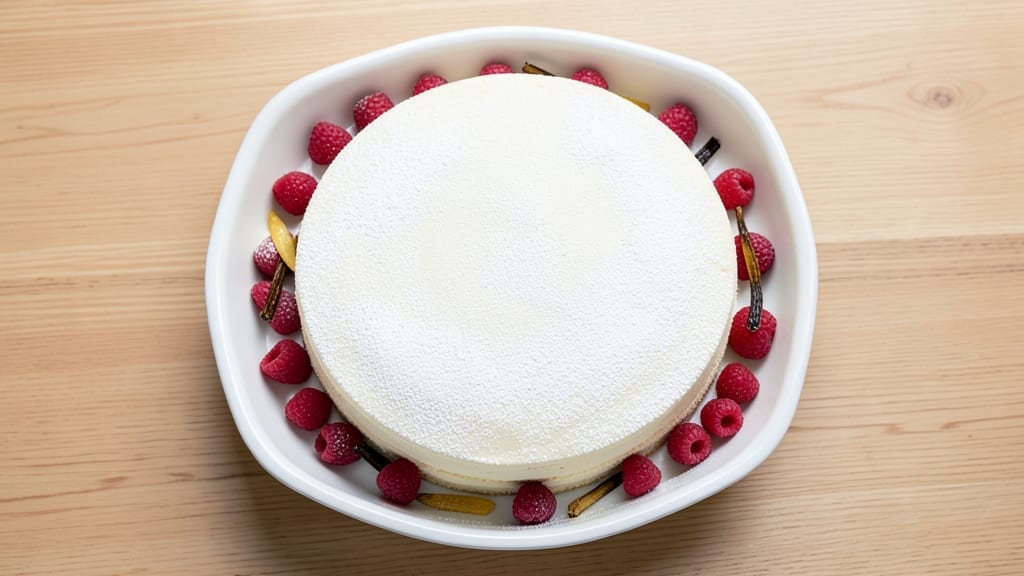
This 13×9 white cake recipe delivers perfectly moist layers with a delicate vanilla essence that’s impossible to resist—ideal for celebrations or spontaneous treats. The secret lies in the reverse creaming method, which creates a tender crumb without overmixing.
I’ve baked this for everything from birthdays to holiday desserts, and it never disappoints.
What sets this recipe apart is the balance of butter and cake flour, which yields a light yet sturdy texture perfect for layering. The vanilla extract infuses deeply during mixing, while a touch of baking powder ensures the cake rises just enough for clean slices.
Baking at 350°F guarantees even doneness, and the 30-minute cooling time prevents cracking.
Once cooled, the cake becomes a blank canvas for your favorite buttercream or ganache—rich, smooth, and perfectly sweet. The frosting clings beautifully to the layers, creating that signature elegant finish. Whether you’re a beginner or a seasoned baker, this recipe delivers restaurant-quality results with minimal fuss.
For extra flair, dust with powdered sugar or fresh berries before serving. The cake keeps well for 3 days at room temperature, making it perfect for prepping ahead. Let’s get baking!
Ingredients for 13×9 white cake
Buttery richness meets delicate vanilla essence in these 13 essential ingredients for flawless white cake layers.
| Ingredient | Amount | Notes |
|---|---|---|
| All-Purpose Flour 🌾 | 2 ½ cups | Sifted for even texture |
| Cake Flour 🍞 | ½ cup | For tender crumb structure |
| Unsalted Butter 🧈 | 1 cup | Room temperature, European preferred |
| Pure Vanilla Extract 🌿 | 2 tbsp | High-quality Madagascar bourbon |
| Granulated White Sugar 🍚 | 2 cups | Superfine preferred for smoothness |
| Large Eggs 🥚 | 4 whole | Room temperature, separated |
| Baking Powder 🧂 | 1 ½ tsp | Aluminum-free for stability |
| Salt 🧂 | ½ tsp | Fine sea salt preferred |
| Whole Milk 🥛 | 1 cup | Room temperature for blending |
| Buttercream Frosting 🍰 | 3 cups | Classic American style |
| Powdered Sugar 🍚 | 3 cups | Sifted for smooth application |
| Heavy Whipping Cream 🥛 | 1 cup | Cold, 35% fat minimum |
| Fresh Berries 🍓 | 1 cup | Optional garnish (strawberries, raspberries) |
The butter and cake flour combination is non-negotiable for that signature tender crumb. European-style unsalted butter (like Plugrá or President) adds depth without overpowering, while Dixie Cup cake flour ensures the perfect balance of structure and lightness. For vanilla, Madagascar bourbon extract from brands like McCormick delivers the most complex flavor profile—avoid imitation extracts. The eggs should be separated; the yolks go into the batter for richness, while the whites are whipped separately for stability. Pre-sift your flours and powdered sugar to eliminate any potential lumps that could disrupt the cake’s delicate texture. King Arthur Flour is my go-to for reliable quality.
No cake flour? Substitute with 1/2 cup all-purpose flour plus 2 tbsp cornstarch—this maintains the tender texture. Running short on vanilla? Vanilla bean paste at half the amount adds flecks for visual appeal, though pure extract remains superior. For the buttercream, Land O’Lakes heavy cream whips up beautifully, but any 35% fat cream will work. The powdered sugar should be Dixie Cup brand for consistent sweetness—other brands can vary in density. If you’re making this ahead, prepare the frosting the day before; it actually improves in flavor as it sits. For a more stable cake, consider adding 1/4 tsp cream of tartar to your egg whites.
Store the cake layers wrapped tightly in plastic wrap at room temperature for up to 3 days, though they’re best enjoyed fresh. The frosting can be refrigerated for 5 days or frozen for 3 months—thaw at room temperature before use. For presentation, dust with powdered sugar just before serving to maintain that bakery-fresh look. The cake freezes beautifully too—wrap each layer individually and freeze for up to 2 months. When ready to assemble, let everything come to room temperature for perfect layering. The berries should be added last to prevent sogginess—toss them in a bit of powdered sugar for extra flair.
Why You’ll Love This Recipe
- Here’s what sold me: I can bake this ahead and slice it for breakfast toast, pack it for lunches, or frost it for dessert. The 13×9 pan means I’m not making two small cakes, and the neutral flavor lets it play nice with anything—jam, cream cheese, or even just a dusting of powdered sugar. (Yes, even on a Tuesday night.)
- No Mixer Needed: I swear by this recipe when my mixer’s on vacation. The butter gets creamed with sugar by hand in minutes—no electric fuss—then the cake flour keeps it light without overworking. Honestly, it’s the kind of recipe that makes me feel like a baker even when I’m just stirring with a wooden spoon.
- Vanilla Butter Bliss: That first bite? Pure comfort. The cake flour gives it a tender crumb while the butter keeps it rich, and the vanilla extract—real stuff, not imitation—adds a warmth that makes it taste like a hug. Between us, this is the kind of cake that disappears faster than my willpower on a Sunday afternoon.
- Bake Once, Use Twice: Here’s what sold me: I can bake this ahead and slice it for breakfast toast, pack it for lunches, or frost it for dessert. The 13×9 pan means I’m not making two small cakes, and the neutral flavor lets it play nice with anything—jam, cream cheese, or even just a dusting of powdered sugar. (Yes, even on a Tuesday night.)
Step-by-step instructions for vanilla-infused white cake layers
This method delivers perfectly moist, tender layers with a delicate crumb and clean vanilla flavor every time.
Prepare Your Mixing Equipment and Ingredients
Begin by sifting together the 2.5 cups all-purpose flour and 0.5 cup cake flour into a medium bowl. Set aside—this prevents lumps in your batter and ensures an even texture. In a separate bowl, whisk together the 1.5 teaspoons baking powder and 0.5 teaspoon salt, then sift this mixture over the flours. Gently fold with a whisk until just combined, being careful not to develop the gluten.
Next, measure out the 2 cups granulated white sugar and set aside. Separate the 4 whole large eggs, placing the yolks in one bowl and whites in another. Let both come to room temperature—this ensures even baking and prevents cracks. The 1 cup unsalted butter should also be at room temperature, with just a slight indentation when pressed. These preparations guarantee a smooth, creamy batter.
Cream Butter and Sugar for Maximum Volume
In a stand mixer fitted with the paddle attachment, beat the 1 cup room-temperature butter and 2 cups sugar on medium speed for 3-4 minutes until light and fluffy. You’ll see the mixture nearly double in volume and become pale in color—this incorporates air that creates the cake’s signature tender crumb. Scrape down the sides of the bowl with a spatula to ensure even mixing.
Here’s the thing—don’t rush this step. The butter should be completely smooth with no graininess, and the mixture should hold soft peaks when lifted with the paddle. If it’s still grainy, continue beating for another 30-60 seconds. This thorough creaming prevents dense cake and ensures proper rise.
Incorporate Eggs and Vanilla Extract
Add the 4 egg yolks, one at a time, mixing on low speed after each addition until fully incorporated. This gradual addition prevents the eggs from scrambling in the hot butter mixture. After all yolks are added, mix in the 2 tablespoons pure vanilla extract and the 1 cup whole milk. The batter should be smooth and well-combined, with a thick but pourable consistency.
In a separate bowl, beat the 4 egg whites with an electric mixer on high speed until soft peaks form. Gradually add the 3 cups powdered sugar, 1 tablespoon at a time, continuing to beat until the meringue is glossy and holds stiff peaks. This meringue will give your cake its signature lightness and stability.
Combine Wet and Dry Ingredients
Gently fold one-third of the egg white meringue into the butter mixture using a spatula, being careful not to deflate the batter. Then, in three additions, fold in the remaining meringue, alternating with the sifted flour mixture. Begin and end with the flour to ensure proper distribution. The goal is to create a smooth, uniform batter without overmixing—you should see some streaks of white, but the batter should hold its shape when lifted.
This is where precision matters: overmixing develops gluten, resulting in a tough cake. If the batter appears too thick, gently fold in 1-2 tablespoons of whole milk to achieve a smooth, spoonable consistency. The batter should be thick enough to hold its shape when dropped from a spoon but still flow easily.
Bake the Layers to Perfect Doneness
Preheat your oven to 350°F and grease two 13×9-inch cake pans with butter or baking spray, then line the bottoms with parchment paper. Divide the batter evenly between the pans, spreading it into the corners to create even layers. Bake for 25-30 minutes, or until a toothpick inserted into the center emerges clean and the edges pull away slightly from the pan.
Here’s the critical checkpoint: the cake should spring back when gently pressed in the center—no jiggling should remain. If the top browns too quickly, tent the pans with aluminum foil after 15 minutes to prevent overbrowning while ensuring even cooking. Allow the cakes to cool in the pans for 10 minutes, then transfer to a wire rack to cool completely before frosting.
Frost and Assemble the Final Cake
Once the layers are completely cool, spread 1.5 cups of the buttercream frosting evenly over the first layer. Place the second layer on top and spread the remaining 1.5 cups frosting over the top and sides. For a smooth finish, use an offset spatula to create clean edges. Chill the cake in the refrigerator for 30 minutes to set the frosting before serving.
To add the finishing touch, whip the 1 cup heavy whipping cream to soft peaks and pipe it around the edges of the cake. Top with the 1 cup fresh berries for a pop of color and freshness. This cake serves 12, with each slice offering a perfect balance of tender crumb, buttery richness, and delicate vanilla flavor.
Pro Tips For Making 13×9 White Cake
- Sift the Flours Together: Mixing cake flour and all-purpose flour separately means uneven texture—sift them together first, then fold gently into wet ingredients. I learned this the hard way when my cake turned out dense instead of light; the sifting breaks up lumps and aerates the dry mix before it hits the butter.
- Cream Butter and Sugar Slowly: Let the butter sit at room temperature for 2 hours before creaming, then mix on medium-high for 3-4 minutes until pale and fluffy. Rushing this step traps air poorly, and cold butter won’t emulsify right—your cake will end up compacted instead of tender.
- Don’t Overmix the Batter: Stop folding in the dry ingredients as soon as they’re just incorporated—no streaks, no dry spots. I used to beat like I was making pancakes, and my cakes always turned out tough. A few swirls with a spatula keeps gluten from overdeveloping.
- Test for Doneness Early: Check the cake at 25 minutes (not 30!)—it’s done when a toothpick comes out clean and the edges pull away slightly from the pan. Overbaking dries out the crumb, and underbaking leaves it gummy. Trust the visual cues more than the recipe’s time.
Make-ahead tips for 13×9 white cake
Prep Ahead Timeline
Plan your timeline to maximize efficiency. Start by making the buttercream frosting 1-2 days ahead—it actually tastes better after resting as the flavors meld. Store it in an airtight container at room temperature (or refrigerate for up to 5 days).
The cake layers can be baked and cooled completely, then wrapped individually in plastic wrap and stored at room temperature for up to 3 days before assembly. This gives you flexibility to bake the cake layers a day ahead and assemble right before serving. 📅
Freezing for Future Use
For long-term storage, freeze the baked cake layers individually wrapped in plastic wrap and placed in freezer bags with all air removed. They’ll keep for up to 2 months without losing moisture or texture. When ready to assemble, thaw at room temperature for 2-3 hours before frosting.
I like to freeze the frosting separately too—just thaw it in the fridge overnight before use. This method ensures you always have cake layers ready for last-minute celebrations. ❄️
Frosting Prep Tips
Prepare the buttercream frosting the day before baking the cake layers—this gives the flavors time to develop fully. Whip the heavy whipping cream to soft peaks and set it aside in the fridge until ready to use.
For a smoother finish, sift the powdered sugar before mixing to avoid lumps. If your frosting is too thick, add 1 teaspoon of milk at a time until it reaches a spreadable consistency.
Pro tip: Use a stand mixer with the paddle attachment for 3-5 minutes on medium speed to achieve that perfect, fluffy texture. 🥄
Layer Assembly Shortcuts
To make assembly easier, use a serrated knife to level the cake layers if needed—this creates even surfaces for clean frosting application. Spread the frosting on the first layer, then place the second layer on top before adding the remaining frosting.
For a professional look, chill the cake in the fridge for 30 minutes before serving to help the frosting set. If you’re short on time, you can even assemble the cake the night before and refrigerate it overnight—just bring it to room temperature before serving. 🍰
Garnish Prep
If using fresh berries as garnish, wash and dry them thoroughly, then toss with 1 tablespoon powdered sugar just before serving to keep them vibrant. For extra flair, arrange the berries in a circular pattern on top of the cake or pipe a border of whipped cream around the edges.
If you’re making this ahead, store the berries separately in the fridge and add them just before serving to maintain freshness. A dusting of powdered sugar right before serving adds that bakery-fresh finish. 🍓
Transporting Made-Ahead Cakes
For events or gatherings, transport the assembled cake in a sturdy cake carrier or wrapped tightly in plastic wrap and placed in a cardboard box. Keep it in a cool, dry place (not the trunk of a car) to prevent melting or sogginess.
If transporting for more than 2 hours, place it in the fridge and let it sit at room temperature for 30 minutes before serving. For outdoor events, cover the cake with a damp towel and place it in a cooling box to keep it fresh.
This ensures your cake arrives looking and tasting perfect. 🚗
Nutrition facts
Frequently asked questions
Why does this recipe use both all-purpose and cake flour?
The combination creates the perfect texture—all-purpose flour provides structure while cake flour delivers that signature tender crumb. Cake flour contains a higher starch content, which prevents a dense, heavy cake. This blend ensures your layers stay moist without becoming too delicate.
Can I bake this cake in a 9×13-inch pan instead of two 13×9-inch pans?
Yes, but you’ll need to bake it in batches. Divide the batter evenly between the two pans to maintain even baking. A single 9×13-inch pan would require 30-35 minutes at 350°F, but the layers may be slightly thicker. For best results, stick to the two-pan method for consistent texture.
How do I prevent cracks in the cake layers?
Cracks usually happen from overmixing or cooling too quickly. Avoid overbeating the egg whites and make sure your oven is fully preheated. After baking, let the cakes cool in the pans for 10 minutes before transferring to a wire rack. Also, ensure your butter and eggs are at room temperature.
What’s the best way to level the cake layers?
Use a serrated knife or cake leveler to trim the tops evenly. Place the knife on the cake and gently saw back and forth while pressing down lightly. Wipe the knife clean between cuts to maintain a smooth surface. This step is key for clean frosting application and a professional finish.
Can I substitute milk for a dairy-free alternative?
Yes, use unsweetened almond milk or oat milk in a 1:1 ratio. However, the cake may be slightly less moist. For best results, add 1 tablespoon cornstarch to thicken the liquid. Test the batter consistency—it should be slightly thicker than with dairy milk.

- Baked Potatoes in Crock Pot Recipe: Buttery Interiors and Crispy Top Magic - November 1, 2026
- Braised Beef Short Ribs Recipe: Crock Pot Fall-Off-Bone Magic in 6 Hours - November 1, 2026
- Crock Pot Cocoa Recipe: Velvety Warmth With Hidden Spice Magic - November 1, 2026