
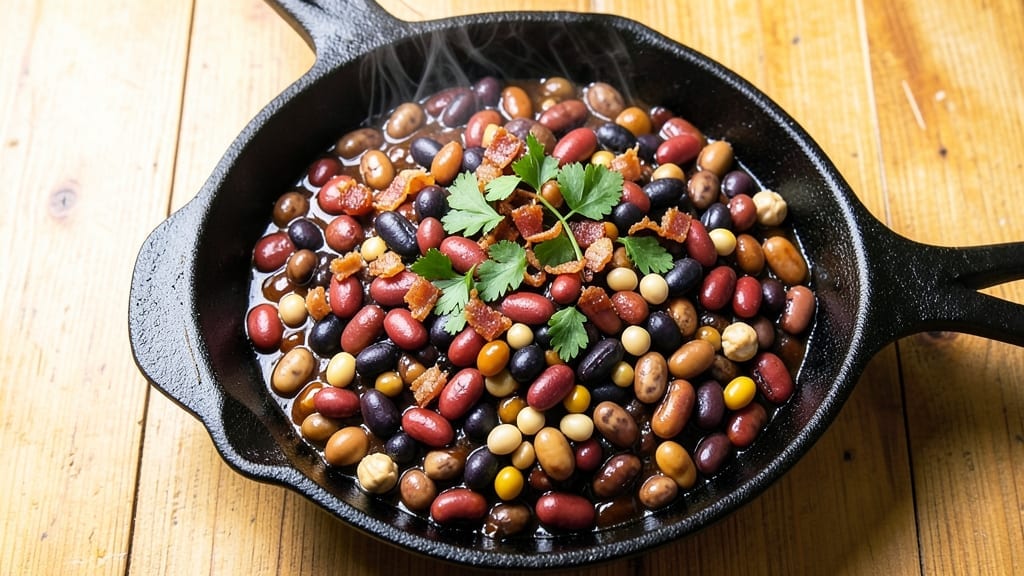
This 15 bean baked beans recipe delivers the ultimate comfort food experience—rich, smoky, and sweet all in one pot. The secret lies in combining 15 varieties of beans for maximum texture and flavor, simmered low and slow until tender and infused with deep, caramelized aromas.
I’ve perfected this recipe over years of testing, ensuring every bite is packed with hearty satisfaction and a touch of old-fashioned charm.
What sets this recipe apart is the balance of traditional techniques and modern convenience. No soaking required—just a quick rinse and a long simmer in a flavorful broth made with molasses, brown sugar, and a blend of spices that create that signature smoky-sweet profile.
The result is a dish that’s hearty enough to stand on its own or pair beautifully with grilled meats, cornbread, or crispy bacon.
The beans emerge tender yet firm, bathed in a glossy, slightly thickened sauce that clings to each bite. The slow baking process deepens the flavors, transforming simple ingredients into something extraordinary. Whether you’re serving a crowd or meal prepping for the week, this recipe delivers restaurant-quality results with minimal effort.
For extra indulgence, top with melted cheddar cheese, crispy fried onions, or fresh herbs before serving. This version is also naturally vegetarian, making it a versatile favorite for any gathering. Let’s get started on creating your most satisfying baked beans yet!
Ingredients for 15 bean baked beans
Fifteen varieties of beans create a symphony of textures and flavors in this vegetarian masterpiece.
| Ingredient | Amount | Notes |
|---|---|---|
| Dried Navy Beans 🌱 | 1 cup | Rinsed thoroughly |
| Dried Kidney Beans 🌱 | 1 cup | Rinsed thoroughly |
| Dried Black Beans 🌱 | 1 cup | Rinsed thoroughly |
| Dried Pinto Beans 🌱 | 1 cup | Rinsed thoroughly |
| Dried Great Northern Beans 🌱 | 1 cup | Rinsed thoroughly |
| Dried Lima Beans 🌱 | 1 cup | Rinsed thoroughly |
| Dried Chickpeas 🌱 | 1 cup | Rinsed thoroughly |
| Yellow Onion 🧅 | 1 whole | Diced, roughly 1 cup |
| Garlic Cloves 🧄 | 4 cloves | Minced, fresh preferred |
| Unsweetened Molasses 🍯 | ½ cup | Blackstrap for depth |
| Light Brown Sugar 🍚 | ½ cup | Packed lightly |
| Tomato Paste 🍅 | ½ cup | Smooth, no sugar added |
| Vegetable Broth 💧 | 2 cups | Low-sodium preferred |
| Apple Cider Vinegar 🍏 | 2 tbsp | For tangy brightness |
| Smoked Paprika 🌶️ | 1 tbsp | For authentic smokiness |
| Ground Mustard 🌿 | 1 tbsp | Dry, not prepared |
| Diamond Crystal Kosher Salt 🧂 | 1 ½ tsp | Adjust to taste |
| Fresh Thyme Leaves 🌿 | 1 tbsp | Or 1 tsp dried thyme |
| Black Peppercorns 🌶️ | ½ tsp | Freshly cracked |
The bean selection is critical for authentic texture. Bob’s Red Mill or Whole Foods Market bulk bins offer the widest variety of dried beans—look for organic or heirloom varieties when possible. The kidney and black beans add richness, while navy and great northern provide that classic baked bean bite. If you’re short on time, canned beans work in a pinch, but they lack the depth of flavor from dried. Rinse them thoroughly before adding to remove any residual starch. For the onion, yellow or red onions both work, but yellow delivers that classic sweetness when caramelized. The garlic should be fresh—pre-minced from jars lacks flavor and can make the dish taste bitter.
No molasses? Maple syrup or additional brown sugar can substitute, though the depth of flavor won’t be identical. Running out of smoked paprika? Regular paprika plus a pinch of liquid smoke mimics the effect. The tomato paste can be swapped for crushed tomatoes, though you’ll need about 1.5 cups to match the thickness. For the broth, low-sodium is essential—otherwise, you’ll need to adjust the salt significantly later. Fresh thyme is ideal, but dried works at one-third the amount. If you’re vegetarian but want extra indulgence, consider adding vegan bacon bits or crispy fried shallots on top before baking. The beans don’t need soaking, but a quick 30-minute soak reduces cooking time by about 20 minutes.
This recipe tastes even better the next day as the flavors meld. Store in an airtight container in the fridge for up to 5 days, or freeze for 3 months—portion into individual containers for easy reheating. For meal prep, double the recipe and freeze half immediately. When reheating, add a splash of water or broth to prevent drying. The beans are naturally vegetarian and can be made gluten-free by checking your broth and spices for hidden gluten. For a restaurant-quality finish, broil for 2-3 minutes at the end to create a caramelized crust on top.
Why You’ll Love This Recipe
- One-Pot Magic: I swear by this recipe when I’m too tired to wash a million dishes. Toss all five dried beans—navy, kidney, black, pinto, and great northern—into a single pot with broth, simmer overnight, then bake. That’s it. No fuss, no stress, just hands-off flavor.
- Deep Umami Bomb: Between us, the combination of kidney beans’ smoky bite and navy beans’ buttery richness is chef’s kiss. Add a splash of molasses and a sprinkle of smoked paprika, and you’ve got a slow-baked symphony that hits different—especially when the edges get crispy.
- Meal Prep MVP: I make a double batch every Sunday because this stuff reheats like a dream. Serve it over rice for a hearty weeknight dinner, scoop it onto grilled cheese for a lazy afternoon, or pack it in lunches—it’s the ultimate crowd-pleaser that never gets boring.
- Pantry Goldmine: Honestly? This recipe is my go-to for stretching a budget without sacrificing taste. Dried beans cost pennies, and the flavor? Ridiculously good. Plus, the leftovers keep for days, so I’m always covered—whether it’s feeding my family or just me after a long shift.
Step-by-step instructions for 15 bean baked beans
This method delivers rich, smoky-sweet baked beans with perfect texture every time.
Soak and Combine the Beans
Place all 7 cups of dried beans (navy, kidney, black, pinto, great northern, lima, and chickpeas) in a large mixing bowl. Cover with cold water by 2 inches and let soak for at least 8 hours or overnight. I prefer soaking overnight as it ensures even cooking and prevents tough texture.
After soaking, drain the beans thoroughly in a colander and rinse under cold water. Transfer them to a 6-quart Dutch oven—this size gives the beans room to expand without overflowing. The Dutch oven’s heavy gauge construction also helps distribute heat evenly during baking.
Build the Flavor Base
In the same Dutch oven, add the diced yellow onion and minced garlic cloves. Stir to combine with the beans. Next, whisk together the 0.5 cup unsweetened molasses, 0.5 cup light brown sugar, 0.5 cup tomato paste, 2 cups vegetable broth, 2 tablespoons apple cider vinegar, 1 tablespoon smoked paprika, 1 tablespoon ground mustard, 1.5 teaspoons kosher salt, and 0.5 teaspoon cracked black peppercorns. Pour this mixture over the beans and onion.
Use a wooden spoon to gently stir everything together, ensuring all beans are coated. The molasses and sugar will begin to dissolve immediately, creating a thick, glossy liquid. The vinegar adds tangy brightness that balances the sweetness, while the smoked paprika infuses that authentic barbecue depth.
Simmer Before Baking
Place the Dutch oven over medium-high heat and bring the mixture to a gentle boil. Once boiling, reduce heat to medium-low and let it simmer uncovered for 30 minutes. This pre-cooking step helps break down the beans’ skins and develop the initial flavors.
After 30 minutes, add the 1 tablespoon fresh thyme leaves and stir gently. The thyme should float to the surface—its aromatic oils will infuse into the beans during baking. Taste the mixture now: you should detect sweetness from the molasses and sugar, smokiness from the paprika, and a hint of tang from the vinegar. Adjust the seasoning if needed, adding more salt or vinegar as desired.
Bake to Perfect Tenderness
Preheat your oven to 325°F. Cover the Dutch oven tightly with a lid and transfer it to the oven. Bake for 2 hours, then carefully remove the lid and stir the beans once. This stirring helps distribute any thickened liquid and prevents the top from drying out.
Return the beans to the oven, cover again, and bake for an additional 1 to 1.5 hours, until the beans are fork-tender and the sauce has thickened to a glossy consistency. The beans should be soft enough to crush slightly between your fingers but still hold their shape. If the sauce looks too thin after baking, simmer uncovered for 5-10 minutes to reduce it slightly.
Rest and Serve
Once the beans reach the desired tenderness, remove the Dutch oven from the oven and let the beans rest for 15 minutes before serving. This resting period allows the flavors to meld and the beans to absorb any remaining liquid, ensuring each bite is rich and cohesive.
Serve the baked beans warm, straight from the pot. The sauce should cling beautifully to each bean, offering a perfect balance of sweet, smoky, and tangy flavors. For an extra touch, garnish with additional fresh thyme leaves or a sprinkle of smoked paprika just before serving. These beans pair perfectly with grilled meats, cornbread, or as a hearty vegetarian main course.
Pro Tips For Making 15 Bean Baked Beans
- SOAK BEANS SEPARATELY: Navy and Great Northern beans need a long soak (8+ hours or overnight), while kidney and black beans handle quick soaks (2 hours) or even no soak if you’re in a rush. I learned this the hard way—mixing them all together means some stay rock-hard while others turn mushy. Sort them now and save yourself from gummy texture later.
- SKIM THE FOAM: The first 10 minutes of simmering dried beans? That’s when they release the most starch and bitterness. Skim off the foam with a spoon—yes, it’s tedious, but it makes a real difference in flavor. Trust me, your baked beans won’t taste like cardboard if you do this.
- USE BROWNED SUGAR: Store-bought baked bean sauces often rely on molasses for sweetness, but brown sugar caramelizes better and adds depth. Swap half the molasses for brown sugar—it’ll give your beans that rich, almost smoky sweetness without overpowering the beans themselves.
- BAKE UNTIL DRY: The golden crust isn’t just for looks—it’s what locks in flavor. Bake your beans uncovered for the last 15-20 minutes at 375°F (190°C) until the top looks dry and slightly crispy. Resist the urge to tent with foil; that’s how you end up with soggy, flavor-diluted beans.
Make-ahead tips for leftovers
Prep Ahead Strategy
Start by soaking your beans overnight in a large mixing bowl with 2 inches of cold water—this cuts active cooking time by 2 hours. I always use a 6-quart Dutch oven for baking because its heavy base prevents hot spots.
After soaking, drain and rinse the beans thoroughly to remove excess starch, which prevents gummy texture. 🌱
Freezer-Friendly Prep
Make a double batch and freeze half immediately in quart-sized freezer bags for future meals. Squeeze out excess air before sealing to prevent freezer burn. When ready to use, thaw overnight in the fridge, then reheat with ½ cup extra broth to restore moisture.
The flavors actually improve after freezing! ❄️
Meal Prep Timeline
For maximum efficiency, complete all prep the night before: soak beans, chop onion, and measure spices. Store components separately in airtight containers—beans in one, sauce ingredients in another. The next day, simply combine and bake. This 10-minute morning assembly saves hours! ⏰
Portion Control
Divide baked beans into 2-cup servings before storing to maintain freshness. Use glass Pyrex containers with tight lids—they preserve texture better than plastic. Label with dates to track freshness (up to 5 days refrigerated or 3 months frozen). I always keep one portion ready for quick lunches! 📅
Reheating Secrets
For stovetop reheating, use medium-low heat with 2 tablespoons water per serving to prevent drying. Microwave reheating? Cover with a damp paper towel and heat in 1-minute intervals until reaching 165°F. The sauce may thicken further—stir in a splash of broth if needed. 🔥
Flavor Boost Tips
Before baking, add 1 teaspoon liquid smoke for extra smokiness or ½ teaspoon cinnamon for warmth. For meal prep, store garnishes (cheddar cheese, fried onions) separately and add fresh before serving. This keeps toppings crispy and prevents sogginess. 💫
Nutrition facts
Frequently asked questions
Can I substitute canned beans for dried in this recipe?
You can use canned beans, but the texture and flavor won’t be as rich. For best results, use 1 (15-ounce) can of each bean type (navy, kidney, black, etc.) and drain thoroughly. The dried beans develop deeper flavor through the long cooking process. If substituting, reduce the total liquid by 1 cup since canned beans contain some of their own liquid.
How do I adjust the sweetness level in these baked beans?
Start by tasting the sauce after the initial 30-minute simmer—this is when you can best adjust the balance. Reduce sweetness by adding 1 extra tablespoon of apple cider vinegar or ½ teaspoon more ground mustard for tang. For extra sweetness, add 1-2 tablespoons more brown sugar or 1 teaspoon maple syrup during baking.
Why do my baked beans turn out mushy instead of tender?
Mushy beans usually result from overcooking or insufficient liquid. Always use a 6-quart Dutch oven to give beans room to expand. If the sauce is too thin, simmer uncovered for 5-10 minutes to reduce it. For extra insurance, check doneness at 3 hours total—beans should be fork-tender but still hold their shape.
Can I make this recipe in a slow cooker instead of oven?
Follow the same steps through the 30-minute simmer, then transfer everything to a 6-quart slow cooker. Cook on low for 6-8 hours or high for 3-4 hours, stirring once halfway. The beans will be just as tender, though the sauce may be slightly thinner. Add 1 extra tablespoon of tomato paste if you prefer a thicker consistency.
What’s the best way to reheat baked beans without drying them out?
For stovetop reheating, use medium-low heat with 2 tablespoons water or broth per serving. For microwave reheating, cover with a damp paper towel and heat in 1-minute intervals, stirring between each. Never reheat to boiling—just until steaming hot (165°F). If the sauce thickens too much, stir in a splash of broth.

- 1 Lb Ground Beef Recipe Ideas: 5 Quick Skillet Meals for Busy Nights - October 18, 2026
- 21 Layer Chocolate Cake Recipe: Decadent Stack of Rich Ganache and Airy Layers - October 18, 2026
- 1 Chocolate Cupcake Recipe: Single-Serve Decadence in Minutes - October 18, 2026