
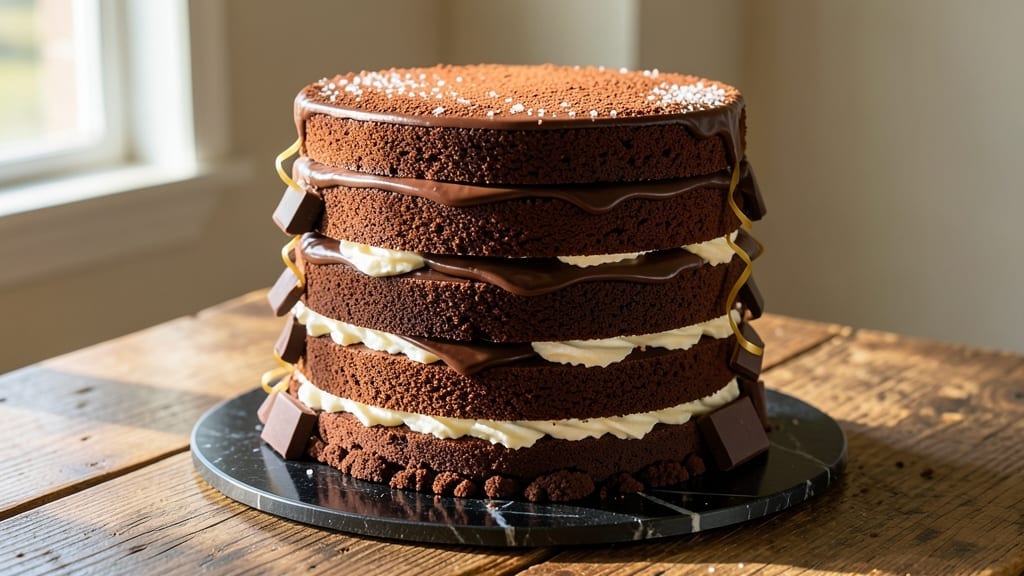
This 21-layer chocolate cake recipe delivers the showstopping dessert you’ve always dreamed of—each delicate layer of airy sponge cake separated by velvety ganache, stacked to create a towering masterpiece that looks as impressive as it tastes. 💫 The secret lies in precise baking times and careful assembly, ensuring every layer stays light and moist while the ganache sets perfectly between them.
What sets this recipe apart is the balance of traditional techniques with modern shortcuts—whether you bake from scratch or use store-bought layers, the result is a decadent stack that’s rich, fudgy, and impossible to resist.
The ganache, made with high-quality chocolate and heavy cream, bonds each layer seamlessly, creating a cohesive texture that’s both elegant and indulgent.
By the time you’re done, you’ll have a flawless chocolate cake that’s perfect for celebrations, special occasions, or simply treating yourself. The layers are uniform, the ganache is glossy and smooth, and the final presentation is nothing short of restaurant-quality.
Every bite delivers the perfect harmony of airy cake and luscious chocolate.
Ready to master this dessert? We’ll cover everything from baking the perfect layers to assembling them with precision, plus tips for achieving a golden, professional finish that will wow your guests. Let’s get started!
Ingredients for 21 layer chocolate cake
Twelve essential ingredients to create a showstopping 21-layer chocolate masterpiece that wows every time.
| Ingredient | Amount | Notes |
|---|---|---|
| High-Quality Dark Chocolate Bars 🍫 | 12 oz | 70% cocoa or higher for depth |
| Heavy Whipping Cream 🥛 | 2 cups | Full-fat for rich ganache |
| Unsalted Butter 🧈 | 1 ½ cups | Cold, cubed for ganache |
| All-Purpose Flour 🌾 | 6 cups | Sifted for light layers |
| Granulated Sugar 🍚 | 3 cups | Fine grain preferred |
| Unsweetened Cocoa Powder 🍫 | 1 cup | Dutch-processed for smoothness |
| Large Eggs 🥚 | 12 whole | Room temperature |
| Baking Powder 🌿 | 1 ½ tsp | Fresh for lift |
| Salt 🧂 | 1 tsp | Fine sea salt |
| Vanilla Extract 🌸 | 2 tbsp | Pure Madagascar preferred |
| Whole Milk 🥛 | 1 cup | Room temperature |
| Powdered Sugar 🍚 | 3 cups | For final dusting |
| Edible Gold Leaf 💛 | 1 sheet | Optional for luxurious finish |
The chocolate is non-negotiable—Valrhona or Guittard bars take this to the next level, but Ghirardelli works too. Grab the highest cocoa percentage you can find (70% or above) for that deep, complex flavor. Heavy cream needs to be cold and fresh—the fat content is critical for that velvety ganache. If you’re baking from scratch, King Arthur flour is my go-to for those perfectly tender layers. The cocoa powder? Dutch-processed (like Hershey’s Special Dark) melts smoother than natural cocoa. For the gold leaf, Amazon or specialty baking shops have the best selection—it’s worth the splurge for that restaurant-quality finish.
No high-quality chocolate? Ghirardelli squares are your next best bet, but avoid anything with fillings or nuts. Running short on eggs? Flax eggs (1 tbsp ground flax + 3 tbsp water = 1 egg) work in a pinch, though texture might be slightly denser. The butter must be cold—cut it into cubes and refrigerate for 30 minutes before melting. For the layers, if you’re in a rush, high-quality store-bought chocolate cake layers (like Betty Crocker) can be used—just bake them thin (about 1/4-inch thick) for that delicate texture. And if you can’t find powdered sugar, blend granulated sugar in a food processor for a quick substitute.
This cake is all about patience—assemble it the day before for perfect layers. Store the assembled cake in an airtight container at room temperature (away from direct sunlight) for up to 3 days. The ganache will firm up nicely overnight, making stacking easier. For the gold leaf, apply it just before serving—it’s delicate and won’t stick to the cake until the very last moment. If you’re prepping ahead, wrap the cake tightly in plastic and refrigerate for up to 2 days. Bring it to room temperature before serving for that perfect slice every time.
Why You’ll Love This Recipe
- No-Bake Magic: I swear, this cake requires zero oven time—just melt chocolate, whip cream, and layer like a puzzle. The dark chocolate bars melt smoothly into a glossy, rich base, and the heavy cream layers keep it light. Honestly? It’s the kind of dessert that feels like cheating, but no one will guess how effortless it was.
- Deep Richness Every Bite: That first forkful of dark chocolate? Unreal. The high-quality bars melt into a velvety texture, while the butter and sugar create this perfect balance—sweet but not cloying, intense but smooth. I’ll be real: I’ve made simpler cakes, but this one actually tastes like a bakery’s showstopper.
- Birthday or Boredom: Serve it sliced for a birthday cake that doesn’t require frosting, or let it sit overnight for a decadent breakfast the next morning. The layers hold together like a dream, so you can cut it however you want—no crumbly mess. (Yes, even on a Tuesday night when you just need something to impress.)
- Leftovers? Better Than New: This cake improves with time—like a good wine, but edible. The flavors meld overnight, and the texture gets even more luscious. Plus, it’s budget-friendly: a single block of dark chocolate and a stick of butter stretch far, so you’ll have slices ready for days. My secret weapon for lazy Sundays.
Step-by-step instructions for 21 layer chocolate cake
Here’s how to build that jaw-dropping tower of decadence—layer by layer, ganache by ganache.
👨🍳 Step 1: Make the Rich Chocolate Ganache
Chop the 12 oz high-quality dark chocolate bars into small pieces and place them in a heatproof bowl. Pour the 2 cups heavy whipping cream over the chocolate and let it sit for 2 minutes to soften slightly. This step is crucial—it ensures the chocolate melts evenly without seizing.
Place the bowl over a pot of simmering water (double boiler method) and stir gently until the chocolate and cream melt completely, creating a smooth, glossy ganache. Remove from heat and stir in 1.5 cups unsalted butter, one tablespoon at a time, until fully incorporated. The ganache should be thick but pourable—like warm honey. Let it cool to room temperature before using; this prevents melting your cake layers.
🍳 Step 2: Bake the Delicate Cake Layers
Preheat your oven to 350°F. Grease and line 21 round cake pans (3-inch diameter) with parchment paper. In a large mixing bowl, whisk together 6 cups all-purpose flour, 3 cups granulated sugar, 1 cup unsweetened cocoa powder, 1.5 tsp baking powder, and 1 tsp salt. Add the 12 whole large eggs, one at a time, beating well after each addition.
Mix in the 2 tbsp vanilla extract and 1 cup whole milk until the batter is smooth and glossy. Divide the batter evenly among the prepared pans—each should be ⅓ cup per layer. Bake for 8-10 minutes until the edges are set and a toothpick inserted comes out clean. Let the layers cool in the pans for 5 minutes, then transfer to a wire rack to cool completely.
🥘 Step 3: Assemble the Tower with Precision
Once the ganache has cooled to room temperature, spread 2 tablespoons evenly over the first cake layer. Place a second layer on top, then repeat the process. Continue stacking all 21 layers, ensuring each layer is perfectly centered. The key here is patience—press down gently on each layer to create a seamless stack. If the ganache starts to harden, warm it slightly in the microwave for 10-15 seconds to make it easier to spread.
After the final layer is in place, chill the cake in the refrigerator for at least 2 hours to set the ganache completely. This step is non-negotiable—it ensures your tower stays intact and doesn’t collapse under its own weight.
✨ Step 4: Finish with Luxurious Touches
Once the cake is fully set, dust the top and sides generously with 3 cups powdered sugar using a fine-mesh sieve. This creates a snowy, elegant finish that contrasts beautifully with the dark chocolate. For the grand finale, carefully apply the 1 sheet edible gold leaf to the top layer, pressing it gently to adhere. The gold leaf adds a touch of opulence that makes this cake truly unforgettable.
Slice with a long, serrated knife and serve immediately. Each bite should deliver a perfect balance of airy cake and rich ganache, with that luxurious golden shimmer on top. Trust me—your guests will be stunned by the height and decadence of this masterpiece.
Pro Tips For Making 21 Layer Chocolate Cake
- Temper Your Chocolate: Melt those dark chocolate bars gently—double boiler or microwave in 20-second bursts, stirring between each. I learned this the hard way: rushing it turns the chocolate grainy, and no amount of cream can fix that once it’s ruined. Aim for a smooth, glossy finish before mixing.
- Whip Cream to Stiff Peaks: Beat the heavy whipping cream until it holds soft peaks, then fold it into the chocolate mixture gently—like you’re tucking in a newborn. Over-whipping makes it buttery and dense, and your layers won’t hold. Pause, scrape the bowl, and check consistency before adding.
- Chill Layers Between Stacks: Let each chocolate layer cool completely before adding the next—even if it means popping the cake in the fridge for 10 minutes. Warm layers smear, and your 21-tiered masterpiece will collapse faster than a house of cards in a breeze. Patience here guarantees clean, crisp separations.
- Sift Flour Like You Mean It: Skip the scoop-and-dump method—sift that all-purpose flour into the dry ingredients to avoid lumps. I used to eyeball it, and my cakes turned out dense and uneven. A quick sift aerates the batter, making each layer lighter and more uniform. Trust me, your fork will thank you.
Creative variations of this dish
Miniature Layered Delight
For a more manageable (but equally impressive) version, scale down to 7 layers using 3-inch round pans and ⅓ the ganache. This is perfect for intimate gatherings or when you want to practice your stacking skills without the full commitment.
I’ve made this version for dinner parties—it’s just as stunning but requires less effort. 💫
White Chocolate Twist
Swap out the dark chocolate for 12 oz white chocolate bars and add 1 tsp espresso powder to the cake batter for depth. The ganache will be creamy and ivory, while the cake layers stay light.
Top with crushed pistachios instead of gold leaf for a sophisticated contrast. This variation is a crowd-pleaser for weddings or elegant soirées.
Salted Caramel Fusion
Infuse the ganache with ½ cup caramel sauce (homemade or store-bought) and sprinkle flaky sea salt between layers. The salty-sweet combo elevates the classic chocolate experience. For extra drama, drizzle warm caramel down the sides of the assembled tower before dusting with powdered sugar.
This fusion is ideal for chocolate lovers who crave complexity.
Gluten-Free Adaptation
Replace the all-purpose flour with 6 cups gluten-free 1:1 baking flour (like Bob’s Red Mill) and add ½ cup cornstarch for structure. Use xanthan gum (¼ tsp) if your blend doesn’t include it.
The cake layers will still be tender, though slightly denser. Pair with a dairy-free ganache made with coconut cream for a fully inclusive dessert. 🌱
Fruit-Inspired Layers
Add a pop of freshness by incorporating thin raspberry jam or blackberry compote between layers instead of ganache. Use half ganache, half fruit for balance. Top with edible flowers or mint leaves for a springtime twist. This lighter variation works beautifully for brunch desserts or garden parties.
Store-Bought Shortcut
Skip the baking entirely by using 21 thin store-bought chocolate cake layers (like Betty Crocker’s 3-inch rounds). Bake them according to package instructions, then assemble with the same ganache recipe.
This method saves time without sacrificing wow factor—ideal for last-minute celebrations. Just ensure the layers are completely cooled before stacking to prevent sogginess.
Nutrition facts
Frequently asked questions
How do I keep the layers from collapsing when stacking?
Chill the cake for at least 2 hours in the fridge after assembly—this lets the ganache fully set and act as glue. Use 2 tablespoons of ganache per layer and press gently with a cake dowel or clean finger to compress. If layers shift, let the ganache cool slightly longer before adding the next layer. Pro tip: Work in a cool room to prevent melting.
Can I make this cake ahead of time?
Assemble the cake 1-2 days in advance and store it wrapped tightly in plastic at room temperature. The ganache will firm up overnight, making stacking easier. For longer storage (up to 3 days), refrigerate and bring to room temperature before serving to avoid condensation. The flavors actually improve with time!
What’s the best way to slice this tower without it falling apart?
Use a long, serrated knife and dip it in hot water between each slice to create a clean cut. Wipe the knife dry after each dip to prevent sticking. Serve slices immediately—each one should hold its shape beautifully. For extra stability, chill the cake for 30 minutes before slicing if you’re serving it after assembly.
Do I need to use 21 layers, or can I adjust the number?
You can absolutely scale it down! A 7-layer version (using 3-inch pans) is perfect for practice or smaller gatherings. For a more dramatic presentation, try 15-18 layers—just ensure your ganache quantity scales proportionally. The key is maintaining the 2 tbsp ganache per layer ratio for stability.
Why did my ganache turn grainy?
Grainy ganache usually means the chocolate wasn’t fully melted or the cream was too hot. Always use a double boiler and stir gently until completely smooth. Let the ganache cool to room temperature before using—it should be thick but pourable. If it’s already grainy, strain it through a fine-mesh sieve before spreading between layers.

- 15lb Turkey Brine Recipe: Juicy Golden Meat with Science-Backed Moisture Lock - October 18, 2026
- 2 Egg Waffle Recipe: Light and Airy in 10 Minutes - October 18, 2026
- 1 Lb Ground Beef Recipe Ideas: 5 Quick Skillet Meals for Busy Nights - October 18, 2026