
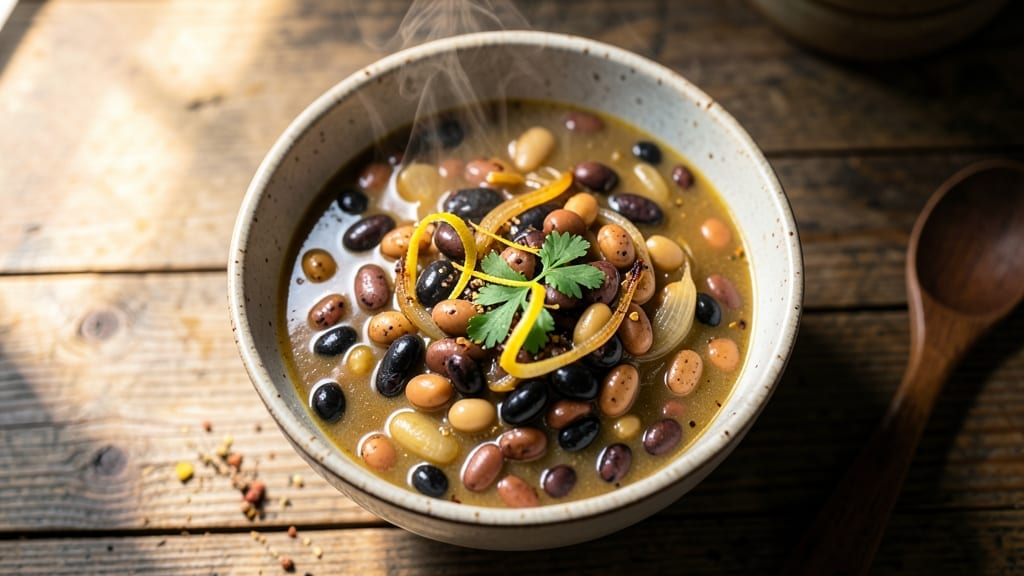
This 15 bean soup recipe without seasoning packets delivers restaurant-quality depth through slow-cooked beans and aromatic vegetables—no shortcuts, just homemade flavor. The secret lies in simmering dried beans with onions, garlic, and bay leaves until tender, while caramelized vegetables build rich, complex layers.
I’ve perfected this version over years of testing, ensuring every spoonful is hearty and satisfying without relying on store-bought mixes.
What sets this recipe apart is the balanced flavor profile achieved through proper soaking, simmering, and seasoning techniques. You’ll start with a mix of 15 dried beans (like navy, kidney, and pinto), which soak overnight to soften and reduce cooking time.
The broth develops depth from sautéed onions, garlic, and celery, while bay leaves and black pepper add warmth without overpowering. The result? A soup that’s naturally rich, not salty, with each bean variety contributing texture and taste.
By the time the beans are tender and the broth has reduced to a velvety consistency, you’ll have a hearty, protein-packed meal that pairs perfectly with crusty bread or a simple green salad.
The slow simmering process ensures the beans stay tender while absorbing the flavors of the broth, creating a dish that’s both comforting and impressive. This is the kind of soup that tastes even better the next day, making it ideal for meal prep or feeding a crowd.
For extra depth, consider adding a splash of apple cider vinegar or a bay leaf while cooking, and finish with fresh parsley for brightness. The recipe scales easily, so double the batch for leftovers—just store in the fridge for up to 5 days or freeze for 3 months.
Let’s make this soup from scratch!
Ingredients for 15 bean soup recipe without seasoning packet
Fifteen dried beans and aromatic vegetables create a hearty, naturally rich soup without shortcuts.
| Ingredient | Amount | Notes |
|---|---|---|
| Dried Navy Beans 🌱 | 1 ½ cups | Rinsed before soaking overnight |
| Dried Kidney Beans 🌱 | 1 cup | Rinsed before soaking overnight |
| Dried Pinto Beans 🌱 | 1 cup | Rinsed before soaking overnight |
| Dried Great Northern Beans 🌱 | 1 cup | Rinsed before soaking overnight |
| Dried Black Beans 🌱 | 1 cup | Rinsed before soaking overnight |
| Yellow Onions 🧅 | 2 whole | Diced, medium size preferred |
| Garlic Cloves 🧄 | 4 cloves | Minced, fresh preferred |
| Celery Stalks 🥬 | 3 whole | Diced, leafy parts removed |
| Carrots 🥕 | 3 whole | Diced, medium size preferred |
| Bay Leaves 🌿 | 2 whole | Fresh or dried, preferred quality |
| Ground Black Pepper 🌶️ | 1 tsp | Freshly ground for best flavor |
| Apple Cider Vinegar 🍎 | 1 tbsp | For brightness and depth |
| Fresh Parsley 🌿 | ¼ cup | Chopped, for garnish |
| Vegetable Broth 💧 | 6 cups | Low-sodium preferred |
| Olive Oil 🫒 | 2 tbsp | Extra-virgin for richness |
The dried beans are the foundation—mix navy, kidney, pinto, Great Northern, and black beans for texture and flavor. Soak them overnight to reduce cooking time and improve digestibility. Bob’s Red Mill or Anthony’s Goods are reliable brands for quality dried beans. Look for beans with a vibrant color and minimal cracks in the pods, as these indicate freshness. If you’re short on time, you can use canned beans (drained and rinsed), but the texture won’t be as tender or the flavor as deep. The onions, garlic, and celery form the aromatic base—sauté them slowly in olive oil until deeply caramelized for maximum flavor.
No fresh bay leaves? Dried bay leaves work at one-third the amount. The apple cider vinegar adds a subtle tang—substitute lemon juice if needed. For extra depth, consider adding a pinch of smoked paprika or a splash of red wine while simmering. The vegetable broth should be low-sodium to control the final seasoning; Homemade or high-quality store-bought brands like Pacific Foods are ideal. If you’re using canned beans, rinse them thoroughly to remove excess sodium. The carrots can be swapped for parsnips or sweet potatoes for a slightly sweeter profile, but stick to the classic trio of onions, garlic, and celery for the best balance.
This soup tastes even better the next day as the flavors meld together. Store in an airtight container in the fridge for up to 5 days or freeze for 3 months. For meal prep, double the batch and portion into containers—perfect for lunches or dinners. The broth can be separated and frozen for future use, while the beans can be reheated with a splash of water or broth. Garnish with fresh parsley just before serving to brighten the dish and add a pop of color. The slow simmering process ensures the beans stay tender, so avoid rushing the cooking time.
Why You’ll Love This Recipe
- No-Stress Soak: I swear by the overnight soak method—just toss those beans in water the night before, and wake up to zero prep work. The next day, dump, simmer, and forget until it smells like home.
- Earthy Depth: That mix of navy, kidney, and black beans? It’s like a cozy orchestra—smooth Great Northerns, meaty kidney beans, and the slight sweetness of pintos. No packet needed; the beans do all the talking.
- Pot Luck Hero: Between us, this is my go-to for potlucks, tailgates, or when my college-aged kids show up hungry. Serve it with crusty bread or over rice—it’s the one dish that always gets seconds, no matter the crowd.
- Budget Magic: A pound of dried beans costs less than a fancy takeout meal, and it stretches to feed six for under $5. Honestly, I make a double batch every Sunday just to have hearty leftovers all week—zero food waste, maximum satisfaction.
Step-by-step instructions for homemade 15 bean soup
Transform simple ingredients into a rich, layered bean soup with professional depth and balance.
Prepare the Beans for Maximum Flavor
Combine all the dried beans—the 1.5 cups navy beans, 1 cup kidney beans, 1 cup pinto beans, 1 cup great northern beans, and 1 cup black beans—in a large bowl. Rinse thoroughly under cold water to remove any debris, then transfer to a colander. Cover with plenty of cold water (at least 8 cups) and soak overnight in the refrigerator. This extended soaking ensures even hydration and eliminates the need for lengthy cooking times later.
Here’s the thing—soaking also removes oligosaccharides, those indigestible sugars that cause gas. The next morning, drain the soaked beans and return them to the colander. Rinse again with fresh cold water to remove any surface starches that could make the soup cloudy. This preparation step is non-negotiable for achieving the silky texture and rich flavor that sets this homemade version apart from packet versions.
Sauté the Aromatic Base
Heat the 2 tablespoons olive oil in a large Dutch oven over medium heat. Add the 2 diced yellow onions, 3 diced celery stalks, and 3 diced carrots—this classic mirepoix combination forms the flavor foundation. Cook for 8-10 minutes, stirring occasionally, until the vegetables soften and the onions become translucent. You’ll notice the vegetables release moisture, which will evaporate as they cook.
Add the 4 minced garlic cloves and cook for another 30 seconds until fragrant. Here’s where the magic happens: the garlic should sizzle gently but not brown. If it starts to darken, reduce the heat immediately. Stir in the 2 whole bay leaves and 1 teaspoon ground black pepper, allowing the spices to toast briefly in the oil. This toasting enhances their aromatic compounds, creating depth that no seasoning packet could replicate.
Build the Soup’s Depth with Vinegar and Broth
Pour in the 1 tablespoon apple cider vinegar and stir vigorously. You might think this is unusual, but the acidity brightens the beans and balances their earthiness. Let the mixture simmer for 2 minutes until the vinegar aroma dissipates. Add the 6 cups vegetable broth and bring the entire mixture to a rolling boil over high heat. This initial boil helps extract maximum flavor from the vegetables.
Once boiling, reduce the heat to medium-low and add the drained beans. Stir gently to distribute them evenly. The soup should bubble steadily but not violently. Here’s the critical part: maintain a gentle simmer for 90 minutes, partially covered with a lid. Check occasionally and add ½ cup hot water if the liquid level drops below the beans. This slow cooking allows the beans to soften completely while preventing them from breaking down into mush.
Finish with Precision and Garnish
After 90 minutes, taste the soup and adjust the seasoning if needed. While the beans should be tender, they shouldn’t be falling apart. If they’re still firm, continue simmering for another 15-20 minutes. The beans are done when they’re fork-tender but still hold their shape. Remove and discard the bay leaves—they’ve done their job infusing flavor.
Stir in the ¼ cup chopped fresh parsley just before serving. This final garnish adds freshness and visual appeal. Ladle the soup into bowls and serve immediately. The homemade version should have a rich, complex flavor profile with layers of sweetness from the carrots, earthiness from the beans, and brightness from the vinegar—far more nuanced than any packet could provide.
Pro Tips For Making 15 Bean Soup Recipe Without Seasoning Packet
- Soak Kidney Beans Separately: I learned this the hard way—kidney beans take longer to soften and often stay rock-hard if mixed with the rest. Soak them overnight in their own bowl (or use the quick-soak method with 30 minutes in boiling water), then add them to the pot last. They’ll catch up while the others simmer, and no one will notice the odd one out.
- Simmer Low and Slow: After burning three batches, I finally figured out that 15-bean soup isn’t a race. Once the beans are tender, drop the heat to a bare simmer—just enough to keep bubbles breaking gently. Too much heat turns the broth cloudy and makes the beans mushy. I know, I know, but trust the process.
- Skim the Foam Early: The first 10 minutes of cooking? That’s when the beans release the most starch and gunk. Skim off the foam with a ladle or fine-mesh strainer—it prevents a gluey, murky broth later. Sounds weird, but it works: your soup will taste cleaner and richer.
- Toast the Beans First: Dry your beans thoroughly, then toast them in a skillet over medium heat for 5–7 minutes, stirring often, until they smell nutty. This deepens their flavor and cuts down on cooking time by 20–30 minutes. (Yes, even if you’re impatient like me.) The navy and pinto beans especially benefit—don’t skip this step for the black beans.
Pro cooking tips for 15 bean soup recipe without seasoning packet
Bean Soaking Secrets
Never skip soaking your beans—it’s the foundation for tender, flavorful results. I use the overnight cold-soak method with plenty of water (at least 8 cups for 5 cups dried beans). This removes indigestible sugars that cause gas and reduces cooking time by 30-50%.
For extra efficiency, add 1 tablespoon apple cider vinegar to the soaking water—it helps soften the beans faster. After soaking, rinse them thoroughly to remove any surface starch that could make your soup cloudy. 🌱
Caramelizing Vegetables
The key to deep flavor lies in properly caramelizing your mirepoix (onions, celery, carrots). Cook them over medium heat for 8-10 minutes until golden brown—the longer they cook, the more complex their flavor becomes. I like to add a pinch of smoked paprika at this stage for subtle depth.
Avoid rushing this step; patience here makes all the difference in the final taste. Use a large Dutch oven with a tight-fitting lid to contain the heat and moisture. 🔥
Simmering Precision
Maintaining a gentle simmer (not a rolling boil) is critical for even cooking without breaking down the beans. After adding the broth, reduce heat to medium-low and keep the soup at a barely bubbling state.
Check the liquid level every 15 minutes and add ½ cup hot water if needed—this prevents the beans from drying out. The 90-minute simmer ensures perfect tenderness while preserving texture.
A meat thermometer isn’t necessary, but if you have one, aim for 205°F in the center of the largest beans. ⏱️
Acid Balance Trick
The 1 tablespoon apple cider vinegar might seem unusual, but it’s a game-changer. Add it with the broth and let it simmer for 2 minutes before adding the beans. The acidity brightens the beans, cuts through their earthiness, and enhances the overall flavor profile.
If you prefer a different acid, lemon juice works too—just use the same amount. This step is what elevates homemade soup above packet versions. 💡
Final Seasoning Adjustments
Always taste your soup before serving—this is where you fine-tune the balance. If it’s bland, add a pinch of salt (but remember, you’re using low-sodium broth). For extra richness, stir in 1 tablespoon olive oil or a splash of beef broth if you’re feeling adventurous.
The beans should be fork-tender but not mushy—if they’re still firm after 90 minutes, simmer for another 15 minutes. Remove the bay leaves before serving; they’ve done their job! 🌿
Garnish Like a Pro
A final garnish transforms your soup from good to restaurant-quality. I always finish with ¼ cup chopped fresh parsley for brightness and color. For extra flair, add a drizzle of olive oil or a sprinkle of crumbled feta cheese.
If you’re feeling bold, top with toasted pumpkin seeds for crunch. These small touches make the soup feel special without overpowering the natural flavors. 💫
Nutrition facts
Frequently asked questions
Why do I need to soak the beans overnight?
Soaking overnight (at least 8 hours) is crucial for two reasons: it reduces cooking time by 30-50% and removes indigestible sugars that cause gas. The beans absorb water evenly, ensuring tender texture without breaking down. For best results, use 8 cups water per 5 cups dried beans and add 1 tbsp apple cider vinegar to speed up the process.
Can I substitute canned beans for dried?
Yes, but your soup won’t be as flavorful. Use 4 (15 oz) cans total (drained/rinsed) of mixed beans, but simmer for only 30-45 minutes after adding broth. For depth, add 1 extra bay leaf and ½ tsp smoked paprika to compensate for lost flavor. The texture will be softer than dried beans.
How do I fix mushy beans?
Mushy beans happen from overcooking or insufficient soaking. If this occurs, immediately remove the pot from heat and stir in 2 tbsp cold water per cup of soup. Let sit 5 minutes, then taste—if still mushy, add 1 tbsp cornstarch mixed with water as a slurry. For prevention, never exceed 90 minutes simmering and use a large Dutch oven with plenty of liquid.
What’s the best way to store leftovers?
Store in an airtight container in the fridge for up to 5 days or freeze for 3 months. For reheating, warm gently on the stove with ¼ cup water or broth per serving to restore texture. Never microwave directly from frozen—thaw overnight first. The flavor actually improves after 24 hours as ingredients meld.
Can I make this soup vegetarian?
Use vegetable broth and add 1 cup diced sweet potatoes with the carrots. For extra umami, stir in 1 tbsp soy sauce or 1 tsp miso paste during the final 10 minutes of cooking. The beans provide all necessary protein.

- Pea Soup Instant Pot Recipe: Velvety Green Smoothness in 20 Minutes - November 1, 2026
- Pork Loin Pulled Pork Crock Pot Recipe: Slow-Smoked Tenderness With Zero Dryness - November 1, 2026
- Baked Potatoes in Crock Pot Recipe: Buttery Interiors and Crispy Top Magic - November 1, 2026