
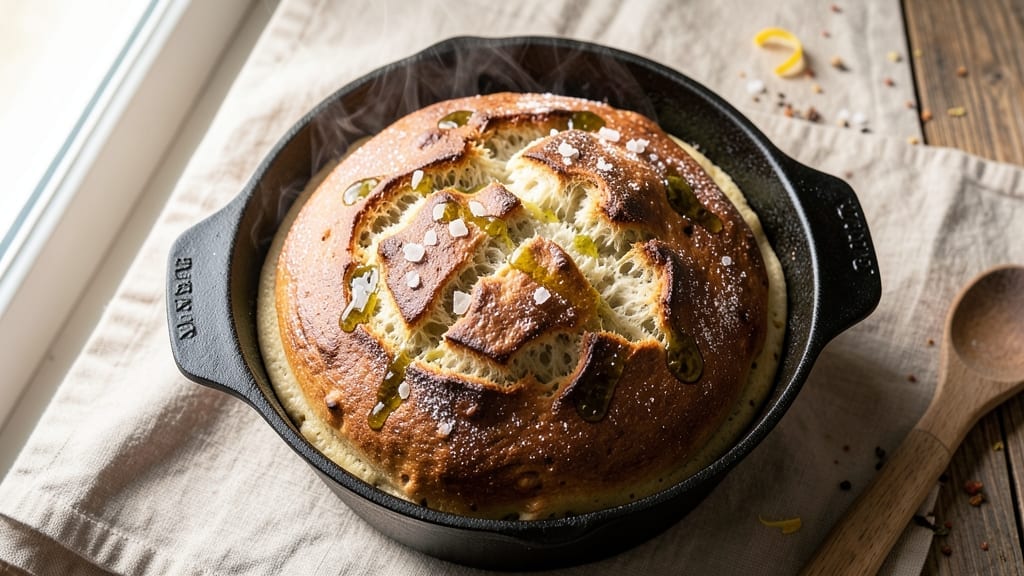
Mastering the perfect Dutch oven bread in a 2-quart dutch oven is all about balancing heat, steam, and timing—this recipe delivers a crusty exterior with an airy, pillowy crumb every time.
The secret lies in preheating the Dutch oven to create a steamy environment that mimics a professional bakery, while the high-heat bake ensures that signature crackly crust. After years of trial and error (and a few failed loaves), I’ve refined this method to guarantee consistent results, even for home bakers.
This recipe starts with a straightforward dough made from basic pantry staples—flour, yeast, salt, and water—but the magic happens in the Dutch oven. The high-heat preheating creates steam when you add the dough, which is essential for that professional bakery-style crust.
Once the bread bakes, the crust develops a deep golden color with a satisfying crunch, while the inside remains soft and open, with a texture that’s almost impossible to resist. The process is simple, but the technique is what makes all the difference.
By the time you pull that bread from the oven, you’ll have a loaf that looks and tastes like it came from a bakery—crispy on the outside, tender and airy inside, with that unmistakable aroma of freshly baked bread filling your kitchen.
The best part? This recipe uses just one 2-quart Dutch oven, so you don’t need specialized equipment or a massive batch. Whether you’re baking for a family dinner or just craving fresh bread, this method delivers restaurant-quality results with minimal effort.
The key to success is patience—letting the dough rise properly and preheating the Dutch oven thoroughly. Follow the steps carefully, and you’ll end up with a loaf that’s worth every minute of waiting.
Ready to bake? Let’s get started with the ingredients and instructions that will transform your kitchen into a bread bakery.
Ingredients for 2 qt dutch oven bread
Four cups flour, a pinch of yeast, and your Dutch oven—this is all you need for bakery-style bread.
| Ingredient | Amount | Notes |
|---|---|---|
| All-Purpose Flour 🌾 | 4 cups | Unbleached, high-protein preferred |
| Active Dry Yeast 🍞 | 2 ¼ tsp | Fresh yeast at 1 tsp |
| Granulated Sugar 🍚 | ½ tsp | Enhances yeast activation |
| Kosher Salt 🧂 | 1 ½ tsp | Diamond Crystal preferred |
| Water 💧 | 1 ½ cups | Warm, 110°F ideal |
| Extra-Virgin Olive Oil 🫒 | 1 ½ tbsp | For dough elasticity |
| Cornmeal 🌽 | ¼ cup | For dusting Dutch oven |
| Ice Water ❄️ | 1 tbsp | For shaping dough |
| Coarse Sea Salt 🧂 | ½ tsp | For final crust |
Flour is the backbone here. King Arthur or Gold Medal are my go-tos—they’ve got that perfect balance of protein for structure without overpowering the dough. Yeast can be tricky: if it’s old, it’ll smell yeasty and take forever to activate. Bob’s Red Mill sells it in small amounts, which is perfect for this recipe. The water needs to be warm but not hot—think lukewarm bathwater. Too hot and you’ll kill the yeast; too cold and it won’t activate. I always double-check with my finger—should feel like a warm bath, not a sauna. The olive oil? Use something fruity and robust—California Olive Ranch is my secret weapon for that extra depth of flavor.
No yeast? Sourdough starter at 1/4 cup works, but you’ll need to adjust the rise time. Running low on flour? Whole wheat at half the amount adds texture but can make the crust denser. The cornmeal is non-negotiable for that perfect crust—it creates a barrier between the dough and the Dutch oven, preventing sticking. No cornmeal? Semolina or all-purpose flour in a pinch, but cornmeal is the gold standard. And that ice water? It’s not just for shaping—it helps tighten the gluten for that signature crackly crust. Skip it, and you’ll end up with a loaf that’s more rustic than bakery-style.
This dough is a beast when it comes to storage. 48 hours in the fridge actually improves flavor—just let it sit at room temp for 1 hour before baking. Freezing? Shape the loaf, wrap tightly in plastic, and it’ll keep for 3 months. The key is to thaw it overnight in the fridge before baking. And that crust? It’s best eaten fresh, but if you’ve got leftovers, toast it within 2 days—the texture goes from perfect to sad fast. I always bake two loaves—one for dinner, one for breakfast the next morning.
Why You’ll Love This Recipe
- No-Fuss Mixing: I swear by this dough—just flour, yeast, sugar, and water. No butter, no eggs, no fussing with measurements beyond a 2:1:1 ratio. Honestly, my hands are often floury by the time I knead it, but that’s the only mess I make.
- Crust That Cracks: That golden, shatteringly crisp crust? It’s all thanks to the dutch oven’s steam trap. The inside stays soft and pillowy, but the outside? It’s like biting into a fresh-baked treasure every time. (Yes, even on a Tuesday night.)
- Weeknight To Crowd-Pleaser: Make a double batch, freeze half, and you’ve got a backup for sandwiches or toast. My kids grab it straight from the fridge for lunch—no reheating needed. It’s my secret weapon for lazy mornings and unexpected company.
- Pantry Staples Only: Four ingredients, zero specialty items. The yeast might be the priciest part, but a packet lasts forever. Between us, this is the kind of recipe that makes me feel like I’ve earned my “homemaker” badge without breaking the bank.
Step-by-step instructions for Dutch oven bread
Here’s how to transform simple ingredients into a loaf with a crackly crust and tender crumb.
Activate the Yeast for Maximum Rise
In a small bowl, combine the 1.5 cups warm water (around 110°F), 0.5 tsp granulated sugar, and 2.25 tsp active dry yeast. Let it sit for 5-10 minutes until frothy—this confirms the yeast is alive and ready to work. You should see bubbles forming and a light foam on top.
If the mixture doesn’t bubble after 10 minutes, your yeast might be dead. Start fresh with new yeast—this is the foundation of your bread’s rise. Once active, proceed immediately to avoid overproofing.
Mix and Knead the Dough
In a large bowl, whisk together the 4 cups all-purpose flour and 1.5 tsp kosher salt. Create a well in the center and pour in the yeast mixture along with the 1.5 tbsp extra-virgin olive oil. Using a wooden spoon, stir until a shaggy dough forms.
Turn the dough onto a lightly floured surface and knead for 8-10 minutes until smooth and elastic. You’ll know it’s ready when it springs back slowly when poked. If the dough feels sticky, add flour 1 tablespoon at a time—but don’t overdo it, or your bread will be dense.
First Rise and Shape the Dough
Lightly oil a large bowl, place the dough inside, and cover with a damp towel. Let it rise in a warm spot for 1-2 hours or until doubled in size. A good test is to gently press two fingers into the dough—if the indentation stays, it’s ready.
Punch down the dough to release air, then shape it into a round loaf. For extra flavor, I like to tuck the edges under as I shape it. Place the dough seam-side down in a bowl and cover again. Let it rise for another 30 minutes while you preheat your oven.
Prepare the Dutch Oven for Baking
Place a 2-quart Dutch oven (with lid) in the oven and preheat to 475°F for 30 minutes. While it heats, sprinkle 0.25 cup cornmeal evenly on the bottom of the Dutch oven—this prevents sticking and adds texture.
After preheating, carefully remove the hot Dutch oven using oven mitts. Lift the dough into the prepared Dutch oven, then sprinkle 0.5 tsp coarse sea salt evenly over the top. Cover immediately with the lid to trap steam.
Bake to Golden Perfection
Return the Dutch oven to the oven and bake for 30 minutes covered. Then remove the lid and bake for another 10-15 minutes until the bread is deep golden brown and sounds hollow when tapped on the bottom.
Let the bread cool on a wire rack for at least 20 minutes before slicing—this allows the crumb to set properly. The crust should be crispy enough to shatter, while the interior remains soft and airy. Slice thickly for the best texture, and enjoy with butter or your favorite jam.
Pro Tips For Making 2 Qt Dutch Oven Bread
- Preheat That Pot: DESCRIPTION: Crank your oven to 475°F and let the Dutch oven sit inside for at least 30 minutes—no exceptions. I used to skip this and wondered why my bread never got that deep, crackly crust. The residual heat is what creates that oven-spring magic.
- Dissolve the Yeast First: DESCRIPTION: Mix the yeast with warm water (110°F) and a pinch of sugar before adding flour—let it foam for 5 minutes. I learned this the hard way after making dough that took forever to rise. No bubbles? Your yeast might be dead, and that’s a whole new problem.
- Don’t Overmix the Dough: DESCRIPTION: Stop stirring once the flour is just incorporated—you’re aiming for shaggy, not smooth. Overworking it develops gluten too early, and your bread turns out dense instead of airy. I know, I know, it’s tempting to get it “perfect,” but resist.
- Steam the Lid: DESCRIPTION: Pour a tablespoon of water into the bottom of the Dutch oven before adding the dough, then place the lid on. When you bake, the steam creates a better oven spring and that golden crust. Sounds weird, but it works—my bread now rises higher and looks pro-baked.
Pro cooking tips for 2 qt dutch oven bread
Dutch Oven Preheat Hack
Preheating your 2-quart Dutch oven for 30 minutes at 475°F is non-negotiable—this creates the steam environment that gives your bread that bakery-style crust. I place the oven on the middle rack to ensure even heat distribution.
If your Dutch oven has a dark-colored exterior, it heats faster, so check it at 25 minutes to avoid overcooking. Pro tip: Use Le Creuset or Lodge Dutch ovens—they retain heat like champs. 🔥
Yeast Activation Test
Your yeast is the bread’s lifeblood, so don’t skip the 5-10 minute activation test. If it doesn’t bubble, your bread will be flat and sad. I always test the water temperature with my finger—it should feel like a warm bath (110°F).
Too hot? Let it cool. Too cold? Warm it up. Fresh yeast from Bob’s Red Mill works best, but if you’re using old yeast, 2.5 tsp might be needed for this recipe.
Dough Kneading Trick
Kneading by hand gives you better control than a mixer. Work the dough for 8-10 minutes until it’s smooth and springs back when poked. If it sticks to your hands, add flour 1 tbsp at a time—but don’t overdo it, or your bread will be dense.
I like to use a light dusting of flour on my hands and surface to keep things clean. The goal is elasticity, not a flour explosion.
Steam Trap Technique
The lid stays on for the first 30 minutes of baking to trap steam—this is what creates that crackly crust. After removing the lid, you’ll see the bread rise dramatically as the steam escapes.
If your bread isn’t browning enough after 10-15 minutes uncovered, try increasing the oven temp to 500°F for the final 5 minutes. A spray bottle with water can also help generate extra steam if needed.
Crust Finishing Touch
That coarse sea salt sprinkle before baking isn’t just for flavor—it also helps create a crispier crust. For extra crunch, I like to use Maldon flaky salt and sprinkle it right after removing the lid during baking.
Let the bread cool for 20 minutes before slicing—this prevents a gummy interior. The longer it cools, the better the texture becomes. Trust me, patience pays off here. ✨
Dutch Oven Cleanup
Cornmeal isn’t just for texture—it makes cleanup a breeze. After baking, let the bread cool completely, then scrape out the cornmeal residue with a spatula or wooden spoon. A damp paper towel helps remove any stubborn bits.
I always store my Dutch oven empty and dry to prevent rust—just a quick wipe-down after each use keeps it ready for the next batch. No soaking required! 💪
Nutrition facts
Frequently asked questions
Why does my Dutch oven bread turn out dense instead of airy?
Underproofing or overproofing are the most common culprits. The dough should double in size during the 1-2 hour rise—if it doesn’t, your yeast may be dead or the environment too cold. For a 2-quart Dutch oven, use a warm spot (like a turned-off oven with a bowl of hot water) and check water temperature (110°F). Overproofing happens if you leave it too long—punch it down and reshape if it’s ready early.
Can I use a different size Dutch oven for this recipe?
A 2-quart Dutch oven is ideal, but a 3-4 quart will work too—just reduce the recipe by 25% to avoid overfilling. The key is leaving 1 inch of space between the dough and the rim. A 1.5 quart is too small and may not generate enough steam for that signature crust. If using a larger pot, check doneness 5 minutes early as it may bake faster.
How do I fix a bread that’s too pale after baking?
Pale bread usually means insufficient heat or steam. For next time, try these fixes: Increase oven temp to 500°F for the final 5 minutes uncovered, or add 1 tbsp ice water to the dough for better gluten development. If baking now, tent foil over the bread and return to oven for 5-10 minutes. For immediate results, broil for 1-2 minutes—watch closely to avoid burning!
What’s the best way to store leftover Dutch oven bread?
Wrap cooled bread tightly in plastic wrap or a bread bag, then store at room temperature for 2-3 days. For longer storage, freeze sliced bread in a sealed bag for up to 3 months. To revive, warm slices in a 350°F oven for 5-10 minutes or toast directly. Never refrigerate—this makes bread stale faster. The crust stays crispy best when stored properly!
Can I add herbs or cheese to this recipe?
For herbs, try 1 tbsp fresh rosemary or thyme mixed into the dough. For cheese, ½ cup shredded Gruyère or Parmesan works beautifully—sprinkle it on top before baking. Just reduce flour by 1 tbsp to maintain dough consistency. Avoid wet ingredients like garlic or tomato paste, as they can make the dough too sticky. The Dutch oven’s steam will help these flavors meld perfectly.

- 3 Lb Meatloaf Recipe with Bread Crumbs All: Glazed Crust and Juicy Heart - October 20, 2026
- 32 Ounce Cranberry Sauce Recipe: Homemade Holiday Glaze With No Pits - October 20, 2026
- 2lb Loaf Tin Bread Recipe: No-Knead Artisan Crust in 3 Hours - October 20, 2026