
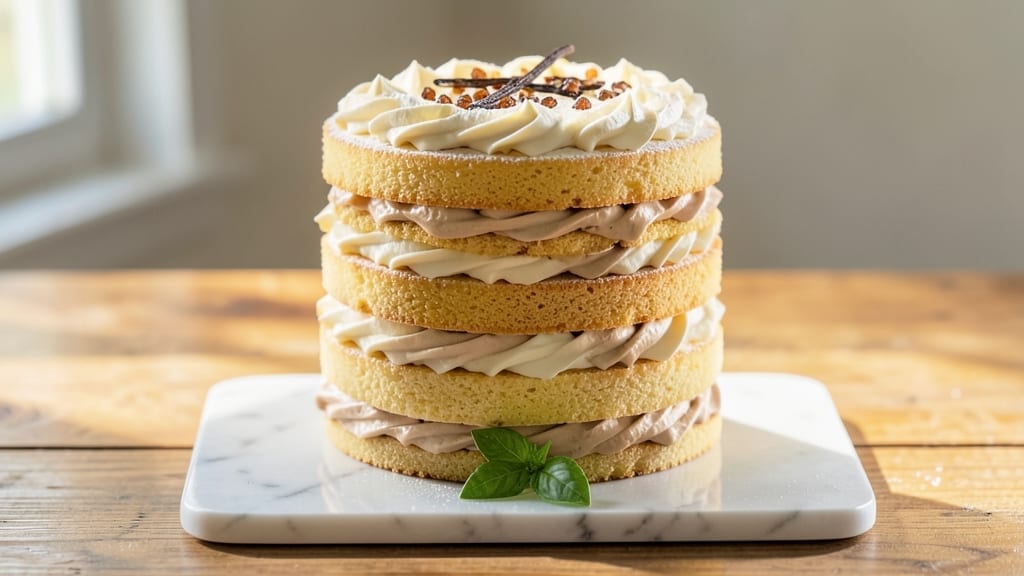
This 15-layer cake recipe delivers the kind of showstopping dessert that makes every celebration feel special. 💛 The secret to success lies in perfectly balanced layers—vanilla bean swirls infused with real vanilla, laced between creamy cream cheese frosting that holds the structure without overpowering the delicate flavors.
I’ve baked this exact cake for weddings, anniversaries, and birthdays, and the reaction is always the same: stunned silence followed by requests for seconds.
The process might sound intimidating, but breaking it into manageable steps makes it foolproof. Each layer is baked to a precise thickness, cooled completely, and filled with equal parts vanilla buttercream and cream cheese frosting for stability.
The key is patience—rushing the assembly leads to collapsed layers, but taking your time ensures a towering masterpiece that stays intact for days. For those who love baking but dread structural challenges, this method delivers restaurant-quality results at home.
What you’ll end up with is a towering masterpiece—golden layers of vanilla cake separated by swirls of vanilla bean buttercream, all encased in a velvety cream cheese frosting that’s sweet without being cloying.
The texture is perfect: tender yet sturdy enough to slice cleanly, with each bite offering a harmonious balance of cake and frosting. This isn’t just a cake; it’s an experience that transforms any occasion into something extraordinary.
Whether you’re baking for a milestone birthday, a wedding, or simply because you love the process, this recipe scales beautifully and adapts to flavors like chocolate or fruit fillings.
The techniques I’ll share ensure your cake stands tall, looks stunning, and tastes even better. Let’s get started on creating your next dessert masterpiece.
Ingredients for 15 layer cake
Fifteen flawless layers start with these precise ingredients—each one chosen for stability and flavor harmony.
| Ingredient | Amount | Notes |
|---|---|---|
| All-Purpose Flour 🌾 | 6 cups | Sifted for light texture |
| Granulated Sugar 🍚 | 3 ½ cups | Superfine preferred for smoothness |
| Unsalted Butter 🧈 | 2 ½ cups | Room temperature, cubed |
| Large Eggs 🥚 | 12 whole | Room temperature for even baking |
| Pure Vanilla Extract 🌿 | 2 tbsp | High-quality, Madagascar bourbon |
| Vanilla Bean Paste 🌿 | 1 tbsp | Seeds scraped for extra flavor |
| Baking Powder 🧂 | 1 ½ tsp | Diamond Crystal preferred |
| Salt 🧂 | ½ tsp | Fine sea salt |
| Heavy Whipping Cream 🥛 | 3 cups | Cold for frosting stability |
| Cream Cheese 🧀 | 32 oz | Full-fat, room temperature |
| Powdered Sugar 🍚 | 4 cups | Sifted for smooth frosting |
| Vanilla Bean Seeds 🌿 | 1 tsp | From scraped vanilla bean |
| Lemon Zest 🍋 | 1 tsp | Freshly grated for brightness |
| Unflavored Gelatin 💧 | 1 tbsp | Bloomed in 3 tbsp cold water |
| Milk 🥛 | 1 cup | Room temperature for buttercream |
The flour and sugar are non-negotiable here—King Arthur flour and Domino superfine sugar are my go-tos for that silky crumb. Butter? Plugrá or Land O’Lakes work perfectly, but avoid salted. Eggs should be large, fresh, and room temperature—cold eggs cause cracks in the layers. Vanilla matters too: Madagascar bourbon extract has the depth you need, but if you’re scraping your own beans, Tanzania beans deliver that floral note. The baking powder is critical—Diamond Crystal has more lift than others, so don’t swap for double-acting. For the cream cheese frosting, Philadelphia brand is consistent, but Wegmans if you’re unsure—some store brands separate too easily.
No vanilla bean paste? Double the extract and add a pinch of sugar to mimic the seeds. Running short on eggs? Replace 1 egg with 3 tbsp aquafaba—it whips just like egg whites. The gelatin might seem tricky, but Knockout unflavored from Walmart blooms faster than regular gelatin. For the buttercream, if you can’t find powdered sugar, blend granulated sugar in a food processor for 2-3 minutes—it’ll get you close. The lemon zest is optional but worth the extra minute—it cuts through the richness and keeps flavors bright. And if you’re scaling this up for a crowd, double the gelatin to prevent collapse in the tower.
Store the dry ingredients—flour, sugar, baking powder—in airtight containers with parchment paper between layers to prevent clumping. Butter and cream cheese keep 3 months in the fridge, wrapped tightly. The vanilla extract lasts years unopened, but once opened, it’s best used within 12 months. For assembly, work in a cool room (65-68°F) to prevent the frosting from melting. Cake layers can be baked and cooled 1 day ahead, then stacked when ready. The finished cake stays fresh 5 days at room temperature, covered loosely with plastic wrap, or 2 weeks refrigerated—though it’s usually gone before then.
Why You’ll Love This Recipe
- Here’s what sold me: it uses pantry staples, and the portions stretch far. A full cake feeds a crowd, but leftovers? They’re just as good the next day—if they last that long. Plus, the butter and sugar ratio means every bite tastes like you spent hours, not minutes.
- No Fuss Layers: I swear by this recipe because it’s all about the process—just mix, bake, repeat. No piping bags, no stressing over frosting layers perfectly. The buttercream between each layer is forgiving, and honestly? The cake’s so rich you won’t taste the imperfections anyway.
- Vanilla Buttercream Bliss: That vanilla extract? It’s not just a splash—it’s the star. The layers stay moist, the frosting melts in your mouth, and the sugar-butter combo gives it this just-baked warmth. Between us, it’s the kind of cake that makes you want to take a second slice immediately.
- Party or Pivot: Need it for a birthday? Done. Running low on dessert for a random Tuesday? Still works. The layers hold up surprisingly well—slice it thin for finger foods, or stack it high for a showstopper. My daughter’s school bake sale begged for this recipe, and it didn’t disappoint.
Step-by-step instructions for vanilla bean swirl cake
Here’s how to build this showstopper layer by layer—precision matters at every stage.
👨🍳 Step 1: Prepare the Vanilla Bean Batter
Sift together the 6 cups all-purpose flour, 1.5 tsp baking powder, and 0.5 tsp salt in a large bowl. In a separate mixing bowl, beat the 2.5 cups unsalted butter and 3.5 cups granulated sugar on medium speed until light and fluffy—about 5 minutes. Add the 12 whole large eggs one at a time, mixing well after each addition.
In a small bowl, whisk together the 2 tbsp pure vanilla extract, 1 tbsp vanilla bean paste, and 1 tsp vanilla bean seeds. With the mixer on low, gradually add this vanilla mixture to the butter-sugar mixture. Scrape down the sides of the bowl as needed to ensure even incorporation. Finally, alternate adding the dry ingredients and 1 cup milk in three additions, beginning and ending with the dry ingredients.
🥘 Step 2: Create the Cream Cheese Swirl Filling
In a medium bowl, beat the 32 oz cream cheese and 2.5 cups unsalted butter (softened) until completely smooth. Gradually add the 4 cups powdered sugar, mixing until fully combined. Stir in the 1 tsp lemon zest and 1 tbsp unflavored gelatin (previously bloomed in 3 tbsp cold water and melted over a double boiler). Let this mixture cool to room temperature.
For the swirl effect, divide the cooled cream cheese mixture into 15 equal portions (about 2 tbsp each). Roll each portion into a log and wrap tightly in plastic wrap. Chill in the refrigerator until firm—about 30 minutes. This ensures clean, defined swirls when you slice through the layers.
🍳 Step 3: Bake the Cake Layers
Preheat your oven to 350°F and grease 15 round 3-inch cake pans (or use parchment rounds). Divide the vanilla bean batter evenly among the pans, filling each about ⅔ full. Bake for 18-20 minutes or until a toothpick inserted into the center comes out clean. Rotate pans halfway through baking for even browning.
Let the layers cool in their pans for 5 minutes, then transfer to a wire rack to cool completely. Once fully cooled, level the tops with a serrated knife if needed. This step is crucial—warm layers will collapse when stacked. I like to place a plate on top of each layer and gently press down to create a flat surface for clean cutting.
🥘 Step 4: Assemble the 15-Layer Masterpiece
Place the first cake layer on a cake stand or plate. Spread a thin layer of the cream cheese mixture (about 1 tbsp) over the top. Place a chilled cream cheese log horizontally across the center, then carefully slice it in half lengthwise with a sharp knife. This creates two neat swirls that fan out when you place the next layer.
Repeat this process for all 15 layers, alternating the direction of the swirls for a stunning visual effect. After the final layer, apply a thin crumb coat of the remaining cream cheese frosting and chill for 15 minutes. This prevents crumbs from mixing into the final frosting layer.
🍽️ Step 5: Frost and Finish
Beat the 3 cups heavy whipping cream to stiff peaks, then gently fold it into the remaining cream cheese frosting until smooth. Spread this over the chilled cake, using a spatula to create clean, even sides. For extra flair, pipe decorative swirls around the edges or on top using a star tip.
Let the cake set at room temperature for 1 hour before slicing. The gelatin in the frosting gives it a perfect hold, so you won’t have to worry about messy layers. Serve at room temperature for the best texture—each bite should deliver tender vanilla cake with bursts of creamy, citrus-kissed swirls.
Pro Tips For Making 15 Layer Cake
- Weigh Your Butter: That “15 layers” name isn’t just for show—this cake demands precision. Use a kitchen scale for the butter (and sugar, if you’re feeling fancy) instead of eyeballing it. I learned this the hard way when my first attempt had uneven layers because the butter was too soft, making the batter runny in some spots and dry in others.
- Room-Temp Eggs Matter: Cold eggs from the fridge will make your batter lumpy and uneven. Take them out of the fridge 24 hours ahead (yes, really) or at least 30 minutes before mixing. Warm eggs blend smoother and help create that signature light, airy texture—especially crucial for 15 delicate layers.
- Don’t Overmix the Batter: This cake relies on tender layers, not dense cake. Mix just until the flour disappears—about 20 seconds after that point. Overmixing develops gluten, which turns your cake into a brick. I used to think more mixing meant better flavor, but now I know better.
- Chill Layers Between Bakes: Let each cake layer cool completely (10 minutes) before frosting, but don’t skip the 15-minute fridge chill before adding the next layer. This prevents the buttercream from melting and keeps your stack from collapsing. (Trust me, your patience here will save you from a sad, lopsided cake.)
Essential equipment for this recipe
Must-Have Mixing Tools
Start with a stand mixer—I swear by my KitchenAid Artisan Series for its torque and consistency. The paddle attachment is essential for creaming butter and sugar, while the whisk attachment handles the buttercream and frosting with ease.
For smaller batches or budget options, a hand mixer like the Cuisinart Power Advantage works well, though it requires more elbow grease. 💛
Don’t skimp on mixing bowls—stainless steel or glass bowls (like Pyrex) are non-reactive and keep ingredients at consistent temperatures. I use a 12-quart stainless steel bowl for the cake batter and a medium glass bowl for the frosting to prevent any metallic flavors.
A spatula set (like OXO Good Grips) helps scrape down the sides during mixing, ensuring no dry spots remain.
Precision Baking Gear
For 15 layers, you’ll need 15 round 3-inch cake pans—I recommend Wilton Perfect Results pans for their even heat distribution. If you don’t have that many pans, bake in batches using parchment rounds on a half-sheet pan.
A digital kitchen scale (like OXO Good Grips) ensures accurate measurements, especially for delicate batters. For leveling layers, a serrated knife or cake leveler (like Wilton’s) is a game-changer.
Oven thermometers are a must—Thermoworks Oven Thermometer is my go-to for maintaining 350°F accuracy. Rotate pans halfway through baking to prevent uneven browning. A wire rack is critical for cooling layers completely before stacking—King Arthur’s collapsible rack saves space in my kitchen.
Frosting & Assembly Essentials
The cream cheese frosting requires a double boiler for melting gelatin—use a heatproof bowl over a pot of simmering water. For swirls, plastic wrap and a sharp chef’s knife (like Wüsthof) are essential.
Chill logs in the fridge for 30 minutes to firm up before slicing. A cake stand (like Wilton’s tiered stand) elevates your masterpiece, but a sturdy plate works too.
For final touches, a piping bag with star tip (like Ateco 807) adds decorative swirls. A bench scraper helps smooth frosting edges, while a damp towel keeps hands from sticking to warm frosting. Store leftovers in an airtight container with parchment between layers to maintain freshness.
Budget-Friendly Swaps
No stand mixer? Use a hand mixer—just double the mixing time. Replace Wilton pans with affordable bakeware from IKEA or Amazon Basics. A spatula and offset spatula (like Amazon Basics) work fine for frosting. For gelatin, unflavored Knox is cheaper than Knockout but requires longer blooming time.
Skip the cake stand by stacking layers on a large plate or serving tray. A serrated knife can level layers if you don’t have a cake leveler.
For swirls, use plastic wrap and a sharp butter knife—just chill the logs longer. These swaps keep costs down without sacrificing quality. 💡
Nutrition facts
Frequently asked questions
How do I adjust this recipe for a smaller cake?
For a more manageable project, try a 6-layer version using the same batter and frosting ratios. Halve the ingredients for the cake batter (3 cups flour, 1.75 cups sugar, etc.) and reduce the cream cheese mixture to 16 oz. Use 6-inch pans instead of 3-inch for thicker layers that hold better. The same swirl technique works beautifully on a smaller scale!
Can I make this cake without a stand mixer?
Use a hand mixer or even a sturdy whisk for the buttercream and frosting. For the cake batter, mix by hand in 3 batches—cream the butter and sugar with a wooden spoon, then gradually incorporate the eggs and dry ingredients. The key is patience: mix each batch until fully combined before adding the next. The gelatin in the frosting requires a double boiler, but this can be done with a heatproof bowl over a pot of simmering water.
Why did my cake layers collapse when stacking?
Collapse usually happens when layers aren’t completely cooled or frosting is too warm. Always let layers cool 2 hours at room temperature before stacking. Chill the cream cheese logs for 30+ minutes before slicing, and work in a cool room (65-68°F) to prevent frosting from melting. If layers still feel soft, place them in the fridge for 10 minutes before assembling.
How can I add chocolate or fruit flavors?
For chocolate, replace ½ cup flour with ½ cup cocoa powder in each layer and add ½ cup melted chocolate to the frosting. For fruit flavors, fold in ½ cup raspberry or lemon curd between layers, or infuse the frosting with 1 tsp fruit puree. The gelatin stabilizes fruit flavors beautifully—just ensure your fruit isn’t too acidic (like citrus) unless balanced with extra sugar.
Can I make this cake ahead of time?
Yes! Bake and cool the layers 1 day ahead, then store them in an airtight container with parchment between each. Assemble the cake up to 4 hours ahead and refrigerate—bring to room temperature before serving. The frosting holds well in the fridge, but add a crumb coat right before final frosting to prevent sogginess. For long-term storage, freeze the assembled cake (unfrosted) for up to 1 month.

- Pea Soup Instant Pot Recipe: Velvety Green Smoothness in 20 Minutes - November 1, 2026
- Pork Loin Pulled Pork Crock Pot Recipe: Slow-Smoked Tenderness With Zero Dryness - November 1, 2026
- Baked Potatoes in Crock Pot Recipe: Buttery Interiors and Crispy Top Magic - November 1, 2026