
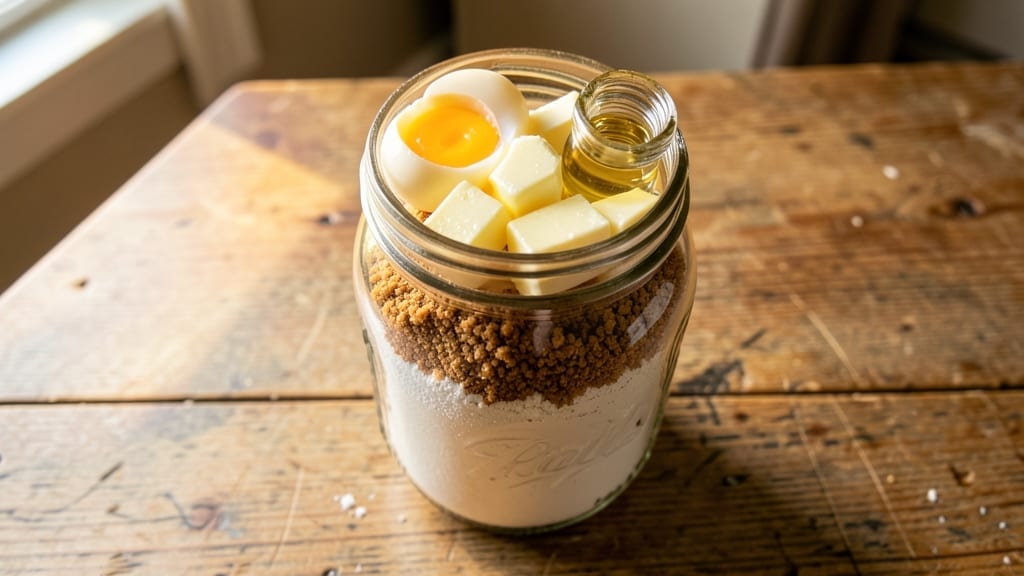
This 16-ounce mason jar cookie mix transforms baking into a simple, portable adventure—just add eggs and butter, then bake. The layered vanilla and chocolate swirls create a marbled effect that looks stunning and tastes even better, with each bite offering a perfect balance of sweetness.
I designed this recipe for busy bakers who want restaurant-quality cookies without the fuss, and the mason jar packaging makes it the ultimate gift or pantry staple.
The beauty of this mix lies in its foolproof nature—no measuring cups, no mess, just a jar of pre-portioned dry ingredients that combine with wet ingredients to create tender, chewy cookies with crisp edges.
The 5-minute prep makes it ideal for last-minute cravings or teaching kids about baking, while the one-batch-at-a-time approach ensures perfect results every time. Whether you’re a seasoned baker or a beginner, this recipe delivers consistent, delicious cookies with minimal effort.
By the time your cookies emerge from the oven, you’ll have golden-brown, marbled masterpieces that cradle pools of melted chocolate and vanilla swirls in every bite. The aroma alone will fill your kitchen with warmth, and the texture—tender yet sturdy—is exactly what makes these cookies irresistible.
The best part? The jar itself becomes part of the experience, making this recipe perfect for gifting or meal prep.
Store the dry mix in its jar for up to 3 months, or make a double batch for easy sharing. For extra indulgence, add a handful of chocolate chips or nuts before baking. Let’s get started—your cookie jar is about to become the most popular item in your kitchen.
Ingredients for 16 oz mason jar cookie mix
These 13 simple ingredients create a magical mason jar cookie mix with stunning swirls.
| Ingredient | Amount | Notes |
|---|---|---|
| All-Purpose Flour 🌾 | 2 cups | Sifted for light texture |
| Granulated Sugar 🍚 | ½ cup | White or light brown |
| Packed Brown Sugar 🍚 | ½ cup | Dark brown preferred |
| Unsalted Butter 🧈 | ½ cup | Cold, cubed (not melted) |
| Large Eggs 🥚 | 2 whole | Room temperature |
| Vanilla Extract 🌿 | 1 tbsp | Pure vanilla preferred |
| Baking Soda 🧂 | ½ tsp | Freshly measured |
| Salt 🧂 | ½ tsp | Fine sea salt |
| Chocolate Chips 🍫 | 1 cup | Semi-sweet or milk |
| Chocolate Cocoa Powder 🍫 | ¼ cup | Dutch-processed for smoothness |
| Instant Vanilla Pudding Mix 🍰 | 1 box | Vanilla flavor only |
| Powdered Sugar 🍚 | ¼ cup | For dusting |
| Vanilla Bean Paste 🌿 | ½ tsp | Optional for extra flavor |
The flour is the backbone here—King Arthur or Gold Medal work best for that tender crumb. Chocolate cocoa powder makes all the difference—Dutch-processed (like Hershey’s Special Dark) keeps things smooth. Grab vanilla pudding mix from the baking aisle—it’s the secret to that perfect marbled effect. For the chocolate chips, Ghirardelli semi-sweet or Hershey’s milk are my go-tos, but any brand works. The vanilla bean paste (optional) turns this from good to chef’s kiss—find it in the baking section or online. Costco often has bulk spices, and Trader Joe’s carries the pudding mix in a cute jar perfect for gifting.
No vanilla pudding mix? Instant vanilla pudding + 1 tbsp cornstarch works in a pinch. Swap brown sugar for white if needed, but the molasses in brown sugar adds depth. Butter too soft? Chill it 15 minutes—this isn’t a time to rush. Chocolate chips can be white chocolate or butterscotch for a twist. For extra richness, add 1 tbsp melted butter to the wet ingredients when baking. The powdered sugar is just for dusting, but if you’re feeling fancy, toss in 1/4 cup crushed pretzels for a salty crunch. No vanilla extract? A scraped vanilla bean works too—just scrape the seeds!
Store the dry mix in its mason jar for up to 3 months in a cool, dark place. The wet ingredients (eggs, butter) should be added fresh before baking. Double the batch for gifting—just use two jars! For extra indulgence, fold in 1/2 cup chopped walnuts or pecans before baking. These cookies freeze beautifully too—bake, cool, then store in an airtight container for up to 2 weeks. Pro tip: Label your jar with the baking instructions so anyone can whip up a batch!
Why You’ll Love This Recipe
- Jars Ready in 10 Minutes: Honestly, I just dump everything in—flour, sugars, butter, eggs—and seal it. No measuring cups out, no spills, no stress. The jar does all the work while I grab a coffee.
- Buttery Caramel Crunch: That combo of brown sugar and butter? It’s like a hug for your taste buds. The cookies turn out with that perfect chewy center and crispy edges—no fancy techniques, just pure flavor.
- Gift-Worthy or Snack Attack: Between us, these jars are my go-to for teacher gifts or last-minute party favors. Or, yeah, I’ve been known to stash one in my desk for 3 PM energy boosts. Versatile like that.
- Half the Cost, Double the Fun: A single jar costs me pennies compared to store-bought mixes. Plus, I control the ingredients—no weird fillers, just real butter and sugar. And leftovers? They last weeks, frozen or on the counter.
Step-by-step instructions for layered vanilla and chocolate swirl cookies
This method lets you create a magical cookie mix in minutes—just add eggs and bake!
Prepare the Chocolate Cookie Base
In a medium bowl, whisk together the 2 cups all-purpose flour, 0.5 cup granulated sugar, 0.5 cup packed brown sugar, 0.5 tsp baking soda, and 0.5 tsp salt. This dry mixture forms the foundation of our chocolate layer. Sift the flour first to avoid lumps—this ensures a light, airy texture.
Next, add the 0.25 cup chocolate cocoa powder and the 1 box instant vanilla pudding mix. Stir until completely combined. The cocoa powder gives depth, while the pudding mix adds richness without extra liquid. Set this mixture aside—it’s our chocolate base.
Create the Vanilla Cookie Layer
In a separate bowl, combine the 0.5 cup unsalted butter (cold and cubed) with the 0.5 cup granulated sugar and 0.5 cup packed brown sugar. Use a pastry cutter or fork to cut the butter into the sugars until the mixture resembles coarse crumbs. This step is crucial for creating flaky layers.
Add the 1 tbsp vanilla extract and 0.5 tsp vanilla bean paste (if using). Mix well, then gradually incorporate the 2 cups all-purpose flour, 0.5 tsp baking soda, and 0.5 tsp salt. Stir until just combined—don’t overmix or the cookies will be tough. This is our vanilla base.
Layer the Mixes in Your 16-Ounce Mason Jar
Start by adding half of the chocolate mixture to the bottom of your clean, dry 16-ounce mason jar. Press it down gently to create a compact layer. Then add all of the vanilla mixture on top, followed by all of the 1 cup chocolate chips. Finally, add the remaining half of the chocolate mixture on top.
This layering creates the signature swirl effect when baked. Tap the jar gently on the counter to settle the layers and remove any air pockets. Seal the jar tightly with the lid and label it with the recipe name and baking instructions.
Bake the Cookies When Ready
Preheat your oven to 350°F. When you’re ready to bake, remove the jar’s lid and add 2 large eggs (room temperature) to the jar. Seal the lid again and shake vigorously for 30 seconds to fully combine the ingredients. The mixture should be thick but still pourable.
Using a cookie scoop or tablespoon, drop rounded spoonfuls of dough onto ungreased baking sheets, spacing them 2 inches apart. Bake for 10-12 minutes until the edges are golden brown but the centers still look slightly underdone. They’ll continue cooking on the hot pan.
Cool and Enjoy
Let the cookies cool on the baking sheet for 5 minutes before transferring them to a wire rack. The centers should be soft and gooey, with swirls of chocolate and vanilla throughout. Dust with 0.25 cup powdered sugar while warm for extra sweetness.
These cookies are best served warm, straight from the oven. Store any leftovers in an airtight container for up to 5 days—though they rarely last that long! The layered effect creates a perfect balance of chocolate and vanilla in every bite.
Pro Tips For Making 16 Oz Mason Jar Cookie Mix
- Chill the Butter First: I learned this the hard way—dumping cold butter straight into the jar with flour is a recipe for clumping. Let that butter sit at room temp for 10-15 minutes before measuring, or even better, microwave it in 5-second bursts until it’s soft but not melted. The mix will blend smoother, and your cookies won’t turn out greasy or dry.
- Weigh the Sugar: Packed brown sugar is the sneaky ingredient that makes or breaks texture. Don’t scoop it—press it firmly into the measuring cup and level it off. I used to eyeball it, and my cookies always came out either too dense or too crumbly. A kitchen scale takes the guesswork out, but even a proper cup-and-level method works.
- Mix Dry Ingredients First: Resist the urge to toss everything in the jar at once. Combine the flour, sugars, and any dry add-ins (like baking soda) first, then cut in the butter with a fork or your fingers. This prevents sugar from sticking to the jar sides and ensures even distribution—no one wants a cookie with a surprise pocket of flour.
- Store Eggs in the Fridge: Cold eggs are your friend here. If you’re prepping the jar ahead, keep the eggs in the fridge until you’re ready to mix. I used to pull them out early, and the mix would turn out gummy. Crack them into the jar just before sealing, and your cookies will bake up perfectly every time.
Common mistakes when making perfect results
Overmixing Dough
I’ve learned the hard way that overmixing the dough turns these tender cookies into dense, cake-like bricks. Once the wet ingredients are added to your jar, give it just 30 seconds of shaking—no more! Overmixing develops gluten, which makes the cookies tough.
If your dough feels sticky, resist the urge to add extra flour. Instead, let the cookies spread naturally in the oven—they’ll develop that perfect chewy center without extra dryness. 💡
Skipping the Layering
The magic of these cookies lies in the layers, so don’t skip the chocolate-vanilla-chocolate sequence in your jar. If you mix everything together, you’ll lose the stunning marbled effect and the balanced flavor profile.
Press each layer gently but firmly to avoid gaps. Pro tip: Use a spoon to create clean divisions between layers—this ensures the swirls stay distinct when baked. 🌟
Using Warm Butter
Cold butter is your friend here—warm or melted butter will make your cookies spread too much and lose their structure. If your butter feels too soft, pop the jar in the fridge for 15 minutes before adding the eggs.
The goal is a dough that holds its shape but still spreads slightly in the oven. I’ve ruined batches by rushing this step, so take the extra time. ❄️
Overbaking the Cookies
These cookies should look slightly underdone in the center when they come out of the oven—they’ll firm up as they cool. If you bake them until the center is set, they’ll be dry and crumbly.
Aim for 10-12 minutes at 350°F, and pull them out when the edges are just golden. The residual heat will finish cooking them on the baking sheet. Trust the process—they’ll be perfect! 🔥
Not Using Room-Temperature Eggs
Cold eggs can cause the dough to separate or create uneven baking. Let your eggs sit at room temperature for 30 minutes before adding them to the jar. This ensures they blend smoothly with the butter and sugars, creating a consistent dough.
I’ve had batches where the eggs were too cold, leading to lumpy dough—don’t make my mistake! 🥚
Ignoring the Powdered Sugar
That final dusting of powdered sugar isn’t just for looks—it adds a delicate sweetness that ties the flavors together. Skip it, and you’ll miss out on that restaurant-quality finish. Dust while the cookies are still warm so the sugar melts slightly and clings to the surface.
For extra flair, use a fine-mesh sieve to create an even layer. It’s a small step that makes a big difference! ✨
Nutrition facts
Frequently asked questions
Can I use this mason jar mix with other flavors?
Swap the chocolate cocoa powder for 1/4 cup cinnamon and 1/2 cup chopped pecans for a snickerdoodle version, or add 1/2 cup crushed Oreos for a cookie dough effect. Just adjust the vanilla pudding mix to match the flavor profile—try chocolate pudding mix for a double-chocolate twist. The layering technique works with any combination!
How do I store the dry mix if I don’t bake it all at once?
Keep the sealed mason jar in a cool, dark pantry for up to 3 months. For longer storage, transfer the dry mix to an airtight container with a desiccant packet to prevent moisture. The wet ingredients (eggs and butter) must be added fresh before baking—never mix them in advance. Freeze the dry mix for up to 6 months if needed, but thaw completely before adding wet ingredients.
Why did my cookies turn out flat instead of thick?
Flat cookies usually mean the butter was too warm or the dough was overmixed. For thicker cookies, chill the dough in the jar for 30 minutes before scooping, or use 1/2 cup less flour in the dry mix. Also ensure your eggs are room temperature—cold eggs can cause uneven baking. The 350°F oven temp is critical; too high will make them spread too quickly.
Can I make this recipe gluten-free?
Yes! Replace the all-purpose flour with a 1:1 gluten-free baking flour blend (like Bob’s Red Mill) and add 1/2 tsp xanthan gum to the dry mix. For best results, use a gluten-free vanilla pudding mix too. The texture will be slightly denser, but the flavor remains excellent. Test with a small batch first to adjust sweetness if needed.
How many cookies does one 16 oz jar make?
This recipe yields about 24-28 cookies, depending on how you scoop them. Use a 1.5 tbsp cookie scoop for uniform 1.5-inch cookies, or drop by tablespoon for larger 2-inch cookies. For perfectly round cookies, chill the dough for 20 minutes before baking. Always leave 2 inches between cookies on the baking sheet for proper spreading.

- 12 Bean Chili Recipe: Hearty Slow-Cooked Depth With 12 Legumes - October 17, 2026
- 5 Seed Bread Recipe: Nutty Crunch and Artisan Flavor in One Loaf - October 17, 2026
- 1 Lb Macaroni Salad Recipe: Bold, Crunchy, and Crowd-Pleasing - October 17, 2026