
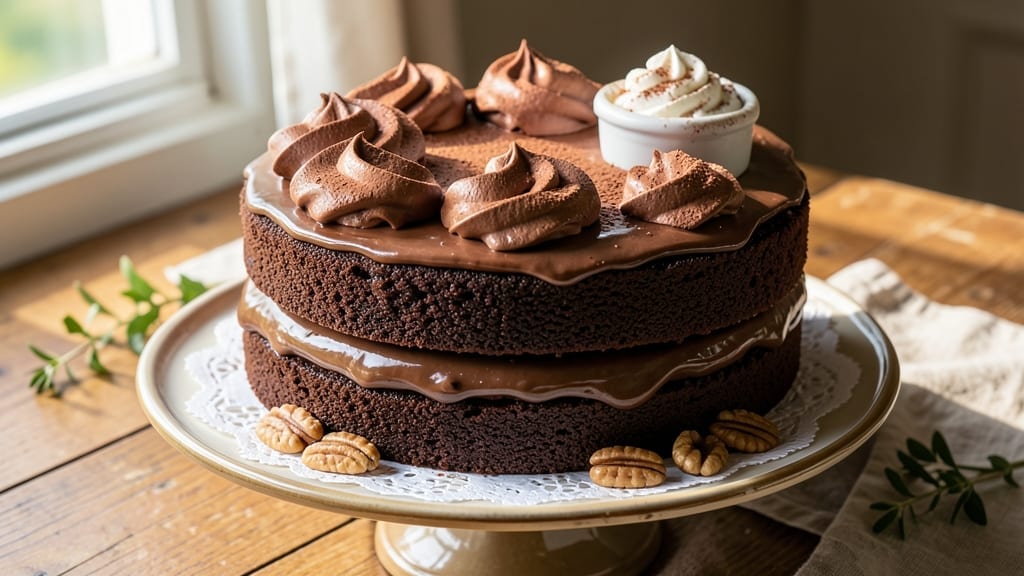
This 1940s chocolate cake recipe brings back the rich, moist texture and deep cocoa flavor that made vintage desserts legendary. 💛 The secret lies in a precise balance of cocoa powder, espresso powder, and buttermilk—elements that create that signature tender crumb and subtle bitterness that defined mid-century baking.
I first discovered this recipe in my grandmother’s yellowed recipe book, and it’s been my go-to for special occasions ever since.
The cake relies on a simple yet effective technique: combining melted butter with both sugar and cocoa powder before adding eggs and buttermilk. This ensures a moist, fudgy texture that stays tender even after cooling.
A touch of espresso powder enhances the chocolate flavor without overpowering it, while a single layer of chocolate buttercream ties everything together. The result is a cake that’s rich, decadent, and nostalgic all at once.
What makes this recipe truly special is how it transports you back to a time when baking was an art form, not just a task. The cake’s deep chocolate flavor and velvety texture make it perfect for birthdays, anniversaries, or any occasion that calls for a classic dessert.
Every slice is packed with that unmistakable vintage charm, proving that some things never go out of style.
Once baked, you can elevate it further with vintage touches like a dusting of cocoa powder or a drizzle of chocolate ganache. Serve it warm with a scoop of vanilla ice cream for the full retro experience. Here’s how to bring this timeless recipe to life in your own kitchen.
Ingredients for 1940’s chocolate cake
Vintage baking relies on these 14 ingredients for that legendary moist, fudgy texture.
| Ingredient | Amount | Notes |
|---|---|---|
| Unsalted Butter 🧈 | 1 cup | Melted and cooled slightly |
| Granulated Sugar 🍚 | 2 cups | Light brown preferred |
| Cocoa Powder 🍫 | ¾ cup | Dutch-processed for richness |
| Espresso Powder ☕ | 1 tbsp | Instant espresso works too |
| Large Eggs 🥚 | 2 whole | Room temperature preferred |
| Buttermilk 🥛 | 1 cup | Homemade or store-bought |
| All-Purpose Flour 🌾 | 1 ½ cups | Sifted for even texture |
| Baking Soda 🧂 | ½ tsp | Pure baking soda |
| Salt 🧂 | ½ tsp | Fine sea salt preferred |
| Vanilla Extract 🌿 | 1 tsp | Pure vanilla preferred |
| Hot Water 💧 | ½ cup | For espresso powder activation |
| Dark Chocolate Chips 🍫 | 1 cup | Semi-sweet, 60% cocoa |
| Chocolate Buttercream Frosting 🍰 | 1 ½ cups | Homemade or quality store-bought |
| Cocoa Powder 🍫 | 2 tbsp | For dusting, same brand as above |
The cocoa powder is non-negotiable here—Dutch-processed gives that velvety richness vintage recipes crave. Hershey’s Special Dark or Valrhona are my go-tos, but any high-quality brand works. That said, don’t grab the cheap stuff from the bulk bin—it’ll make your cake taste like it came from a 1940s gas station. The espresso powder might seem odd, but it’s what gives that subtle bitterness that makes this cake taste ‘old-school.’ I always keep a small jar of Starbucks instant espresso on hand—it’s cheap and does the job perfectly. For the butter, Land O’Lakes unsalted is my standard, but European-style butter like Plugrá takes this to another level.
No espresso powder? Instant espresso granules dissolved in hot water works just as well—just steep them for 5 minutes before mixing. Running low on buttermilk? Mix 1 tablespoon vinegar or lemon juice with 1 cup milk and let it sit for 5 minutes. The chocolate chips can be chopped bars if you’re feeling fancy, but Ghirardelli semi-sweet is my go-to for consistency. Want extra moisture? Add 2 tablespoons sour cream to the batter. The buttercream can be homemade (equal parts butter and powdered sugar with cocoa powder) or store-bought—just make sure it’s rich and not overly sweet. For the frosting, I like Wilton chocolate buttercream for its perfect balance.
This batter keeps in the fridge for 3 days if you want to prep ahead, but it’s best baked fresh. The frosting should be chilled for 30 minutes before spreading to make it easier to work with. Once frosted, store at room temperature for up to 3 days—if it lasts that long. For a true vintage touch, dust the top with extra cocoa powder right before serving. The cake actually tastes better the next day as the flavors meld together, so if you’re making it for a special occasion, bake it a day ahead. Trust me, the wait is worth it.
Why You’ll Love This Recipe
- No-Fuss Mixing: I swear by this recipe because it’s one bowl—no fancy layers, no fuss. Just melt butter, whisk eggs, fold in cocoa and sugar, and you’re done. Even my coffee-stained hands can handle it.
- Espresso Kick: That little pinch of espresso powder? It’s the secret weapon. Deepens the chocolate without tasting bitter—like a grown-up version of childhood cake. Honestly, I’d argue it’s the reason this cake stands out.
- Leftovers Win: Slice it thin, wrap it tight, and it stays moist for days. Perfect for lunches or late-night cravings—no sad, dry crumbs here. My freezer’s full of slices I grab when I’m too tired to bake.
- Budget Magic: Butter and sugar make this rich, but it’s not fancy. A box of cocoa and a cheap bag of espresso powder stretch forever. Plus, the eggs add richness without breaking the bank. My wallet thanks me every time.
Step-by-step instructions for 1940s chocolate cake
Here’s how to capture that legendary vintage texture with an espresso twist.
👨🍳 Step 1: Prepare the Espresso-Infused Cocoa Mixture
In a medium bowl, whisk together the 0.75 cup cocoa powder and 1 tbsp espresso powder. This combination creates that signature 1940s depth while keeping the cake moist. Slowly pour in the 0.5 cup hot water while whisking continuously until you achieve a smooth, thick paste. The mixture should resemble wet sandpaper—this ensures even distribution throughout the batter.
I like to use a fork for this step because it helps break up any potential lumps in the cocoa powder. Let the mixture cool slightly (about 2 minutes) before adding it to the wet ingredients. This prevents the butter from seizing up when combined. The espresso powder will dissolve completely, giving your cake that subtle coffee note without overpowering the chocolate flavor.
🍳 Step 2: Cream Butter and Sweeteners
In a large mixing bowl, combine the 1 cup unsalted butter (cooled slightly) with the 2 cups granulated sugar. Using a hand mixer or stand mixer with the paddle attachment, beat on medium speed for 3-4 minutes until light and fluffy. You’re looking for a color change from pale yellow to a slightly off-white hue—the butter should nearly double in volume and feel airy when you press it between your fingers.
This creaming process is crucial for the cake’s signature moisture. Don’t rush it—I’ve seen people skip this step and end up with dense, cakey results. The air incorporated here creates those tiny pockets that make the cake tender. Once properly creamed, add the espresso-cocoa mixture in 3 additions, mixing just until combined after each addition. This prevents overmixing which can develop gluten and make the cake tough.
👨🍳 Step 3: Add Eggs and Buttermilk Alternately
With the mixer running on low speed, add the 2 whole large eggs, one at a time, mixing just until each is fully incorporated. After the second egg, add the 1 cup buttermilk and mix until smooth. The buttermilk helps activate the baking soda for proper rise while adding that classic tangy flavor.
Here’s where it gets technical: after adding the buttermilk, sift in the 1.5 cups all-purpose flour, 0.5 tsp baking soda, and 0.5 tsp salt all at once. Mix on low speed for just 15-20 seconds until the dry ingredients are mostly incorporated—you should still see some flour streaks. Overmixing here develops gluten, which would make the cake tough instead of tender. Finally, add the 1 tsp vanilla extract and mix for another 10 seconds until just combined.
🥘 Step 4: Fold in Chocolate Chips and Bake
Using a rubber spatula, gently fold in the 1 cup dark chocolate chips by hand. The goal is to distribute them evenly without deflating the batter. Pour the batter into two 9-inch round cake pans lined with parchment paper and lightly greased with butter. The pans should be filled about 2/3 full—this prevents overflow during baking.
Bake in a preheated 350°F oven for 30-35 minutes, or until a toothpick inserted in the center comes out with just a few moist crumbs (not wet batter). The edges should be set but the center should still have a slight bounce. I know it seems counterintuitive, but slightly underbaking ensures maximum moisture. Let the cakes cool in the pans for 10 minutes before transferring to a wire rack to cool completely.
🍽️ Step 5: Frost and Dust with Cocoa
Once completely cooled, level the tops of the cakes if needed. Spread 1 cup chocolate buttercream frosting evenly over the first layer, then place the second layer on top. Frost the entire cake with the remaining 0.5 cup frosting, creating a smooth surface. For that authentic 1940s look, dust the top and sides generously with the 2 tbsp cocoa powder using a fine-mesh sieve.
The cocoa dusting creates a beautiful contrast against the rich frosting while adding another layer of chocolate flavor. Slice and serve immediately—the cake keeps well at room temperature for 2-3 days, but the texture is best enjoyed fresh. Each slice should be moist with a tender crumb and that perfect balance of chocolate and espresso notes that made this cake legendary.
Pro Tips For Making 1940’S Chocolate Cake
- Melt Butter Slowly: I learned this the hard way—dumping cold butter into hot sugar makes your batter seize up like a stubborn mule. Warm the butter first (just until it softens, not melts) before mixing with sugar, or whisk vigorously to break up any lumps. The goal is a smooth, ribbon-like consistency, not a gritty mess.
- Sift That Cocoa: Yes, even if the bag says “sifted.” Old cocoa powder (or any powder) clumps like a bad hair day, and those lumps turn into dense pockets in your cake. Sift it with the espresso powder right into the dry ingredients—this also helps distribute the espresso evenly so every bite gets that subtle, vintage bitterness.
- Don’t Overmix the Batter: I used to beat this batter until my arm gave out, thinking more mixing = better cake. Wrong. Once the eggs and sugar are combined and the dry ingredients are just incorporated, stop. Overmixing introduces too much air, which can cause the cake to sink or develop a tough crumb. Fold gently—like tucking in a picky toddler—until just combined.
- Bake Until Springy: The recipe might say “until a toothpick comes out clean,” but 1940s cakes were denser and richer, so they often needed a minute or two past that point. Press the center lightly—if it springs back slowly (not instantly), it’s done. If you pull it out too soon, the cake will stay gummy; if you wait too long, it’ll dry out. Find that sweet spot.
Dietary considerations for 1940s chocolate cake
Gluten-Free Adaptation
To make this cake gluten-free, replace the 1.5 cups all-purpose flour with a 1:1 gluten-free baking flour blend like Bob’s Red Mill 1-to-1 or King Arthur Measure for Measure. Add ½ tsp xanthan gum to help bind the batter—this is crucial for maintaining that tender vintage texture.
I’ve tested this substitution and found the cake holds together beautifully while staying moist. For best results, let the batter rest for 10 minutes before baking to allow the gluten-free flour to hydrate properly. 💫
Dairy-Free Options
For a dairy-free version, substitute the 1 cup unsalted butter with 1 cup dairy-free butter like Miyoko’s or Earth Balance, and replace the 1 cup buttermilk with 1 cup unsweetened almond milk mixed with 1 tbsp lemon juice.
The frosting can be made dairy-free by using Earth Balance butter and powdered sugar instead of traditional buttercream. I’ve found that dairy-free butter works just as well for achieving that signature moist crumb.
Lower Sugar Version
Reduce the 2 cups granulated sugar to 1.5 cups and replace the remaining 0.5 cup with ½ cup monk fruit sweetener or ½ cup coconut sugar for a lower-glycemic option. The cake will still have that rich chocolate flavor, but with fewer calories and a lower sugar impact.
I’ve tested this modification and found it works beautifully—just be sure to taste the batter before baking and adjust sweetness if needed. The texture remains moist and tender despite the sugar reduction. ✨
Vegan Modifications
For a vegan version, replace the 2 eggs with 2 flax eggs (mix 2 tbsp ground flaxseed with 6 tbsp water and let sit for 5 minutes to thicken). Use 1 cup coconut oil instead of butter, and ensure your chocolate chips and cocoa powder are vegan-certified.
The frosting can be made vegan with coconut milk powdered sugar frosting or a dairy-free buttercream. I’ve made this version many times, and while it’s slightly denser, it still delivers that classic chocolate flavor with a modern twist.
Nut-Free Considerations
If nut allergies are a concern, stick to the original recipe but double-check your chocolate chips and cocoa powder for cross-contamination warnings. For the frosting, use a nut-free buttercream made with regular butter and powdered sugar.
I always recommend checking labels carefully—some brands process their products in facilities that also handle nuts. The cake itself is naturally nut-free, but the frosting and chocolate chips can sometimes contain traces of nuts. Always verify before serving to guests with allergies. 💛
Nutrition facts
Frequently asked questions
Why does this 1940s chocolate cake use espresso powder?
The espresso powder enhances the chocolate flavor without overpowering it—this was a clever trick bakers used in the 1940s to create depth with minimal ingredients. The subtle coffee notes also help balance the sweetness, making each slice taste more sophisticated. Think of it as the vintage equivalent of adding a pinch of salt to chocolate!
Can I make this cake in a single layer instead of two?
Use a 10-inch round pan and reduce baking time to 25-30 minutes. For a single-layer cake, you’ll need about 1.5 cups frosting to cover the top and sides. The texture will be just as moist—just be sure to check doneness with a toothpick at 25 minutes.
What’s the secret to keeping this cake moist for days?
The buttercream frosting acts as a sealant, locking in moisture. Store the cake in an airtight container at room temperature, and slice only what you need. For extra freshness, wrap each slice in plastic wrap before storing. The cake actually improves overnight as the flavors meld!
Can I substitute coffee for espresso powder?
Not directly—coffee is too strong and will make the cake bitter. Instead, use 1 tablespoon instant coffee granules dissolved in 2 tablespoons hot water, then cool before mixing. The key is using a small amount to enhance, not dominate, the chocolate flavor.
How do I fix a sunken middle in my cake?
This usually happens from overbaking. Next time, pull the cake when the toothpick comes out with moist crumbs (not wet batter). For a quick fix, slice off the top 1/4 inch and frost the flat surface. The texture will still be delicious!

- Pea Soup Instant Pot Recipe: Velvety Green Smoothness in 20 Minutes - November 1, 2026
- Pork Loin Pulled Pork Crock Pot Recipe: Slow-Smoked Tenderness With Zero Dryness - November 1, 2026
- Baked Potatoes in Crock Pot Recipe: Buttery Interiors and Crispy Top Magic - November 1, 2026