
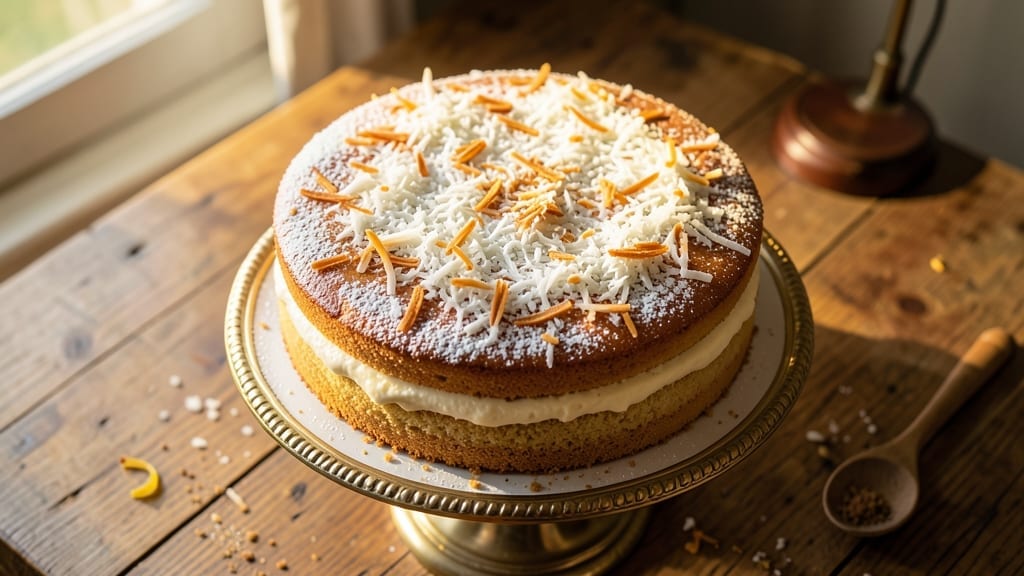
This 1950s old-fashioned coconut cake brings back the golden era of homemade baking with its delicate vanilla-coconut layers and tender crumb. The secret lies in a simple yet precise method that creates perfectly moist layers with just the right balance of sweetness and tropical flavor.
I’ve recreated this recipe using vintage techniques that modern kitchens can easily replicate, ensuring every bite transports you to a simpler time.
The cake’s charm comes from its classic ingredients—vanilla extract, shredded coconut, and a touch of nutmeg—that work together to create a nostalgic flavor profile. Baking at 350°F for about 25-30 minutes ensures a tender crumb that stays moist for days.
The recipe also includes a light coconut frosting that ties everything together with its signature sweetness and texture.
What makes this recipe special is how it combines tradition with modern convenience. You’ll love the way the vanilla and coconut flavors harmonize in every slice, while the frosting adds a touch of elegance that makes it perfect for special occasions or everyday treats.
The cake’s simplicity ensures it’s foolproof, yet the result feels like a true vintage masterpiece.
Whether you’re baking for a family gathering or simply craving a taste of nostalgia, this coconut cake delivers. The recipe includes tips for modern adaptations, like adjusting oven temperatures or using boxed cake mix for a shortcut, while still honoring the original’s charm.
Let’s get started on creating a slice of history.
Ingredients for 1950 old fashioned coconut cake
Classic ingredients that bring back the golden era of homemade baking perfection.
| Ingredient | Amount | Notes |
|---|---|---|
| All-Purpose Flour 🌾 | 2 ½ cups | Sifted for light texture |
| Granulated Sugar 🍚 | 1 ½ cups | White sugar preferred |
| Unsalted Butter 🧈 | 1 cup | Room temperature for creaming |
| Large Eggs 🥚 | 3 whole | Room temperature for best texture |
| Vanilla Extract 🌿 | 2 tsp | Pure extract preferred |
| Shredded Coconut 🥥 | 1 cup | Sweetened, unsweetened works too |
| Baking Powder 🧂 | 2 tsp | Aluminum-free preferred |
| Ground Nutmeg 🌶️ | ½ tsp | Freshly grated for depth |
| Salt 🧂 | ½ tsp | Fine sea salt preferred |
| Milk 🥛 | ½ cup | Whole milk for tenderness |
| Coconut Milk 🥥 | ¼ cup | Canned, full-fat preferred |
| Powdered Sugar 🍚 | 2 cups | For frosting, sifted |
| Heavy Cream 🥛 | ½ cup | Cold for frosting stability |
| Lemon Juice 🍋 | 1 tbsp | Freshly squeezed |
The flour and sugar form the foundation of this vintage recipe. King Arthur flour or Gold Medal are ideal for their consistent quality, but any all-purpose will work. For the butter, Land O’Lakes or Plugrá brands provide reliable fat content—never use margarine for that authentic 1950s texture. The eggs must be room temperature; cold eggs create dense layers. I always grab organic eggs from local farms when possible, but store-bought works fine. The vanilla extract should be pure—Nelson James or McCormick are top-tier choices that elevate the nostalgic flavor profile.
No vanilla extract? Vanilla bean paste at half the amount works beautifully. Substituting coconut milk? Full-fat canned coconut milk is non-negotiable—light versions won’t create the same creamy frosting. For the nutmeg, freshly grated is ideal, but if you only have ground, toast it lightly in a dry pan first to deepen the flavor. The baking powder must be fresh—test by mixing with water; if it fizzes vigorously, it’s good. For the frosting, powdered sugar from a fine-mesh sifter prevents lumps, and cold heavy cream whips to stiffer peaks for that classic vintage texture.
Store the dry ingredients—flour, sugar, baking powder—in airtight containers for up to 6 months. Butter and eggs keep in the fridge for 3 months and 4 weeks respectively. The cake layers can be wrapped individually and frozen for 2 months—thaw at room temperature before frosting. Once frosted, the cake stays fresh for 5 days at room temperature or 2 weeks refrigerated. For a shortcut, bake the layers a day ahead and assemble when ready—flavors meld beautifully overnight.
Why You’ll Love This Recipe
- No Mixer Needed: I swear by this recipe when my stand mixer’s on vacation—just a bowl and a whisk. The butter and sugar cream so effortlessly by hand, and the eggs fold right in without a fight.
- Tropical Nostalgia: That coconut flavor? It’s like a hug from your grandma’s kitchen. The vanilla and butter make it rich, but the toasted coconut on top keeps it light—no heavy frosting required.
- Birthday Party Ready: Slice it for a crowd, or serve whole for a special occasion. Honestly, it’s the kind of cake that makes people pause and say, “Wow, you made this?” (Yes, even when it’s just flour, sugar, and love.)
- Dollar Stretches Far: A single batch costs me less than takeout, and it feeds six. Leftovers? They disappear faster than I can say “second slice.” (Between us, I’ve never regretted baking extra.)
Step-by-step instructions for 1950s old fashioned coconut cake
Mastering this classic recipe delivers tender layers and rich coconut flavor—every detail matters.
Prepare the Cake Batter
Preheat your oven to 350°F and grease two 9-inch round cake pans, lining the bottoms with parchment paper. In a large mixing bowl, cream together the 1 cup unsalted butter and 1.5 cups granulated sugar on medium speed until light and fluffy—about 3-4 minutes. This step incorporates air, which creates the signature tender crumb.
Add the 3 whole large eggs one at a time, mixing well after each addition. Then stir in the 2 teaspoons vanilla extract and 1 tablespoon lemon juice. The lemon brightens the coconut flavor while keeping the cake moist. In a separate bowl, whisk together the 2.5 cups all-purpose flour, 2 teaspoons baking powder, 0.5 teaspoon salt, and 0.5 teaspoon ground nutmeg. Sift these dry ingredients directly into the wet mixture and mix on low speed just until combined.
Fold in Coconut and Wet Ingredients
Gently fold in the 1 cup shredded coconut using a spatula, being careful not to overmix. The coconut should be evenly distributed throughout the batter. In a small measuring cup, combine the 0.5 cup milk and 0.25 cup coconut milk. Slowly pour this mixture into the batter while mixing on low speed until just incorporated. The coconut milk adds richness while maintaining moisture.
Divide the batter evenly between the prepared cake pans, smoothing the tops with a spatula. Bake for 25-30 minutes, or until a toothpick inserted into the center comes out clean. Rotate the pans halfway through baking for even browning. The cakes should be golden on top with slightly domed centers.
Prepare the Coconut Cream Frosting
While the cakes cool, prepare the frosting by beating the 0.5 cup heavy cream with an electric mixer until soft peaks form. Gradually add the 2 cups powdered sugar, mixing on low speed until smooth. Add the 1 tablespoon lemon juice and mix until fully incorporated. The frosting should be thick but spreadable.
Once the cakes have cooled completely, place one layer on a serving plate and spread a generous layer of frosting on top. Repeat with the second layer, then frost the entire cake. Press the 1 cup shredded coconut onto the sides and top of the cake, gently patting it into place. Chill the cake in the refrigerator for at least 1 hour before serving to allow the frosting to set.
Serve with Confidence
Slice the cake into 8 equal servings using a sharp serrated knife. The layers should be tender with a delicate crumb, and the coconut flavor should be balanced by the subtle tang of lemon. Serve at room temperature for the best texture and flavor. This cake keeps well in an airtight container in the refrigerator for up to 3 days, though it’s best enjoyed fresh.
Here’s the thing—this recipe delivers that authentic 1950s taste, but with modern precision. The key is patience: don’t rush the cooling or frosting process, and always use room-temperature ingredients for the best results. Each bite should transport you back to classic home baking, with just the right balance of sweetness and coconut richness.
Pro Tips For Making 1950 Old Fashioned Coconut Cake
- Cream Butter Slowly: Beat the butter and sugar together until it’s light and fluffy—about 3-5 minutes with an electric mixer. I used to rush this, and the cake turned out dense. The butter needs time to incorporate air, which keeps the crumb tender and light, especially with all that coconut later.
- Sift the Flour Twice: Don’t skip sifting the flour before adding it to the butter mixture. The first sift removes lumps, but the second ensures even distribution—no surprise pockets of dry flour or uneven texture. I learned this after a batch turned out gummy in spots.
- Bake at 325°F: Preheat the oven to 325°F and bake the cake in the middle rack. Too hot, and the outside burns before the center sets; too cool, and it stays wet. My first attempt at 350°F gave me a crusty exterior and a gooey middle—this recipe needs patience.
- Whisk Eggs Separately: Whisk the eggs in a separate bowl first, then add them to the batter one at a time. This prevents overmixing the flour once it’s in the wet ingredients, which can make the cake tough. I was skeptical, but it’s the thing that keeps the texture light and airy.
Common mistakes when making this recipe
Overmixing the Batter
This is the #1 mistake that turns your cake into a dense brick. I’ve seen beginners mix the batter on high speed for minutes, and it’s a heartbreaker. The moment your batter looks smooth and uniform, stop mixing—overworking develops gluten and makes the cake tough.
Use a spatula to gently fold in the coconut and wet ingredients instead of relying on the mixer. Remember, the goal is just to combine, not to create a batter that could stand on its own. 🥥
Skipping Room Temp Ingredients
Cold butter and eggs are the silent saboteurs of this recipe. When ingredients aren’t room temperature, they create pockets of steam in the oven, leading to uneven baking and a cake that’s dense in spots.
Take your butter out of the fridge at least 1 hour before baking, and let eggs sit in warm water for 5 minutes to bring them to the perfect temp. Trust me, this small step makes all the difference in that tender crumb we’re after.
Incorrect Baking Time
Underbaking or overbaking ruins the texture—there’s no in-between with this cake. A toothpick should come out clean (or with a few moist crumbs) after 25-30 minutes. If you’re in doubt, err on the side of slightly underbaked—you can always pop it back in for a few more minutes.
Overbaking dries out the layers and turns that perfect crumb into a sad, dry disappointment. Set a timer and check at 25 minutes to avoid any surprises.
Ignoring the Cooling Process
Rushing to frost warm cake layers is a rookie mistake. The frosting won’t set properly, and the heat from the cake will melt it into a sticky mess.
Let the cakes cool completely in their pans for 10 minutes, then transfer to a wire rack to cool for another 30-45 minutes. Patience here ensures clean slices and that signature vintage texture. I’ve learned this the hard way—trust the process!
Using the Wrong Coconut
Not all shredded coconut is created equal. Unsweetened coconut works, but sweetened adds that nostalgic touch this recipe craves. And for the frosting, toasted coconut (lightly browned in a dry pan) adds depth of flavor.
Avoid pre-shredded coconut from a can—it’s often too dry and lacks the freshness of the bagged kind. The difference is night and day in the final product.
Frosting Too Thin or Too Thick
The frosting should be thick enough to hold its shape but still spreadable. If it’s too thin, add more powdered sugar; if it’s too thick, whip in a splash of heavy cream. The lemon juice is key here—it balances the sweetness and helps stabilize the frosting.
I’ve had to start over more times than I’d like to admit because the frosting was either too runny or too stiff. Taste as you go—this is where the magic happens! 🍋
Nutrition facts
Frequently asked questions
Can I make this cake without coconut milk?
Yes, but the texture will differ slightly. Replace the 0.25 cup coconut milk with an equal amount of whole milk or heavy cream. The cake will still be moist, though you’ll lose some of the rich, tropical depth that coconut milk provides. For frosting, use 0.5 cup heavy cream instead of coconut milk to maintain stability.
How do I store leftover coconut cake?
Wrap the unfrosted cake layers tightly in plastic wrap and store them in an airtight container in the fridge for up to 3 days. For the fully frosted cake, keep it refrigerated for 3-4 days or freeze for up to 2 months. Thaw overnight in the fridge before serving. The frosting may soften slightly when chilled, but it will firm up at room temperature.
Can I substitute butter with another fat?
For the most authentic results, stick with butter, but you can use vegetable shortening or coconut oil in a pinch. If using coconut oil, chill it first to solidify. Shortening will give a slightly denser texture, while coconut oil adds a more pronounced coconut flavor. Reduce the amount by 1 tablespoon if substituting to prevent excess moisture.
Why does my cake have a strong coconut smell but bland flavor?
This usually happens when the coconut isn’t toasted properly or the lemon juice is omitted. Lightly toast the shredded coconut in a dry pan for 2-3 minutes before adding it to the batter to deepen its flavor. Also ensure you’re using 1 tablespoon lemon juice—it brightens the coconut and balances sweetness. Freshly grated nutmeg adds warmth that complements the coconut beautifully.
Can I make this cake in a single layer?
Use a 9×13-inch baking pan and reduce the baking time to 20-25 minutes. For the frosting, spread it evenly over the cooled cake and press the shredded coconut on top. This version works well for sheet cakes or when you prefer a simpler presentation. The flavor remains the same, just with a different structure.

- Pea Soup Instant Pot Recipe: Velvety Green Smoothness in 20 Minutes - November 1, 2026
- Pork Loin Pulled Pork Crock Pot Recipe: Slow-Smoked Tenderness With Zero Dryness - November 1, 2026
- Baked Potatoes in Crock Pot Recipe: Buttery Interiors and Crispy Top Magic - November 1, 2026