
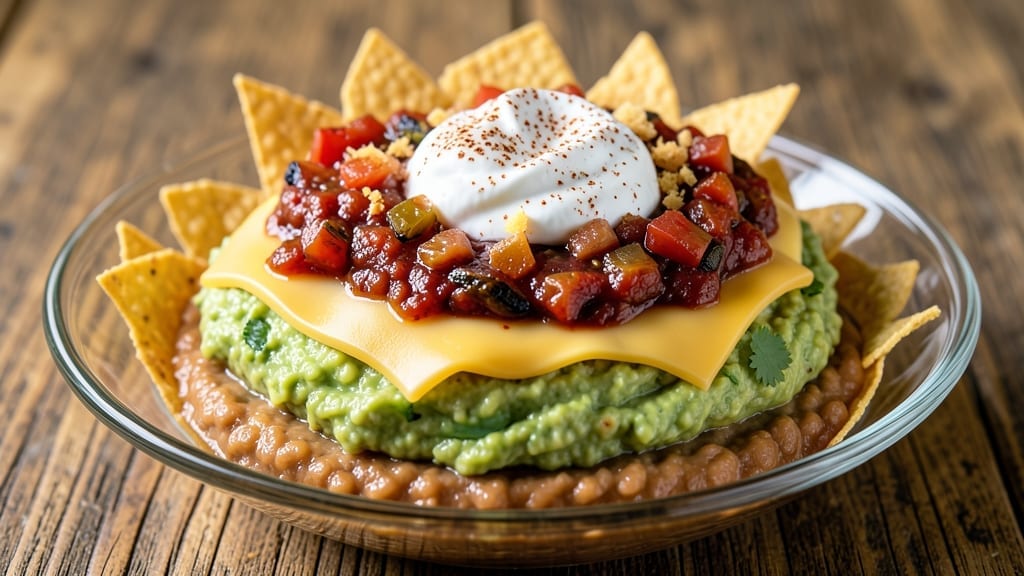
This 7-layer Mexican bean dip recipe delivers the ultimate crowd-pleasing appetizer that’s creamy, crunchy, and packed with bold flavors—perfect for game day, parties, or a cozy night in. 💛 The secret lies in layering ingredients strategically, from velvety refried beans to cool sour cream and zesty guacamole, creating a dip that’s as satisfying as it is visually stunning.
This vegetarian-friendly version is a staple in my kitchen, but I’ll show you how to add chorizo or black beans for extra depth if you prefer.
The beauty of this recipe is its foolproof assembly—no fancy techniques required, just a dish and your hands.
Each layer builds on the last, starting with a warm base of refried beans and melted cheese, then adding vibrant salsa, creamy guacamole, and dollops of sour cream for that signature tang. The final touch? Crushed tortilla chips on top for crunchy texture that holds up perfectly for serving.
It’s the kind of dish that disappears faster than you can say “fiesta.”
What makes this dip truly special is how it balances textures and flavors in every bite—creamy from the beans and sour cream, fresh from the guacamole, and tangy from the salsa. The layers meld together when baked, creating a harmonious blend that’s impossible to resist.
Plus, it’s easy to customize: swap in roasted corn, add jalapeños for heat, or top with cilantro for freshness. This is the dip that turns snack time into a celebration.
Ready in just 30 minutes (including prep), this recipe is perfect for feeding a crowd or meal prepping ahead. Serve with tortilla chips, veggies, or even as a taco filling. Here’s how to assemble it like a pro—layer by layer.
Ingredients for 7 layer mexican bean dip
Layer by layer, these 13 ingredients create the ultimate crowd-pleasing fiesta in your dish.
| Ingredient | Amount | Notes |
|---|---|---|
| Refried Beans 🌽 | 2 cups | Canned or homemade, warmed |
| Cheddar Cheese 🧀 | 2 cups | Shredded, mild or medium |
| Salsa 🍅 | 1 ½ cups | Medium or pico de gallo |
| Guacamole 🥑 | 1 ½ cups | Fresh, ripe avocado-based |
| Sour Cream 🥛 | 1 cup | Full-fat for creaminess |
| Tortilla Chips 🍞 | 4 cups | Crushed, blue corn or regular |
| Black Beans 🌿 | 1 cup | Optional, for extra depth |
| Cilantro 🌿 | ¼ cup | Chopped, for garnish |
| Jalapeños 🌶️ | 2 whole | Sliced, for optional heat |
| Cream Cheese 🧈 | 4 oz | Softened, for extra creaminess |
| Olive Oil 🫒 | 1 tbsp | For greasing the dish |
| Salt 🧂 | ½ tsp | Kosher or sea salt |
| Black Pepper 🌶️ | ¼ tsp | Freshly ground |
The refried beans are your foundation—look for canned beans with just beans and salt, nothing fancy. Trader Joe’s and Whole Foods have great options, but the store brand works too. Warm them up with a splash of water or broth to loosen them. Cheddar cheese is a must here—mild or medium melts best, and pre-shredded gets clumpy, so grab a block and shred it yourself. The guacamole should be fresh, not that sad tub from the store. Make your own with ripe avocados—it’s worth the 5 minutes. For the salsa, I love Herdez or La Victoria for that authentic taste, but anything with chunks works. The tortilla chips? Blue corn adds color, but regular chips keep it classic.
No refried beans? Mash cooked black beans with a fork for a similar texture. Skip the cheese? Add extra sour cream or cream cheese for richness. The guacamole can be store-bought if you’re in a pinch, but fresh is always better. No cilantro? Skip it or use parsley—it’s not the end of the world. Want more heat? Add diced jalapeños or a dash of hot sauce to the salsa layer. The cream cheese is non-negotiable for that ultra-creamy texture—don’t use low-fat. For the chips, if you can’t find crushed, just pulse them in a food processor. And if you’re feeling fancy, swap in roasted corn or diced tomatoes for extra texture.
This dip tastes even better the next day once everything melds together. Cover and refrigerate for up to 3 days, but the chips will get soggy after a day, so serve those fresh. For make-ahead prep, assemble everything except the chips, bake, then add the chips right before serving. Freezes beautifully for up to 2 months—just reheat in the oven for 10 minutes to restore that gooey texture. Portion into small containers for easy snacking, or double the recipe for parties. The layers hold up perfectly, so it’s ideal for meal prep too.
Why You’ll Love This Recipe
- No-Fuss Assembly: I swear by this recipe because it’s the kind of dish where you just layer and press—no baking, no frying, no stress. Five minutes of spreading refried beans, cheese, and guac, then chilling. That’s it. Even my college apartment days couldn’t break this.
- Flavor Explosion: The magic happens when those layers melt together—creamy beans under sharp cheddar, tangy sour cream cutting through the heat of the salsa, and guacamole adding that fresh, buttery richness. It’s like a party in your mouth, and every bite has something new to discover.
- Game for Any Gathering: Honestly, this dip is my go-to for game day, book club, or even a lazy Sunday with friends. Serve it with chips, tortilla crisps, or even on toasted baguette slices—suddenly, you’re the host who didn’t stress. (Yes, even on a Tuesday night.)
- Budget-Friendly Leftovers: Between us, this recipe costs me less than $10 for a crowd, and it keeps for days in the fridge. The layers actually improve overnight—more flavors meld, the cheese gets extra gooey. I make it once a month, and it disappears faster than I can say “refried beans.”
Step-by-step instructions for 7 layer Mexican bean dip
Layer by layer, we’re building the ultimate crowd-pleaser—creamy, crunchy, and packed with fiesta flavors.
🥘 Step 1: Grease Your Serving Dish
Start with a 9×13-inch baking dish—this is your canvas. Brush the bottom and sides lightly with the 1 tablespoon olive oil, then sprinkle evenly with ½ teaspoon salt and ¼ teaspoon black pepper. This creates a flavorful barrier that prevents sticking and adds subtle seasoning to every layer.
I like to use a pastry brush for this—it distributes the oil evenly without over-saturating. Wipe any excess oil with a paper towel; too much will make your layers soggy. This step is non-negotiable for that perfect texture contrast in your final dip.
👨🍳 Step 2: Build the Foundation Layers
Begin with the 2 cups refried beans, spreading them evenly across the bottom of your prepared dish. Use a rubber spatula to press gently—this creates a solid base that won’t slide when you cut into it later. Next, layer the 1 cup black beans (if using) directly on top, spreading them smoothly.
Here’s the thing—don’t worry about perfect lines. The beauty of this dip is in the rustic layers. Just make sure each layer is completely covered. For the black beans, I like to break them up slightly with my fingers first so they distribute more evenly. This prevents clumps that can make your dip messy to serve.
🥘 Step 3: Add the Creamy Layers
Now for the creamy magic: spread the 4 oz softened cream cheese evenly over the beans. Use your spatula to create a smooth, thin layer—about ¼-inch thick. This layer is your secret weapon for that luscious texture that makes this dip irresistible.
Next comes the 1 cup sour cream, spread directly on top of the cream cheese. Don’t skip this step—it’s what makes your dip truly creamy. I like to use a slightly warmed spatula for this layer to help it spread smoothly. The contrast between the creamy layers and the crunchy layers ahead is what makes this dip so addictive.
🍳 Step 4: Layer the Flavor Bombs
Spread the 2 cups shredded cheddar cheese evenly over the sour cream. Press it down gently with your spatula—this helps it melt slightly and creates a better bond with the layers below. The cheese will soften as you assemble, but that’s okay; it’ll firm up nicely when chilled.
Now for the fresh elements: spread the 1.5 cups guacamole evenly, followed by the 1.5 cups salsa. I like to use a slightly warmed spoon for the guacamole to make it spread more easily. For the salsa, I press it down gently to help it adhere to the cheese layer. This is where all the vibrant colors come together—green, red, and white creating that beautiful Mexican fiesta look.
🥘 Step 5: Finish with Crunch and Garnish
Sprinkle the 4 cups crushed tortilla chips evenly over the top layer. Press them down gently with your fingers—this creates that satisfying crunch we all love. For extra heat, arrange the 2 sliced jalapeños on top in a decorative pattern. Finally, scatter the ¼ cup chopped cilantro evenly over everything.
Here’s the moment that matters: press down very gently on the entire surface with your hands. This helps the layers bond together and creates that perfect texture contrast when you cut into it. Cover the dish with plastic wrap and refrigerate for at least 2 hours (or overnight) before serving. This chilling time lets all the flavors meld together perfectly.
Pro Tips For Making 7 Layer Mexican Bean Dip
- CHILL THE BEANS: Warm refried beans straight from the can? Skip it. Spread them on a plate and pop them in the fridge for 10 minutes first—this stops the dip from getting soggy layers. I learned this after watching my first batch turn into a sad, watery mess by halftime.
- MELT CHEESE LOW: Cheddar cheese loves to scorch. Once you spread that first layer, turn the oven down to 325°F (165°C) and let the cheese melt slowly. After 5 minutes, check it—if it’s golden but still creamy, you’ve nailed it. Rushing this step makes the cheese stringy and unappetizing.
- DRAIN THE SOUR CREAM: Thick sour cream is your friend, but only if you drain it first. Line a fine-mesh strainer with paper towels, spoon the sour cream in, and let it sit for 10 minutes. This removes excess moisture so your top layer doesn’t turn into a watery puddle. Yes, it’s weird—yes, it works.
- LAYER SALSA LAST: Salsa is the dip’s crowning glory, but it’s also its Achilles’ heel. Add it right before serving—raw salsa mixed with warm cheese makes the whole thing slide off the plate like a greasy pancake. Keep it cool and fresh until the final moment.
Creative variations of this dish
Fiesta Spicy Version
Add 2 tbsp chopped pickled jalapeños to the salsa layer for extra heat, then top with ¼ cup crumbled cotija cheese before adding the tortilla chips. For a smoky kick, mix 1 tsp chipotle powder into the refried beans before spreading.
This version is perfect for those who love bold, spicy flavors while keeping the creamy texture intact. 🌶️
Vegetarian Protein Boost
Swap the sour cream layer for 1 cup mashed white beans mixed with 1 tbsp lime juice and ½ tsp cumin for extra protein. Add ½ cup corn kernels to the guacamole layer for sweetness and texture.
This keeps the dip vegetarian while adding hearty depth. I find it especially satisfying for lunchboxes or potlucks. 🌱
Breakfast Twist
Transform this dip into a breakfast dish by spreading it on warm tortillas with scrambled eggs and crumbled bacon. For a veggie version, top with sautéed bell peppers and onions.
The creamy layers pair perfectly with breakfast flavors, making it a fun brunch alternative. Serve with warm chips for dipping on the side. 🍳
Dessert-Inspired Sweet Version
Replace the salsa with 1.5 cups sweet corn salsa (mix corn, diced peaches, red onion, and lime) and the guacamole with 1.5 cups whipped cream cheese mixed with 2 tbsp honey.
Top with crushed graham crackers instead of tortilla chips. This sweet version is perfect for dessert parties or a unique twist on traditional Mexican flavors. 🍯
Protein-Packed Layer
Add a layer of ½ cup cooked chorizo between the refried beans and cream cheese for a meaty kick. For a lighter option, use ½ cup cooked lentils mixed with 1 tsp smoked paprika.
This adds protein and heartiness while keeping the dip’s signature texture. It’s a great option for those who want more substance in their snack. 💪
Slow Cooker Adaptation
For a hands-off version, assemble the dip in a 6-quart slow cooker and cook on low for 2 hours before adding the tortilla chips. This method works especially well for large gatherings, as the slow cooker keeps everything warm and melty.
Just be sure to press down the layers gently before covering. ✨
Nutrition facts
Frequently asked questions
Can I make this dip without refried beans?
If you don’t have refried beans, mash 2 cups cooked black beans with a fork until smooth, then mix in 1 tablespoon olive oil and ½ teaspoon cumin for that classic flavor. Spread this mixture as your first layer just like you would the refried beans. The texture will be slightly different but still delicious!
How long can I keep this dip in the fridge?
The dip stays fresh in the fridge for up to 3 days, but the tortilla chips will get soggy after 1 day. For best results, add fresh chips just before serving. It actually tastes better the next day as the flavors meld together—just give it a stir before eating. Freezing isn’t recommended as it can make the textures too soft.
Can I make this dip ahead of time?
Yes! Assemble everything except the tortilla chips up to 24 hours ahead and refrigerate. Add the chips right before serving to keep them crispy. For parties, you can even prepare the layers separately in small containers and let guests assemble their own mini dips. This makes it perfect for game day or potlucks!
What’s the best way to reheat leftover dip?
For best results, transfer portions to a microwave-safe dish and heat for 30-45 seconds on medium power, stirring halfway. If reheating in the oven, cover with foil and bake at 350°F for 10-15 minutes. Avoid high heat—it can make the guacamole turn brown and the cheese get rubbery. A quick zap in the microwave works best for just a few servings.
Why did my dip turn out too runny?
This usually happens when too many wet ingredients (like extra salsa or guacamole) are layered on top without enough binding elements. Try adding ½ cup extra shredded cheese or ¼ cup crushed chips to the top layer to absorb moisture. For future attempts, press each layer gently as you go—this helps everything stick together better. The cream cheese layer is your secret weapon for holding everything in place!

- Pea Soup Instant Pot Recipe: Velvety Green Smoothness in 20 Minutes - November 1, 2026
- Pork Loin Pulled Pork Crock Pot Recipe: Slow-Smoked Tenderness With Zero Dryness - November 1, 2026
- Baked Potatoes in Crock Pot Recipe: Buttery Interiors and Crispy Top Magic - November 1, 2026