
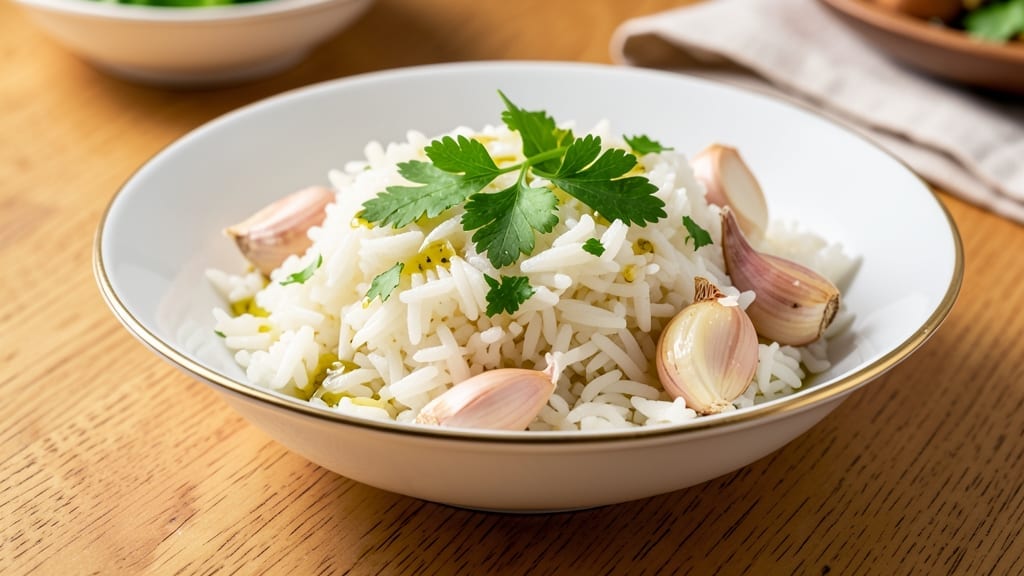
Mastering 2 cups white rice that’s perfectly fluffy and separate every time is simpler than you think—this foolproof method guarantees restaurant-quality results without the guesswork.
The secret lies in precise water ratios, proper cooking times, and a few key techniques that transform plain rice into a versatile base for any meal.
I’ve perfected this approach after years of trial and error, and it never fails to impress, whether you’re feeding a family or meal prepping for the week.
What sets this recipe apart is the balance between texture and flavor—achieving that ideal fluffy yet firm bite while keeping the grains distinct. We’ll use a 1:1.5 water-to-rice ratio (2 cups rice to 3 cups water) and a simple stovetop method that requires minimal effort but delivers maximum consistency.
Optional seasonings like garlic, herbs, or broth can elevate the rice into a side dish worthy of the main event, without complicating the process.
By the end, you’ll have light, separate grains that hold their shape perfectly—ideal for pairing with proteins, stir-fries, or even as a standalone dish. The best part? This method works for any variety of white rice, from long-grain to jasmine, and adapts easily to rice cookers or Instant Pots.
Whether you’re a beginner or a seasoned cook, these instructions will ensure your rice turns out faultlessly every time.
Ready to elevate your rice game? Let’s break down the exact steps, including timing, water adjustments, and flavor boosters, so you can confidently serve up restaurant-quality rice at home. The process is straightforward, and the results will have everyone asking for seconds.
Ingredients for 2 cups white rice
Pantry staples plus a few optional flavor boosters—this is all you need for perfect white rice every time.
| Ingredient | Amount | Notes |
|---|---|---|
| Long-Grain White Rice 🍚 | 2 cups | Uncooked, any variety (jasmine, basmati, or white) |
| Water 💧 | 3 cups | Room temperature preferred |
| Salt 🧂 | ½ tsp | Diamond Crystal kosher salt preferred |
| Extra-Virgin Olive Oil 🫒 | 1 tbsp | For flavor infusion (optional) |
| Fresh Garlic Cloves 🧄 | 2 cloves | Minced, for aroma (optional) |
| Fresh Parsley 🌿 | ¼ cup | Chopped, for garnish (optional) |
| Vegetable Broth 🍲 | ½ cup | Low-sodium, for seasoning (optional) |
| Lemon Zest 🍋 | 1 tsp | Brightens flavor (optional) |
The rice variety matters less than you think, but jasmine or basmati hold up best to the 1:1.5 water ratio. Trader Joe’s has great bulk bins if you cook rice often—just grab a 5-pound bag and store it in a cool, dark place. The water should be room temperature (cold water takes longer to heat), and never use salted water unless you’re adding broth later. For the optional flavor boosters, garlic and olive oil are my go-tos—they infuse into the rice as it cooks, giving it restaurant-level depth without extra effort. Fresh parsley adds a pop of color and freshness, but dried works in a pinch (use half the amount).
No extra-virgin olive oil? Any neutral oil like avocado or vegetable oil works—just don’t overdo it. Skipping garlic? Asafoetida (hing) powder at 1/8 tsp mimics its savory depth. The vegetable broth can be swapped for chicken or beef broth (if vegetarian, use vegetable), but reduce the salt in your final dish accordingly. Lemon zest is optional but worth it—it brightens the rice and cuts through richness. If you’re short on time, Instant Pot or rice cooker versions of this method use the same ratios but adjust cooking times (check your manual).
Rice keeps best in the fridge for 4-5 days in an airtight container, but it reheats beautifully—just add a splash of water and microwave for 2-3 minutes. For meal prep, cook a double batch and freeze portions in 1-cup servings for quick reheating. The optional seasonings (garlic, parsley, lemon) can be added fresh after cooking to keep flavors vibrant. If your rice turns out slightly undercooked, just add 2 tbsp water, cover, and steam for another 5 minutes.
Why You’ll Love This Recipe
- Five-Minute Start: I swear by this—just measure, pour, and walk away. No fancy tools, no stress. That first sizzle of garlic in olive oil? It’s the only prep you’ll do, and it’s worth it.
- Garlic Kiss Magic: Honestly, the secret’s in the oil. Toasting those cloves until they’re golden and fragrant before adding water transforms plain rice into something ridiculously good. That nutty aroma? It sticks to every grain.
- Meal Prep MVP: Between us, this is my go-to for lunches. Cook a big batch on Sunday, and you’ve got crispy-edged, flavorful rice ready to pair with anything—stir-fries, salads, or even just eggs. No sad, dry leftovers here.
- Budget-Buster Win: Two cups of rice, a splash of oil, a pinch of salt—this feeds four for under $2. I’ll be real: my college budget still thanks me for this trick, and my wallet does too.
Step-by-step instructions for perfectly fluffy white rice
Here’s how to transform simple rice into restaurant-quality side dishes every time.
Rinse the Rice Until Water Runs Clear
Place the 2 cups long-grain white rice in a fine-mesh strainer and rinse under cold running water for about 30 seconds. Swirl the rice with your fingers to remove surface starch – you’ll see the water turn cloudy. Keep rinsing until the water runs completely clear. This step prevents gummy rice by removing excess starch that would otherwise make the grains stick together.
Drain the rice thoroughly and let it sit in the strainer for 1 minute to evaporate any remaining surface moisture. I find this extra drying step makes a noticeable difference in texture. Don’t skip it – it’s what separates good rice from exceptional rice.
Toast the Rice with Olive Oil and Garlic
In a medium saucepan with a tight-fitting lid, combine the rinsed rice with the 1 tablespoon extra-virgin olive oil and 2 minced garlic cloves. Place over medium-high heat and stir constantly for 2-3 minutes until the rice becomes fragrant and the garlic turns golden. You’ll smell the nutty aroma of the rice and the sweet, pungent scent of garlic – this is your signal to move to the next step.
This toasting process develops deeper flavor in the rice. I like to use a wooden spoon for stirring as it distributes the oil more evenly than metal. If the rice starts to brown too quickly, reduce the heat slightly to prevent burning.
Add Water and Salt for Perfect Hydration
Pour in the 3 cups water and the 0.5 teaspoon salt, stirring once to distribute evenly. Bring to a boil over high heat, then immediately reduce heat to low, cover tightly with the lid, and reduce heat to the lowest setting that maintains a gentle simmer. The water should barely bubble at the edges – you want to maintain steady, even heat without boiling vigorously.
This precise heat control is crucial. Too high heat causes uneven cooking, while too low heat leaves rice undercooked. I find the perfect simmer is when you see just a few tiny bubbles at the edges and hear a soft, steady hum from the pot.
Cook Until All Water is Absorbed
Cook for 15 minutes without lifting the lid. After 15 minutes, turn off the heat but leave the rice covered and undisturbed for an additional 10 minutes. This resting period allows the steam to finish cooking the rice evenly and redistribute moisture throughout each grain.
During this time, you’ll notice the rice will look slightly underdone when you peek, but resist the urge to check frequently. The residual heat will complete the cooking process perfectly. The rice should be tender but still have a slight bite in the center when you press a grain between your fingers.
Fluff and Finish with Aromatics
Using a fork, gently fluff the rice to separate the grains. Stir in the 0.5 cup vegetable broth, 1 teaspoon lemon zest, and 0.25 cup chopped parsley. The broth adds depth of flavor while the lemon zest brightens the dish and the parsley adds freshness. Mix just until everything is evenly distributed – you want to preserve the individual grains.
Let the rice sit covered for 5 minutes before serving to allow the flavors to meld. The final result should be perfectly fluffy, separate grains with a tender yet slightly toothsome texture. Each bite should deliver the subtle garlic aroma, bright lemon notes, and the satisfying texture of perfectly cooked rice.
Pro Tips For Making 2 Cups White Rice
- Boil Water First: Fill your pot with water, salt it before adding rice, and bring it to a full rolling boil—no simmering first. I used to add cold rice to lukewarm water and spent 10 extra minutes waiting for it to cook evenly. A proper boil guarantees even grains every time.
- Toast the Garlic: Sauté 2 smashed garlic cloves in olive oil for 30 seconds until golden, then remove them. The oil infuses flavor, and the crispy garlic adds depth—no need to eat it all. Skip this, and your rice tastes like plain rice with a side of garlic breath.
- Use a 1:1.5 Ratio: For 2 cups rice, measure 3 cups water—not 2.5. Long-grain rice needs that extra moisture to steam properly. I learned this after making mushy, sticky rice that stuck to the pot like glue.
- Stir Once, Then Stop: After adding rice, stir once to distribute it, then leave it alone. Poking or stirring later breaks the grains and makes them gummy. Trust the process—your rice will cook itself if you let it.
Wine and beer pairings for this dish
White Wine Pairings
For this bright, aromatic rice dish, a crisp Sauvignon Blanc is my go-to choice—its citrusy notes complement the lemon zest beautifully while the mineral finish cuts through the garlic.
Look for a New Zealand Sauvignon Blanc like Oyster Bay or a French Sauvignon Blanc from Loire Valley for that perfect balance of acidity and freshness. The wine’s herbal undertones also echo the parsley, creating a harmonious flavor connection. 🍷
Light Red Wine Options
If you prefer red, a Pinot Noir with its delicate berry and earthy tones works surprisingly well, especially if your rice includes a touch of vegetable broth. A Willamette Valley Pinot Noir like Domaine Serene offers enough acidity to match the dish without overpowering it.
Avoid heavy reds like Cabernet Sauvignon—their tannins clash with the rice’s light texture.
Beer Pairings
A Belgian witbier like Hoegaarden or Stella Artois brings a refreshing contrast with its citrusy coriander notes and effervescence. The beer’s light body and subtle spice complement the garlic and lemon zest without competing.
For a darker option, try a wheat beer with a hint of clove, like Blue Moon Belgian White. The carbonation helps cleanse your palate between bites of rich main dishes. 🍺
Non-Alcoholic Options
Skip the alcohol? A sparkling apple cider like Martinelli’s or a ginger beer (like Feather Ginger Beer) adds brightness and effervescence that mirrors the lemon zest’s zing.
For something more savory, try a sparkling water infused with a splash of lemon juice and a pinch of sea salt—it’s surprisingly effective at enhancing the rice’s flavors. 💧
Regional Variations
In Southern Italy, this rice would pair with a Vermentino—its saline finish echoes the dish’s lemony brightness. For Spanish tapas, a Albariño from Rías Baixas complements the garlic and parsley beautifully.
Each region’s wine enhances the rice’s natural flavors while adding its own unique character to the meal.
Nutrition facts
Frequently asked questions
Why does rinsing the rice matter so much?
Rinsing removes excess starch that would otherwise make your rice gummy or sticky. The 30-second rinse until water runs clear ensures each grain stays separate and light. Skipping this step is the #1 reason for mushy rice—don’t skip it!
Can I use a rice cooker or Instant Pot for this recipe?
For a rice cooker, use the same 2 cups rice to 3 cups water ratio and follow the manufacturer’s cooking time (usually 15-20 minutes). In an Instant Pot, set to “White Rice” mode for 4 minutes on high pressure, then natural release for 10 minutes. Both methods maintain perfect texture.
What if my rice turns out too firm or undercooked?
If your rice is undercooked, add 2-3 tablespoons water, cover, and steam for 5-10 minutes on low heat. For overcooked rice, fluff it immediately and spread on a tray to cool—it’ll dry out slightly but regain texture when reheated with a splash of water. The key is the 10-minute resting period after cooking.
How can I make this rice dish vegetarian or vegan?
Swap the vegetable broth for vegetable broth (obviously!) and ensure your salt is vegan. For extra flavor, add 1/2 tsp smoked paprika or 1/4 tsp turmeric to the water while cooking. The garlic, lemon zest, and parsley keep it fully plant-based without sacrificing depth.
Can I make this recipe with brown rice or other varieties?
This method works best for white rice, but for brown rice, use a 1:2 rice-to-water ratio (2 cups rice to 4 cups water) and increase cooking time to 45-50 minutes. For jasmine or basmati, stick to the original ratio—they absorb water slightly differently. Always check the package instructions for specific varieties.

- 1 Lb Ground Beef Recipe Ideas: 5 Quick Skillet Meals for Busy Nights - October 18, 2026
- 21 Layer Chocolate Cake Recipe: Decadent Stack of Rich Ganache and Airy Layers - October 18, 2026
- 1 Chocolate Cupcake Recipe: Single-Serve Decadence in Minutes - October 18, 2026