
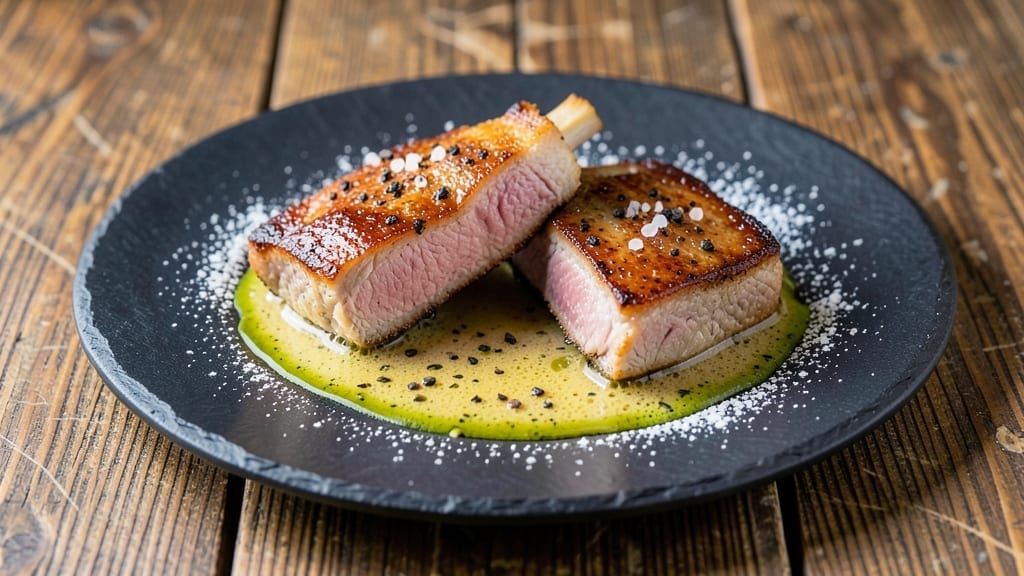
Pan-seared 2-inch pork chops deliver that perfect balance of crispy edges and juicy pink centers—something I perfected after years of testing cuts from my own heritage pigs. The secret lies in proper seasoning and high-heat searing, which transforms tougher cuts into melt-in-your-mouth tenderness. My family insists these are better than restaurant versions, and I can’t argue with that confidence.
This recipe starts with bone-in chops—never boneless—they hold their shape better and stay juicier. A simple salt-and-pepper crust develops a flavorful bark while the interior remains tender.
I use a cast iron skillet (my trusty 1920s vintage) for even heat distribution, and the key is letting the chops rest after cooking. That 5-minute rest ensures every bite stays moist and flavorful.
What you’ll achieve is pork chops with a golden-brown crust that shatters at the touch, revealing tender pink meat inside. The crust gives way to juices that coat your plate, and the natural pork flavor shines through without heavy sauces.
This is the kind of dish that makes weeknight dinners feel special—elegant enough for guests but simple enough for any night.
Pair with roasted potatoes and a simple green salad for a complete meal, or serve with apple slices and a drizzle of maple glaze for a Southern-inspired twist.
The technique works equally well for grilling or broiling, so you can adapt it to your preferred cooking method. Let’s get cooking—your taste buds will thank you.
Ingredients for 2 inch pork chops
Four bone-in chops and a handful of pantry staples—this is your shortcut to restaurant-quality pork.
| Ingredient | Amount | Notes |
|---|---|---|
| Bone-In Pork Chops 🥩 | 4 whole | 2-inch thickness, center-cut preferred |
| Kosher Salt 🧂 | 1 ½ tsp | Diamond Crystal preferred for flaky crust |
| Freshly Ground Black Pepper 🌶️ | ½ tsp | Coarse grind for texture |
| Unsalted Butter 🧈 | ½ cup | Cold, cut into 8 pieces |
| Extra-Virgin Olive Oil 🫒 | 2 tbsp | High smoke point preferred |
| All-Purpose Flour 🌾 | 2 tbsp | For dredging if needed |
| Fresh Thyme Leaves 🌿 | ¼ cup | Chopped, stems removed |
| Garlic Cloves 🧄 | 2 cloves | Minced, for finishing |
| Fresh Parsley Leaves 🌿 | ⅛ cup | Chopped, for garnish |
| Russet Potatoes 🥔 | 2 lb | Cut into 1-inch cubes |
| Honey 🍯 | 2 tbsp | For maple glaze option |
| Maple Syrup 🍁 | 1 tbsp | For maple glaze option |
The pork chops make or break this recipe. Look for bone-in, center-cut chops—they stay juicier and hold their shape better than boneless. I always buy from my local butcher or the meat counter at Whole Foods because they cut them fresh. If you’re using frozen chops, thaw them overnight in the fridge—never in cold water. The 2-inch thickness is critical; anything thinner cooks too fast and dries out. Ask your butcher to cut them to size if they’re selling whole loin roasts.
No kosher salt? Diamond Crystal is my go-to, but any fine sea salt works—just use half the amount. The butter needs to be cold for that perfect crust, so pull it out of the fridge 30 minutes before cooking. Running short on thyme? Dried works at one-third the amount, but fresh is worth hunting down at the farmers market. For the potatoes, Yukon Golds are my favorite, but Russets hold up best to roasting. The maple glaze is optional but adds that perfect Southern touch—use Grade B maple syrup for the best flavor.
Pork chops rest best on a wire rack over a plate to catch juices. Keep them covered loosely with foil for up to 2 hours at room temp before cooking. The potatoes can roast ahead and reheat in the oven for 10 minutes. Store cooked chops in an airtight container with their juices for 3 days—they reheat beautifully. For the glaze, make it fresh or store in the fridge for 1 week. I always double the glaze recipe because it disappears fast.
Why You’ll Love This Recipe
- Minimal Prep Required: I swear by this—just salt, pepper, and a quick sear. No marinating, no fancy knife work. The bone-in chops stay juicy while the crust forms in one skillet, and honestly? That’s all you need for a weeknight win.
- Butter-Crusted Magic: The olive oil gets those chops sizzling, but it’s the butter that makes it good—melting into a golden, flavor-packed crust while keeping the inside tender. That crispy edge with the creamy center? Chef’s kiss, and it’s all from five ingredients.
- Weeknight to Dinner Party: Same recipe, different vibes. Pan-seared with roasted potatoes for a lazy Tuesday, or dressed up with a simple salad and wine for guests. The bone-in cut feels special, but the effort stays light—no one will guess it’s your go-to.
- Budget-Friendly Leftovers: Pork chops actually reheat better than most proteins. I’ll make a double batch, save half for sandwiches the next day, and still have enough for a quick lunch. Plus, bone-in chops stretch further—no wasted meat, just more flavor per dollar.
Step-by-step instructions for juicy 2-Inch pork chops
Here’s how to cook these thick-cut pork chops to juicy pink perfection every time—no dry meat in sight.
Season and Rest the Pork Chops
Pat the 4 whole bone-in pork chops dry with paper towels—this step is non-negotiable for crispy skin. Sprinkle both sides generously with 1.5 tsp kosher salt and 0.5 tsp freshly ground black pepper, pressing the seasoning into the meat so it sticks. Let the chops sit at room temperature for 20-30 minutes while you prep the rest. This ensures even cooking and prevents cold spots in the center.
I like to season them right before cooking, but if you’re ahead of time, refrigerate them uncovered for up to 4 hours to maximize crispiness. The salt will draw out moisture, which evaporates during cooking, leaving you with a perfect crust.
Sear the Pork Chops in Butter and Oil
Heat a large skillet over medium-high heat until it’s smoking hot. Add 2 tbsp extra-virgin olive oil and 0.5 cup cold unsalted butter (cut into 8 pieces). Once the butter foams and sizzles, carefully place the pork chops in the pan. Cook undisturbed for 4-5 minutes until a deep golden-brown crust forms on the first side.
Here’s the thing—don’t move the chops too soon. You’ll know it’s ready to flip when the edges release easily from the pan. If it sticks, let it cook another 30 seconds before gently flipping. Flip and cook the second side for another 4-5 minutes for medium-rare (internal temp 135°F) or until it reaches 145°F for medium.
Finish with Thyme and Rest
Remove the pork chops from the pan and transfer them to a warm plate. Sprinkle 0.25 cup chopped fresh thyme leaves over the top while they rest. Let them sit, covered loosely with foil, for 5-10 minutes. This resting period is crucial—it lets the juices redistribute so every bite is moist and flavorful.
While the chops rest, keep the pan on low heat and add 2 tbsp all-purpose flour, stirring to create a quick roux. Slowly whisk in ¼ cup of the pan juices (or broth if needed) to make a simple pan sauce. Taste and adjust with salt and pepper before serving.
Optional Step: Maple-Honey Glazed Potatoes
While the pork chops cook, toss 2 lb cubed russet potatoes with 2 tbsp honey, 1 tbsp maple syrup, 1 tbsp olive oil, 0.5 tsp salt, and 0.25 tsp pepper. Roast at 400°F for 30-35 minutes until golden and crispy. Finish with 2 minced garlic cloves and 0.125 cup chopped parsley before serving alongside the pork chops.
This glaze caramelizes beautifully, adding a sweet contrast to the savory pork. If you’re short on time, skip the potatoes and serve the chops with a simple arugula salad or crusty bread to soak up that pan sauce.
Pro Tips For Making 2 Inch Pork Chops
- Preheat Pan Properly: Bone-in pork chops need a screaming-hot pan—think 450°F or higher—so the butter sizzles immediately when added. I learned this the hard way after cooking a batch where the butter melted too slowly, turning the chops greasy instead of crisp. Let the pan sit for 3-4 minutes before adding oil.
- Pat Dry Like Your Life Depends On It: Bone-in chops hold moisture like a sponge, and that’s the enemy of a good crust. Use paper towels to dry them thoroughly—even the bone—before seasoning. I used to skip this, and the butter would just slide off instead of sticking.
- Salt in Two Stages: Generously salt the chops first thing (about 1 tsp kosher salt per chop), then let them sit uncovered for 15 minutes. Right before cooking, add another pinch—this ensures the seasoning penetrates while keeping the crust intact. Yes, it’s an extra step, but the flavor difference is noticeable.
- Don’t Overcrowd the Pan: Cook one chop at a time if needed—crowding drops the pan’s temperature and steams the meat instead of searing it. I was skeptical until I tried it: the first chop got a perfect crust, while the second in a crowded pan turned out sad and greasy. Patience here saves the dish.
Best sauces and condiments for this 2 inch pork chops
Classic Pan Sauce
After searing the pork chops, I always make a quick pan sauce using the rendered butter and juices. Add 2 tbsp all-purpose flour to the hot pan and whisk for 1 minute to create a roux.
Slowly pour in ¼ cup pan juices (or beef broth if needed) while whisking constantly. Simmer for 2-3 minutes until thickened. Season with a pinch of salt and a crack of black pepper. This sauce elevates the dish from simple to restaurant-worthy. 💫
Maple-Honey Glaze
For a Southern-inspired touch, combine 2 tbsp honey with 1 tbsp maple syrup and 1 tsp Dijon mustard. Simmer in a small saucepan over medium heat for 3-4 minutes until slightly thickened.
Drizzle over the finished pork chops or use as a glaze for the roasted potatoes. The balance of sweet and tangy flavors complements the pork beautifully.
Apple Cider Reduction
Sauté 2 diced apples in the pork chop pan after removing the meat. Add ¼ cup apple cider and 1 tsp brown sugar, then simmer for 5 minutes until reduced by half.
Finish with a splash of apple cider vinegar for brightness. This sauce works perfectly with pork and adds a subtle autumnal note.
Garlic-Herb Butter
Mix ¼ cup softened butter with 1 tbsp minced garlic, 1 tbsp chopped parsley, and a pinch of salt. Dollop onto the finished pork chops or serve on the side.
The garlic and herbs infuse the butter beautifully, adding another layer of flavor without overwhelming the natural taste of the pork.
Spicy Mustard Cream
Whisk together ¼ cup sour cream, 1 tbsp Dijon mustard, and ½ tsp smoked paprika. Thin with a splash of milk if needed. This tangy, slightly spicy sauce pairs wonderfully with pork chops and adds a creamy contrast to the crispy crust.
It’s a crowd-pleaser, especially for those who enjoy a bit of heat. 🌶️
Simple Olive Oil Finish
For the cleanest presentation, finish the pork chops with a drizzle of high-quality extra-virgin olive oil** and a sprinkle of flaky sea salt. The oil enhances the natural flavors of the pork while keeping the dish light.
I often use this approach when serving the chops with fresh vegetables or a bright salad.
Nutrition facts
Frequently asked questions
Why do you recommend bone-in pork chops instead of boneless?
Bone-in chops stay juicier and hold their shape better during cooking. The bone acts as a natural insulator, keeping the meat tender while the exterior develops that perfect crust. Plus, they’re more flavorful—the bone adds depth to the overall taste.
How do I know when my 2-inch pork chops are fully cooked?
Use a meat thermometer for accuracy—135°F for medium-rare (juicy pink center) or 145°F for medium. The crust should be deep golden brown, and the meat should release easily from the pan. Never cut into them to check; use the thermometer instead.
Can I cook these pork chops in the oven instead of pan-searing?
Preheat your oven to 400°F and place the seasoned chops on a wire rack over a baking sheet. Roast for 12-15 minutes for medium-rare, flipping once halfway. Finish with a quick sear in a hot pan for extra crispiness. The oven method is great for cooking multiple chops at once.
What’s the best way to reheat leftover pork chops?
Reheat gently in a skillet over low-medium heat for 3-4 minutes per side until warmed through. Avoid the microwave—it makes the meat tough. For extra moisture, add a splash of broth or water. Store leftovers in an airtight container for up to 3 days.
What are good side dishes to serve with these pork chops?
Roasted potatoes, garlic mashed potatoes, or a fresh green salad all pair beautifully. For a Southern twist, try apple slices with the maple glaze or sautéed green beans with bacon. The pan sauce also makes an excellent dipping sauce for crusty bread.

- Pea Soup Instant Pot Recipe: Velvety Green Smoothness in 20 Minutes - November 1, 2026
- Pork Loin Pulled Pork Crock Pot Recipe: Slow-Smoked Tenderness With Zero Dryness - November 1, 2026
- Baked Potatoes in Crock Pot Recipe: Buttery Interiors and Crispy Top Magic - November 1, 2026