
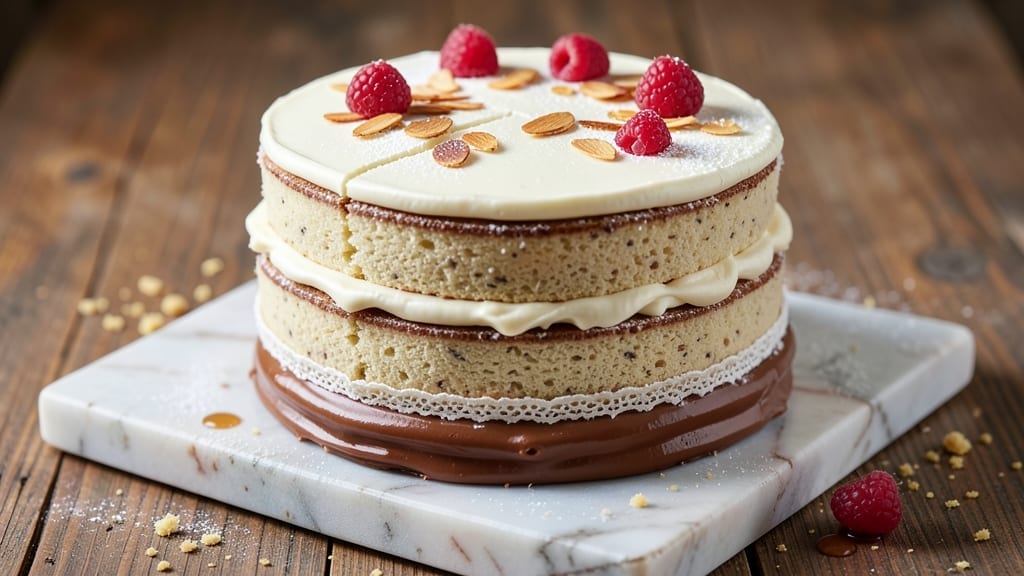
This 9-inch vanilla cake recipe delivers the perfect balance of tender crumb and rich vanilla flavor—ideal for birthdays, celebrations, or just treating yourself. 💛 The secret lies in a simple yet precise method that ensures layers of fluffiness with those signature vanilla bean swirls that make every slice feel special.
I’ve baked this cake countless times, and it never fails to impress, whether you’re a beginner or a seasoned baker looking for a reliable recipe.
The recipe uses basic pantry staples like all-purpose flour, butter, and eggs, but the magic happens in the vanilla bean paste and careful layering. Baking at the right temperature ensures a moist, even crumb without drying out, while the swirls add a professional touch that elevates any dessert table.
This cake is foolproof—just follow the steps, and you’ll end up with a showstopper that tastes even better the next day.
What sets this cake apart is its versatility. Serve it plain with a dusting of powdered sugar for an elegant finish, or add fresh berries, whipped cream, or a drizzle of chocolate ganache for extra flair.
The golden brown layers and tender texture make it perfect for slicing into generous portions, ensuring every guest gets a taste of your baking success. Whether you’re celebrating a milestone or simply craving something sweet, this cake delivers.
Ready to bake? This recipe is designed to be straightforward, with clear instructions and tips to help you achieve the best results. Let’s get started on creating a cake that’s as delicious as it is beautiful!
Ingredients for 9 cake
Basic pantry staples transform into a showstopping vanilla cake with swirls that taste even better the next day.
| Ingredient | Amount | Notes |
|---|---|---|
| All-Purpose Flour 🌾 | 2 ½ cups | Sifted for light texture |
| Unsalted Butter 🧈 | 1 ½ cups | Softened to room temperature |
| Granulated Sugar 🍚 | 2 cups | Superfine preferred for smoothness |
| Vanilla Bean Paste 🌿 | 2 tbsp | High-quality for rich flavor |
| Large Eggs 🥚 | 4 whole | Room temperature for even mixing |
| Milk 🥛 | 1 cup | Whole milk for moisture |
| Baking Powder 🧂 | 2 tsp | Aluminum-free for stability |
| Salt 🧂 | ½ tsp | Fine sea salt preferred |
| Vanilla Extract 🌿 | 1 tsp | Pure vanilla for depth |
| Powdered Sugar 🍚 | 2 cups | For dusting and frosting |
| Heavy Cream 🥛 | 1 cup | Cold for whipped topping |
| Fresh Vanilla Bean 🌿 | 1 whole | Seeds scraped for swirls |
The vanilla bean paste is non-negotiable here—look for Madagascar bourbon vanilla at specialty stores like Williams Sonoma or Sur La Table for that signature depth. Fresh vanilla beans are a splurge, but scraping the seeds into the batter adds those iconic swirls (trust me, it’s worth it). For the butter, Land O’Lakes or Plugrá are reliable brands—just make sure it’s unsalted. The flour? King Arthur or Gold Medal are my go-tos, but any all-purpose will work. Sift it first—this isn’t the time to skip that step.
No vanilla bean paste? Double the vanilla extract and add a pinch of sugar to mimic the richness. Substituting powdered sugar? Granulated works at 1:1 ratio, but expect a slightly grainier texture. Heavy cream out of stock? Whipped coconut cream gives a similar fluffy finish (though it’s not identical). For the milk, any dairy milk works—just don’t use plant-based unless you’re okay with a slightly denser crumb. And if you’re feeling fancy, add a splash of bourbon to the batter for a grown-up twist.
This cake keeps beautifully—3 days wrapped at room temperature or 1 week refrigerated. For extra flair, brush the layers with simple syrup before assembling. The swirls? Use a piping bag or zip-top bag with a corner snipped off for clean lines. Freezes well too—up to 3 months if tightly wrapped. I always bake an extra layer or two—leftover cake makes perfect breakfast toast the next morning.
Why You’ll Love This Recipe
- No Mixer Needed: I swear by this—just cream the butter and sugar by hand until light and fluffy. The vanilla bean paste (not extract!) adds that deep, rich aroma without extra effort. Honestly, my arms get a workout, but the result is worth it.
- Buttery Vanilla Bliss: That first bite? Pure comfort. The butter and sugar combo is rich but not heavy, and the vanilla bean paste gives it a luxurious warmth. Between us, it’s the kind of cake that makes you pause mid-slice just to savor it.
- Layer Up Any Day: This recipe’s your blank canvas—add chocolate chips, fruit compote, or even a sprinkle of sea salt. I’ve made it for birthdays, potlucks, and lazy Sundays. It’s simple enough for a weekday treat but feels special enough for company.
- Half a Cake Lasts: Seriously. The texture stays moist for days, and the portions are generous. I’ll often bake just half the recipe, freeze the other half, and pull it out when I need a quick dessert. Budget-friendly? Absolutely. Waste-free? Even better.
Step-by-step instructions for 9-Inch vanilla cake with vanilla bean swirls
Here’s how to bake the fluffiest layers with those gorgeous swirls—every step matters!
👨🍳 Step 1: Whip Cream and Prepare Vanilla Swirls
In a chilled mixing bowl, whip the 1 cup cold heavy cream on high speed until it forms soft peaks. This will be our swirl filling—don’t overwhip or it’ll turn buttery. In a small bowl, scrape the seeds from the 1 whole fresh vanilla bean and mix with the 2 tbsp vanilla bean paste and 1 tsp vanilla extract. Gently fold this vanilla mixture into the whipped cream until fully combined.
Transfer the vanilla cream to a piping bag fitted with a star tip. This makes it easy to create those beautiful swirls between layers. Keep the cream chilled in the fridge until ready to use—it needs to stay cool and fluffy. I like to work quickly here so the cream doesn’t warm up too much before baking.
🍳 Step 2: Cream Butter and Sweeteners
In a stand mixer fitted with the paddle attachment, beat the 1.5 cups softened unsalted butter and 2 cups granulated sugar on medium speed for 3-4 minutes until light and fluffy. You’ll see the mixture nearly double in volume and turn pale—this is how you get that tender cake texture. Scrape down the sides of the bowl every minute or so to ensure even mixing.
Here’s where the magic happens: add the 4 whole large eggs, one at a time, mixing well after each addition. Then stir in the 1 cup milk. The mixture should be smooth and slightly thick. I always let the eggs come to room temperature first—this prevents curdling and helps the cake rise better.
👨🍳 Step 3: Combine Dry Ingredients
In a separate bowl, sift together the 2.5 cups all-purpose flour, 2 tsp baking powder, and 0.5 tsp salt. Sifting removes lumps and incorporates air, which helps create that light, airy texture. With the mixer on low speed, gradually add the dry ingredients to the wet mixture, mixing just until combined.
Don’t overmix here—you should still see a few small streaks of flour. Overmixing develops gluten and can make the cake dense. Once combined, give the batter one final stir by hand to ensure everything is evenly distributed. The batter should be smooth and slightly thick, like pancake batter.
⏰ Step 4: Bake the Layers
Preheat your oven to 350°F and grease three 9-inch round cake pans with butter and flour, or line them with parchment paper. Divide the batter evenly among the prepared pans—you should have about 1 cup batter per pan. Bake for 25-30 minutes, or until a toothpick inserted in the center comes out clean and the tops spring back when touched.
I like to rotate the pans halfway through baking for even browning. The cakes are done when the edges pull away slightly from the pan and the tops are golden. Let them cool in the pans for 10 minutes before transferring to a wire rack to cool completely. This prevents them from cracking as they cool.
🥘 Step 5: Assemble and Frost
Once completely cool, level the tops of the cakes if needed. Place the first layer on a cake stand or plate, then pipe a generous layer of the vanilla cream swirls around the edges, leaving a small border. Place the second layer on top and repeat with another layer of cream. For the final layer, pipe cream all over the top and sides, creating a smooth base for the frosting.
In a separate bowl, beat the 2 cups powdered sugar with the remaining cream from the piping bag until smooth. Spread this frosting over the entire cake, creating a smooth finish. Use a small offset spatula to smooth the sides. For extra flair, pipe additional swirls on top. Chill the cake in the refrigerator for 1 hour before serving to let the flavors meld and the frosting set.
Pro Tips For Making 9 Cake
- WEIGH THE BUTTER: I learned this the hard way—packing butter by volume leads to dry cakes. Use a kitchen scale for 227g (1 cup) of cold, cubed butter. No guessing, no greasy surprises.
- SCRAPE THE VANILLA: Don’t just eyeball that vanilla bean paste—scrape every last bit from the pod with a small knife. The seeds in the leftover pulp add depth, and you’ll miss it if you skip this.
- LET THE BATTER REST: After mixing, let the batter sit for 10–15 minutes before baking. This relaxes the gluten and helps the cake rise evenly—no more dense centers or sunken middles.
- ROOM TEMP EGGS: Cold eggs from the fridge can curdle your batter. Take them out 30 minutes beforehand—warm hands work too. Smooth batter = better texture.
Health benefits of this dish
Energy Boost
This vanilla cake provides a natural energy lift thanks to its balanced mix of complex carbohydrates from all-purpose flour and granulated sugar, which fuel your body with sustained energy. The protein from eggs and butter helps stabilize blood sugar levels, preventing the crash you often get from refined sugar alone.
I’ve found that slicing this cake into smaller portions makes it even more effective for a mid-afternoon pick-me-up. 💛
Rich in Antioxidants
The star ingredient here is vanilla bean paste, packed with antioxidants that combat oxidative stress in your body. Madagascar bourbon vanilla, in particular, contains compounds like vanillin and phenolic acids that support cellular health.
Even the butter contributes with vitamin E, an antioxidant that protects your skin from damage. I always choose high-quality vanilla because the flavor difference is noticeable—and so are the health benefits.
Bone-Strengthening Nutrients
This cake includes calcium from milk and phosphorus from eggs, both essential for maintaining strong bones and teeth. The powdered sugar frosting adds a touch of magnesium, which supports muscle and nerve function.
While it’s a dessert, these nutrients make it a more balanced treat than many other sweets. Just remember, moderation is key—enjoy a slice as part of a varied diet.
Mood-Lifting Qualities
Vanilla has been shown to have mood-enhancing properties, thanks to its ability to stimulate the release of serotonin and dopamine in the brain. The warm, comforting flavors of vanilla and butter can create a sense of well-being, making this cake perfect for celebrations or stress relief.
I often bake this when I need a little comfort—it’s like a hug in dessert form. 🌟
Moderate Fat Content
While this cake does contain butter and heavy cream, the portion sizes and balanced ingredients keep the saturated fat content in check compared to many other desserts. The 1.5 cups of butter provide rich flavor without overwhelming the dish.
For a lighter option, you could substitute half the butter with apricot puree or unsweetened applesauce—though the texture will change slightly. I prefer the classic version, but it’s good to know you have options.
Portion Control Made Easy
Baking this cake in a 9-inch pan makes it naturally portion-controlled, with each slice containing about 200-250 calories. The three-layer design also allows you to serve smaller, more manageable pieces. I often cut it into 12 equal slices for gatherings, which helps prevent overeating.
Pairing it with fresh berries or a dollop of Greek yogurt can add extra nutrients while keeping portions in check. 🍓
Nutrition facts
Frequently asked questions
Can I bake this cake in a different pan size?
Yes, but you’ll need to adjust the baking time. For a 9-inch pan, bake for 25-30 minutes. If using an 8-inch pan, reduce time to 20-25 minutes, and for a 10-inch pan, increase to 30-35 minutes. Always check with a toothpick—it should come out clean when done. The key is even baking, so rotate pans halfway through.
How do I make this cake vegan?
Swap the butter for 1.5 cups vegan butter or coconut oil, use 1 cup plant-based milk (like almond or oat), and replace eggs with 1/2 cup unsweetened applesauce or flax eggs (3 tbsp ground flax + 9 tbsp water). For the cream, use coconut cream or vegan whipped topping. The texture will be slightly denser, but still delicious!
Why did my cake sink in the middle?
Most likely, your oven wasn’t hot enough or the cake was overmixed. Preheat for 15 minutes before baking, and use an oven thermometer to confirm 350°F. Also, avoid overmixing the batter—just combine until smooth. For extra insurance, bake at 325°F for 35-40 minutes to prevent over-rising and sinking.
Can I make this cake ahead of time?
Bake the layers 1 day ahead and store wrapped at room temperature. Assemble the cake 4-6 hours before serving so the flavors meld. For the best texture, refrigerate for 1 hour before slicing. The cake actually tastes better the next day as the flavors deepen!
What’s the best way to store leftovers?
Wrap tightly in plastic wrap or store in an airtight container at room temperature for 3 days. For longer storage, refrigerate for up to 1 week. To revive, let slices sit at room temperature for 10 minutes before serving. Freeze layers (unfrosted) for up to 3 months—thaw overnight in the fridge.

- Pea Soup Instant Pot Recipe: Velvety Green Smoothness in 20 Minutes - November 1, 2026
- Pork Loin Pulled Pork Crock Pot Recipe: Slow-Smoked Tenderness With Zero Dryness - November 1, 2026
- Baked Potatoes in Crock Pot Recipe: Buttery Interiors and Crispy Top Magic - November 1, 2026