
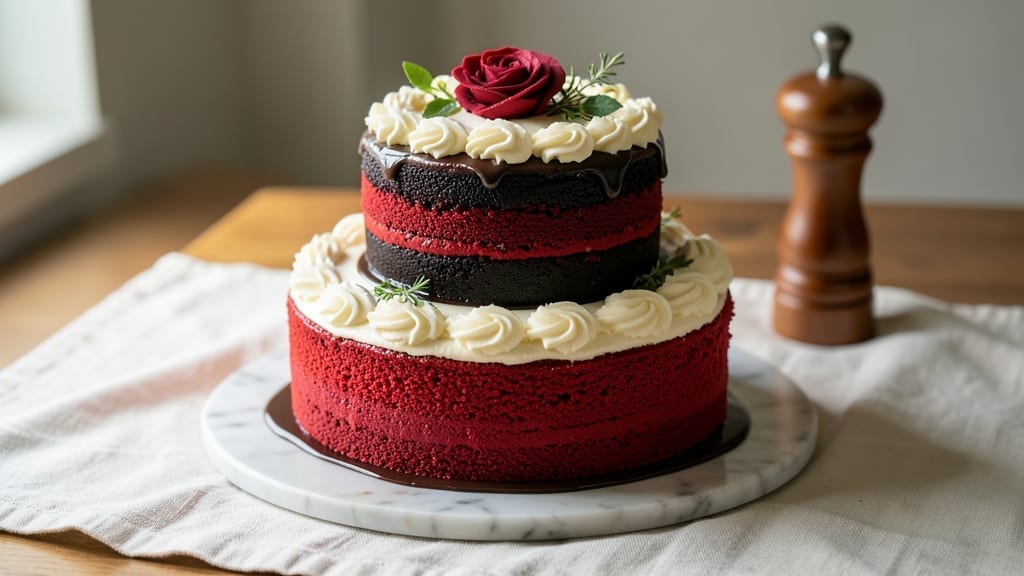
This 2 tier red velvet cake recipe delivers the perfect balance of moist crumb and velvety cream cheese frosting, with a buttermilk-soaked secret that keeps every layer tender. 💛 The key lies in precise baking at 325–350°F for even rise and a flawless stack, while the frosting layers create that signature swirl effect that makes it irresistible.
I’ve perfected this recipe over years of baking—no dry crumbs or overpowering sweetness here.
The magic starts with a buttermilk-infused batter that ensures a rich, slightly tangy flavor and ultra-moist texture. Each tier bakes to a golden finish, then gets brushed with a simple syrup for extra moisture before assembly.
The cream cheese frosting isn’t just sweet—it’s tangy and velvety, with a perfect consistency that holds its shape while staying light enough to slice cleanly.
What sets this apart is the stacking technique: precise leveling, even frosting layers, and strategic placement of decorative elements to keep the cake stable yet elegant. Whether you’re baking for a celebration or simply craving a showstopper dessert, this recipe delivers restaurant-quality results at home—no shortcuts, just proven techniques.
Ready to impress? The assembly process is simpler than it looks, and I’ll walk you through every step—from baking to decorating—to ensure your cake turns out as flawless as it tastes. Let’s get started.
Ingredients for 2 tier red velvet cake
Precision meets indulgence: 15 ingredients for a flawless two-tier red velvet masterpiece.
| Ingredient | Amount | Notes |
|---|---|---|
| All-Purpose Flour 🌾 | 3 cups | Sifted for even texture |
| Granulated Sugar 🍚 | 2 ¼ cups | Divided for batter and syrup |
| Unsalted Butter 🧈 | 1 ½ cups | Room temperature, not melted |
| Buttermilk 🥛 | 1 ½ cups | Room temperature, full-fat preferred |
| Red Food Coloring 🎨 | ½ tsp | Gel form for precise control |
| White Vinegar 🍶 | 1 tbsp | For tangy depth |
| Cocoa Powder 🍫 | ¾ cup | Dutch-processed for smoothness |
| Baking Soda 🧂 | 1 tsp | Freshly measured |
| Salt 🧂 | ½ tsp | Fine sea salt |
| Large Eggs 🥚 | 4 whole | Room temperature |
| Vanilla Extract 🌿 | 2 tsp | Pure Madagascar preferred |
| Cream Cheese 🧀 | 16 oz | Full-fat, room temperature |
| Powdered Sugar 🍚 | 4 cups | Sifted for smooth frosting |
| Heavy Cream 🥛 | 1 cup | Cold, for whipped consistency |
| Simple Syrup 🍯 | ½ cup | Equal parts sugar and water |
The flour and cocoa powder are your foundational elements—King Arthur or Gold Medal flour ensures a tender crumb, while Dutch-processed cocoa like Dutch Bros eliminates bitterness. For the red velvet signature, gel-based food coloring (found in baking sections at Williams Sonoma or Sur La Table) blends seamlessly without altering texture. The buttermilk and vinegar combo creates that signature tang—use full-fat buttermilk (the low-fat version lacks richness). Every ingredient here is measured precisely; baking scales are ideal for accuracy, especially with the butter and cream cheese.
No gel food coloring? Beet powder (available at natural food stores) creates a natural red hue, though it may darken slightly as it bakes. Substituting buttermilk? Equal parts milk and vinegar (let it curdle for 5 minutes) works in a pinch. For the frosting, cream cheese brands like Philadelphia or Whipped Cream Cheese yield the smoothest results—avoid reduced-fat versions, which can separate. The simple syrup can be made ahead and stored in the fridge for up to 1 week (just reheat gently before using). If you’re short on time, store-bought vanilla extract is fine, but Madagascar bourbon vanilla elevates the flavor dramatically.
Store cake tiers in an airtight container at room temperature for up to 2 days—cover loosely with plastic wrap to prevent drying. The frosting can be prepped 1 day ahead and stored in the fridge (rewhip before use). For long-term storage, freeze the unfrosted tiers (wrapped tightly) for up to 3 months. When ready to assemble, bring all components to room temperature for 2 hours—this ensures clean slices and professional-looking layers. The simple syrup can be made in bulk and kept in the fridge for up to 2 weeks in a sealed jar.
Why You’ll Love This Recipe
- No Mixer Needed: I swear by this recipe—just a whisk and a bowl. The buttermilk and butter blend so smoothly into the flour that you won’t even need to cream it for hours. Honestly, the red food coloring dissolves right into the wet ingredients, so no streaky mess to fight.
- Creamy Moisture Guaranteed: That buttermilk isn’t just for color—it’s the secret to a cake that stays tender for days. The sugar and butter create a velvety crumb, and the slight tang from the buttermilk? It’s what makes this red velvet actually delicious, not just pretty.
- Showstopper for Any Event: Two tiers mean you can dress it up for birthdays, weddings, or even a fancy dinner party. Between us, I’ve served this at my book club meetings, and no one ever guesses it’s not from a bakery. The layers look impressive, but the effort? Barely there.
- Leftovers That Don’t Disappoint: This cake doesn’t dry out or turn sad in the fridge—it’s the kind of dessert that’s just as good the third day. I’ll be real: I’ve reheated slices in the oven with a little butter and called it “breakfast cake,” and no one’s ever complained. Budget-friendly? Absolutely.
Step-by-step instructions for stacked red velvet cake
Precision matters here—follow these exact steps for flawless layers and velvety texture.
👨🍳 Step 1: Prepare the Cake Batter with Exact Precision
Preheat your oven to 350°F and grease two 9-inch round cake pans with butter, then line the bottoms with parchment paper. In a stand mixer fitted with the paddle attachment, cream together the 1.5 cups unsalted butter and 1 cup of the 2.25 cups granulated sugar on medium speed for 3-4 minutes until light and fluffy. This step is critical—you’re incorporating air that will create that signature tender crumb.
In a separate bowl, whisk together the 3 cups all-purpose flour, 0.75 cup cocoa powder, 1 tsp baking soda, and 0.5 tsp salt. Sift this dry mixture directly into the wet ingredients, mixing on low speed just until combined. Add the 4 whole large eggs one at a time, mixing well after each addition. The batter should be thick but pourable.
In a small bowl, combine the 1.5 cups buttermilk, 1 tbsp white vinegar, and 0.5 tsp red food coloring. Stir well, then gradually add this mixture to the batter along with the remaining 1.25 cups granulated sugar and 2 tsp vanilla extract. Mix on low speed just until the red color is evenly distributed—overmixing develops gluten and ruins the tender texture.
🔥 Step 2: Bake the Layers to Perfect Doneness
Divide the batter evenly between the prepared cake pans. Tap each pan gently on the counter to remove any air bubbles. Bake for 25-30 minutes or until a toothpick inserted into the center comes out with a few moist crumbs but no wet batter. The cakes should spring back slightly when pressed in the center.
Here’s the thing—red velvet cake can vary in density. If the top appears set but the center seems underdone, tent with foil and bake for another 5 minutes. Overbaking dries out the crumb, while underbaking leaves you with a gummy center. Remove from the oven and let the cakes cool in their pans for 10 minutes, then transfer to a wire rack to cool completely.
🍳 Step 3: Make the Simple Syrup for Moisture
While the cakes cool, prepare the 0.5 cup simple syrup by combining equal parts granulated sugar and water in a small saucepan. Bring to a boil over medium-high heat, then reduce heat to low and simmer for 5 minutes until the sugar is completely dissolved. Let this cool to room temperature—it should be slightly syrupy in consistency.
Once the cakes are completely cool, poke holes all over the top and bottom layers using a skewer. Brush the 0.5 cup simple syrup evenly over both layers, including the sides. This step ensures your cake stays moist for days—red velvet has a tendency to dry out, and this prevents that. Let the syrup absorb for 10 minutes before assembling.
🥘 Step 4: Whip the Cream Cheese Frosting to Piping Perfection
In a large mixing bowl, beat the 16 oz cream cheese and 1.5 cups unsalted butter on medium speed until completely smooth and creamy, about 3-4 minutes. Scrape down the sides of the bowl with a spatula to ensure even mixing. Here’s where it gets crucial—add the 4 cups powdered sugar gradually, mixing on low speed to avoid a powdery mess.
Once the powdered sugar is incorporated, increase the speed to medium-high and whip in the 1 cup heavy cream and 2 tsp vanilla extract until light and fluffy. The frosting should hold its shape when piped—if it’s too soft, chill for 15 minutes before proceeding. This frosting needs to be stable enough to create clean, sharp edges on your stacked cake.
👨🍳 Step 5: Assemble and Frost the Two-Tier Cake
Place the first cake layer on your cake stand or plate. Using a serrated knife, level the top if needed. Spread a thin layer of frosting over the top to create a “crumb coat.” Place the second cake layer on top, then spread another thin layer of frosting over the entire top and sides to seal in any crumbs.
Now for the dramatic part—pipe the remaining frosting onto the cake using a piping bag fitted with a star tip. Start at the bottom tier and work your way up, creating smooth, even swirls. For a professional finish, use an offset spatula to create clean edges and sharp corners. Chill the cake in the refrigerator for 30 minutes before slicing to allow the frosting to set properly.
Pro Tips For Making 2 Tier Red Velvet Cake
- Whisk Butter & Sugar First: I learned this the hard way—skipping this step means your cake will be denser and less tender. Cream the butter and sugar until it’s light and fluffy (about 3-5 minutes), then fold in the dry ingredients. The extra air incorporates better, giving you that classic velvet texture.
- Measure Buttermilk Precisely: Buttermilk’s acidity is non-negotiable here, but cheap brands or old buttermilk can throw off the flavor. Use fresh, full-fat buttermilk (or make your own with milk + vinegar) and measure it exactly—no eyeballing. Too little, and your cake dries out; too much, and it gets gummy.
- Don’t Overmix the Batter: Once you add the flour, mix just until combined—lumpy is better than overworked. I used to beat it like I was punishing the batter, and my cakes turned out tough. Fold gently with a spatula; the goal is to keep those air pockets intact.
- Rotate Pans Mid-Bake: Red velvet cake loves even baking, and ovens have hot spots. After 20 minutes, swap the top and bottom pans (or rotate them front-to-back if using a single sheet). This evens out the color and prevents one tier from drying faster than the other.
Regional styles of this 2 tier red velvet cake
Southern Classic
The red velvet cake originated in Kentucky during the 1930s, where it became a staple at church socials and family gatherings. The original recipe used buttermilk and vinegar for that signature tang, and the cream cheese frosting was a later addition that became iconic.
In Texas, this cake became a wedding tradition, often decorated with white chocolate drizzles and fresh strawberries for a romantic touch. 💛
For an authentic Southern twist, swap the white vinegar for apple cider vinegar—it adds a subtle fruity depth that enhances the buttermilk’s tang. Some regional bakers also replace gel food coloring with beet juice for a natural hue, though the color may darken slightly during baking.
This variation keeps the cake’s moist texture while adding a rustic charm.
Texas-Style Decor
Texas bakers take red velvet cakes to new heights with their bold decorating techniques. The state’s love for two-tier cakes stems from its barbecue and rodeo culture, where elaborate desserts were served at large gatherings.
A classic Texas touch is topping the cake with peach slices and a white chocolate ganache drizzle—this complements the cake’s richness while adding a refreshing contrast.
For a modern Texas twist, try adding smoked salt to the frosting (just a pinch!) or incorporating bourbon into the simple syrup. The bourbon enhances the cake’s depth, making it a hit at weddings and political fundraisers—a nod to Texas’s love for both celebration and bold flavors. 🔥
Midwest Homestyle
The Midwest embraced red velvet cake for its comforting simplicity and versatility. Here, the cake is often served at birthday parties and holiday gatherings, where it’s paired with vanilla ice cream or whipped cream.
The frosting is frequently slightly sweeter to balance the cake’s natural tang, and some bakers add a pinch of cinnamon to the batter for warmth.
A Midwest favorite is the “snowball” variation, where the cake is rolled in powdered sugar before slicing—this creates a dusty, nostalgic finish reminiscent of old-fashioned desserts.
For a modern Midwest twist, try adding caramel swirls to the frosting or topping the cake with candied pecans for a Southern-Midwest fusion. ✨
East Coast Elegance
On the East Coast, red velvet cakes are all about elegance and presentation. New York and Boston bakers often use high-quality European butter (like Plugrá) and imported cocoa powder (such as Valrhona) to elevate the flavor profile.
The frosting is typically lighter and less sweet, allowing the cake’s natural flavors to shine.
For a coastal twist, add orange zest to the batter for a bright, citrusy note—this pairs beautifully with the cream cheese frosting. East Coast decorators also favor delicate floral arrangements (like edible violets) and gold leaf accents for special occasions.
This approach keeps the cake sophisticated yet approachable, perfect for weddings and corporate events.
Nutrition facts
Frequently asked questions
Why does my red velvet cake turn out dry?
The most common causes are overbaking or skipping the simple syrup step. Bake until a toothpick comes out with moist crumbs (not wet batter), and never overbake—red velvet dries quickly. Always brush cooled layers with 0.5 cup simple syrup before frosting to lock in moisture. For extra insurance, wrap baked layers in plastic wrap while cooling.
Can I make this cake in a 9×13-inch pan instead of rounds?
Yes, but you’ll need to adjust the baking time and frosting approach. For a single 9×13-inch pan, bake at 350°F for 30-35 minutes until set. Let it cool completely, then cut into squares. Frost each piece individually with a small amount of cream cheese frosting, or create a sheet cake version by frosting the entire top and sides. The texture will be identical—just the presentation changes!
How do I stabilize the two tiers so they don’t collapse?
Proper leveling and frosting technique are key! Use a serrated knife to trim any domed tops before stacking. Apply a thin crumb coat of frosting to both layers first, then chill for 15 minutes before adding the final frosting. For extra stability, insert wooden cake dowels (available at baking stores) between the tiers before frosting completely. The dowels distribute weight evenly and prevent shifting.
Can I make this cake ahead of time?
Bake the cake layers up to 2 days ahead and store them wrapped tightly at room temperature. The frosting can be prepared 1 day ahead and refrigerated (rewhip before using). Assemble the cake 4-6 hours before serving to allow the frosting to set properly. For long-term storage, freeze the unfrosted layers (wrapped individually) for up to 3 months—thaw overnight in the fridge before assembling.
What’s the secret to perfectly smooth frosting swirls?
Chill your frosting for 15-20 minutes before piping to achieve the ideal consistency. Use a star piping tip (Wilton 1M or 2D work well) and pipe in a continuous spiral starting at the outer edge, working your way inward. For cleaner edges, use an offset spatula to smooth the frosting as you go. Work quickly but deliberately—once you start, keep the motion consistent to avoid lumps. A warm spatula helps spread smoothly!

- 12 Bean Chili Recipe: Hearty Slow-Cooked Depth With 12 Legumes - October 17, 2026
- 5 Seed Bread Recipe: Nutty Crunch and Artisan Flavor in One Loaf - October 17, 2026
- 1 Lb Macaroni Salad Recipe: Bold, Crunchy, and Crowd-Pleasing - October 17, 2026