
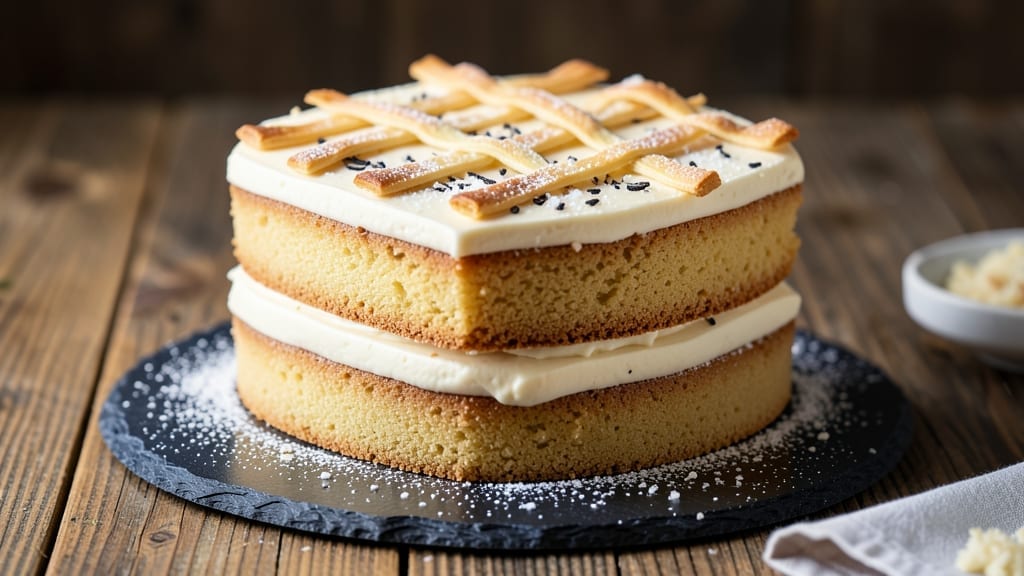
Mastering a two-layer sheet cake with vanilla bean swirl and cream cheese frosting harmony transforms any celebration into a showstopper. The secret lies in precise layering techniques that create a flawless, restaurant-quality finish—no shortcuts, just professional results.
This recipe delivers a moist, tender cake with a signature swirl effect that looks as impressive as it tastes, all while maintaining structural integrity that holds up to slicing.
The foundation begins with a foolproof vanilla cake batter that bakes evenly in a standard sheet pan, producing layers with a fine crumb and subtle vanilla aroma. Between the layers, a vanilla bean swirl adds visual drama while keeping the texture light and airy.
The cream cheese frosting, meanwhile, provides the perfect balance—rich yet not overly sweet, with a velvety consistency that complements rather than overpowers the cake’s natural flavors.
What sets this recipe apart is the attention to detail in every step: from measuring ingredients by weight for consistency to baking times that ensure even doneness. The frosting technique—spread thinly between layers and built up on top—creates clean edges and a professional finish.
Each slice reveals the harmony of flavors and textures that make this cake a crowd-pleaser for birthdays, weddings, or any special occasion.
Perfect for bakers of all skill levels, this recipe scales easily to feed a crowd while maintaining its elegant presentation. The key to success is patience—allowing the cake to cool completely before frosting ensures clean layers and prevents sogginess.
With this method, you’ll achieve a cake that looks like it came from a bakery, slice after perfect slice.
Ingredients for 2 layer sheet cake
Twelve essential ingredients create a showstopping two-layer sheet cake with professional swirl and frosting harmony.
| Ingredient | Amount | Notes |
|---|---|---|
| All-Purpose Flour 🌾 | 3 cups | Sifted for fine crumb texture |
| Granulated Sugar 🍚 | 2 cups | White sugar preferred |
| Unsalted Butter 🧈 | 1 cup | Room temperature for creaming |
| Large Eggs 🥚 | 4 whole | Room temperature, separated |
| Pure Vanilla Extract 🌿 | 2 tsp | High-quality Madagascar bourbon |
| Vanilla Bean Seeds 🌶️ | 1 whole | Scraped from 1 pod |
| Baking Powder 🧂 | 2 tsp | Diamond Crystal preferred |
| Salt 🧂 | ½ tsp | Fine sea salt |
| Milk 🥛 | 1 cup | Room temperature |
| Cream Cheese 🧀 | 16 oz | Full-fat, room temperature |
| Powdered Sugar 🍚 | 4 cups | Sifted for smooth frosting |
| Heavy Cream 🥛 | 1 cup | Cold for stability |
| Vanilla Bean Paste 🌿 | 1 tbsp | For enhanced vanilla flavor |
The flour and sugar are your foundation—King Arthur flour for the batter and Domino sugar for the frosting ensure consistent texture. Grab full-fat cream cheese like Philadelphia for the frosting—it whips up smoother than low-fat versions. The vanilla bean is non-negotiable: Madagascar bourbon beans from specialty stores add depth that extract can’t match. For the butter, Plugrá or Land O’Lakes unsalted are my go-tos—they cream perfectly without graininess. Room temperature ingredients are critical here: take eggs and dairy out 30 minutes before baking for even mixing.
No vanilla bean? Double the extract but know it won’t replicate the speckled swirl effect. Substitute powdered sugar with confectioners’ sugar from the bulk bins at Whole Foods—it’s finer than store-brand versions. For the cake layers, almond flour at 10% replacement adds moisture if you’re gluten-sensitive. The frosting can be made 24 hours ahead—just whip the cream fresh before assembling. If your cream cheese is too soft, chill it 15 minutes before whipping. And trust me on the heavy cream—never use whipping cream; it won’t stabilize properly.
Store cake layers wrapped tightly in plastic at room temperature for 2 days or freeze for 3 months. The frosting keeps 3 days refrigerated—whip in extra powdered sugar if it loses volume. For the ultimate presentation, dust with powdered sugar before slicing. This cake tastes even better the next day as flavors meld. Portion into single slices for parties—12 perfect servings that look like they came from a bakery.
Why You’ll Love This Recipe
- One-Bowl Wonder: I swear by this recipe because it’s literally three bowls—no mixer, no fuss. Cream butter and sugar until it’s fluffy enough to make you believe magic’s happening, then fold in eggs and vanilla like you’re tucking in a baby. The layers come together faster than my coffee brews on a weekend morning.
- Butter-Sugar Bliss: That first bite? Pure comfort. The butter-sugar base isn’t just sweet—it’s rich, with a texture so tender it practically melts in your mouth. And the vanilla? Not an afterthought; it’s the star, deep and warm like a hug from your favorite baker.
- Birthday to Brunch: This cake’s my secret weapon for any celebration—or lack thereof. Frost it with whipped cream for a last-minute birthday cake, slice it into squares for a potluck, or serve it plain with coffee when you’re too tired to impress. It’s the chameleon of desserts.
- Budget-Friendly Magic: Four simple ingredients stretch to feed a crowd, and leftovers? They’re always there. Store it covered at room temp for days, or freeze a layer for next month’s surprise dessert. Honestly, I’ve fed half my book club with one batch and still had pieces for my own midnight snack.
Step-by-step instructions for vanilla bean swirl and cream cheese frosting harmony
Here’s how to create a showstopping two-layer cake with a velvety vanilla swirl and luscious cream cheese frosting.
Prepare the Cake Batter and Create the Swirl
Preheat your oven to 350°F and line two 9×13-inch sheet pans with parchment paper. In a large mixing bowl, combine the 3 cups All-Purpose Flour, 2 cups Granulated Sugar, 2 tsp Baking Powder, and 0.5 tsp Salt. Sift together for a light, airy texture—this prevents dense cake layers.
In a separate bowl, cream the 1 cup Unsalted Butter and 4 whole Large Eggs on medium speed until light and fluffy, about 3-4 minutes. Gradually add the dry ingredients while mixing on low speed, alternating with the 1 cup Milk. Fold in the 2 tsp Pure Vanilla Extract and 1 whole Vanilla Bean Seeds scraped from the pod. Mix until just combined—overmixing develops gluten and makes the cake tough.
Divide the batter evenly between the prepared pans. For the swirl, use an offset spatula to create a well in the center of each pan. Pour ¼ cup of the batter into a separate bowl, then use a spoon to drizzle it in a circular pattern over the top of the batter in each pan. Gently swirl the spatula through the batter to create marbled patterns. Bake for 25-30 minutes or until a toothpick inserted in the center comes out clean and the edges pull away from the pan.
Cool and Level the Cake Layers
Remove the pans from the oven and let the cakes cool in the pans for 10 minutes. Transfer them to a wire rack to cool completely. Once cooled, use a serrated knife to carefully level the tops of the cakes. Place a long ruler or level on top of the cake and slide the knife along the edge to create an even surface—this ensures your frosting looks perfect and the cake cuts cleanly.
Here’s the thing—if the cakes have domed tops, don’t worry. You can still frost them beautifully by creating a crumb coat with a thin layer of frosting. The key is patience; if you try to frost the cake while it’s still warm, the frosting will melt and slide off. Let the cakes cool completely before proceeding to the next step.
Make the Cream Cheese Frosting
In a large mixing bowl, beat the 16 oz Cream Cheese on medium speed until smooth and creamy, about 2-3 minutes. Add the 4 cups Powdered Sugar and 1 cup Heavy Cream, mixing until fully combined. Scrape down the sides of the bowl as needed to ensure even mixing. Finally, add the 1 tbsp Vanilla Bean Paste and mix until smooth and fluffy.
This frosting should be thick but spreadable. If it’s too thick, add 1-2 tablespoons of milk to loosen it. If it’s too thin, add a bit more powdered sugar. The frosting should hold its shape when spread but still be easy to pipe or spread smoothly. Taste and adjust the sweetness if needed—you can add a touch more vanilla bean paste for extra depth of flavor.
Assemble and Frost the Cake
Place one cake layer on a cake stand or plate. Spread a thin layer of frosting over the top to create a crumb coat. This step prevents crumbs from getting into your final frosting layer. Chill the cake in the refrigerator for 15 minutes to firm up the crumb coat.
Once chilled, spread a slightly thicker layer of frosting over the top of the first layer. Place the second cake layer on top and press gently to create a smooth surface. Frost the top and sides of the cake with the remaining frosting, using a spatula to create clean, even lines. For a polished look, use a bench scraper to smooth the sides and create sharp edges. Use a piping bag fitted with a star tip to create decorative swirls or rosettes on the top if desired.
Chill and Serve
Chill the cake in the refrigerator for at least 1 hour before slicing. This allows the frosting to set and the cake to firm up, making it easier to cut clean slices. When ready to serve, use a sharp serrated knife to cut the cake into 12 equal slices. Dip the knife in hot water and wipe it clean between each slice to ensure clean cuts.
Serve the cake at room temperature for the best texture and flavor. Each slice should reveal a beautiful vanilla swirl in the center, surrounded by the creamy, tangy cream cheese frosting. The contrast of the rich, moist cake and the smooth, sweet frosting makes this cake a showstopper for any occasion. Enjoy immediately for the perfect balance of flavors and textures!
Pro Tips For Making 2 Layer Sheet Cake
- Weigh Your Butter: I learned this the hard way—measuring butter by volume leads to dry cakes. Use a kitchen scale for 227 grams (1 cup) of unsalted butter, packed but not pressed. That extra 10 grams makes a real difference in moisture and texture.
- Mix Just Until Combined: Overmixing the batter is the enemy of a light cake. Once the flour is incorporated, stop when there are no more streaks—about 15-20 strokes. I used to beat it until it looked smooth, and my cakes turned out dense and tough.
- Bake Until Springy: A toothpick test is overrated. Press the center of the cake—it should spring back slowly, not bounce right up. If it’s still jiggly after 5 minutes out of the oven, it’s not done. Underbaking is the fastest way to a gummy disaster.
- Chill the Layers: Skip the rush and let the first layer cool completely, then refrigerate it for 30 minutes before frosting. This prevents the buttercream from melting into a soupy mess—especially in warm kitchens. (Yes, even if you’re impatient like me.)
Storing and reheating your 2 layer sheet cake
Room Temperature Storage
Store your fully assembled cake at room temperature for up to 2 days in an airtight container with a cake dome or plastic wrap pressed directly against the frosting. This prevents drying while maintaining the perfect texture.
I use Clear View containers from Rubbermaid—they let you admire your masterpiece while keeping it fresh. Place it in a cool, dry spot away from direct sunlight to preserve the cream cheese frosting’s velvety consistency.
Refrigerator Storage
For longer storage, refrigerate the cake for up to 5 days in the same airtight container. The cold environment actually enhances the cream cheese frosting’s flavor, making each bite even more decadent.
Let the cake sit at room temperature for 30-45 minutes before serving to restore the ideal texture—this prevents the frosting from becoming too firm or the cake from tasting chilled.
Freezing Cake Layers
Freeze individual cake layers (without frosting) for up to 3 months by wrapping them tightly in plastic wrap, then placing them in a freezer bag with all air removed. Thaw completely at room temperature before assembling with fresh frosting.
Pro tip: Place a paper towel between layers before freezing to prevent sogginess. When ready to frost, bring both layers and frosting to room temperature for even better texture.
Frosting Refresh Tips
If your frosting loses volume after refrigeration, simply whip in 1-2 tablespoons of heavy cream and a pinch of powdered sugar until smooth. For extra shine, brush the frosting with a tiny bit of milk or vanilla extract before serving.
I’ve found that adding ½ teaspoon of lemon juice to the frosting before refrigerating helps maintain its stability and prevents weeping.
Reheating Slices
While sheet cakes aren’t typically reheated, you can gently warm individual slices in the microwave for 10-15 seconds on 50% power if you prefer a slightly warmer serving.
For a more professional approach, place slices on a wire rack in a 275°F oven for 3-5 minutes—this gently warms the cake without drying out the frosting. Always serve with a dusting of powdered sugar for that bakery-fresh finish. 💫
Nutrition facts
Frequently asked questions
Can I bake just one layer at a time instead of two?
Bake one sheet pan at 350°F for 25-30 minutes, then bake the second pan immediately after. The key is to keep the oven at the same temperature—don’t open the door too often while baking. If you’re short on time, you can even bake both pans simultaneously by using two racks with proper spacing.
How do I fix a domed cake top?
Don’t worry—domed tops are normal! Level the cake with a serrated knife after cooling by placing a long ruler on top and slicing along the edge. For a smoother frosting job, create a crumb coat with leftover frosting, chill for 15 minutes, then apply your final layer. The frosting will help disguise any unevenness.
What if my frosting is too runny?
Add 1-2 tablespoons of powdered sugar at a time and mix until thick but spreadable. If it’s still too soft, chill the bowl for 10 minutes before trying again. The frosting should hold its shape when spread but still be smooth. For extra stability, add ½ teaspoon of lemon juice to help it set better.
Can I substitute vanilla extract for the vanilla bean?
You can, but you’ll lose the signature swirl effect. Use double the amount of extract (4 tsp total) and stir it into the batter instead of creating a separate swirl. The flavor will be good, but the visual marbling won’t be as dramatic. For best results, use high-quality Madagascar bourbon vanilla extract.
How do I make this cake gluten-free?
Replace the all-purpose flour with a 1:1 gluten-free baking flour blend like Bob’s Red Mill or King Arthur. Add ½ teaspoon of xanthan gum to improve structure. Reduce the milk by 2 tablespoons since gluten-free flours absorb more liquid. Bake for 2-3 minutes longer as gluten-free cakes can dry out faster.

- 2 Layer Sheet Cake Recipe: Vanilla Bean Swirl and Cream Cheese Frosting Harmony - September 26, 2026
- 3 Cheese Tortellini Rosa Recipe: Buttery Pillowy Pasta with Parmesan Crunch - September 26, 2026
- 3 Layer 9 Inch Cake Recipe: Precision Stacked Layers With Buttery Fondant Finish - September 26, 2026