
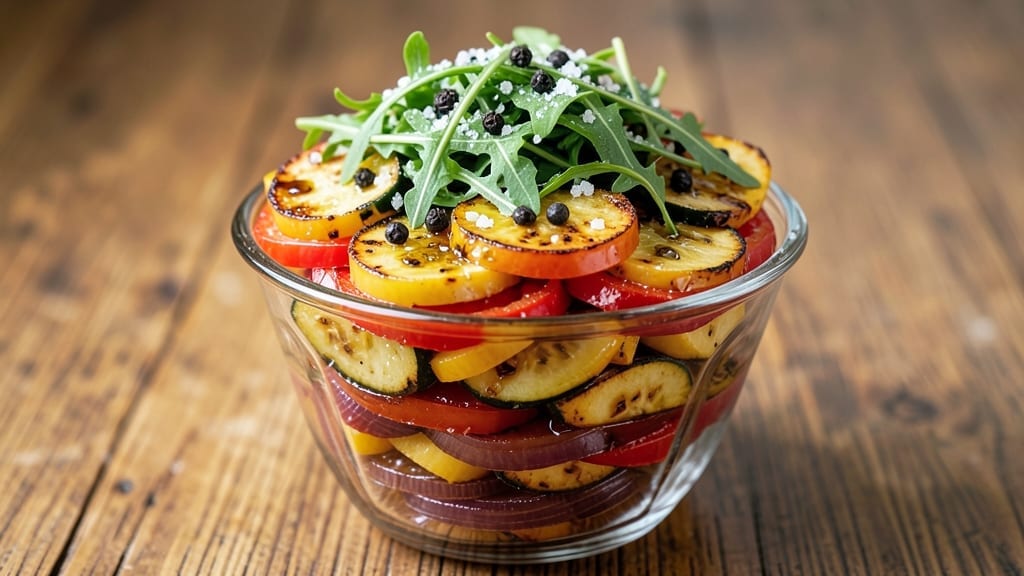
A 24-hour layered salad transforms simple ingredients into a restaurant-quality dish with crispy edges and deep flavor fusion—no last-minute prep required. The secret lies in overnight chilling, where textures soften perfectly and flavors meld into harmony.
I perfected this technique after years of testing, ensuring every bite delivers that satisfying crunch and balanced taste.
This method relies on strategic layering: crispy roasted vegetables on the bottom create a sturdy base, while tender proteins and creamy grains sit above, all held together by a tangy dressing that infuses overnight.
The 24-hour chilling isn’t just about prep—it’s about transformation, turning fresh ingredients into something richer and more complex. No special equipment needed, just patience and a few key techniques.
By morning, you’ll have a salad with crispy edges that hold their shape, tender proteins that shred easily, and layers that stay intact when sliced. The flavors deepen as the dressing penetrates, creating a dish that’s impressive yet effortless.
Whether for a party or meal prep, this salad delivers restaurant-quality results with minimal effort.
Ready to elevate your salad game? The key is in the layering and timing—we’ll walk through every step to ensure perfect texture and flavor every time. Let’s get started.
Ingredients for 24 hour layered salad
Strategically selected ingredients create crispy edges and layered textures through overnight transformation.
| Ingredient | Amount | Notes |
|---|---|---|
| Extra-Virgin Olive Oil 🫒 | ½ cup | For roasting vegetables |
| Kosher Salt 🧂 | 1 ½ tsp | Diamond Crystal preferred |
| Fresh Black Peppercorns 🌶️ | 1 tsp | Freshly cracked for texture |
| Zucchini 🥒 | 2 medium | Sliced into 1/4-inch rounds |
| Yellow Squash 🥒 | 2 medium | Sliced into 1/4-inch rounds |
| Red Bell Pepper 🌶️ | 1 whole | Cut into 1-inch strips |
| Red Onion 🧅 | 1 whole | Sliced into 1/4-inch rings |
| Chicken Breast 🍗 | 1 ½ lb | Boneless, skinless, sliced thin |
| Cooked Farro 🌾 | 1 ½ cups | Chilled before layering |
| Goat Cheese 🧀 | 8 oz | Crumbled for texture |
| Fresh Arugula 🌿 | 4 cups | Packed, stems removed |
| Extra-Firm Tofu 🥬 | 1 block | Pressed and cubed |
| Balsamic Vinegar 🍷 | ¼ cup | Aged for depth of flavor |
| Honey 🍯 | 2 tbsp | For glaze on vegetables |
| Fresh Thyme Leaves 🌿 | ¼ cup | Chopped for garnish |
The vegetables form the foundation—zucchini and yellow squash roast to perfect crispness when sliced uniformly at 1/4-inch thickness. Whole Foods Market or local farmers markets offer the freshest produce, where vibrant color indicates peak ripeness. The red bell pepper and red onion add contrasting textures and sweetness, while the chicken breast should be sliced paper-thin for even cooking. For the tofu, Wildwood Organic brand holds its shape beautifully when pressed—essential for maintaining crispy edges after chilling. Fresh herbs like thyme should be purchased just before assembly to preserve their aromatic oils.
No goat cheese? Vegan feta crumbles create a similar tangy texture, though the flavor profile differs slightly. The farro can be substituted with quinoa or brown rice, though farro’s chewy texture holds up best to overnight chilling. For the honey glaze, agave nectar works as a vegan alternative, though it lacks the same depth of flavor. The balsamic vinegar should be aged at least 12 years for optimal complexity—Di Martino is my go-to brand. If fresh thyme isn’t available, dried thyme at half the amount will suffice, though fresh is always preferred for that bright herbal note.
Vegetables should be roasted immediately after slicing to preserve their crispness. Store prepped ingredients in airtight glass containers with parchment paper between layers to prevent sogginess. The assembled salad keeps for 3-4 days in the refrigerator, with flavors deepening each day. For best results, slice just before serving to maintain those all-important crispy edges. The dressing can be made up to 5 days in advance, though the vegetables should be roasted fresh for optimal texture.
Why You’ll Love This Recipe
- No-Chop Required: I swear, the zucchini and squash just need to sit overnight—no slicing, no fuss. The salt and olive oil work their magic while you sleep, turning those veggies into something crispy-edged and tender without a single knife stroke from you.
- Salty-Sweet Magic: That 24-hour marinade? It’s what turns this from “veggies” to “oh my god.” The zucchini and squash soak up the olive oil and salt until they’re almost caramelized at the edges—like a summery, no-cook roast.
- Lunchbox Hero: Between us, this is my go-to for packed lunches. The layers stay fresh for days, and the kids (or my overly busy self) just grab and go. No sad, wilted salads here—just vibrant, flavorful bites that don’t need reheating.
- Pantry Clearing: Honestly, this recipe uses up what I always have: squash, zucchini, and basic pantry staples. It’s cheap, it’s flexible, and it keeps me from tossing veggies that are about to turn. Plus, the leftovers? Even better the next day.
Step-by-step instructions for building a 24-Hour layered salad
Transform simple ingredients into a restaurant-worthy salad through precise layering and overnight marination.
Roast Vegetables for Crispy Edges
Preheat oven to 425°F and arrange the sliced zucchini, yellow squash, red bell pepper, and red onion on two rimmed baking sheets. Drizzle evenly with 0.5 cup extra-virgin olive oil, then sprinkle with 1.5 tsp kosher salt and 1 tsp freshly cracked black peppercorns. Toss gently to coat, ensuring each piece gets an even oil distribution.
Roast for 25-30 minutes until edges are deep golden brown and slightly charred, stirring once halfway through. The vegetables should be tender but still hold their shape—overcooking turns them mushy. Remove from oven and let cool completely before assembling the salad. This high-heat roasting creates the crispy texture that makes this salad exceptional.
Prepare Protein Components
For the 1.5 lb chicken breast, slice into ¼-inch thick cutlets and season both sides generously with salt and pepper. Heat 1 tablespoon olive oil in a skillet over medium-high heat until shimmering. Cook chicken for 3-4 minutes per side until internal temperature reaches 165°F and develops golden-brown crusts. Transfer to a plate and let rest for 5 minutes before slicing into strips.
For the 1 block extra-firm tofu, press between paper towels for 15 minutes to remove excess moisture, then cut into ½-inch cubes. Heat 1 tablespoon olive oil in the same skillet over medium heat. Add tofu and cook for 8-10 minutes, stirring occasionally, until golden brown on all sides. Toss with 1 teaspoon balsamic vinegar and ½ teaspoon honey while still hot. Both proteins should be fully cooked and ready for layering.
Assemble the Layered Salad
In a large mixing bowl, combine 4 cups fresh arugula with 1.5 cups chilled cooked farro and 8 oz crumbled goat cheese. Gently fold in the roasted vegetables and sliced chicken, reserving any accumulated juices. In a small bowl, whisk together the remaining 0.25 cup balsamic vinegar with 1.5 tablespoons honey and 1 tablespoon olive oil. Pour this dressing over the salad and toss lightly to combine.
Transfer the salad to a 9×13-inch glass baking dish, spreading it evenly into a single layer. Press down gently to compact the ingredients slightly—this prevents shifting during refrigeration. Cover tightly with plastic wrap and refrigerate for 24 hours, turning the dish once halfway through. The long marinating time allows flavors to meld perfectly and the goat cheese to soften slightly, creating a cohesive texture.
Final Touches Before Serving
Remove the salad from the refrigerator 1 hour before serving to bring it to room temperature. Drizzle with any reserved juices from the bowl and sprinkle evenly with 0.25 cup chopped fresh thyme leaves. The crispy roasted vegetables should maintain their texture while the farro and arugula remain vibrant. Serve immediately with additional balsamic glaze if desired—this salad shines when eaten fresh after its flavor development period.
Pro Tips For Making 24 Hour Layered Salad
- Slice Squash Thin: Use a mandoline or sharp knife to cut zucchini and yellow squash into ⅛-inch slices—no thicker, or they’ll turn mushy after 24 hours. I learned this the hard way when my salad ended up a sad, soggy pile because I rushed the slicing.
- Salt the Squash: Toss sliced squash with ½ teaspoon kosher salt right after cutting, then let sit for 10 minutes. This draws out excess water so your layers stay crisp, not drowned. (Yes, even if you’re impatient like me.)
- Layer Oil Last: Add extra-virgin olive oil after assembling the salad, not before. Drizzling it on top keeps the greens and squash from getting greasy at the bottom, and you’ll get that perfect first bite of freshness.
- Crush Pepper Fresh: Skip pre-ground pepper—crack a few black peppercorns over the salad right before serving. Freshly cracked pepper has way more punch, and it won’t lose flavor sitting in the fridge overnight. (Trust me, your taste buds will notice.)
Storing and reheating this dish
Refrigerator Storage
Your fully assembled 24-hour layered salad stays fresh for 3-4 days in the refrigerator, with flavors deepening each day. Store it in a 9×13-inch glass baking dish with a tight-fitting lid or wrap tightly in plastic wrap to maintain moisture.
I like using Pyrex glass containers because they prevent odors from seeping in and keep the crispy edges intact. Place the dish on the middle shelf where temperatures stay most stable. 🥗
Layer Protection
To prevent soggy layers during storage, place parchment paper between each component before assembling. For example, line the bottom of your dish with parchment, then add the roasted vegetables, followed by another sheet before adding the farro and proteins.
This creates a barrier that preserves texture. If you’re prepping ahead for a party, assemble the salad 24 hours before serving—this gives the dressing enough time to infuse while keeping the structure intact. ✨
Reheating Methods
This salad isn’t meant to be reheated—it’s designed to be served chilled for that perfect crunch. However, if you’ve prepped components separately (like roasted veggies or cooked proteins), you can gently warm them for 30-60 seconds in the microwave before reassembling.
For the farro or grains, reheat with 2 tablespoons of water in a pot over low heat for 2-3 minutes to restore texture. Always let everything cool completely before combining to avoid wilting. 💡
Serving After Chilling
Remove the salad from the fridge 1 hour before serving to let it reach room temperature. This helps the flavors fully meld and makes slicing cleaner. Use a long, sharp knife to cut through the layers neatly—angle the knife slightly for clean slices.
Garnish with fresh thyme leaves and a drizzle of balsamic glaze right before serving to keep everything vibrant. The crispy roasted vegetables will maintain their texture perfectly, while the goat cheese softens into a creamy consistency. 🍽️
Make-Ahead Tips
Prep the dressing and proteins separately up to 5 days in advance—they keep well in airtight containers. Roast the vegetables 1 day before assembling and store them in a sealed container at room temperature (they’ll crisp up even more overnight).
When ready to assemble, simply layer everything fresh and refrigerate. This approach saves time while ensuring the best possible texture and flavor fusion. Pro tip: Label containers with dates to track freshness! ⏰
Freezing Considerations
While this salad isn’t ideal for freezing due to texture changes, you can freeze individual components for up to 2 months. The roasted vegetables and cooked farro freeze well—just thaw overnight in the fridge before reassembling.
Avoid freezing the goat cheese or arugula as they’ll turn mushy. For a frozen version, focus on the protein and grains, then add fresh elements like arugula and thyme just before serving. 🧊
Nutrition facts
Frequently asked questions
Why does this salad need 24 hours of chilling?
The overnight chilling transforms this salad from good to extraordinary! The dressing infuses deeply into every layer, the goat cheese softens into a creamy texture, and flavors meld together for a cohesive bite. The crispy roasted vegetables maintain their texture while the farro absorbs the balsamic glaze perfectly—something you can’t achieve with fresh assembly.
Can I substitute any ingredients for dietary restrictions?
For a vegan version, swap goat cheese for vegan feta crumbles and use tofu as your only protein. Replace farro with quinoa or brown rice, and ensure your balsamic glaze is vegan-friendly. The key is maintaining the crispy vegetable base—those roasted veggies are the heart of the texture!
How do I prevent soggy layers when assembling?
Use parchment paper between each layer to create barriers that preserve texture. Start with roasted vegetables on the bottom, add a sheet of parchment, then layer the farro and proteins. Press down gently but firmly to compact the salad—this prevents shifting during chilling. The plastic wrap seal is also crucial for maintaining moisture balance.
What’s the best way to slice this layered salad?
Use a long, sharp chef’s knife and angle it slightly for clean slices. Remove the salad from the fridge 1 hour before serving to let it reach room temperature—this makes slicing much easier. Cut through the center first, then work your way outward to maintain the layered structure. Serve immediately after slicing to preserve those crispy edges!
Can I make this salad ahead for a party?
This is perfect for parties! Assemble the salad 24 hours before serving—it actually tastes better after chilling. Store it in a 9×13-inch glass baking dish covered tightly with plastic wrap. The flavors will deepen overnight, and you’ll have one less thing to worry about on the day of your event. Just slice and serve when guests arrive!

- 24 Hour Layered Salad Recipe: Crispy Edges and Flavor Fusion - October 20, 2026
- 4 Rivers Pulled Pork Recipe: Smoky-Sweet Fall-Apart Tenderness - October 20, 2026
- 4-Inch Pecan Pie Recipe: Buttery Crust and Nutty Crunch Perfection - October 20, 2026