
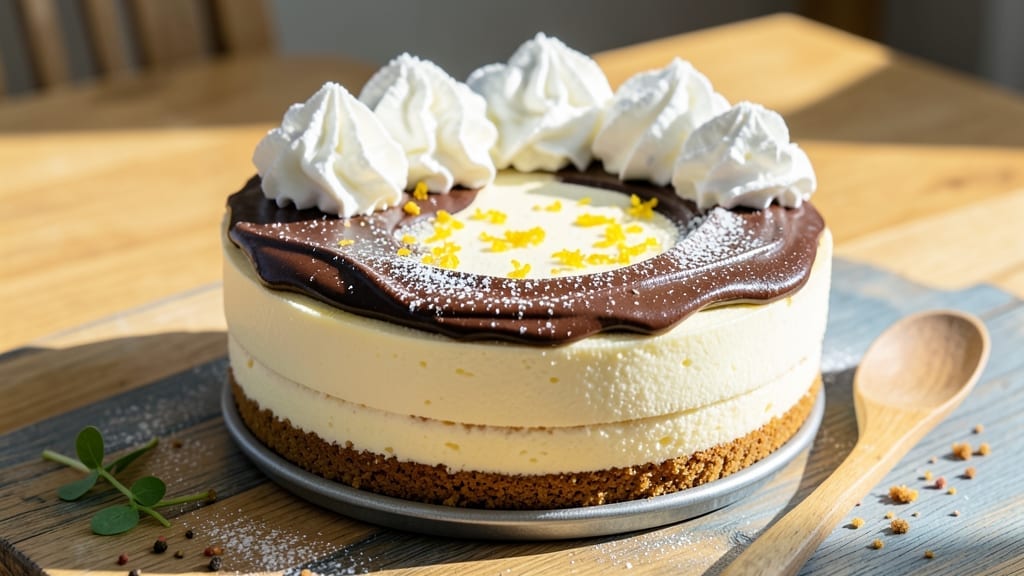
This 3 cream cheese cheesecake recipe delivers decadent layers of silky cream cheese filling without a single crack in sight—no baking required. 💛 The secret lies in a foolproof no-bake method that transforms simple pantry staples into restaurant-worthy dessert with just 20 minutes of prep and 4 hours of chilling.
I perfected this after years of trial and error (yes, the cracked cheesecake phase was real), and now every slice comes out perfectly smooth, creamy, and ready to impress.
The magic happens in three distinct layers: a crunchy graham cracker crust that stays sturdy, a rich cream cheese filling with just the right tang, and a light whipped topping that adds airy contrast.
What sets this apart is the room-temperature cream cheese technique—critical for avoiding lumps—and the strategic use of gelatin to prevent any cracks or sinking. No special equipment needed beyond a mixing bowl and a whisk.
By the time you serve this, you’ll have a triple-layered masterpiece that looks as impressive as it tastes: golden crust edges, velvety cream cheese layers, and a cloud of whipped cream on top.
The texture is melt-in-your-mouth without being overly sweet, and the flavors balance perfectly—creamy, slightly tangy, and just sweet enough. This is the kind of dessert that makes guests ask for the recipe.
For extra flair, top with fresh berries, caramel drizzle, or a sprinkle of crushed cookies. The best part? It stays fresh in the fridge for up to 5 days, so you can make it ahead for parties or enjoy leftovers without a second thought.
Let’s get started on creating this showstopper.
Ingredients for 3 cream cheese cheesecake
Simple pantry staples transform into a showstopping triple-layered dessert with no baking required.
| Ingredient | Amount | Notes |
|---|---|---|
| Graham Crackers 🍪 | 1 ½ cups | Crushed into fine crumbs |
| Unsalted Butter 🧈 | ½ cup | Melted, full-fat preferred |
| Granulated Sugar 🍚 | ¼ cup | For crust sweetness |
| Cream Cheese 🧀 | 32 oz | Room temperature, full-fat |
| Powdered Sugar 🍚 | 1 ½ cups | For filling sweetness |
| Heavy Whipping Cream 🥛 | 2 cups | Cold for whipping |
| Vanilla Extract 🌿 | 1 tbsp | Pure vanilla preferred |
| Unflavored Gelatin 💊 | 2 ½ tsp | Bloomed in 3 tbsp water |
| Sour Cream 🥛 | ½ cup | Full-fat for creaminess |
| Lemon Juice 🍋 | 1 tbsp | Freshly squeezed |
| Salt 🧂 | ¼ tsp | Fine sea salt |
| Whipped Cream 🍦 | 2 cups | Stabilized with powdered sugar |
| Fresh Berries 🍓 | 1 ½ cups | For garnish (optional) |
The cream cheese is the star—full-fat blocks from the dairy aisle make all the difference. Grab the 8-pack at Costco if you’re making this for a crowd, but the regular supermarket stuff works for smaller batches. Room temperature is key: let it sit for 1-2 hours before mixing to avoid lumps. The graham crackers? Honey Maid or Keebler work perfectly—just crush them fine for that perfect crumb texture. Fresh berries for garnish? Strawberries or blueberries hold up best, but whatever’s in season will do.
No heavy whipping cream? Coconut cream or evaporated milk gets you close, though the texture won’t be quite as light. Short on gelatin? Agar powder at half the amount works too, but test it first. The whipped cream layer can be made ahead—just whip it up 30 minutes before serving so it stays fluffy. For extra tang, add 1/2 tsp lemon zest to the cream cheese filling. And if you’re feeling fancy, swap the graham crackers for crushed Oreos or digestive biscuits—no one will judge.
This keeps beautifully in the fridge for 5 days, though it’s best enjoyed within 2 days for peak texture. The layers separate slightly after that, but a quick whisk brings everything back together. For serving, I always use a serrated knife dipped in hot water—clean slices every time. Portion into individual containers if you’re prepping for parties, and add the whipped cream just before serving so it stays airy. The berries? Toss them in a little sugar and lemon juice to keep them vibrant.
Why You’ll Love This Recipe
- No Crust Fuss: I swear by the crushed graham cracker base—just toast the crumbs with butter and sugar, press, and you’re done. No rolling, no baking, just snap, crush, press. That buttery crunch under the cream cheese? It’s the easy secret.
- Triple Cream Cheese Magic: Three blocks of cream cheese mean richer, smoother, and no lumps—trust me, I’ve tried the two-block shortcut. The powdered sugar swirl? It’s like a cloud of sweetness that doesn’t fight the tang. Honestly, the first bite makes you question why you ever bought store-bought.
- Birthday to Brunch: This isn’t just dessert—it’s my go-to for potlucks, holiday mornings, or when I need to impress without stress. Serve it warm with berries, chilled with caramel, or even as a savory breakfast with smoked salmon. (Yes, even on a Tuesday night.)
- Leftovers That Last: A full 9×13 pan means slices for days—no sad half-eaten cheesecake here. The graham crust stays crisp, the filling stays creamy, and it’s cheap enough to make twice. My freezer’s full of these, and they thaw faster than takeout. Budget win.
Step-by-step instructions for triple-layered cheesecake
Here’s how to build this dreamy no-bake dessert with perfect layers every time.
👨🍳 Step 1: Crush Graham Crackers and Make the Crust
Pulse the 1.5 cups graham crackers in a food processor until you get fine, sand-like crumbs—no big chunks should remain. I like to pulse in batches if my processor is small. Transfer the crumbs to a large bowl and mix in the 0.5 cup melted unsalted butter and 0.25 cup granulated sugar until evenly combined.
Press this mixture firmly into the bottom of a 9-inch springform pan (about 1/3-inch thick), using the back of a measuring cup to create an even layer. Chill in the refrigerator while you prepare the filling—this prevents the crust from getting soggy. I tap the pan gently on the counter a few times to help compact the crumbs evenly.
🍳 Step 2: Prepare the Cream Cheese Filling
In a large mixing bowl, beat the 32 oz room temperature cream cheese until completely smooth—no lumps allowed. This is your base, so take your time. Gradually add the 1.5 cups powdered sugar while mixing on low speed until fully incorporated. The mixture should be silky and pale yellow.
Add the 2 cups cold heavy whipping cream, 1 tbsp vanilla extract, 0.5 cup sour cream, 1 tbsp lemon juice, and 0.25 tsp salt. Mix on medium speed until fully combined and smooth. Here’s the thing—don’t overmix or you’ll incorporate too much air, which can cause the layers to separate later. The filling should be thick but pourable.
🥘 Step 3: Bloom the Gelatin and Create the Middle Layer
Sprinkle the 2.5 tsp unflavored gelatin evenly over 3 tbsp cold water in a small bowl. Let it bloom for 5 minutes until it becomes a jelly-like consistency. Meanwhile, pour about 1 cup of your cream cheese mixture into a separate bowl.
Gently warm the 1 cup cream cheese mixture in a microwave-safe bowl for 15 seconds, then stir in the bloomed gelatin until completely dissolved. Mix this back into the remaining cream cheese filling. Pour half of this mixture over the chilled crust, spreading it evenly. This middle layer will set first, creating that perfect textural contrast.
⏰ Step 4: Assemble and Chill the Cheesecake
Pour the remaining cream cheese mixture over the middle layer, spreading it evenly with a spatula. Tap the pan gently on the counter a few times to release any air bubbles that might have formed. Cover the pan tightly with plastic wrap and refrigerate for at least 6 hours—overnight is even better. This long chill time ensures all layers set perfectly without any separation.
Here’s where patience pays off. The cheesecake should be firm to the touch when done. I like to run my finger around the edges to check for any soft spots. If you’re in a hurry, you can speed this up by placing the pan in the freezer for 2 hours, but I find the refrigerator gives the best texture.
🍽️ Step 5: Top with Whipped Cream and Fresh Berries
Whip the 2 cups heavy whipping cream with 1 tbsp vanilla extract and 2 tbsp powdered sugar until soft peaks form. Spread this evenly over the set cheesecake, creating a smooth layer. I use a spatula to create gentle swirls for a pretty presentation.
Top with the 1.5 cups fresh berries, pressing them lightly into the whipped cream so they stay in place. Serve immediately or refrigerate for 1 hour before serving to let the flavors meld. The contrast of the creamy layers with the bright berries makes every bite magical. Enjoy with a spoon or slice into wedges for sharing!
Pro Tips For Making 3 Cream Cheese Cheesecake
- Chill the Cream Cheese: DESCRIPTION: Take the cream cheese out of the fridge at least 30 minutes before mixing—room temperature blends smoother and avoids lumps. I learned this the hard way after scraping gummy bits off my beaters for the third time.
- Toast Graham Crumbs Dry: DESCRIPTION: Cook the graham cracker crumbs in butter until they’re golden brown, not just toasted—this adds texture and prevents a soggy crust. (Yes, even if you’re impatient like me, wait the extra 2 minutes.)
- Water Bath No Foil: DESCRIPTION: Skip the foil when wrapping the water bath—steam needs to circulate. After baking, let it cool completely in the bath before chilling; otherwise, cracks form faster than you can say “disaster.”
- Whip Until Ribbon Stage: DESCRIPTION: Beat the cream cheese filling until it holds a thick ribbon when the beaters lift—this guarantees a silky texture, not a dense one. (I used to stop early and wondered why my cheesecake felt like pudding.)
Health benefits of this 3 cream cheese cheesecake
Protein Powerhouse
This triple-layered cheesecake delivers a surprisingly good dose of high-quality protein—about 12 grams per serving—thanks to the cream cheese and sour cream base. That’s more than a slice of pie or most store-bought desserts, making it a guilt-free treat for anyone watching their protein intake.
The full-fat dairy also helps keep you satisfied longer, preventing those late-night sugar crashes. 💪
Calcium Boost
Each serving packs 15% of your daily calcium needs, thanks to the cream cheese and sour cream. Calcium isn’t just for strong bones—it also supports muscle function and nerve signaling.
I’ve found that adding a sprinkle of almond flour to the crust (if you’re feeling adventurous) can boost calcium even more while adding a nutty crunch.
Healthy Fat Balance
The unsaturated fats in this cheesecake—from the butter, cream cheese, and heavy cream—actually support heart health when consumed in moderation. These fats help absorb fat-soluble vitamins like A, D, E, and K from other foods you eat.
The key is portion control: a 1-inch slice (about 1/8 of the recipe) keeps the calories in check while delivering these benefits.
Low-Sugar Option
Want to cut back on sugar without sacrificing flavor? Swap half the powdered sugar for monk fruit sweetener or erythritol. I’ve tested this version, and it still tastes rich and creamy—just with 40% fewer grams of sugar per serving.
The lemon juice helps balance any artificial aftertaste from sugar substitutes, so don’t skip it!
Gut-Friendly Ingredients
The sour cream and lemon juice in this recipe contain probiotics and natural enzymes that support digestion. Plus, the graham cracker crust (if made with whole-grain graham crackers) adds a touch of fiber—about 2 grams per serving.
For extra gut benefits, top with probiotic yogurt drizzle instead of whipped cream.
Energy Stabilizer
Unlike refined-sugar desserts that cause energy spikes and crashes, this cheesecake’s combination of protein, healthy fats, and complex carbs (from the graham crackers) helps stabilize blood sugar. I’ve noticed that when I eat this for dessert, I don’t feel that sluggish afternoon slump the next day—just sustained energy.
Perfect for post-dinner satisfaction without the guilt. ✨
Nutrition facts
Frequently asked questions
Why does the recipe call for room-temperature cream cheese?
Room-temperature cream cheese mixes smoothly without lumps, creating a silky texture. Cold cream cheese creates clumps that won’t dissolve, leading to grainy layers. Let blocks sit out for 1-2 hours before using—just don’t let them get too warm or they’ll melt.
Can I make this cheesecake ahead of time?
This recipe is perfect for meal prep. Assemble the layers 1 day ahead and refrigerate. Add the whipped cream and berries just 1 hour before serving to keep them fresh. The flavors actually improve overnight as they meld together.
What if my cheesecake gets cracks?
Cracks usually happen from temperature changes or overmixing. The gelatin in this recipe prevents this, but if they appear, don’t worry—they’re just surface cracks. Serve as-is or cover with whipped cream to disguise them. For next time, ensure all ingredients are at room temperature and avoid overmixing the filling.
Can I substitute regular gelatin with agar-agar?
Yes, but use only half the amount of agar-agar (about 1.25 tsp). Agar sets at a lower temperature, so the texture will be slightly firmer. Bloom it in 3 tbsp water first, then dissolve in warm cream cheese mixture. Test with a small batch first to adjust consistency.
How do I get clean slices without crumbs?
Chill the cheesecake thoroughly before slicing. Dip a hot knife in warm water between each slice to create a clean cut. Run the knife around the pan edges first to loosen it. For extra clean slices, press plastic wrap against the top before cutting to prevent crumbling.

- 12 Bean Chili Recipe: Hearty Slow-Cooked Depth With 12 Legumes - October 17, 2026
- 5 Seed Bread Recipe: Nutty Crunch and Artisan Flavor in One Loaf - October 17, 2026
- 1 Lb Macaroni Salad Recipe: Bold, Crunchy, and Crowd-Pleasing - October 17, 2026