
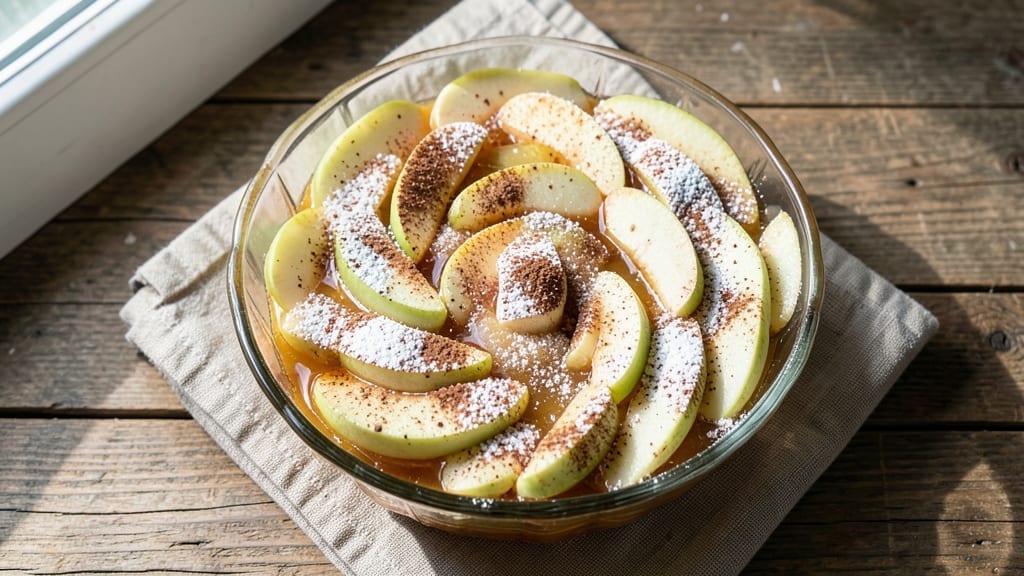
This 9-inch apple pie filling recipe delivers the perfect balance of spiced cinnamon-sugar swirls that transform ordinary apples into a golden, bubbling masterpiece. The secret lies in pre-cooking the filling to achieve that signature thick, glossy consistency—no more watery centers or soggy crusts.
I’ve perfected this technique over years of baking, ensuring every slice delivers that ideal harmony of tender fruit, warm spices, and buttery crust.
What sets this recipe apart is the simplicity of the method: just one bowl for mixing, a stovetop pre-cook to develop flavors, and a lattice crust that keeps the filling moist while allowing for crispy edges.
The cinnamon-sugar swirls add a touch of elegance without overpowering the natural sweetness of the apples. Whether you’re baking for a family gathering or a quiet Sunday afternoon, this filling is foolproof and always impressive.
By the time your pie emerges from the oven, you’ll have a golden, flaky crust encasing perfectly spiced apple filling—just thick enough to hold its shape but tender enough to melt in your mouth.
The aroma alone will have everyone gathering around the table, and the first bite will confirm why this is a classic worth mastering. Ready to bake? Let’s get started with the ingredients.
This recipe works beautifully with traditional or modern crust variations—whether you prefer a classic all-butter crust, a gluten-free alternative, or even a vegan option. The filling itself is adaptable too, so feel free to swap in different apple varieties or adjust the spice levels to suit your taste.
The goal? A pie that tastes like nostalgia, but with a technique that’s easy to replicate at home.
Ingredients for 9 inch apple pie filling
These twelve ingredients create the perfect balance of spiced apple filling for your 9-inch pie.
| Ingredient | Amount | Notes |
|---|---|---|
| Granny Smith Apples 🍎 | 4 medium | Peeled, cored, sliced thin |
| Granulated Sugar 🍚 | 1 ½ cups | Light brown sugar for depth |
| All-Purpose Flour 🌾 | ½ cup | For thickening consistency |
| Ground Cinnamon 🌿 | 2 tbsp | Freshly ground preferred |
| Granulated Sugar (extra) 🍚 | ¼ cup | For cinnamon-sugar swirls |
| Ground Cinnamon (extra) 🌿 | 1 tbsp | For cinnamon-sugar swirls |
| Unsalted Butter 🧈 | ½ cup | Cold, cubed for texture |
| Lemon Juice 🍋 | 2 tbsp | Freshly squeezed |
| Vanilla Extract 🌸 | 1 tsp | Pure vanilla preferred |
| Salt 🧂 | ½ tsp | Fine sea salt |
| Ground Nutmeg 🌿 | ¼ tsp | Freshly grated preferred |
| Allspice 🌶️ | ¼ tsp | Optional for complexity |
The apples are the heart of this filling, so choose firm Granny Smiths—they hold their shape during baking. Local farmers markets often have the freshest varieties, but any crisp apple (like Honeycrisp or Braeburn) works. Peel and slice them uniformly for even cooking. The butter matters here—use European-style if you can, as it has more fat content for that rich, flaky texture. For the cinnamon, Penzeys or McCormick brands offer the highest quality, but the grocery store stuff is fine if it’s fresh. The nutmeg should be freshly grated for maximum aroma, though pre-ground works in a pinch.
No Granny Smiths? Honeycrisp or Braeburn apples are excellent substitutes—they’re sweeter but still hold their shape. Running low on butter? Coconut oil works too, though it has a slightly different flavor. Prefer less spice? Halve the allspice and nutmeg amounts. The sugar can be swapped for maple syrup or coconut sugar, though granulated gives the best texture. For a vegan option, use vegan butter and ensure your vanilla is alcohol-free. The lemon juice is non-negotiable—it brightens the filling and prevents browning.
Prepped apples keep for 3 days in the fridge, covered tightly. The cinnamon-sugar swirl mix stays fresh for 2 weeks in an airtight container. For the filling itself, pre-cook it and store in the fridge for 3 days—it actually tastes better the next day as flavors meld. Freeze for up to 3 months by portioning into airtight containers. When reheating, add a splash of water or apple juice to restore moisture.
Why You’ll Love This Recipe
- No Fuss, No Mess: I swear by this recipe—just toss those Granny Smiths into a pot, add the sugar and flour, and let them simmer until thick. No peeling required, no fancy techniques, just pure, effortless filling that still tastes like you slaved over it.
- Tart-Sweet Magic: That first bite of Granny Smith with its bright acidity cutting through the cinnamon and sugar? It’s the kind of flavor that makes you pause mid-slice. Honestly, the flour thickens it just enough to hold its shape, but it’s still juicy—never cloying.
- Leftovers That Work: Make a double batch and store it in the fridge for weeks. It’s perfect for quick hand pies, dumping into oatmeal, or even just eating straight from the jar with a spoon. (Yes, even on a Tuesday night.)
- Budget-Friendly Staples: You’re using apples you already have, pantry sugar, and a handful of flour—no specialty ingredients, no markup. It’s the kind of recipe that stretches your dollar without sacrificing taste, and the cinnamon makes it feel like a treat.
Step-by-step instructions for 9-Inch apple pie filling
Here’s how to create a perfectly balanced filling with tender apples and aromatic spice swirls.
Prepare the Apple Mixture
In a large bowl, combine the 4 medium Granny Smith Apples (previously peeled, cored, and sliced thin) with the 1.5 cups Granulated Sugar and 2 tbsp Ground Cinnamon. Toss gently until every apple slice is evenly coated. The sugar should begin to dissolve slightly, creating a light syrup that will caramelize beautifully during baking.
Add the 2 tbsp Lemon Juice and 1 tsp Vanilla Extract, mixing again until fully incorporated. The lemon juice brightens the tartness of the Granny Smiths while preventing browning. Let this mixture sit for 10 minutes at room temperature while you prepare the rest of the filling. This resting period allows the apples to soften slightly and release their juices, which is crucial for achieving that perfect balance of tender fruit and thickened filling.
Create the Thickening Base
In a separate medium bowl, whisk together the 0.5 cup All-Purpose Flour, 0.5 tsp Salt, 0.25 tsp Ground Nutmeg, and 0.25 tsp Allspice. This combination of spices adds depth to the filling without overpowering the apple flavor. The flour will act as the thickening agent, creating that classic pie filling consistency that clings beautifully to the crust.
Cut the 0.5 cup Unsalted Butter into small cubes and add them to the flour mixture. Using your fingers or a fork, work the butter into the flour until you achieve a coarse crumb texture with pea-sized butter pieces visible. This texture is essential—it creates pockets of butter that melt during baking, creating a luscious, velvety filling rather than a gluey one. If the mixture feels too dry, add 1-2 teaspoons of ice water to help the dough come together.
Combine and Swirl the Filling
Transfer the apple mixture to a 9-inch pie dish that’s already been lined with your favorite pie crust. Spread the apples evenly across the bottom, creating a single layer. This even distribution ensures that every bite will have that perfect combination of fruit and spiced filling.
Sprinkle the flour-butter mixture evenly over the apples. Then, in a small bowl, mix together the 0.25 cup Granulated Sugar (extra) and 1 tbsp Ground Cinnamon (extra) for the swirl. Using a knife or offset spatula, create gentle swirls through the filling, cutting through the top layer to the bottom. This creates those beautiful cinnamon-sugar streaks that make this filling so visually appealing and flavorful.
Bake to Perfection
Place the pie dish on a baking sheet lined with parchment paper to catch any potential drips. Bake in a preheated 375°F oven for 45-55 minutes, until the filling is bubbling vigorously and the edges are golden brown. The filling should be thick enough to hold its shape when the pie is sliced, but still slightly jiggly in the center—this indicates it’s reached the perfect consistency.
During the last 10 minutes of baking, watch for the filling to thicken noticeably. If it begins to darken too quickly, tent the pie with aluminum foil to prevent over-browning. The apples should be tender enough to collapse slightly when pressed with a fork, but still retain their shape. Once done, let the pie cool for at least 2 hours before slicing—this resting period allows the filling to set properly and develop its full flavor.
Pro Tips For Making 9 Inch Apple Pie Filling
- PEEL AND GRATE APPLES: Granny Smiths stay firmer when peeled, but don’t skip the grating—it releases more juice and thickens the filling faster. Use a box grater (not slices) to avoid soggy bottoms, and toss the shreds with a splash of lemon juice right away. (Yes, even if you’re impatient like me.)
- SIMMER LOW AND LONG: After mixing the filling, keep the heat at a gentle bubble—not a boil. I learned this the hard way: rushing it turns the flour into glue. Let it thicken for 15–20 minutes, stirring occasionally, until it coats the back of a spoon. Patience here means no gummy pie.
- WEIGH THE SUGAR: Granulated sugar varies by brand, and eyeballing it leads to either cloying sweetness or bland apples. Use a scale for the first ¾ cup—aim for 180g—and adjust the extra sugar to taste after tasting the cooked filling. (Your future self will thank you.)
- ADD A PINCH OF SALT: The recipe might not mention it, but a ¼ teaspoon of salt balances the tartness of Granny Smiths and rounds out the cinnamon. Skip it, and the filling tastes flat—like someone forgot the butter in a biscuit. (I know, it’s weird for pie, but trust it.)
Common mistakes when making this recipe
Over-Mixing the Filling
I’ve seen so many home bakers overwork the filling, especially when combining the apples with the flour-butter mixture. This creates a dense, gluey texture instead of that perfect velvety consistency we all crave. The key is gentle tossing—just enough to coat the apples evenly.
Overmixing releases too much starch from the flour, which can turn your filling into a thick paste rather than a luscious, spoonable delight. 🍎
Skipping the Pre-Cook
One of the biggest mistakes is baking the pie without pre-cooking the filling on the stovetop. This step is non-negotiable for achieving that signature thick, glossy texture. When you skip it, the filling can become watery or even leak out during baking.
I always pre-cook my filling for 8-10 minutes until it thickens slightly—this ensures it holds its shape beautifully in the oven.
Uneven Apple Distribution
An uneven layer of apples leads to uneven baking, which can result in some slices being undercooked while others are overdone. Always spread the apples in a single, even layer across the bottom of your pie dish.
This ensures consistent heat distribution and prevents any dry or mushy spots. A quick trick? Use a ruler to check for evenness before adding the flour-butter mixture.
Ignoring the Resting Time
Rushing to slice your pie right after it comes out of the oven is a recipe for disaster. The filling needs time to set properly, which happens during the 2-hour cooling period.
If you cut into it too soon, the filling will ooze out, making a mess and ruining the presentation. Trust me, that extra waiting time is worth it for clean, perfect slices every time.
Overloading the Crust
Stuffing your pie with too much filling can cause it to overflow or create a soggy bottom crust. The rule of thumb is to fill your pie dish only ¾ full—this gives the filling room to bubble and thicken without spilling over.
If you’re using a lattice crust, leave even more space to account for the extra height. I’ve learned this the hard way after a few too many overflow incidents!
Using Soft Butter
Cold, cubed butter is essential for achieving that perfect crumb texture in the flour-butter mixture. If you use softened butter, it melts too quickly during baking, leading to a filling that’s too thin or even runny.
Always cut your butter into small cubes and keep it cold until you’re ready to mix it with the flour. This ensures those pockets of butter melt gradually, creating a rich, velvety filling instead of a watery one. ⚡
Nutrition facts
Frequently asked questions
Can I use any apple variety for this filling?
While Granny Smith apples are ideal for their tartness and firmness, you can absolutely use other varieties! Honeycrisp or Braeburn work beautifully—they’re sweeter but still hold their shape. For extra juiciness, try a mix of tart and sweet apples. Just avoid overly soft varieties like Red Delicious, as they’ll turn mushy during baking.
Why does my filling get watery when baked?
Watery filling usually means you skipped the stovetop pre-cook step or overloaded the crust. The pre-cook thickens the filling by reducing excess moisture—always simmer for 8-10 minutes until slightly thickened. Also, fill your pie dish only ¾ full to prevent overflow and sogginess. Cold butter in the flour mix helps too!
How do I make this filling without gluten?
Swap the all-purpose flour for a 1:1 gluten-free flour blend like Bob’s Red Mill or Cup4Cup. Use the same amount (0.5 cup) and follow the same mixing method. For extra binding, add 1 tbsp cornstarch to the flour mixture. The texture will be slightly different but still delicious—just check for doneness at 40 minutes instead of 45.
Can I make this filling ahead of time?
Pre-cooked filling keeps in the fridge for 3 days in an airtight container. For longer storage, freeze portions for up to 3 months. When reheating, add 1-2 tbsp water or apple juice to restore moisture. The flavors actually improve overnight—perfect for stress-free baking days!
What’s the secret to perfect cinnamon-sugar swirls?
Use a sharp knife or offset spatula to cut through the filling in smooth, even strokes—think “S” shapes rather than tight circles. The key is to cut through the top layer all the way to the bottom. For extra drama, sprinkle an additional 1 tbsp cinnamon on top before baking. Pro tip: Chill the filling for 30 minutes before swirling to make cutting easier!

- 12 Bean Chili Recipe: Hearty Slow-Cooked Depth With 12 Legumes - October 17, 2026
- 5 Seed Bread Recipe: Nutty Crunch and Artisan Flavor in One Loaf - October 17, 2026
- 1 Lb Macaroni Salad Recipe: Bold, Crunchy, and Crowd-Pleasing - October 17, 2026