
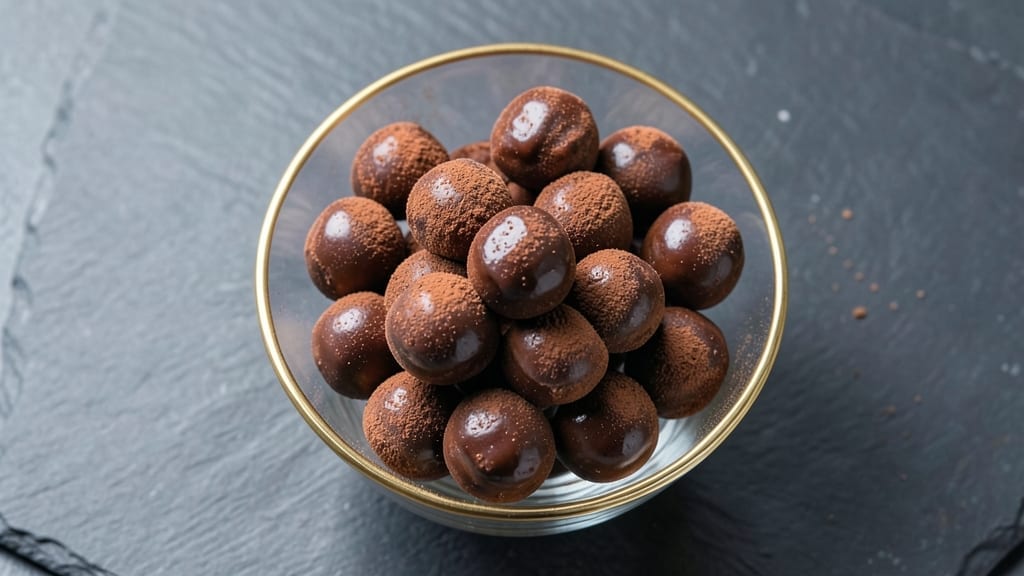
This 3-ingredient chocolate truffles recipe delivers decadent, melt-in-your-mouth bites with just a handful of pantry staples—no fancy equipment or baking required. The secret lies in combining high-quality dark chocolate with creamy butter and a simple filling, then rolling them into perfectly bite-sized spheres.
I developed this recipe during a particularly busy week when I needed a dessert that was both impressive and effortless, and it’s been my go-to ever since for parties, gifts, or satisfying a late-night sweet tooth.
The beauty of these truffles is their simplicity: rich, velvety texture comes from the chocolate and butter, while the filling (vanilla extract or a splash of cream) adds depth without complicating the process.
No need to temper chocolate or worry about precise measurements—this recipe is foolproof for beginners and experienced bakers alike. The result? Truffles that taste like they came from a high-end patisserie, but with a fraction of the effort.
By the time you’re done, you’ll have a batch of glossy, velvety truffles that require just 15 minutes of active time and 30 minutes of chilling. They’re elegant enough to serve at gatherings but simple enough for a weeknight treat.
The best part? These truffles keep well in the fridge for up to a week, making them perfect for meal prep or gifting.
For extra flair, roll them in cocoa powder, crushed nuts, or colorful sprinkles—but the basic version is already irresistible. Let’s get started on these decadent, no-fuss bites that prove great desserts don’t have to be complicated.
Ingredients for 3 ingredient chocolate truffles
Three ingredients. Zero fuss. Restaurant-quality truffles in minutes with no baking required.
| Ingredient | Amount | Notes |
|---|---|---|
| High-Quality Dark Chocolate Bars 🍫 | 12 oz | 70% cocoa or higher, chopped finely |
| Unsalted Butter 🧈 | 8 oz | Cold, cut into small cubes |
| Vanilla Extract 🌿 | 1 tbsp | Pure, high-quality extract |
The chocolate makes or breaks this—Ghirardelli or Lindt bars are my go-tos, but any high-quality dark chocolate (70% cocoa or higher) works. Look for bars without additives like emulsifiers or milk powder, which can make the truffles grainy. The butter? European-style unsalted (like Plugrá) gives the best flavor, but regular unsalted works too. Chop the chocolate into tiny pieces—think rice-sized bits—for even melting. Cold butter is key here; if it starts to soften, pop it in the fridge for 10 minutes. The vanilla extract? Pure Madagascar bourbon if you’re splurging, but any good-quality extract will do.
No vanilla extract? A splash of heavy cream (1 tsp) or a pinch of vanilla bean paste works in a pinch. Short on butter? Coconut oil in equal amounts gives a similar texture, though the flavor will differ slightly. If your chocolate is particularly thick, add 1 tsp of coconut milk to help bind it. The truffles should hold their shape when rolled—if they’re too soft, chill them longer. For extra decadence, add 1 tsp of instant espresso powder to the chocolate mix to deepen the flavor. And if you’re feeling fancy, roll them in toasted cocoa powder or crushed hazelnuts after chilling.
These truffles keep beautifully in the fridge for up to 1 week, though they’re best enjoyed within 3 days for peak texture. Store them in an airtight container between layers of parchment paper to prevent sticking. For gifting, transfer them to a decorative box or tin—they make stunning presents that require no wrapping paper. Freeze for up to 3 months if you’re not planning to use them soon, but let them come to room temperature before serving. Pro tip: Roll them in melted white chocolate right before serving for an elegant touch.
Why You’ll Love This Recipe
- No Chopping, No Stress: I melt the chocolate and butter together in one bowl—no knives, no mess, just 5 minutes of hands-off work while I sip my coffee. The vanilla extract does all the flavor lifting, so I don’t even need to measure it precisely (a few drops is enough).
- Rich Without the Fuss: That first bite of dark chocolate and butter, wrapped in vanilla warmth? It’s like a hug for my taste buds. Honestly, I’ve tried fancy truffle recipes with fillings and coatings, but this one hits the same decadence with zero extra steps.
- Gift-Worthy in Minutes: Roll them into little balls, dip in crushed nuts or cocoa powder, and boom—you’ve got a last-minute hostess gift. I’ve thrown these together for birthday surprises, teacher appreciation, or even just to stash in my desk drawer when I need a morale boost.
- Pantry Staples, Zero Waste: If I’ve got dark chocolate and butter, I’ve got truffles. No special ingredients, no expiration dates to fret over. And if I make a big batch? They keep for weeks in the fridge—perfect for when I’m too tired to bake but still crave something sweet.
Step-by-step instructions for 3-Ingredient chocolate truffles
Here’s how to transform three simple ingredients into decadent truffles that taste like they came from a patisserie.
Melt Chocolate and Butter Together
Place the 12 oz high-quality dark chocolate bars and 8 oz unsalted butter (cut into small cubes) in a heatproof bowl set over a saucepan of simmering water. Keep the heat at a gentle simmer—you want the water to create steady heat without boiling. Stir occasionally with a silicone spatula until both the chocolate and butter melt completely, creating a smooth, glossy mixture. This should take about 8-10 minutes.
Here’s the thing—don’t let the water boil directly against the bowl. You’re aiming for a bain-marie effect where the steam gently melts the ingredients without scorching them. If the chocolate starts to seize up (look for streaks of unmelted chocolate), add a few drops of water to help it smooth out. Once fully melted, remove the bowl from the heat and let it cool slightly for 5 minutes—it should be warm but not hot to the touch.
Infuse with Vanilla Extract
Add the 1 tablespoon vanilla extract to the melted chocolate mixture and stir gently but thoroughly. This is where the magic happens—the vanilla enhances the deep cocoa flavor and adds a subtle complexity that makes these truffles taste anything but basic. Let the mixture sit for 2-3 minutes to allow the vanilla to fully infuse into the chocolate. You’ll notice the aroma become richer and more aromatic.
I know it seems like a small amount, but trust me—this is the perfect balance. Too much vanilla can overpower the chocolate, while too little won’t make a noticeable difference. After adding the vanilla, give the mixture one final stir to ensure it’s completely incorporated. The texture should now be smooth, thick, and ready for shaping.
Chill and Shape the Truffles
Transfer the chocolate mixture to a shallow dish or loaf pan and cover it tightly with plastic wrap. Place it in the refrigerator and chill for 2-3 hours or until the mixture is firm enough to hold its shape when scooped. This step is crucial—it allows the chocolate to set properly so you can shape perfect truffles without them melting in your hands.
While the mixture is chilling, I like to prepare my workspace by lining a baking sheet with parchment paper. This makes cleanup a breeze and prevents the truffles from sticking. Once the mixture is firm, use a small scoop or tablespoon to portion out 1-inch balls of chocolate. Roll each ball between your palms to create smooth, round truffles. If your hands get too warm, dip them in cold water between shapes.
Finish and Store for Maximum Freshness
Place the shaped truffles back on the baking sheet and return them to the refrigerator to set for an additional 30 minutes. This final chill ensures they hold their shape perfectly. Once set, you can roll them in cocoa powder, crushed nuts, or even shredded coconut if you like—but they’re delicious just as they are with their rich, velvety texture.
Store the truffles in an airtight container in the refrigerator for up to 5 days, or transfer them to the freezer for up to 3 months. When you’re ready to serve, let them sit at room temperature for 10-15 minutes so they’re easier to handle. The contrast of the cool, firm truffles melting gently on your tongue is what makes these three-ingredient bites so irresistible.
Pro Tips For Making 3 Ingredient Chocolate Truffles
- Chop the Chocolate Coarse: Skip the fine powder—roughly chop the dark chocolate into ½-inch chunks instead of melting it smooth. The texture stays richer, and you avoid that waxy mouthfeel that happens when chocolate gets too fine during melting.
- Use Room-Temp Butter: Take the unsalted butter out of the fridge 30 minutes before you start. Cold butter won’t blend evenly with melted chocolate, and you’ll end up with streaks or a grainy mixture. Trust me, this isn’t just about convenience—it’s about texture.
- Don’t Overmix the Ganache: Once the butter is folded into the chocolate, stop stirring after 2-3 minutes. Overworking it introduces air, which makes the truffles dry out faster and lose that silky finish. Let the heat do the work, then chill immediately.
- Chill in Stages: Spread the mixture into a shallow dish and refrigerate for 20 minutes before rolling into balls. If you rush it, the chocolate will crack when you shape it, and the truffles won’t hold their form. Patience here saves you from a messy cleanup.
Dietary considerations for this dish
Vegan Adaptations
Skip the butter entirely and replace it with 8 oz coconut oil (refined for neutral flavor) or ½ cup coconut cream for a dairy-free version. Use vegan dark chocolate with at least 70% cocoa—I recommend Lindt Excellence 85% or Enjoy Life Foods bars.
Add 1 tsp vanilla extract and 1 tbsp maple syrup to balance the richness. Chill the mixture longer (up to 4 hours) since plant-based fats set more slowly. 🌱
Gluten-Free Safety
This recipe is naturally gluten-free since it contains only chocolate, butter, and vanilla. Double-check your chocolate bar ingredients—some brands add gluten-containing additives. For extra caution, use certified gluten-free chocolate like Hu Kitchen or Pascha bars.
The butter and vanilla are inherently gluten-free, so no substitutions are needed here. Always verify labels if you’re highly sensitive to cross-contamination.
Nut-Free Options
If you’re avoiding nuts due to allergies, skip the nut-based coatings entirely. Instead, roll truffles in unsweetened cocoa powder, crushed freeze-dried raspberries, or toasted coconut flakes.
For a festive touch, use colored sugar sprinkles or edible gold leaf**. Store nut-free truffles in a separate container to prevent cross-contact with nut products in your kitchen.
Lower Sugar
Reduce the sweetness by using 85% or higher cocoa content chocolate—the higher the percentage, the less sugar it contains. Skip adding any extra sweeteners like maple syrup. If you need a touch of sweetness, add ½ tsp stevia powder or 1 tsp erythritol to the melted chocolate mixture.
The natural bitterness of dark chocolate will still shine through beautifully. 💡
Dairy-Free Coatings
For a dairy-free finish, melt ½ cup white chocolate substitute (like Pascha or Enjoy Life Foods) and dip the truffles halfway. Let them set on parchment paper before serving. Alternatively, use melted coconut butter for a tropical twist.
Both options create a glossy, elegant coating without dairy. Store coated truffles in the fridge for up to 3 days to maintain their crisp texture.
Nutrition facts
Frequently asked questions
Can I make these truffles without vanilla extract?
Yes! If you’re out of vanilla, substitute with 1 teaspoon heavy cream or ½ teaspoon vanilla bean paste. For a nutty depth, add ½ teaspoon instant espresso powder to the melted chocolate. The truffles will still taste rich and delicious without vanilla, though it adds a lovely complexity.
Why are my truffles too soft or crumbly?
Soft truffles usually mean the chocolate didn’t chill long enough. Let the mixture set for 3-4 hours instead of 2. Crumbly texture often happens if the butter was too warm when melting—use cold cubes and avoid direct heat. For extra stability, add 1 teaspoon coconut milk to the chocolate mixture before chilling.
How do I store these truffles for gifting?
Transfer truffles to an airtight container layered with parchment paper to prevent sticking. They’ll keep fresh in the fridge for 5 days or freeze for 3 months. For gifting, package them in decorative tins or boxes—no wrapping paper needed! Add a ribbon for extra elegance.
Can I use white or milk chocolate instead?
Technically yes, but dark chocolate (70%+ cocoa) gives the best flavor and texture. White chocolate lacks cocoa depth, and milk chocolate can make the truffles grainy. If you must use white, add 1 extra tablespoon butter to compensate for its lower fat content. For milk chocolate, reduce the butter to 6 oz instead.
What’s the best way to reheat or serve truffles straight from the fridge?
Let truffles sit at room temperature for 10-15 minutes before serving—they’ll be easier to handle and develop a smoother texture. For a restaurant-style touch, dip them in melted white chocolate or roll in crushed pistachios. If serving cold, pair with a warm beverage like chai tea to contrast the temperatures.

- 12 Bean Chili Recipe: Hearty Slow-Cooked Depth With 12 Legumes - October 17, 2026
- 5 Seed Bread Recipe: Nutty Crunch and Artisan Flavor in One Loaf - October 17, 2026
- 1 Lb Macaroni Salad Recipe: Bold, Crunchy, and Crowd-Pleasing - October 17, 2026