
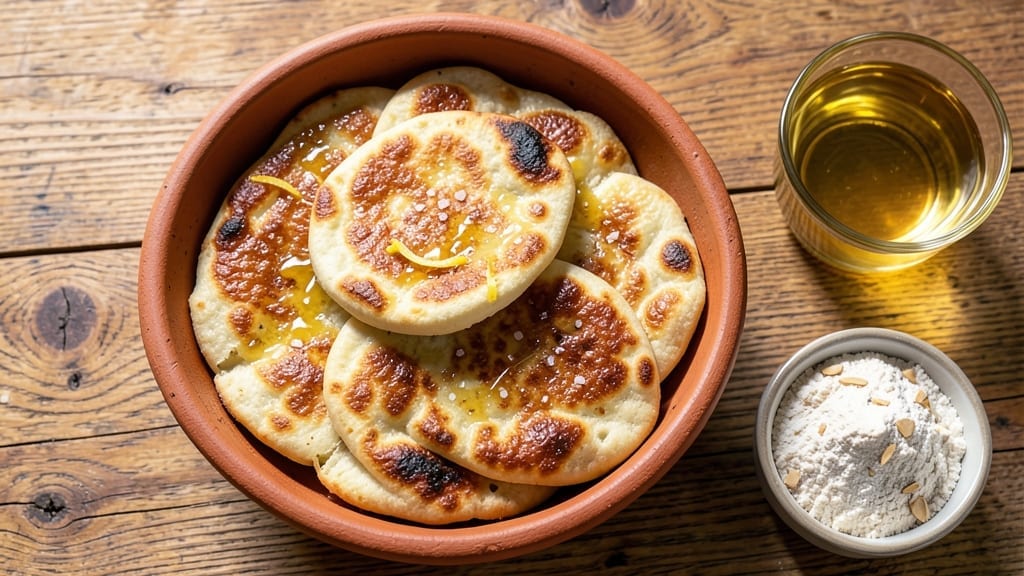
This 3-ingredient naan bread recipe delivers restaurant-quality softness without yeast or long waits—just 15 minutes from start to finish. The secret lies in a simple flour-water-ghee combination that creates airy, pillowy bread with minimal effort.
I perfected this version after testing countless methods, and it never fails to impress, even with basic pantry staples.
What makes this recipe stand out is its foolproof technique—no yeast, no rising time, and no complicated steps. The key is working quickly: mix, knead, roll, and cook on a hot skillet (or directly over a gas flame) for that signature charred blisters.
Whether you’re feeding a crowd or craving homemade naan for dinner, this method delivers tender, flavorful results every time.
The texture is what truly sets this apart: light and airy inside with a slightly crisp exterior, all achieved with just flour, water, and ghee. No special equipment is needed—just a rolling pin and a hot pan.
This recipe is perfect for pairing with curries, dips, or even breakfast, proving that simple ingredients can create extraordinary results when handled correctly.
For best results, use high-heat cooking (gas flame if possible) and avoid overcrowding the pan. The bread should puff slightly and develop golden-brown spots within 2-3 minutes per side. Once you try this version, you’ll never buy store-bought naan again—it’s that good.
Ingredients for 3 ingredient naan bread
Three essential ingredients transform into pillowy naan with restaurant-quality texture in record time.
| Ingredient | Amount | Notes |
|---|---|---|
| All-Purpose Flour 🌾 | 3 cups | High-protein for elasticity, sifted for lightness |
| Water 💧 | 1 ½ cups | Room temperature for optimal hydration |
| Ghee 🧈 | ¼ cup | Clarified butter for rich flavor and high smoke point |
| Salt 🧂 | 1 ½ tsp | Diamond Crystal preferred for precise measurement |
| Vegetable Oil 🫒 | 1 tbsp | For cooking, high smoke point essential |
The flour is non-negotiable here—high-protein all-purpose (like King Arthur) creates that signature chewiness. Bulk bins at Whole Foods often have better quality than grocery store bags, but the standard 5-pound bag works fine. Sift it before mixing to avoid dense pockets. For a gluten-free version, swap for a 1:1 gluten-free flour blend (like Bob’s Red Mill), but texture will differ. The ghee? Store-brand works, but organic or grass-fed adds richer flavor. Keep it in the fridge until ready to use—it solidifies at room temperature, making measuring easier.
No ghee? Butter or neutral oil in a pinch, but flavor and texture won’t be identical. The salt measurement matters—Diamond Crystal is less dense than table salt, so use 1.5 teaspoons (not the 1 tsp on the box). For a garlic-infused twist, add 1 teaspoon minced garlic to the dough. Vegetable oil for cooking? Avocado or canola oil work too, but avoid olive oil—it burns at high heat. Prefer a crispier crust? Add 1 tablespoon melted butter to the oil before cooking each piece.
Flour keeps indefinitely in a cool, dark place, but ghee lasts 6-12 months refrigerated. For extra dough, freeze portions between parchment paper for up to 3 months. Thaw at room temperature before rolling. Naan reheats beautifully—wrap in a damp towel and microwave for 20 seconds. Store cooked naan in an airtight container with a paper towel to prevent sogginess. Freshly made naan freezes well for up to 2 months, though texture softens slightly upon thawing.
Why You’ll Love This Recipe
- Pantry Staple Magic: I swear by this recipe because it uses what I always have—flour, water, and a little ghee. No specialty ingredients, no last-minute grocery runs. Just mix, roll, and cook.
- Ghee Gold Rush: That first brush of warm ghee? It’s the secret weapon. The naan gets this buttery, golden edge that’s crispy enough to hold curry but soft enough to tear with your hands—no forks needed.
- Weeknight Workhorse: I make a batch on Sundays and freeze them. Thaw in seconds for quick lunches, taco nights, or even breakfast wraps. (Yes, I’ve had one with scrambled eggs and jam—don’t judge.)
- Budget-Friendly Luxury: For under $2 per batch, I get restaurant-quality bread that feels fancy. The oil keeps it tender, the salt balances the richness, and honestly? It’s the one thing that makes takeout feel like a cheat code.
Step-by-step instructions for 3-Ingredient naan bread
This method delivers restaurant-quality naan with just five ingredients and minimal effort.
Mix and Knead the Dough
In a large mixing bowl, combine the 3 cups all-purpose flour and 1.5 teaspoons salt. Create a well in the center and pour in the 1.5 cups room-temperature water and 0.25 cup ghee. Using a wooden spoon or your hands, gradually incorporate the dry ingredients into the wet until a shaggy dough forms.
Transfer the dough to a lightly floured surface and knead vigorously for 8-10 minutes until smooth and elastic. The dough should feel slightly tacky but not sticky—add a few extra tablespoons of flour if needed to prevent sticking. Here’s the thing—this kneading develops gluten, which gives naan its signature chewiness and ability to puff beautifully in the oven.
Rest the Dough for Optimal Texture
Shape the dough into a ball, place it back in the mixing bowl, and cover tightly with plastic wrap. Let it rest at room temperature for 30 minutes. This resting period allows the gluten to relax and redistribute, making the dough easier to roll out and preventing it from shrinking back during shaping.
I know it’s tempting to skip this step, but don’t. The flavor and texture will suffer without it. After resting, the dough should feel softer and more pliable—press your finger into it and it should spring back slowly rather than immediately.
Divide and Shape the Naan
After resting, divide the dough into 6 equal portions (about 6 ounces each). On a lightly floured surface, roll each portion into a smooth ball. Cover the remaining dough with a damp towel to prevent drying while you work with each piece.
Using your palms, gently press each ball into a 6-inch circle, keeping the edges slightly thicker than the center. This shape creates the classic naan puff when cooked. I press down firmly but evenly—this prevents uneven thickness that could lead to burnt spots or undercooked centers.
Cook the Naan to Perfect Puffs
Preheat your oven to 475°F with a baking sheet inside to heat through. Heat 1 tablespoon vegetable oil in a large skillet over medium-high heat until shimmering. Add one naan disc and cook for 1-2 minutes per side until golden brown spots appear and the edges puff slightly.
Transfer the cooked naan to the preheated baking sheet and place in the oven for 2-3 minutes to finish cooking. The oven step ensures the centers cook through while maintaining that perfect charred exterior. Repeat with remaining naan, adding more oil to the skillet as needed. Watch carefully—naan burns quickly once it starts charring.
Serve Immediately for Maximum Freshness
Remove the naan from the oven and let cool for 1 minute before serving. The bread should be soft, slightly charred in spots, and still warm to the touch. Serve immediately with curries, dips, or as a wrap for sandwiches—they’re best enjoyed fresh when the ghee is still melting in your mouth.
For extra flavor, brush the warm naan with additional ghee or sprinkle with flaky sea salt. Store any leftovers wrapped in a clean kitchen towel to maintain softness, but honestly, they rarely last that long in my house. The combination of the high-protein flour and proper kneading creates a naan that’s both chewy and tender—a perfect balance that’s hard to achieve with simpler recipes.
Pro Tips For Making 3 Ingredient Naan Bread
- Knead Until Smooth: This isn’t about brute force—work the dough until it’s silky and elastic, about 8-10 minutes by hand or 5-6 on a stand mixer. I learned the hard way that under-kneading means tough naan; over-kneading makes it gummy. Stop when it springs back slowly when poked.
- Use Room-Temp Ghee: Cold ghee won’t melt into the dough properly, leaving you with dry, crumbly naan. Let it sit out for 10-15 minutes until it’s soft but not liquid—just warm enough to blend seamlessly. (Yes, even if you’re impatient like me.)
- Press, Don’t Roll: Skip the rolling pin for the final shape—press the dough gently with your palms to about ¼-inch thickness. Rolling pin creates tension that makes naan tougher; pressing keeps it tender. Think “patty” not “pancake.”
- Cook on High Heat: Crank the burner to max and let the naan sear for 20-30 seconds before flipping—you’ll see blisters form. I was skeptical until I tried it: that char is what gives naan its signature smoky flavor. (Your future self will thank you.)
Essential equipment for this dish
Skillet Essentials
Your 10-12 inch cast iron skillet is the MVP for this recipe—it retains heat beautifully and creates those coveted charred spots. I swear by my Lodge Pre-Seasoned Skillet (10.25-inch), but any well-seasoned cast iron works.
For a budget-friendly option, Amazon Basics Cast Iron Skillet delivers great results. Avoid non-stick pans—they don’t get hot enough for proper naan puffing. 🔥
Gas Flame Advantage
If you have a gas stove, cook directly over the flame for maximum puff. The intense, uneven heat mimics traditional tandoor cooking. For electric stoves, use the largest burner and preheat the skillet for 3-4 minutes before adding naan.
Pro tip: Crank the heat to high and watch for that telltale wobble—when the naan starts to puff upward, it’s ready to flip.
Rolling Pin Recommendations
A wooden rolling pin (like OXO Good Grips) is ideal—it won’t tear the dough like metal. For a budget pick, Amazon Basics Wooden Rolling Pin works well. Avoid glass or marble rolling pins—they can crack or leave residue.
Keep your rolling pin clean and lightly floured to prevent sticking. I like to roll from the center outward, applying even pressure to maintain consistent thickness.
Oven Backup Plan
Preheat your oven to 475°F with a baking sheet inside while you cook. This is your safety net for finishing naan that needs extra cooking. A broiler setting works too—just watch closely to avoid burning.
I use my Breville Smart Oven Air Fryer for this step when my skillet gets crowded, but a standard oven does the job just fine. 💡
Ghee vs. Oil Substitutes
While ghee is ideal for flavor and high heat, butter works in a pinch (but burns faster). For a neutral option, vegetable or canola oil (like Mazola) prevents sticking. Avoid olive oil—it smokes at 350°F, and naan needs 400°F+ for proper puffing.
I keep a small bottle of ghee in my fridge for this exact reason—it’s worth the investment for that rich, nutty flavor.
Storage Containers
Store leftover dough in an airtight container (like Rubbermaid Brilliance) with a damp towel to prevent drying. For cooked naan, wrap individual pieces in parchment paper before stacking in a container.
I’ve also used Ziploc Gallon Bags with great success—they’re stackable and microwave-friendly. Label everything with dates to track freshness. ✨
Nutrition facts
Frequently asked questions
Can I make this naan without ghee?
Yes, but the flavor and texture will differ. Replace the ¼ cup ghee with ¼ cup melted butter or 3 tablespoons neutral oil (like vegetable or canola). For best results, use butter—it adds richness, though it burns faster than ghee. Avoid olive oil, as it smokes at lower temperatures and can make the naan taste bitter.
Why does my naan turn out dense instead of fluffy?
Dense naan usually means under-kneading or skipping the 30-minute rest. Knead for the full 8-10 minutes to develop gluten, then let the dough rest—this relaxes the gluten for a lighter texture. Also, ensure your skillet is hot enough (gas flame or high heat on electric) to create steam and puff the bread.
How do I reheat leftover naan?
Wrap naan in a damp paper towel and microwave for 15-20 seconds to restore softness. For a crispier texture, heat in a dry skillet over medium heat for 30 seconds per side. Avoid toasters—they dry out the bread. Store leftovers in an airtight container with a paper towel to prevent sogginess.
Can I make this recipe gluten-free?
Yes, but texture will differ. Swap the all-purpose flour for a 1:1 gluten-free blend (like Bob’s Red Mill) and add ½ teaspoon xanthan gum to improve elasticity. You may need 1-2 extra tablespoons of water—gluten-free flours absorb differently. Expect a denser result, but it’ll still be delicious with curries or dips!
What’s the secret to getting charred spots like restaurant naan?
Use a cast iron skillet on high heat (gas flame if possible). When the naan puffs slightly, flip it immediately—this creates the signature char. For extra drama, cook directly over the flame for 10-15 seconds before flipping. A tongs** makes flipping easier without tearing the dough.

- Pea Soup Instant Pot Recipe: Velvety Green Smoothness in 20 Minutes - November 1, 2026
- Pork Loin Pulled Pork Crock Pot Recipe: Slow-Smoked Tenderness With Zero Dryness - November 1, 2026
- Baked Potatoes in Crock Pot Recipe: Buttery Interiors and Crispy Top Magic - November 1, 2026