
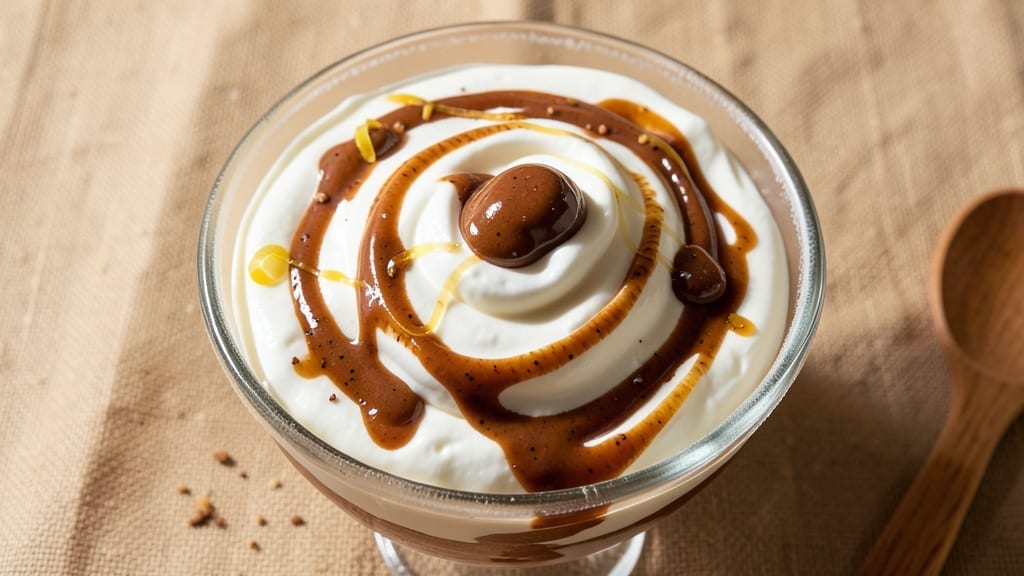
This 3-ingredient Nutella ice cream recipe delivers ultra-creamy, no-churn perfection with just heavy cream, Nutella, and a touch of vanilla—no ice cream maker required. The secret lies in whipping the cream to stiff peaks before folding in the rich chocolate-hazelnut spread, creating a velvety texture that freezes beautifully.
I developed this after craving dessert but dreading the cleanup, and it now satisfies my sweet tooth in under 10 minutes of active time.
The magic happens when you whip the heavy cream until it holds soft peaks—this ensures a light, airy base that won’t turn icy. Nutella’s natural thickness provides structure without needing stabilizers, while vanilla extract enhances its familiar flavor profile.
What you’ll end up with is a dessert that tastes like a gourmet gelato but requires no special equipment or complicated steps.
By the time you’re ready to serve, you’ll have a creamy, bite-sized treat with pockets of Nutella swirled throughout—no graininess, no waiting hours for churning. The texture remains smooth even after hours in the freezer, making it perfect for last-minute cravings or impressing guests with minimal effort.
Serve immediately for soft-serve appeal or let it firm up slightly for scoopable perfection.
For an extra touch, sprinkle crushed hazelnuts or chocolate shavings on top before serving, or drizzle with melted chocolate for a restaurant-quality finish. This recipe proves that decadence doesn’t require complexity—just the right combination of simple ingredients and technique.
Ingredients for 3 ingredient nutella ice cream
Three ingredients, zero fuss—just creamy perfection in minutes.
| Ingredient | Amount | Notes |
|---|---|---|
| Heavy Whipping Cream 🥛 | 2 cups | Full-fat for best texture |
| Nutella 🍫 | 1 cup | Original flavor preferred |
| Pure Vanilla Extract 🌿 | 1 tsp | High-quality for optimal flavor |
The heavy whipping cream is non-negotiable here. Full-fat only—anything less and you risk a grainy texture. I always grab Land O’Lakes or Horizon from the grocery store; they whip up beautifully. Keep it cold until you’re ready to use it—room temperature cream won’t whip properly. The Nutella? Original flavor is the way to go, but if you’re feeling adventurous, try the white chocolate or cookie dough varieties. Just make sure it’s not melted when you add it to the whipped cream, or you’ll end up with clumps.
No vanilla extract? Vanilla bean paste at half the amount works beautifully, or a scraped vanilla bean pod if you’re feeling fancy. Short on Nutella? Hazelnut spread or chocolate-hazelnut butter in a pinch, though the flavor will differ slightly. The whipped cream should hold stiff peaks—if it doesn’t, add a pinch more cream and whip again. Pro tip: Whip the cream in a chilled bowl for even better results, especially in warm kitchens. And for the love of dessert, don’t skip the vanilla—it rounds out the Nutella’s richness.
This ice cream is best enjoyed immediately after freezing, but it keeps for up to 2 weeks in the freezer. For soft-serve appeal, let it sit at room temperature for 5-10 minutes before serving. To portion it neatly, use a cookie scoop or ice cream scoop. If you make extra, store it in an airtight container with parchment paper between layers to prevent freezer burn. The texture stays creamy if you don’t over-whip the cream—just fold in the Nutella gently until fully combined.
Why You’ll Love This Recipe
- No-Fuss Magic: I swear, this is the kind of recipe where you almost feel guilty for how little effort it takes. Just whip the cream, fold in Nutella, and a splash of vanilla—no churning, no waiting hours, no stress. My kids think I’m a genius, and honestly? So do I.
- Rich, Silky Smooth: That first spoonful of Nutella swirled into creamy whipped cream? It’s like dessert hugged you. The vanilla extract ties it all together—just enough to make it feel sophisticated, not overpowering. Between us, I’ve made ice cream from scratch before, and this still wins.
- Party Trick Ready: Serve it in tiny cups for a last-minute dessert spread or scoop it into cones for a crowd. I’ve even used it to top pancakes on lazy Sundays—because why not? It’s the kind of dessert that works for date nights, kids’ birthdays, or when you just need a pick-me-up at 9 PM.
- Zero-Waste Luxury: The leftovers? Still creamy and delicious after a day in the freezer. And since you’re only using three ingredients, there’s no sad, half-used tub of ice cream mix gathering dust. My wallet and my freezer both thank me for this.
Step-by-step instructions for ultra-creamy no-churn Nutella ice cream
This three-ingredient dessert comes together in minutes with zero fuss.
Chill Your Mixing Bowl and Whisk
Place a large mixing bowl and whisk in the freezer for 15-20 minutes before starting. Using cold utensils is crucial because the heavy whipping cream needs to reach exactly 34-38°F to whip properly—any warmer and it won’t hold its shape. I like to set a timer so I don’t forget this step, as room-temperature cream can turn into butter instead of fluffy peaks.
While the bowl chills, measure out all 2 cups heavy whipping cream into a separate container. The cream should be cold but not frozen—it should feel cool to the touch but still pour easily. If you’re using store-bought cream, check the carton for the “ultra-pasteurized” label, as these varieties whip better than regular cream. This is the secret to that restaurant-quality texture you’re after.
Whip the Cream to Stiff Peaks
Once your bowl and whisk are properly chilled, remove them from the freezer and immediately add the 2 cups heavy whipping cream. Using an electric mixer on medium-high speed, whip the cream for 2-3 minutes until soft peaks form. You’ll know it’s ready when you lift the whisk and the cream holds its shape for a moment before slowly melting back down.
Here’s where it gets tricky: stop whipping as soon as you see stiff peaks forming. Over-whipped cream becomes grainy and loses its silky texture. If you’re unsure, do the “peak test”—lift the whisk vertically and if the cream forms a sharp peak that stands for 10 seconds before collapsing, you’re perfect. The cream should look glossy and thick, like a thick pudding. Add the 1 tsp pure vanilla extract now and mix for another 10 seconds to distribute the flavor evenly.
Fold in the Nutella for Perfect Swirls
Lower the mixer speed to low and gradually add the 1 cup Nutella while mixing continuously. I like to use a spatula to break up any large clumps of Nutella first, then add them slowly to the cream. This prevents the Nutella from sinking to the bottom and ensures even distribution. Mix for another 30-45 seconds until the Nutella is completely incorporated and you see beautiful chocolate streaks throughout the cream.
For that classic Nutella ice cream look, use a spatula to gently fold the mixture back and forth across the bowl about 10-12 times. This creates those signature marbled swirls without overmixing. The goal is to keep as much air incorporated as possible while still maintaining a smooth, creamy consistency. If you see the mixture starting to look too dense, give it one final quick mix with the whisk to restore some airiness.
Freeze for Perfect Texture
Transfer the Nutella cream mixture to a loaf pan or airtight container, smoothing the top with a spatula. Cover with plastic wrap pressed directly onto the surface to prevent ice crystals from forming. Place in the freezer and freeze for at least 6 hours—overnight is ideal. This long freezing time ensures the ice cream develops that creamy, scoopable texture rather than being icy or crumbly.
Here’s the pro tip: after the initial 6 hours, let the ice cream sit at room temperature for 10-15 minutes before serving. This allows it to soften slightly, making it easier to scoop while still maintaining its shape. The texture should be thick and creamy, almost like soft-serve, with visible Nutella swirls throughout. If you prefer firmer ice cream, add 15-30 minutes to the freezing time, but don’t exceed 24 hours or it may become too hard.
Serve and Enjoy Immediately
Remove the ice cream from the freezer and let it sit for 5-10 minutes before scooping. Use a metal ice cream scoop for clean, perfect portions. The ideal serving temperature should be just soft enough to scoop easily but still hold its shape on the cone or in a bowl. For extra indulgence, serve with a drizzle of melted Nutella on top or crushed hazelnuts for crunch.
This ice cream is best enjoyed within 3-4 days for optimal texture. The first few scoops will be the creamiest, so don’t wait too long to dig in. The combination of rich Nutella and velvety whipped cream creates a dessert that’s simple yet feels luxurious—perfect for satisfying those chocolate cravings without the fuss of traditional ice cream making.
Pro Tips For Making 3 Ingredient Nutella Ice Cream
- CHILL THE CREAM FIRST: Cold cream whips faster and holds its shape—trust me, I’ve tried room-temperature cream, and it’s a disaster. Pop the heavy whipping cream in the fridge for at least 30 minutes before whipping, or even better, use it straight from the fridge. The colder it is, the smoother your ice cream will be.
- MELT NUTELLA GENTLY: I learned this the hard way—dumping Nutella into hot cream kills its flavor and makes it grainy. Instead, warm the cream in a saucepan over low heat until just steaming (no bubbles), then whisk in the Nutella until fully dissolved. If you’re lazy, microwave it in 10-second bursts, stirring between each.
- USE VANILLA SPARINGLY: Pure vanilla extract is potent—start with just ½ teaspoon for 1 cup of cream, or you’ll end up with a dessert that tastes like a vanilla bean exploded. If you’re unsure, taste the cream before mixing in the Nutella. You can always add more, but you can’t take it out.
- WHIP IN STAGES: Nutella is thick and heavy, so don’t dump it all in at once. Whip the cream to soft peaks first, then fold in a third of the Nutella, whip again, then add the rest. This keeps the texture light instead of turning it into a dense, fudge-like mess. I know it’s tempting to mix it all at once, but resist.
Best sauces and condiments for this 3 ingredient nutella ice cream
Classic Drizzle
A simple drizzle of melted Nutella directly over the scoop adds an extra layer of richness that feels indulgent without complicating the recipe. I like to warm 2 tablespoons Nutella in 10-second bursts in the microwave, stirring between each interval, until it reaches a smooth, pourable consistency.
Drizzle generously over each serving—this works especially well if you’ve let the ice cream sit at room temperature for 5 minutes before scooping. 🍫
Crunchy Toppings
For texture contrast, crushed hazelnuts or toasted almonds add a delightful crunch that balances the creamy base. Toast ¼ cup hazelnuts in a dry skillet over medium heat for 3-4 minutes until fragrant, then pulse in a food processor until finely chopped.
Sprinkle 1 teaspoon over each scoop right before serving. If you’re feeling adventurous, try chocolate-covered espresso beans for a coffee-chocolate twist that pairs beautifully with Nutella’s hazelnut notes.
Fruity Swirls
Brighten the richness with a strawberry or raspberry swirl—simply blend ½ cup frozen berries with 1 tablespoon honey until smooth, then fold 1 tablespoon of the purée into the Nutella cream mixture before freezing.
The acidity of the berries cuts through the sweetness, creating a tart-sweet balance that’s surprisingly refreshing. For a more dramatic presentation, reserve some purée to drizzle over the top after scooping. 🍓
Whipped Cream Finish
A dollop of lightly sweetened whipped cream on top adds airiness and a touch of elegance. Whip ¼ cup heavy whipping cream with ½ teaspoon powdered sugar and ¼ teaspoon vanilla extract until soft peaks form.
Pipe or spoon the whipped cream over the ice cream just before serving—it melts slightly from the warmth of the scoop, creating a luxurious, restaurant-worthy finish. For extra flair, dust with cocoa powder or a pinch of sea salt to enhance the chocolate flavors.
Caramel Drizzle
For a salted caramel twist, drizzle 1-2 tablespoons of homemade or store-bought caramel sauce over the ice cream. Warm the caramel slightly to loosen it, then drizzle in a zigzag pattern.
Finish with a pinch of flaky sea salt (like Maldon) on top—this enhances the Nutella’s natural sweetness while adding a sophisticated depth.
I recommend Smucker’s Salted Caramel Sauce for convenience, or make your own by melting ½ cup brown sugar with ¼ cup butter and 2 tablespoons cream over low heat.
Nutrition facts
Frequently asked questions
Can I use whipped topping instead of heavy whipping cream?
Not recommended! Whipped topping contains stabilizers that prevent proper whipping and create a grainy texture. Heavy whipping cream is essential for achieving that ultra-creamy, velvety consistency. If you’re short on time, use ultra-pasteurized heavy cream—it whips better than regular cream and gives the best results.
Why did my Nutella ice cream turn icy after freezing?
This happens when the cream wasn’t whipped to stiff peaks or if the mixture was exposed to air during freezing. Always cover the surface with plastic wrap pressed directly onto the cream, and ensure your cream reached stiff peaks before adding Nutella. For extra creaminess, let the ice cream sit at room temperature for 10-15 minutes before scooping.
Can I make this without an electric mixer?
Yes, but it requires elbow grease! Use a hand mixer or even a whisk—whip the cream vigorously for 5-7 minutes until stiff peaks form. Work in a chilled bowl and take breaks to let the whisk cool down. The key is patience—keep going until the cream holds its shape when you lift the whisk.
How can I make this recipe vegan?
Swap the heavy cream for full-fat coconut cream—chill it overnight first, then scoop out just the thick part (discard the watery liquid). Use vegan vanilla extract and a vegan chocolate-hazelnut spread like Nutella’s vegan version or homemade blend. The texture will be slightly denser but still delicious. For extra creaminess, add 1 tablespoon coconut oil to the mix.
Can I add other mix-ins like cookies or nuts?
Fold in ½ cup crushed cookies or chopped nuts after adding the Nutella, but do it gently to avoid melting the cream. For best results, use chocolate chips or hazelnuts—they complement the Nutella perfectly. Just be sure not to overmix, or the texture may become dense. Try it with Oreos or pretzels for fun twists!

- 12 Bean Chili Recipe: Hearty Slow-Cooked Depth With 12 Legumes - October 17, 2026
- 5 Seed Bread Recipe: Nutty Crunch and Artisan Flavor in One Loaf - October 17, 2026
- 1 Lb Macaroni Salad Recipe: Bold, Crunchy, and Crowd-Pleasing - October 17, 2026