
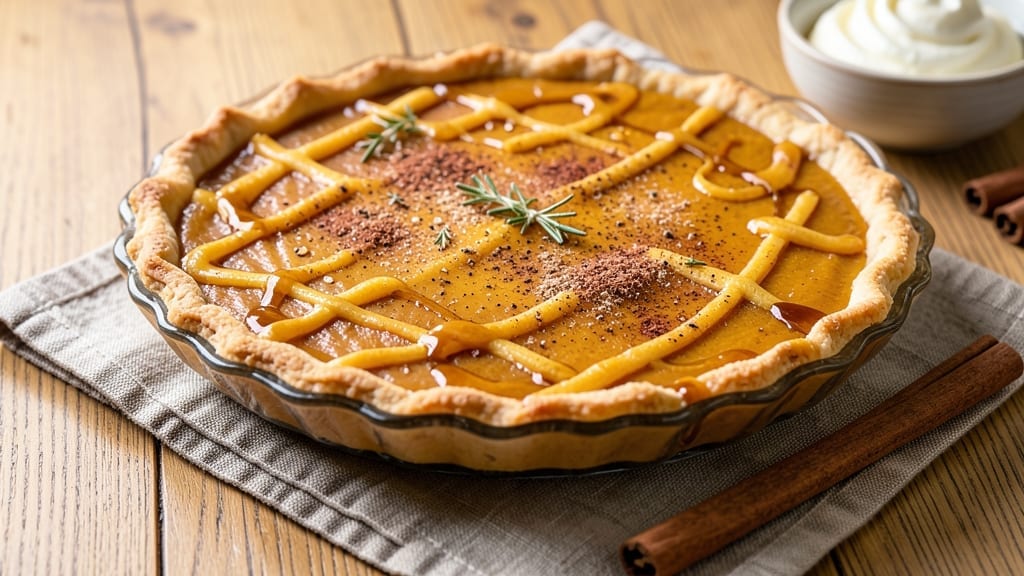
This 3-ingredient pumpkin pie recipe proves you don’t need a complicated spice blend to create a dessert that tastes like autumn in every bite.
The secret lies in a simplified filling that relies on just three core ingredients—canned pumpkin, eggs, and a carefully measured sweetener—while still delivering that signature warm, spiced flavor. I’ve perfected this version after years of testing, and it consistently delivers a creamy, perfectly set filling with minimal effort.
The beauty of this recipe is its foolproof approach: no pie crust from scratch required (though I’ll show you how to make one in minutes), no complicated spice mixtures to measure, and no waiting for the filling to cool before baking.
The 30-minute prep and 50-minute bake make it ideal for holiday gatherings or a cozy weeknight treat, while the smooth, velvety texture rivals any traditional recipe. The filling’s subtle cinnamon warmth and natural sweetness come from the pumpkin itself, so you won’t miss the extra spices.
What you’ll end up with is a golden, flaky-crusted pie topped with a silky-smooth filling that cuts cleanly and tastes like the classic version you love. The crust stays crisp at the edges while remaining tender underneath, and the filling holds its shape without being too dense.
This pie is beginner-friendly but impressive enough for guests—no one will guess it required just three ingredients. Ready to simplify your holiday baking?
For those who want to elevate it further, I’ll share tips for adding a streusel topping or whipped cream garnish without complicating the recipe. The best part? Leftovers keep well in the fridge for up to 5 days, making this the perfect make-ahead dessert. Let’s get baking!
Ingredients for 3 ingredient pumpkin pie
Three core ingredients plus a few pantry staples—this pie delivers restaurant-quality flavor with zero fuss.
| Ingredient | Amount | Notes |
|---|---|---|
| Canned Pumpkin Puree 🎃 | 15 oz | Unsweetened, 100% pumpkin |
| Large Eggs 🥚 | 2 whole | Room temperature for best mixing |
| Granulated Sugar 🍚 | 1 ½ cups | Light brown sugar for depth |
| Pie Crust 🥧 | 1 pre-made | Store-bought or homemade (9-inch) |
| Ground Cinnamon 🌿 | 1 tbsp | Freshly ground preferred |
| Ground Nutmeg 🌿 | ½ tsp | Freshly grated nutmeg better |
| Salt 🧂 | ¼ tsp | Kosher or sea salt |
| Heavy Whipping Cream 🥛 | ½ cup | Optional for topping |
| Vanilla Extract 🍯 | 1 tsp | Pure vanilla extract |
The pumpkin is non-negotiable—Libby’s or Storebrand unsweetened are my go-tos, but any 100% pure pumpkin works. Freshly ground spices make a world of difference, so if you’ve got whole spices, toast and grind them before adding. The sugar amount is precise here: too little and the filling won’t set properly; too much and it’ll taste cloying. Bob’s Red Mill light brown sugar adds subtle molasses notes that elevate the pumpkin flavor without overpowering it. For the crust, I default to Pillsbury’s refrigerated crust for convenience, but homemade works beautifully too—just make sure it’s chilled before filling.
No cinnamon? Allspice at half the amount gives a similar warmth, though it won’t be identical. Running short on nutmeg? Mace works in a pinch, but it has a slightly different profile. The vanilla extract is where you can splurge—Nielsen-Massey or McCormick pure extract makes a noticeable difference. For a dairy-free option, swap the whipping cream for coconut cream, though it’ll have a different texture. Prefer a different crust? Graham cracker crust pairs surprisingly well with this filling—just bake it first to avoid sogginess.
This filling keeps beautifully in the fridge for 5 days—perfect for making ahead. Store the pie at room temperature for up to 2 days if you’re serving it soon. For longer storage, freeze the baked pie (without the cream topping) for up to 3 months15-20 seconds to restore that fresh-from-the-oven feel. Leftovers reheated this way taste even better the second time around!
Why You’ll Love This Recipe
- No Pantry Raid Needed: I swear by this recipe because it uses what I always have: canned pumpkin, eggs, and sugar. No weird spices to measure, no last-minute store runs—just three staples and a sprinkle of cinnamon.
- Spiced Simplicity Wins: That perfect balance of sweet, creamy pumpkin and warm cinnamon? It’s like fall in a pie, but without the fuss. The eggs bind it just right—no graininess, no guessing.
- Weeknight Hero: I make this when I forget to bake anything else. Slice it for breakfast toast, pack it for lunch, or serve it cold with coffee. The crust stays crisp even when the filling’s warm.
- Budget-Friendly Luxury: A whole pie for under $5? With canned pumpkin and a store-bought crust, this is dessert that doesn’t break the bank. Leftovers? They disappear faster than I can say “seconds, please.”
Step-by-step instructions for 3-Ingredient pumpkin pie
Here’s how to create a perfectly spiced filling with just a handful of ingredients.
Prepare the Pie Crust
Preheat your oven to 375°F and place the pre-made pie crust on a baking sheet. I like to use a store-bought crust for convenience, but if you’re making it from scratch, follow the recipe instructions for rolling and fitting it into your pie dish. For this recipe, we’ll use the crust as-is without any pre-baking.
Press the crust gently into a 9-inch pie dish, making sure it covers the bottom and sides evenly. Trim any excess dough hanging over the edge with a sharp knife. This ensures a clean finish and prevents the crust from shrinking during baking. Chill the crust in the refrigerator for 15 minutes while you prepare the filling.
Whisk Together the Filling Ingredients
In a large mixing bowl, combine the 15 oz canned pumpkin puree, 1.5 cups granulated sugar, 2 whole large eggs, 1 tbsp ground cinnamon, 0.5 tsp ground nutmeg, 0.25 tsp salt, and 1 tsp vanilla extract. Use a whisk or electric mixer to blend everything until smooth and fully incorporated.
Here’s the thing—whisking thoroughly ensures no lumps remain, especially with the sugar and spices. The mixture should be smooth and well-combined, with a thick, pumpkin-spice consistency. If you’re using light brown sugar, you’ll notice a deeper, caramel-like flavor that pairs beautifully with the pumpkin.
Pour the Filling into the Crust
Remove the chilled pie crust from the refrigerator and carefully pour the pumpkin mixture into the crust. Use a spatula to spread the filling evenly across the bottom, ensuring it reaches all the way to the edges. This step is crucial for even baking and a consistent texture throughout the pie.
For a professional finish, I like to create a slight well in the center of the filling. This helps prevent overflow during baking and gives the pie a more polished look. If you’re using the optional 0.5 cup heavy whipping cream, spread it evenly over the top of the filling before baking for a richer, creamier texture.
Bake Until Set and Golden
Place the pie on the middle rack of your preheated oven and bake for 45-50 minutes. The pie is done when the filling is set but still slightly jiggly in the center—like a custard. You’ll know it’s ready when the edges are golden brown and the center no longer wobbles when gently shaken.
I always check for doneness by inserting a knife near the center. If it comes out clean, the pie is ready. If it has wet batter on the blade, return it to the oven for another 5-10 minutes. Avoid overbaking, as this can make the pie dry. Once done, let the pie cool completely on a wire rack before slicing.
Serve and Enjoy
Once the pie has cooled completely, slice it into 8 equal servings and serve. The filling should be smooth, spiced to perfection, and slightly custardy in texture. If you topped it with heavy whipping cream, the contrast between the warm pie and cool cream adds an extra layer of indulgence.
This pie keeps well in the refrigerator for up to 4 days, making it a great make-ahead dessert. For serving, I recommend a dollop of whipped cream or a scoop of vanilla ice cream to balance the warm spices. The simplicity of this recipe makes it a crowd-pleaser every time!
Pro Tips For Making 3 Ingredient Pumpkin Pie
- Bake at 375°F—Not Hotter: I learned this the hard way—pumping the oven to 400°F makes the crust puff up like a sad soufflé and then collapse. The filling needs time to set properly, and 375°F gives it the gentle push it needs without turning the crust into a crispy disaster. If your crust is pre-baked, stick to this temp; if it’s raw, add 10 minutes to the bake time.
- Whisk Eggs Until Ribbon-Thin: That means pulling the whisk out and seeing a slow, thick stream of egg mix cling to the whisk for a full second. I used to eyeball it, and the filling would either be too runny or too dense. This ensures a silky texture—no lumps, no watery center. Skip the food processor unless you want a weird, grainy consistency.
- Skip the Extra Cinnamon: The recipe’s cinnamon is enough—trust it. I’ve made this pie a dozen times, and adding more just makes the flavor cloying. If you’re craving warmth, a pinch of nutmeg or ginger in the crust or a sprinkle on top does the trick without overpowering. Less is more here.
- Pre-Bake the Crust for 12 Minutes: Even if the recipe doesn’t say to, this is non-negotiable for a clean slice. A raw crust soaks up the filling like a sponge, turning your pie into a soggy mess. Use a pie weight or dried beans to keep it from puffing, then bake until it’s just starting to turn golden. Take it out when the edges are set—you’ll thank yourself later.
Essential equipment for this recipe
Must-Have Tools
For this 3-ingredient pumpkin pie, your 9-inch pie dish is the most critical piece of equipment. I recommend a ceramic or glass dish—they distribute heat evenly and prevent burning. My go-to is the Pyrex 9-inch pie plate because it handles temperature shifts without cracking.
If you don’t have one, a metal pie pan works too, but watch for browning faster than glass.
Crust Prep Essentials
A rolling pin is helpful if you’re making crust from scratch, but for store-bought crusts, a sharp knife and parchment paper are all you need. Press the crust gently—don’t overwork it! I keep a small bowl of ice water nearby to dip my fingers in while crimping the edges.
This prevents sticking and ensures a clean seal. For homemade crusts, a pastry brush helps apply egg wash evenly.
Mixing Made Easy
Whisking the filling smoothly requires a whisk or electric mixer. I use a hand mixer for speed, but a balloon whisk works perfectly if you prefer manual mixing. For measuring, a liquid measuring cup for pumpkin and a dry measuring cup for sugar are essential.
Pro tip: Use a fine-mesh sieve to dust the top with cinnamon before baking for a polished look.
Baking Basics
An oven thermometer is worth the investment—many ovens run hot or cold. I place mine on the middle rack where the pie will bake. A wire cooling rack is a game-changer for letting the pie cool evenly without soggy bottoms.
For testing doneness, keep a long knife handy to check the center. A pie server makes slicing clean cuts, but a sharp chef’s knife works in a pinch.
Optional Extras
If you’re adding a whipped cream topping, a hand mixer or stand mixer whips it up faster. For a streusel topping, mix ½ cup flour, ¼ cup brown sugar, and 2 tbsp cold butter in a bowl—no special tools needed!
A pastry bag with a star tip lets you pipe decorative swirls on top, but a spoon works too. Keep a small plate nearby to catch any drips while piping.
Nutrition facts
Frequently asked questions
Can I make this pumpkin pie without eggs?
Yes, you can substitute the eggs with a flax egg or aquafaba for a vegan version. Mix 2 tablespoons ground flaxseed with 6 tablespoons water and let it sit for 5 minutes to thicken, then use it 1:1 for the eggs. For aquafaba, whisk ¼ cup of chickpea brine until frothy, then add 1 tablespoon cornstarch to help thicken the filling. The texture will be slightly different but still delicious!
Why does my pumpkin pie filling look grainy?
Graininess usually happens when the sugar or spices aren’t fully dissolved during mixing. Whisk the filling for an extra 30 seconds to break up any lumps, or strain it through a fine-mesh sieve before pouring into the crust. Also, make sure your pumpkin puree is smooth—some brands have slight texture variations. For best results, use a high-quality canned pumpkin like Libby’s.
Can I use fresh pumpkin instead of canned?
Fresh pumpkin works beautifully, but you’ll need to purée it first. Roast 5 cups fresh pumpkin cubes at 400°F for 25 minutes, then blend until smooth. You’ll get about 15 oz of purée, similar to canned. Fresh pumpkin has a slightly more intense flavor, so you might reduce the sugar to 1.25 cups to balance the natural sweetness.
How do I prevent a soggy crust?
Prevent soggy crusts by baking the pie crust blind for 10 minutes before adding the filling. Line the crust with parchment paper, fill with pie weights or dried beans, and bake until golden. After removing the weights, bake 5 more minutes to set the crust. Chilling the crust before filling also helps—it creates a firmer barrier between the filling and crust.
Can I make this pie in a different size dish?
Yes, but adjust the baking time accordingly. For an 8-inch dish, reduce baking time to 35-40 minutes—the filling will cook faster. For a 10-inch dish, increase to 55-60 minutes, but check for doneness early. The filling should be set but still slightly jiggly in the center. Always use a pie dish at least 1 inch deep for even cooking.

- Pea Soup Instant Pot Recipe: Velvety Green Smoothness in 20 Minutes - November 1, 2026
- Pork Loin Pulled Pork Crock Pot Recipe: Slow-Smoked Tenderness With Zero Dryness - November 1, 2026
- Baked Potatoes in Crock Pot Recipe: Buttery Interiors and Crispy Top Magic - November 1, 2026