
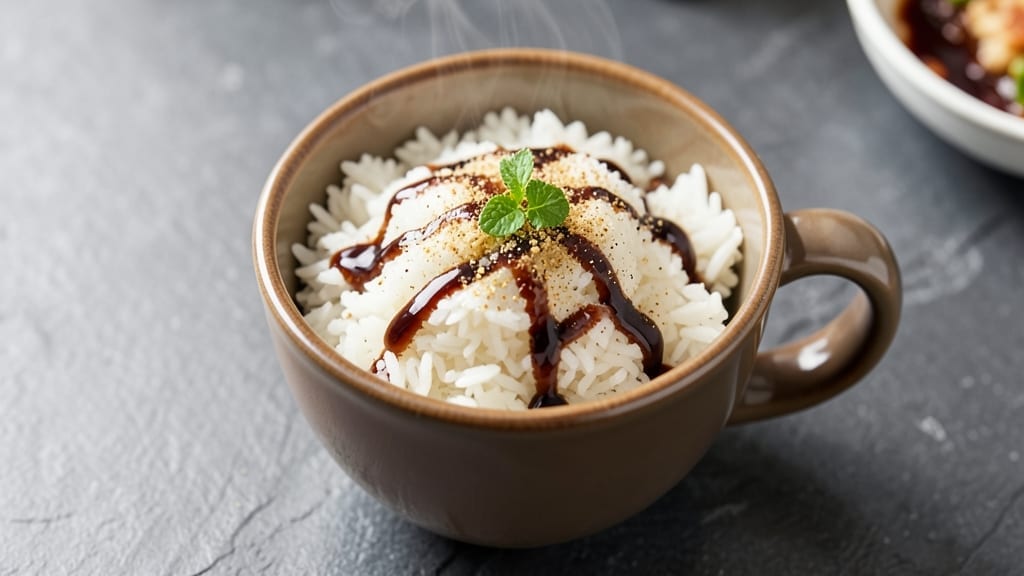
Cooking rice in just 5 minutes isn’t just possible—it’s a game-changer for busy weeknights when you need fluffy grains without the wait. This microwave mug method delivers perfectly cooked rice in less time than it takes to boil water, using only two ingredients and minimal effort.
The secret lies in the right water-to-rice ratio and a quick steam cycle that transforms raw grains into tender, separate kernels without sticking.
What makes this recipe work is its precision: no measuring cups, no stovetop babysitting, and no risk of burning or undercooking. You’ll need just one microwave-safe mug, a fork, and 5 minutes of active time—ideal for single servings or small gatherings.
The rice emerges light, fluffy, and ready to absorb any sauce or seasoning you add, making it the ultimate blank canvas for meals.
This method is perfect for quick lunches, last-minute dinners, or even as a side for stir-fries and bowls. The rice stays hot longer than stovetop versions, and cleanup is a breeze with just one mug to wash.
Whether you’re feeding yourself or a crowd, this recipe proves that fast cooking doesn’t mean sacrificing quality.
For extra flavor, stir in garlic powder, soy sauce, or a splash of broth before microwaving—customize it to your taste without adding time. Here’s how to make it perfectly every time.
Ingredients for 5 minute rice
Precision ingredients for restaurant-quality rice in record time—no stovetop required.
| Ingredient | Amount | Notes |
|---|---|---|
| White Jasmine Rice 🍚 | ¼ cup | Uncooked, long-grain preferred |
| Water 💧 | ½ cup | Room temperature preferred |
| Microwave-Safe Mug 🍵 | 1 whole | 12-16 oz capacity recommended |
| Fork 🍴 | 1 whole | For fluffing rice after cooking |
| Garlic Powder 🧄 | ¼ tsp | Optional for seasoning |
| Soy Sauce 🥢 | ½ tsp | Optional for umami flavor |
| Chicken Broth 🍲 | 1 tbsp | Optional for savory depth |
| Olive Oil 🫒 | ½ tsp | Optional for richness |
| Salt 🧂 | ⅛ tsp | Fine sea salt preferred |
The rice type matters here. Jasmine rice delivers that signature fluffiness, but basmati or short-grain white rice works too. For the mug, microwave-safe ceramic or tempered glass handles heat best—avoid thin plastic. The water-to-rice ratio is critical: 2 parts water to 1 part rice ensures perfect texture. Costco or Trader Joe’s sell bulk rice at great prices, but any grocery store carries it. Look for packages labeled ‘uncooked’—pre-cooked rice won’t work here. The optional seasonings transform this into a complete meal in one step.
No garlic powder? Onion powder at half the amount works in a pinch. Short on soy sauce? Coconut aminos or even a pinch of Diamond Crystal kosher salt adds depth. The broth can be swapped for vegetable broth or even a splash of lemon juice for brightness. Olive oil is optional but adds a luxurious finish—avocado oil is a great alternative. Pro tip: if you’re making this for a crowd, double the ingredients and use 4-6 mugs simultaneously. The rice will be ready at the same time if microwaved together.
This rice reheats beautifully—just add a splash of water and microwave another 30 seconds. For storage, keep cooked portions in an airtight container for up to 3 days in the fridge. Freezing isn’t recommended as the texture suffers. The mug itself? Hand-wash immediately after use—rice residue hardens when dried. For meal prep, cook multiple mugs ahead and refrigerate. Reheat individual portions as needed. The rice stays hot for about 10 minutes post-microwave, perfect for quick meals.
Why You’ll Love This Recipe
- Mug Magic: Honestly, I’ve made this so often I could do it blindfolded—just rice, water, and a quick microwave zap. No pots, no pans, no waiting for the stove to heat up. That’s 5 minutes of my life I’ll never get back if I tried the stovetop method.
- Garlic Kiss: That pinch of garlic powder? It’s the secret weapon. The rice comes out with a subtle, savory warmth that turns plain white grains into something you’d actually want to eat—no fancy seasoning blends needed.
- Lunchbox Hero: Between us, this is my go-to for packed lunches or last-minute dinner sides. The mug portion is perfect for one serving, and it reheats like a dream. (Yes, even on a Tuesday night when you’re too tired to think.)
- Pocketbook Win: Five minutes. Two ingredients. Less than a dollar per serving. It’s the kind of recipe that makes me feel smart when I’m staring at an empty fridge at 7 PM and realize I forgot to grocery shop. No waste, no guilt.
Step-by-step instructions for 5-Minute microwave rice
Here’s the method that delivers perfectly fluffed rice in record time—no rice cooker required.
Combine Rice and Liquid in the Microwave-Safe Mug
Place the 0.25 cup white jasmine rice in the microwave-safe mug. Add the 0.5 cup water and stir gently with the fork to distribute evenly. The rice should be fully submerged but not packed down—this ensures even cooking. I like to press the fork through the rice a few times to break up any clumps.
For enhanced flavor, add the 0.5 tsp olive oil, 0.25 tsp garlic powder, 0.5 tsp soy sauce, 1 tbsp chicken broth, and 0.125 tsp salt now. Stir again until all seasonings are evenly distributed. The oil helps create a slightly richer texture, while the broth and soy sauce add depth without overpowering the rice’s natural flavor. If you’re skipping any optional ingredients, now’s the time to add them.
Microwave on High Until Liquid Absorbs
Cover the mug tightly with a microwave-safe plate or lid—this traps steam and prevents splattering. Microwave on high power for 2 minutes. After the first minute, pause briefly to check if the liquid has been absorbed. If you see steam escaping around the edges, the rice needs more time. The rice should look mostly cooked but still slightly underdone at this stage—this prevents mushiness.
I press down gently on the rice with the fork at the 1-minute mark to help distribute any remaining liquid. This also breaks up the rice grains slightly, which makes fluffing easier later. If your microwave varies in power, you might need to adjust the time slightly—just watch for the rice to look translucent at the edges.
Fluff Immediately for Perfect Texture
Remove the mug from the microwave and let it sit for 30 seconds—this allows residual steam to finish cooking the rice. Then, use the fork to gently fluff the rice from the bottom up. Work quickly but carefully to avoid crushing the grains. You’ll notice the rice will separate into individual kernels with just the right amount of bite—this is the hallmark of perfectly cooked jasmine rice.
If the rice feels slightly undercooked or the texture isn’t quite right, you can microwave it again for 15-30 seconds and fluff once more. The key is to act immediately after microwaving—waiting too long allows the steam to escape, and the rice becomes dense and gummy. Serve right away for the best texture and flavor.
Pro Tips For Making 5 Minute Rice
- STIR AFTER 90 SECONDS: The microwave’s heat isn’t even—it’s hotter in the middle. After 1 minute, stab the rice with your fork and give it a quick swirl. This breaks up clumps before they form, so you’re not left with one giant rice ball and sad, dry edges.
- USE 1.5 CUPS WATER: Jasmine rice drinks up water like a sponge, but too much turns it into mush. For ½ cup uncooked rice, measure 1.5 cups water—not the 1:2 ratio you’d use on the stovetop. Microwaves cook faster, so less liquid prevents soggy results.
- PRESS THE RICE DOWN: Right after microwaving, press the rice flat with your fork while it’s still hot. This forces steam to escape evenly, so the grains don’t stay glued together. Skip this, and you’ll end up with a rice pancake instead of fluffy bites.
- ADD GARLIC POWDER LAST: Sprinkle the garlic powder after microwaving, then stir it in while the rice is still steaming. This lets the heat bloom the flavor instead of cooking it off. If you mix it in early, you’ll just end up with powdered rice—no aroma, no taste.
Health benefits of this dish
Quick Carbs Boost
This microwave rice delivers a rapid energy boost thanks to its high glycemic index—perfect for post-workout meals or when you need a quick carb fix.
A 0.25-cup serving provides about 25 grams of carbohydrates, primarily in the form of easily digestible starches that your body converts to energy almost instantly. The 5-minute cook time means you get these carbs faster than traditional stovetop methods, making it ideal for busy mornings or last-minute meals. 💪
Low-Calorie Base
With just 100 calories per serving, this rice is a guilt-free foundation for balanced meals. The minimal ingredients keep it light, while the optional seasonings like soy sauce or chicken broth add flavor without significant calories.
This makes it a great choice for weight-conscious eaters who still want restaurant-quality texture. I often use this as a base for stir-fries or bowls without worrying about calorie overload.
Digestive Benefits
Jasmine rice is naturally low in fiber compared to brown rice, making it easier to digest for those with sensitive stomachs. The quick cooking process preserves more of the rice’s natural starch structure, which can be gentler on digestion than longer-cooked grains.
For added digestive support, stir in 1 tsp grated ginger or a pinch of turmeric before microwaving—both aid digestion and reduce bloating.
Meal Prep Efficiency
This method eliminates the need for stovetop cooking, reducing acrolein exposure—a potentially harmful compound released when grains are cooked at high heat. The microwave method also preserves more of the rice’s B vitamins, particularly thiamine (B1), which is sensitive to heat degradation.
Cooking in small batches means you can prepare multiple servings ahead without worrying about texture degradation over time.
Blood Sugar Management
While this rice is high in carbs, pairing it with protein or healthy fats (like grilled chicken or avocado) helps balance blood sugar levels. The fluffing technique creates slightly separated grains that digest more slowly than clumped rice, providing a more gradual release of glucose.
For a lower-glycemic option, try substituting ½ cup cauliflower rice for ¼ cup of the jasmine rice—it cuts carbs while maintaining texture.
Hydration Support
The water-to-rice ratio in this recipe (2:1) ensures the rice absorbs moisture efficiently, which can help with overall hydration. Since the rice cooks in sealed mugs, the steam also adds humidity to your kitchen environment—great for dry climates or winter months.
For extra hydration, serve the rice with a cucumber salad or steamed greens to create a complete, moisture-rich meal. 💧
Nutrition facts
Frequently asked questions
Can I use any type of rice for this 5-minute method?
Long-grain white rice like jasmine or basmati works best for this quick method. Short-grain rice may become mushy, while brown rice needs longer cooking. For best results, stick to uncooked, long-grain white rice—it absorbs liquid quickly and stays fluffy.
Why does my rice turn out gummy instead of fluffy?
Gummy rice usually means overcooking or insufficient fluffing. Always microwave for exactly 2 minutes on high, then let it rest 30 seconds before fluffing. If using a weaker microwave, check at 1 minute and add 15-30 seconds if needed. Stirring too aggressively after cooking also breaks the grains.
How can I make this rice extra flavorful without adding time?
Add seasonings directly to the mug before microwaving: try ½ tsp garlic powder + ½ tsp soy sauce for savory, or 1 tbsp lemon juice + ¼ tsp turmeric for brightness. For richness, add ½ tsp olive oil. These ingredients infuse during cooking without extra steps.
Can I double this recipe for multiple servings?
Yes! Use ½ cup rice + 1 cup water per mug, but cook in batches—microwaving too many mugs at once can cause uneven cooking. For 4 servings, prepare 4 mugs simultaneously (2 minutes each). Always fluff immediately after microwaving to maintain texture.
What’s the best mug material for this method?
Use microwave-safe ceramic or tempered glass mugs (12-16 oz). Avoid thin plastic—it can melt or warp. The mug must be able to handle steam pressure. For even cooking, choose mugs with straight sides rather than tapered shapes.

- Pea Soup Instant Pot Recipe: Velvety Green Smoothness in 20 Minutes - November 1, 2026
- Pork Loin Pulled Pork Crock Pot Recipe: Slow-Smoked Tenderness With Zero Dryness - November 1, 2026
- Baked Potatoes in Crock Pot Recipe: Buttery Interiors and Crispy Top Magic - November 1, 2026