
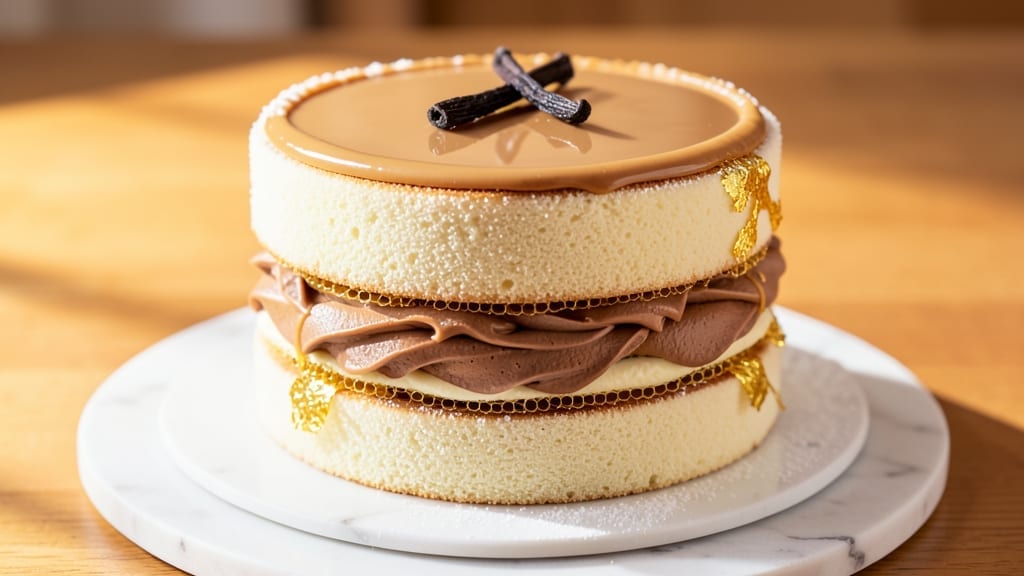
This 3-layer 8-inch cake recipe delivers restaurant-worthy elegance with vanilla bean swirls and buttery piping magic—perfect for celebrations or treating yourself. The secret lies in perfectly balanced layers: tender vanilla sponge, luscious buttercream, and delicate swirls that create a showstopping centerpiece.
I’ve baked this cake dozens of times, and it never fails to impress. What sets this recipe apart is the foolproof technique for smooth layers and clean piping. You’ll use a standard 8-inch pan, which means you can stack three layers without needing specialty equipment.
The buttercream is whipped to just the right consistency—light enough to spread smoothly, rich enough to hold its shape. By the time you’re done, you’ll have a cake with golden layers, fluffy buttercream, and swirled vanilla bean accents that look as stunning as they taste.
The frosting is stable enough for piping but still tender enough to melt in your mouth. This is the kind of cake that makes every occasion feel special. Whether you’re baking for a birthday, anniversary, or just because, this recipe scales beautifully. Let’s get started—your guests won’t believe it’s homemade.
Ingredients for 3 layer 8 inch cake
Twelve ingredients for a showstopping cake—vanilla swirls and buttery layers that impress every time.
| Ingredient | Amount | Notes |
|---|---|---|
| All-Purpose Flour 🌾 | 4 cups | Sifted for light texture |
| Unsalted Butter 🧈 | 2 cups | Room temperature, European preferred |
| Granulated Sugar 🍚 | 2 ½ cups | Superfine for smooth batter |
| Large Eggs 🥚 | 6 whole | Room temperature, separated |
| Pure Vanilla Extract 🌿 | 2 tbsp | Bourbon or Madagascar preferred |
| Vanilla Bean Paste 🌿 | 2 tbsp | For authentic swirls |
| Baking Powder 🍞 | 2 tsp | Aluminum-free preferred |
| Salt 🧂 | ½ tsp | Fine sea salt |
| Whole Milk 🥛 | 1 cup | Room temperature |
| Powdered Sugar 🍚 | 4 cups | For buttercream |
| Heavy Whipping Cream 🥛 | 1 ½ cups | Cold, full-fat |
| Vanilla Bean Seeds 🌿 | 1 whole | Scraped from 1 pod |
| Lemon Zest 🍋 | 1 tbsp | Fresh, finely grated |
The butter is where magic happens. European-style butter (like Plugrá or Miyoko’s) has higher fat content, giving you that ultra-tender crumb. Room temperature is critical—press it with a fork to check. For the vanilla, Madagascar beans from Amazon Fresh or your local specialty store deliver the most complex flavor. The vanilla bean paste is non-negotiable for those gorgeous swirls—Wilton or Chef’s Resource are reliable brands. Sift your flour and powdered sugar together to avoid lumps, and measure your dry ingredients by scooping and leveling for consistency.
No vanilla bean paste? Pure vanilla extract plus a pinch of turmeric mimics the color, though the flavor won’t be identical. Running short on butter? Vegetable shortening works in a pinch, but the cake will be denser. For the eggs, room temperature is key—cold eggs won’t whip properly. The lemon zest adds brightness, but if you’re not a fan, orange zest works equally well. For the buttercream, cold cream whips faster—chill your bowl and beaters for 10 minutes before starting. And if you’re worried about overmixing, use a stand mixer with the paddle attachment for perfect consistency every time.
Store cake layers wrapped in plastic at room temperature for up to 2 days—they’ll keep better than fully frosted. The buttercream keeps 3 days refrigerated or 2 weeks frozen (thaw overnight). For assembly day, bring everything to room temperature first—cold buttercream won’t pipe smoothly. I always make a test cake with the same batter to practice piping before decorating the real one. The swirls look intimidating, but a piping bag with a star tip makes it foolproof.
Why You’ll Love This Recipe
- You already have everything: flour, butter, sugar, eggs, vanilla. No specialty ingredients, no last-minute grocery runs. And because it’s an 8-inch cake, it’s the right size for two or four—no sad leftovers unless you’re really committed. (I’ve been there.)
- No Mixer Needed: I swear by this—just cream the butter and sugar by hand until it’s light and fluffy. The eggs fold in like butter, and the vanilla? It’s the secret that makes the whole thing smell like a bakery even before the oven beeps. (Yes, even if your arms are tired from folding laundry.)
- Butter-Sugar Magic: That first bite of tender crumb with the perfect buttery richness? It’s the kind of cake that makes you pause mid-slice. The sugar caramelizes just enough to give it a subtle depth, while the vanilla ties everything together without overpowering. Honestly, it’s the closest I’ve gotten to a bakery cake without the $20 price tag.
- Birthday or Breakfast: This cake is my go-to for anything—birthday celebrations, potlucks, or even breakfast when I’m feeling fancy. The layers stay moist for days, so it’s perfect for making ahead. Between us, I’ve even used it as a base for ice cream cake when I’m lazy. (Shh, don’t tell.)
Step-by-step instructions for vanilla bean swirl cake
Here’s how to create a showstopping 3-layer cake with professional swirls and velvety buttercream.
Prepare the Cake Batter
Preheat your oven to 350°F and grease three 8-inch round cake pans with butter, then line the bottoms with parchment paper. In a large mixing bowl, combine the 4 cups all-purpose flour, 2.5 cups granulated sugar, 2 tsp baking powder, and 0.5 tsp salt. Sift together until smooth—this ensures no lumps in your final batter.
In a separate bowl, beat the 2 cups unsalted butter and 6 whole large eggs on medium speed until light and fluffy, about 3-4 minutes. Gradually add the dry ingredients while mixing on low speed, alternating with the 1 cup whole milk. Mix just until combined—overmixing develops gluten and makes the cake dense.
Divide the batter evenly among the prepared pans. For the signature swirls, drop spoonfuls of the 2 tbsp vanilla bean paste onto each layer, then swirl gently with a knife before baking. Bake for 25-30 minutes or until a toothpick inserted in the center comes out clean. Let the cakes cool in their pans for 10 minutes before transferring to a wire rack to cool completely.
Make the Vanilla Buttercream
While the cakes cool, prepare the buttercream by beating the 2 cups unsalted butter (softened but not melted) until smooth and creamy. Gradually add the 4 cups powdered sugar, 2 tbsp pure vanilla extract, and 1 tbsp lemon zest, mixing on medium speed until fully incorporated. Scrape down the sides of the bowl as needed.
In a separate chilled bowl, whip the 1.5 cups heavy whipping cream to stiff peaks. Gently fold this into the buttercream mixture until fully combined. The cream adds lightness while maintaining stability for piping. For extra flavor, scrape the seeds from the 1 whole vanilla bean and fold them into the buttercream just before using.
Assemble the Cake Layers
Place the first cake layer on a serving plate or cake stand. Spread a generous layer of the vanilla buttercream over the top, leaving a slight border. Place the second layer on top, repeating the buttercream process. Finally, place the third layer on top and cover the entire cake with a final layer of buttercream, smoothing the top with a spatula for an even finish.
For the signature swirls, pipe additional buttercream in a spiral pattern starting from the center of the cake, then gently swirl with a knife to create elegant patterns. Chill the cake in the refrigerator for 30 minutes before decorating to allow the buttercream to set slightly, making it easier to work with.
Decorate and Serve
Once chilled, use a piping bag fitted with a star tip to pipe decorative swirls or rosettes along the sides of the cake. For extra flair, dust the top with a light coating of powdered sugar or add edible flowers. Let the cake sit at room temperature for 10-15 minutes before slicing to allow the buttercream to soften slightly for easier cutting.
Slice the cake into 12 equal portions and serve immediately. Each slice should reveal the beautiful vanilla bean swirls and layers of tender cake. The combination of warm vanilla, bright lemon zest, and rich buttercream creates a dessert that’s as impressive to look at as it is delicious to eat.
Pro Tips For Making 3 Layer 8 Inch Cake
- Preheat to 350°F: DESCRIPTION: This isn’t just a number—it’s the sweet spot for even baking. Too hot and your layers dry out; too cool and they stay gummy. I learned this after one batch where the middle layer was still undercooked while the edges were browned. Use an oven thermometer to confirm—your stove’s dial isn’t always accurate.
- Sift the Flour Twice: DESCRIPTION: Skimping here means lumps hiding in your batter, which leads to uneven texture. Do it once before mixing, then again after adding dry ingredients. Yes, it’s extra work, but your cake will have that light, airy crumb you’re after—no one wants a dense, brick-like slice.
- Don’t Overmix the Batter: DESCRIPTION: The moment your batter turns from smooth to thick and sticky, stop. Overmixing develops gluten, and that’s how you end up with a cake that’s more like a chewy bread. Fold just until the flour disappears—about 15 seconds max. Trust me, your layers will thank you.
- Cool Layers Fully: DESCRIPTION: I know, you’re excited to frost it. But if you frost warm layers, the buttercream will melt into a sad, greasy mess. Let each layer cool completely on a wire rack—about 20 minutes—before adding the filling. Patience here means no soggy bottoms or collapsed tiers.
Pro cooking tips for perfect results
Batter Consistency
The secret to perfectly smooth layers lies in the batter’s texture. Whisk your dry ingredients until completely smooth—no lumps allowed. When mixing the butter and eggs, beat them until they’re light and fluffy (about 3-4 minutes), which adds air for a tender crumb.
I like to add the milk gradually while mixing on low speed to avoid overworking the batter. Overmixing develops gluten, which makes the cake dense instead of light and airy. 🥄
Swirl Technique
For those stunning vanilla bean swirls, use a small offset spatula or butter knife to create gentle, even swirls. Drop spoonfuls of vanilla bean paste onto each layer before baking, then swirl immediately after pouring the batter.
The paste will sink slightly, creating beautiful marbled patterns. If you’re nervous about the swirls, practice on a small piece of parchment first—it’s easier than it looks!
Buttercream Stability
Your buttercream needs to be stiff enough to hold its shape but still smooth for piping. Beat the butter until it’s completely smooth and creamy, then gradually add the powdered sugar. For extra stability, chill your mixing bowl and beaters for 10 minutes before starting.
The cold temperature helps the buttercream hold its structure better. I also like to add the whipped cream last—it lightens the frosting without compromising its stability.
Layering Secrets
When assembling, always place the first layer on your cake stand or plate. Spread the buttercream evenly, leaving a ½-inch border around the edges. This prevents the layers from sliding during assembly.
For extra security, I like to pipe a thin ring of buttercream around the edges before placing the next layer. This creates a clean, professional finish that holds up beautifully when sliced. 💫
Piping Magic
Use a piping bag fitted with a Wilton 1M tip for clean, professional swirls. Fill the bag about halfway and pipe a spiral starting from the center of the cake. Then, gently swirl with a long knife or offset spatula to create elegant patterns.
For extra flair, pipe a rosette on top or along the sides. Chill the cake for 30 minutes before decorating—this helps the buttercream set slightly, making it easier to work with.
Temperature Control
Let your cake layers cool completely before frosting—this prevents melting buttercream. If you’re in a hurry, pop them in the fridge for 15 minutes to speed up cooling. For the buttercream, keep it slightly cool (around 65°F) while piping to maintain its shape.
If it gets too warm, pop it in the fridge for 5-10 minutes to firm up. This attention to temperature keeps your cake looking flawless from start to finish. ✨
Nutrition facts
Frequently asked questions
Can I use this recipe for a smaller or larger cake?
This recipe is designed for three 8-inch layers, but you can easily adjust it! For a 6-inch cake, reduce each layer to ⅔ cup batter per pan. For a 10-inch cake, increase to 1¼ cups batter per pan and scale the buttercream proportionally. Always keep the same ratio of batter to buttercream for perfect balance.
How do I prevent the layers from sliding when stacking?
Use a thin layer of buttercream as “glue” between each layer—spread it evenly, leaving a ½-inch border around the edges. For extra stability, pipe a small ring of buttercream around the perimeter of each layer before stacking. Chill the cake for 30 minutes before decorating to help everything set properly.
What if I don’t have vanilla bean paste?
No problem! Mix 2 tbsp pure vanilla extract with ½ tsp turmeric (for color) and use it instead. For flavor, scrape seeds from 1 vanilla bean and fold them into the buttercream. The swirls won’t be as vibrant, but the taste will still be delicious. The key is to keep the vanilla flavor strong!
Can I make this cake ahead of time?
Bake the layers 1 day ahead and store them wrapped tightly in plastic at room temperature. The buttercream can be made 3 days ahead and refrigerated. Assemble the cake 4 hours before serving—this gives the frosting time to soften slightly at room temperature. For best results, bring everything to room temp before decorating.
Why did my buttercream turn grainy?
Grainy buttercream usually means the butter was too warm or the powdered sugar wasn’t sifted. Always use softened (not melted) butter and sift the powdered sugar first. For extra smoothness, beat the butter and sugar together for 5-7 minutes until completely creamy. If it’s already grainy, strain it through a fine-mesh sieve before using.

- Pea Soup Instant Pot Recipe: Velvety Green Smoothness in 20 Minutes - November 1, 2026
- Pork Loin Pulled Pork Crock Pot Recipe: Slow-Smoked Tenderness With Zero Dryness - November 1, 2026
- Baked Potatoes in Crock Pot Recipe: Buttery Interiors and Crispy Top Magic - November 1, 2026