
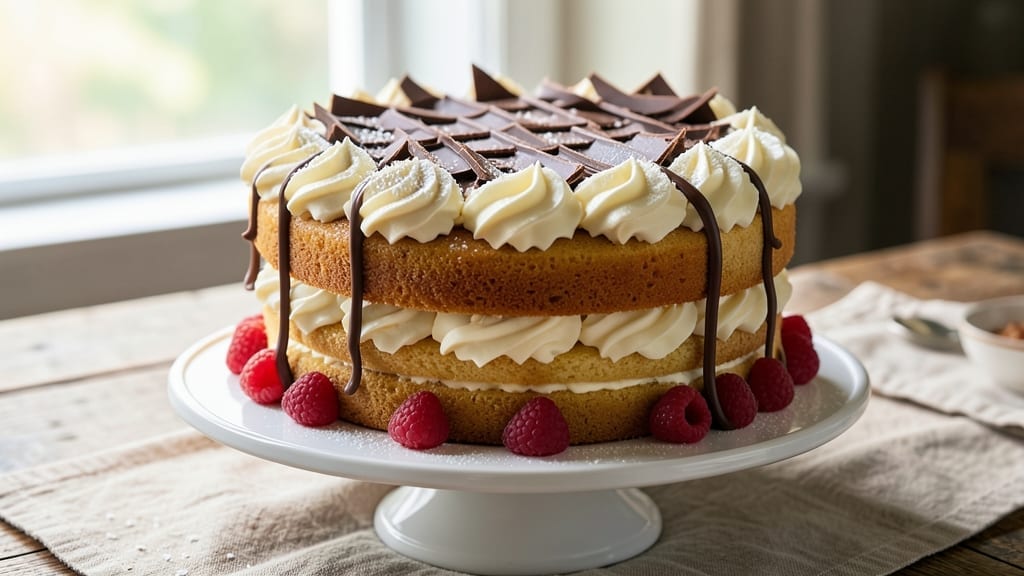
This 3-layer butter cake recipe delivers the perfect balance of tender, moist layers and velvety vanilla buttercream that’ll have everyone asking for seconds. 💛 The secret lies in precise measurements and proper chilling—critical steps that transform this cake from good to showstopping.
I’ve baked countless versions, and this method guarantees layers that stay pillowy, not dense, with a delicate crumb that melts in your mouth.
What sets this recipe apart is the foolproof technique for even layers and smooth buttercream assembly. You’ll start with a simple yet reliable batter that bakes up golden and tender, then master the art of layering without tearing.
The buttercream isn’t just sweet—it’s rich, smooth, and perfectly balanced, with optional flavor variations to customize your cake. No fancy equipment needed, just patience and attention to detail.
By the time you’re done, you’ll have a cake that looks like it came from a bakery—three perfectly even layers, crowned with swirls of buttercream that taste like comfort in every bite.
The chilling stages are non-negotiable for structure, but they’re worth it for that professional finish. This recipe builds confidence, whether you’re baking for a celebration or simply treating yourself.
Ready to elevate your baking game? We’ll cover every step—from mixing the batter to decorating the final layer—so you can serve up a cake that’s as impressive as it is delicious. Let’s get started.
Ingredients for 3 layer butter cake
Twelve essential ingredients create three layers of cloud-like cake and velvety buttercream perfection.
| Ingredient | Amount | Notes |
|---|---|---|
| Unsalted Butter 🧈 | 2 cups | Softened to room temperature (68°F) |
| Granulated Sugar 🍚 | 3 cups | Superfine preferred for smooth texture |
| All-Purpose Flour 🌾 | 3 cups | Sifted, plus extra for dusting |
| Large Eggs 🥚 | 6 whole | Room temperature for even mixing |
| Vanilla Extract 🌿 | 2 tsp | Pure, high-quality extract |
| Baking Powder 🧂 | 1 ½ tsp | Diamond Crystal preferred |
| Salt 🧂 | ½ tsp | Fine sea salt for balance |
| Milk 🥛 | 1 cup | Whole milk for richness |
| Vanilla Bean Paste 🌿 | 1 tbsp | For extra depth of flavor |
| Powdered Sugar 🍚 | 6 cups | For buttercream, sifted |
| Heavy Cream 🥛 | 1 ½ cups | Cold for stable buttercream |
| Vanilla Bean Seeds 🌿 | 1 tsp | Scraped from 1 vanilla bean |
| Lemon Zest 🍋 | 1 tsp | Brightens buttercream flavor |
The butter is non-negotiable here—unsalted, room-temperature sticks from Land O’Lakes or Plugrá work best. I always grab the European-style butter if available, as it has higher fat content for that signature richness. The vanilla extract matters too—pure Madagascar or Tahitian makes all the difference, not the imitation stuff. For the flour, King Arthur or Gold Medal brands are my go-tos; they’re consistently reliable. The powdered sugar should be 10X sifted for that ultra-smooth buttercream. Pro tip: buy it in bulk and sift it yourself—store-bought sifted versions often contain anti-caking agents that affect texture.
No vanilla bean paste? Double the extract plus a pinch of vanilla sugar gets you close. Running short on powdered sugar? Granulated sugar processed in a blender with a pinch of salt works in a pinch, though it won’t be as perfectly smooth. The milk can be swapped for heavy cream or half-and-half for extra richness, but whole milk keeps the cake tender without adding too much fat. For the buttercream, if you’re avoiding dairy, coconut cream whipped with powdered sugar makes a decent substitute—though it won’t be quite as stable. The lemon zest is optional but adds that professional patisserie touch; if you skip it, add an extra 0.5 tsp of vanilla extract instead.
Buttercream keeps best when refrigerated between layers—30 minutes max—so plan your assembly accordingly. Cake layers can be wrapped individually in plastic and stored in the fridge for up to 3 days before assembly. Fully decorated cake? Room temperature for 1 hour before serving lets the flavors meld beautifully. For make-ahead convenience, assemble the cake completely (including final decoration) and freeze it—up to 2 months—then thaw overnight in the fridge before bringing to room temperature. The buttercream will soften slightly but can be re-whipped to perfection with a quick pulse in the stand mixer.
Why You’ll Love This Recipe
- No-Fuss Layers: I swear, this cake comes together in one bowl—no mixer required. Cream the butter and sugar until light, crack in the eggs one at a time, and fold in the flour like you’re tucking in a blanket. That’s it. Even when I’m exhausted, this recipe doesn’t fight back.
- Rich Vanilla Kiss: The vanilla extract isn’t just an afterthought—it’s the star. You’ll taste it in every moist, buttery layer, especially when you cut through that perfect crumb. Honestly, I’ve tried store-bought, but this homemade version? Night and day.
- Birthday Party Ready: Slice it into squares, stack it high, and suddenly you’ve got a showstopper for any celebration. The layers stay intact when cut, so it looks as good as it tastes—no fancy piping skills needed. (Yes, even on a Tuesday night.)
- Leftovers That Last: This cake keeps beautifully for days, wrapped in foil or stored in the fridge. The butter keeps it tender, and the sugar crust stays intact—perfect for quick breakfasts or after-school snacks. My kids beg for it long after the original occasion fades.
Step-by-step instructions for 3 layer butter cake
Here’s how to bake layers so light they melt in your mouth and buttercream that’s fluffy enough to pipe perfect swirls.
🍳 Step 1: Cream Butter and Sugars to Cloud-Light Perfection
In a stand mixer fitted with the paddle attachment, beat the 2 cups unsalted butter and 3 cups granulated sugar on medium speed for 5-7 minutes until the mixture is pale, fluffy, and nearly doubled in volume. You’re looking for a ribbon-like consistency that holds its shape when the beaters are lifted. This step is non-negotiable for those signature pillowy layers—pressured butter creates dense cake.
I like to scrape down the sides every 30 seconds to ensure even mixing. If your kitchen gets warm, pause briefly to let the bowl cool—overheating can cause the butter to separate. The mixture should feel cool to the touch when you press it between your fingers.
👨🍳 Step 2: Add Eggs and Vanilla in Stages
Add the 6 whole large eggs, one at a time, mixing on low speed after each addition until fully incorporated. Then stir in the 2 tsp vanilla extract and 1 tbsp vanilla bean paste, scraping the bowl as needed. This gradual addition prevents curdling and ensures each egg blends completely.
Here’s the thing—room temperature eggs are crucial. If they’re cold, they’ll sink to the bottom and create dense pockets. For extra insurance, I microwave whole eggs in their shells for 45 seconds before using. The mixture should be smooth, thick, and slightly glossy at this stage.
🍳 Step 3: Alternate Dry Ingredients with Milk
With the mixer on low speed, add 1 cup milk in a slow stream, then immediately add 1/3 of the 3 cups all-purpose flour mixed with ½ of the 1.5 tsp baking powder and all 0.5 tsp salt. Repeat this sequence twice more, ending with the remaining flour mixture. Mix just until combined—overmixing develops gluten and makes the cake tough.
I use a whisk to sift the flour mixture directly into the bowl to prevent lumps. The batter should be thick but pourable, like heavy pudding. If it’s too thick, add 1-2 tablespoons more milk. For best results, let the batter rest for 10 minutes at room temperature before baking—this allows the flour to hydrate fully.
🔥 Step 4: Bake Layers to Perfect Doneness
Preheat your oven to 350°F and grease three 8-inch round cake pans with the 2 cups unsalted butter (reserving ½ cup for later), then dust with flour. Divide the batter evenly among the pans. Bake for 25-30 minutes until a toothpick inserted in the center comes out clean and the tops spring back when touched.
I rotate the pans halfway through baking for even browning. The layers should be golden on top but still tender—overbaking leads to dry cake. Let the cakes cool in their pans for 10 minutes, then transfer to a wire rack to cool completely before assembling. This prevents them from becoming soggy when stacked.
🥘 Step 5: Whip Vanilla Buttercream to Pipeable Perfection
In a stand mixer fitted with the whisk attachment, beat the 1.5 cups heavy cream and 1 tsp lemon zest on medium-high speed until soft peaks form. Gradually add the 6 cups powdered sugar and 1 tsp vanilla bean seeds, mixing on low speed until combined, then increase to medium-high for 3-4 minutes until glossy and fluffy.
For extra flavor depth, I press the 1 tbsp vanilla bean paste against the side of the bowl while mixing—this infuses the buttercream with intense vanilla aroma. The finished buttercream should hold its shape when piped but still be soft enough to spread easily. If it’s too stiff, add 1-2 tablespoons milk to loosen.
🍰 Step 6: Assemble with Confidence
Place the first layer on a cake stand and spread a thin layer of reserved buttercream. Add the second layer, then a thicker layer of buttercream, and top with the final layer. Crumb coat the entire cake with buttercream, then chill for 30 minutes to set. Finally, apply the final layer of buttercream and pipe decorative swirls or rosettes while the buttercream is still slightly soft.
I like to use a bench scraper for smooth sides and a piping bag with a star tip for professional-looking swirls. Let the cake set for 1 hour before slicing—this ensures clean cuts and prevents the buttercream from sliding off. Each slice should reveal those signature pillowy layers and creamy buttercream in perfect harmony.
Pro Tips For Making 3 Layer Butter Cake
- Use Room-Temp Butter: Cold butter creates pockets of air in your batter, making your cake dense and dry. Let that butter sit out for 30-60 minutes until it’s soft enough to press with a finger but still holds its shape—this ensures a tender crumb without overworking the fat.
- Weigh Your Flour: Scooping flour from the bag packs in air, which means your cake will be dry and crumbly. Use a kitchen scale and measure by weight (typically 120g per 1 cup for this recipe)—it’s the only way to guarantee consistency, especially when humidity messes with volume.
- Bake Until Slightly Under: Butter cakes finish rising after they leave the oven, so pull them out when the center still jiggles very gently (like a wobbly Jell-O). Overbaking dries out the layers—cover with foil 5 minutes early if your oven runs hot, then check again.
- Chill Layers Between Bakes: Stacking warm layers = a collapsed cake. Let each layer cool on a rack for 10 minutes, then pop them in the fridge for 15-20 minutes before adding filling. This keeps the butter firm and prevents a soggy middle—trust me, your frosting will thank you.
Flavor customization for this recipe
Classic Vanilla Variations
Start with the base vanilla buttercream but infuse it with 1 tsp almond extract for a marzipan twist or ½ tsp orange flower water for a Middle Eastern-inspired flavor. For a modern touch, replace ½ cup powdered sugar with ½ cup white chocolate shavings and mix until smooth.
These subtle changes elevate the cake without overpowering the delicate vanilla layers. 💫
Citrus Zest Infusions
Brighten the buttercream with 1 tsp lemon zest (as in the recipe) or swap for 1 tsp lime zest and ½ tsp ground cardamom for a tropical vibe.
For a bold twist, add 2 tbsp blood orange marmalade to the buttercream—simmer it with 1 tbsp water for 5 minutes until smooth, then cool before incorporating. The acidity cuts through the richness beautifully.
Spiced Buttercream
Warm ½ cup heavy cream with 1 cinnamon stick and 2 whole cloves for 10 minutes, then strain and use in place of cold cream. Add 1 tsp ground cinnamon and ½ tsp freshly grated nutmeg to the buttercream for a cozy autumnal flavor.
For a Mexican-inspired version, fold in 1 tbsp chopped candied chili for a sweet-spicy kick.
Chocolate-Dipped Layers
After assembling the cake, dip the bottom ½ inch of each layer in melted dark chocolate (use 6 oz 70% cacao) and place back on the stand. This creates a stunning ombré effect when sliced.
For extra decadence, drizzle warm white chocolate over the top before adding final buttercream swirls. The contrast of chocolate and vanilla is always a crowd-pleaser.
Fruit-Forward Fillings
Replace half the buttercream between layers with raspberry jam (simmer 1 cup jam with 1 tbsp cornstarch for 5 minutes to thicken) or mango purée (blend 1 cup ripe mango with 1 tbsp lime juice).
For a no-fuss option, layer thinly sliced strawberries between cake layers—add them just before serving to prevent sogginess.
Boozy Buttercream
For an adult-friendly twist, fold 2 tbsp bourbon or 1 tbsp Grand Marnier into the buttercream while mixing. For a non-alcoholic version, use 1 tbsp vanilla syrup (simmer ½ cup sugar with ½ cup water and 1 vanilla bean for 10 minutes, then cool).
The alcohol infuses beautifully, adding depth without overpowering the cake’s delicate flavors. 🍸
Nutrition facts
Frequently asked questions about 3-Layer butter cake
Why do the cake layers need to cool completely before assembling?
Completely cooled layers prevent soggy bottoms when stacked. Warm cake releases moisture that soaks into the buttercream, making the texture gummy. Chill the cake layers for 2 hours in the fridge before assembly—this also helps the buttercream set properly for clean slices. Pro tip: Place parchment between layers while cooling to prevent sticking.
Can I use this recipe for a 2-layer cake instead?
Simply reduce the batter to 2/3 of the recipe and bake in two 8-inch pans. Adjust the buttercream to 4 cups powdered sugar and 1 cup heavy cream for proper coverage. The same chilling and assembly steps apply—just scale everything down proportionally. This works perfectly for smaller gatherings or budget-friendly desserts.
What’s the secret to smooth buttercream that doesn’t slide off?
The crumb coat is non-negotiable! Spread a thin layer of buttercream over the entire cake, chill for 30 minutes, then add the final thick layer. This traps crumbs and creates a barrier. Also, use a bench scraper for ultra-smooth sides and pipe decorations while the buttercream is still slightly soft (70°F) for better adhesion. Let the cake set for 1 hour before slicing.
How do I fix cracked cake layers?
Cracks usually happen from overmixing or underbaking. For minor cracks, simply fill them with extra buttercream during assembly—they’ll disappear when decorated. For severe cracks, level the tops with a serrated knife before baking. Prevent cracks by: 1) Not overfilling pans (fill ⅔ full), 2) Baking until a toothpick comes out clean but not dry, and 3) Cooling layers completely before removing from pans.
Can I make this cake ahead of time?
Yes! Assemble the cake completely (including final decoration) and refrigerate for up to 3 days. For longer storage, freeze the fully decorated cake for up to 2 months. Thaw overnight in the fridge, then bring to room temperature for 1 hour before serving. The buttercream will soften slightly but can be re-whipped to perfection with a quick pulse in the stand mixer.

- 12 Bean Chili Recipe: Hearty Slow-Cooked Depth With 12 Legumes - October 17, 2026
- 5 Seed Bread Recipe: Nutty Crunch and Artisan Flavor in One Loaf - October 17, 2026
- 1 Lb Macaroni Salad Recipe: Bold, Crunchy, and Crowd-Pleasing - October 17, 2026