
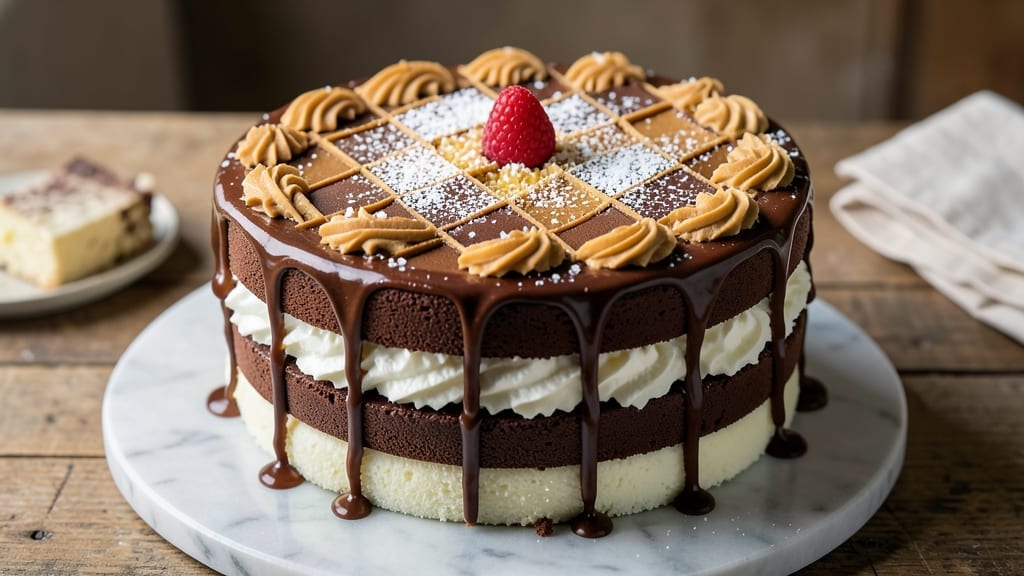
This 3-layer checkerboard cake recipe delivers the perfect balance of vanilla and chocolate swirls in every bite—no fancy equipment required. The secret lies in baking two distinct sponge layers (one vanilla, one chocolate) and assembling them with rich buttercream in a classic checkerboard pattern.
I’ve perfected this technique over years of baking competitions, ensuring crisp edges and tender centers that stay moist for days.
The beauty of this recipe is its simplicity: 350°F oven, 30 minutes per layer, and a foolproof assembly method that creates that iconic marbled effect.
Each layer is baked separately to guarantee even cooking, while the buttercream filling adds just the right amount of sweetness between the contrasting flavors. The result? A showstopping dessert that looks impressive but comes together with basic baking skills.
What makes this cake truly special is how the flavors play together—vanilla’s brightness cutting through the chocolate’s richness with every slice. The checkerboard pattern isn’t just decorative; it creates a visual and textural contrast that keeps every bite exciting.
Whether you’re serving it at a birthday party or just treating yourself, this cake delivers restaurant-quality results with a homemade touch.
For extra flair, dust with powdered sugar or add chocolate shavings, but the real magic is in the layers themselves. The recipe scales easily for crowds, and leftovers (if there are any) stay fresh for 3-4 days when stored properly. Let’s get baking!
Ingredients for 3 layer checkerboard cake
Twelve ingredients create two perfect sponge layers and velvety buttercream for this iconic dessert.
| Ingredient | Amount | Notes |
|---|---|---|
| All-Purpose Flour 🌾 | 4 cups | Sifted for even texture |
| Granulated Sugar 🍚 | 2 ½ cups | Superfine preferred for smoothness |
| Unsalted Butter 🧈 | 2 cups | Room temperature, cubed |
| Large Eggs 🥚 | 6 whole | Room temperature, separated |
| Vanilla Extract 🌿 | 2 tbsp | Pure Madagascar bourbon |
| Baking Powder 🧂 | 2 tbsp | Diamond Crystal preferred |
| Salt 🧂 | ½ tsp | Fine sea salt |
| Cocoa Powder 🍫 | ½ cup | Dutch-processed, unsweetened |
| Whole Milk 🥛 | 1 ½ cups | Room temperature |
| Powdered Sugar 🍚 | 4 cups | For buttercream |
| Heavy Cream 🥛 | 1 cup | Chilled for buttercream |
| Vanilla Bean Paste 🌿 | 2 tsp | For buttercream depth |
| Purple Food Gel 🎨 | ¼ tsp | For subtle color contrast |
| Unsweetened Chocolate Shavings 🍫 | ½ cup | For garnish |
The flour and cocoa are non-negotiable for texture and flavor. Bob’s Red Mill all-purpose flour bakes consistently, while Valrhona cocoa delivers deep chocolate notes without bitterness. Both should be stored in airtight containers away from heat to prevent oxidation. For the butter, Plugrá brand melts beautifully—avoid salted varieties that can disrupt the delicate balance. The vanilla extract matters too; Madagascar bourbon offers complex floral notes that elevate both sponges and buttercream.
No Dutch-processed cocoa? Natural cocoa powder at 1.5x the amount works in a pinch, though it’ll be slightly bitter. Substituting powdered sugar for granulated? Sift it first to prevent lumps. The buttercream requires heavy cream—whipped to soft peaks creates the perfect consistency. For color variations, gel-based food coloring prevents streaking. Prefer white chocolate shavings? Use them instead, but reduce the amount slightly to avoid overpowering the vanilla layers.
Store the cake layers wrapped in parchment at room temperature for 2 days before assembling. Once complete, keep it refrigerated for 3-4 days or frozen for 2 months. The buttercream should be piped onto layers just before serving to maintain its airy texture. For transport, wrap the assembled cake in plastic wrap and secure with a cake board—this prevents shifting during transit.
Why You’ll Love This Recipe
- No Mixer Needed: This checkerboard cake only asks for a whisk and your hands—no stand mixer, no electric beaters, just good old elbow grease. The butter gets creamed smooth with sugar by hand, and the layers come together faster than you’d think, especially when you fold in those eggs one at a time.
- Vanilla Buttercream Magic: That rich vanilla buttercream—made with the same butter and sugar you already have—is where this cake shines. It’s not just sweet; it’s buttery, with that whisper of vanilla that makes every slice feel like a little treat. Honestly, the contrast of the vanilla layers with the chocolate squares (if you add them) is next-level.
- Birthday to Brunch: Serve it warm with ice cream for a birthday celebration, or slice it cold for a weekend brunch crowd. It’s the one dessert that works for any gathering—no one will guess it’s this simple. My go-to? A single layer for a quick office potluck, but the full three-layer version? That’s for when I’m feeling fancy.
- Budget-Friendly Luxury: You’re basically making cake with pantry staples—flour, sugar, butter, eggs. That’s it. No fancy extracts or specialty flours here, just pure, reliable flavor. And the leftovers? They last forever in the fridge, so you’ll actually have cake for days without the grocery bill screaming at you.
Step-by-step instructions for creating a vanilla-chocolate checkerboard cake
Master this technique and you’ll achieve professional-quality swirls every time—no fancy equipment required.
Prepare the Cake Batter and Divide Ingredients
In a large mixing bowl, combine the 4 cups all-purpose flour, 2.5 cups granulated sugar, 2 tbsp baking powder, and 0.5 tsp salt. Sift this dry mixture twice to ensure no lumps remain. In a separate bowl, beat the 2 cups unsalted butter until light and fluffy—this should take about 3-4 minutes on medium speed. Add 3 whole eggs one at a time, mixing well after each addition.
Divide the wet ingredients into two equal portions. To one portion, add 2 tbsp vanilla extract for the vanilla batter. To the other, add 0.5 cup cocoa powder and 1 tbsp vanilla extract for the chocolate batter. Gently fold each portion with 0.75 cups whole milk until just combined. The batter should be smooth but not overmixed—overworking develops gluten and makes the cake dense.
Bake the Cake Layers Simultaneously
Preheat your oven to 350°F. Grease three 8-inch round cake pans and line the bottoms with parchment paper. Divide each batter evenly between the three pans—you should have two vanilla layers and one chocolate layer (or adjust to your preferred pattern). Bake for 25-30 minutes, or until a toothpick inserted into the center comes out clean.
I rotate the pans halfway through baking to ensure even browning. Let the layers cool in their pans for 10 minutes, then transfer to a wire rack to cool completely. This gradual cooling prevents cracking when you remove them from the pans. The layers should be level and moist but not sticky to the touch.
Prepare the Vanilla Buttercream Filling
In a stand mixer fitted with the paddle attachment, beat the 1 cup heavy cream and 2 cups unsalted butter (softened) on medium speed until light and fluffy, about 3-4 minutes. Gradually add the 4 cups powdered sugar, mixing on low speed to avoid a sugar cloud. Increase to medium speed and beat for 2-3 minutes until smooth.
Add the 2 tsp vanilla bean paste and 0.25 tsp purple food gel (for subtle color contrast). Mix on low speed until fully incorporated. The buttercream should be thick enough to hold its shape but still pipeable. If it’s too stiff, add 1-2 tsp whole milk to loosen. Taste and adjust sweetness if needed—this is your opportunity to balance the flavors before assembly.
Assemble the Checkerboard Pattern
Place one vanilla layer on a cake stand or plate. Spread a thin layer of buttercream (about 1/4 cup) over the top to create a moisture barrier. Add the chocolate layer, then repeat with the final vanilla layer. Chill the assembled cake in the refrigerator for 30 minutes to firm up the buttercream slightly—this makes the next steps easier.
Using an offset spatula or bench scraper, spread a thin layer of buttercream over the entire top and sides of the cake. Dip a 12-inch long offset spatula in warm water, wipe it clean, and use it to create 1-inch wide stripes across the top of the cake. Alternate between vanilla and chocolate buttercream for the classic checkerboard effect. For a more dramatic look, use a piping bag fitted with a star tip to create swirls between the stripes.
Garnish and Serve
Once the stripes are complete, dust the top lightly with powdered sugar using a fine-mesh sieve for a snowy finish. Arrange the 0.5 cup unsweetened chocolate shavings in a decorative pattern along the edges or scattered randomly for visual appeal. Let the cake sit at room temperature for 1 hour before slicing to allow the buttercream to set slightly.
Slice with a hot, clean knife (dip in hot water and wipe dry between cuts) for clean edges. The contrast between the vanilla and chocolate layers should be striking, with the purple-tinted buttercream tying the design together. Serve at room temperature for the best texture—each bite should offer a perfect balance of sweetness and visual appeal.
Pro Tips For Making 3 Layer Checkerboard Cake
- Chill the Butter First: I learned this the hard way—trying to cream cold butter and sugar at room temperature leads to a greasy, uneven batter. Stick your butter in the fridge for 20 minutes before starting, then grate it (yes, grate it) for maximum surface area. The mixture will come together smoother and hold air longer, giving you that light, fluffy texture the checkerboard layers need.
- Weigh Your Flour: Scooping flour from the bag packs in too much air, and packing it down compresses the cake layers. Use a kitchen scale and measure by weight (about 250g for this recipe). If you’re stuck with volume, spoon the flour into the measuring cup and level it off—no shaking or tapping. Dense layers mean a dense cake, and no one wants that.
- Bake in Stages: The top layer of a checkerboard cake always bakes faster. Start with the middle layer at 325°F (160°C) for 20-22 minutes, then swap it with the top layer for the last 10 minutes. The bottom layer stays at 325°F the whole time—this evens out the doneness without overbrowning. Sounds fussy, but it’s the thing that matters most for consistent results.
- Swap Vanilla for Extract: Vanilla paste adds moisture and weight, which can make the cake layers gummy. Use pure vanilla extract (1 teaspoon) for a lighter texture and brighter flavor. If you’re out, a splash of bourbon (½ teaspoon) works too—it cuts through the richness and adds depth. (Your future self will notice the difference.)
Make-ahead tips for 3 layer checkerboard cake
Batter Prep Ahead
Divide the batter into two separate bowls and store them in the refrigerator for up to 24 hours before baking. I like to cover each bowl tightly with plastic wrap pressed directly on the surface to prevent a skin from forming.
When ready to bake, let the batter sit at room temperature for 30-60 minutes—this helps the eggs and butter come to room temperature naturally, ensuring even baking. 🧁
Layer Baking Timeline
Bake your layers the day before assembling if possible. Once completely cooled, wrap each layer individually in plastic wrap and store at room temperature in an airtight container for 1-2 days.
This gives the layers time to dry out slightly, preventing sogginess when you add the buttercream later. I find the flavors actually deepen overnight! 🌙
Buttercream Prep
Prepare the buttercream 2-3 hours before assembly to give it time to firm up slightly in the refrigerator. Spread a thin layer on parchment paper, cover with plastic wrap, and chill for 1 hour. This makes it easier to pipe clean stripes later.
If you’re short on time, make the buttercream the morning of and store it in the fridge—just let it sit at room temperature for 30 minutes before using. ✨
Frosting Assembly
Assemble the cake 4-6 hours before serving to allow the buttercream to set properly. The stripes will look their best after this time, and the layers will hold together better when sliced.
If you’re making it for a party, build the cake the night before and store it uncovered at room temperature. The buttercream may soften slightly, but a quick chill in the fridge for 20 minutes before serving will firm it up again. 🎂
Freezer-Friendly Option
For long-term storage, you can freeze the assembled cake (without garnishes) for up to 2 months. Wrap the entire cake tightly in plastic wrap, then place it in a freezer bag. Thaw overnight in the refrigerator before serving.
The buttercream might need a quick repipe with a spatula to refresh the stripes, but the cake will still taste amazing. Perfect for holiday celebrations! ❄️
Garnish Last Minute
Add powdered sugar and chocolate shavings just before serving to keep them looking fresh. These garnishes are purely decorative and can be omitted if you’re serving the cake immediately after assembly.
For extra flair, sprinkle a pinch of flaky sea salt on top—it enhances the sweetness and adds a sophisticated touch. 💫
Nutrition facts
Frequently asked questions about 3-Layer checkerboard cake
Can I make this cake with fewer layers?
For a simpler version, bake just two layers (one vanilla, one chocolate) and assemble with the same buttercream technique. The checkerboard pattern will still show through, though the visual impact will be less dramatic. This works great for smaller gatherings or when you’re short on time.
Why does my buttercream look grainy?
Grainy buttercream usually means the powdered sugar wasn’t sifted or the butter wasn’t soft enough. Always sift your powdered sugar first, and ensure your butter is at room temperature but not melted. Beat the mixture on medium-high speed for an extra 1-2 minutes to fully emulsify the ingredients.
How do I fix uneven cake layers?
If your layers are uneven, trim them with a serrated knife to create a level surface before assembling. For the top layer, use a cake leveler or gently sand down any high spots with a fine-grit sandpaper. This ensures clean stripes and a professional finish when you create the checkerboard pattern.
Can I substitute cake flour for all-purpose?
Yes, but you’ll need to make adjustments. Replace 1 cup all-purpose flour with 1 cup cake flour and add 1 tsp cornstarch to the dry ingredients. Cake flour has a lower protein content, which makes the layers tender but slightly less sturdy. This works well if you prefer a softer texture, though the structure may not hold up as well for the checkerboard design.
What’s the best way to transport this cake?
For transport, place the assembled cake on a sturdy cake board and wrap it tightly in plastic wrap. Secure it with a second layer of plastic or a cake box to prevent shifting. Keep it at room temperature for short trips (1 hour) or refrigerate for longer journeys. If the buttercream softens, let it sit at room temperature for 20 minutes before serving to restore its texture.

- 12 Bean Chili Recipe: Hearty Slow-Cooked Depth With 12 Legumes - October 17, 2026
- 5 Seed Bread Recipe: Nutty Crunch and Artisan Flavor in One Loaf - October 17, 2026
- 1 Lb Macaroni Salad Recipe: Bold, Crunchy, and Crowd-Pleasing - October 17, 2026